
在运行 Android 15 或更高版本的设备上,一旦您的应用目标 SDK 达到 35 或更高版本,您的应用将全屏显示。窗口通过在系统栏后面绘制来跨越显示屏的整个宽度和高度。系统栏包括状态栏、标题栏和导航栏。
许多应用都有顶部应用栏。顶部应用栏应延伸到屏幕顶部边缘,并在状态栏后面显示。可选地,当内容滚动时,顶部应用栏可以缩小到状态栏的高度。
许多应用还有底部应用栏或底部导航栏。这些栏也应延伸到屏幕底部边缘,并在导航栏后面显示。否则,应用应在导航栏后面显示可滚动内容。
在您的应用中实现全屏布局时,请记住以下几点
- 启用全屏显示
- 处理任何视觉重叠。
- 考虑在系统栏后面显示遮罩。
启用全屏显示
如果您的应用目标 SDK 为 35 或更高版本,则对于 Android 15 或更高版本的设备,全屏显示将自动启用。
要在以前的 Android 版本上启用全屏显示,请执行以下操作
在您的应用或模块的
build.gradle文件中添加对androidx.activity库的依赖Kotlin
dependencies { val activity_version =
activity_version// Java language implementation implementation("androidx.activity:activity:$activity_version") // Kotlin implementation("androidx.activity:activity-ktx:$activity_version") }Groovy
dependencies { def activity_version =
activity_version// Java language implementation implementation 'androidx.activity:activity:$activity_version' // Kotlin implementation 'androidx.activity:activity-ktx:$activity_version' }将
enableEdgeToEdge扩展函数导入您的应用
通过在 Activity 的 onCreate 方法中调用 enableEdgeToEdge 手动启用全屏显示。它应该在 setContentView 之前调用。
Kotlin
     override fun onCreate(savedInstanceState: Bundle?) {
       enableEdgeToEdge()
       super.onCreate(savedInstanceState)
       ...
     }
Java
     @Override
     protected void onCreate(@Nullable Bundle savedInstanceState) {
       EdgeToEdge.enable(this);
       super.onCreate(savedInstanceState);
       ...
     }
默认情况下,enableEdgeToEdge() 会使系统栏透明,但在三按钮导航模式下,状态栏会获得半透明遮罩。系统图标和遮罩的颜色会根据系统亮色或深色主题进行调整。
enableEdgeToEdge() 函数会自动声明应用应全屏布局并调整系统栏的颜色。
要在不使用 enableEdgeToEdge() 函数的情况下在您的应用中启用全屏显示,请参阅手动设置全屏显示。
使用内边距处理重叠
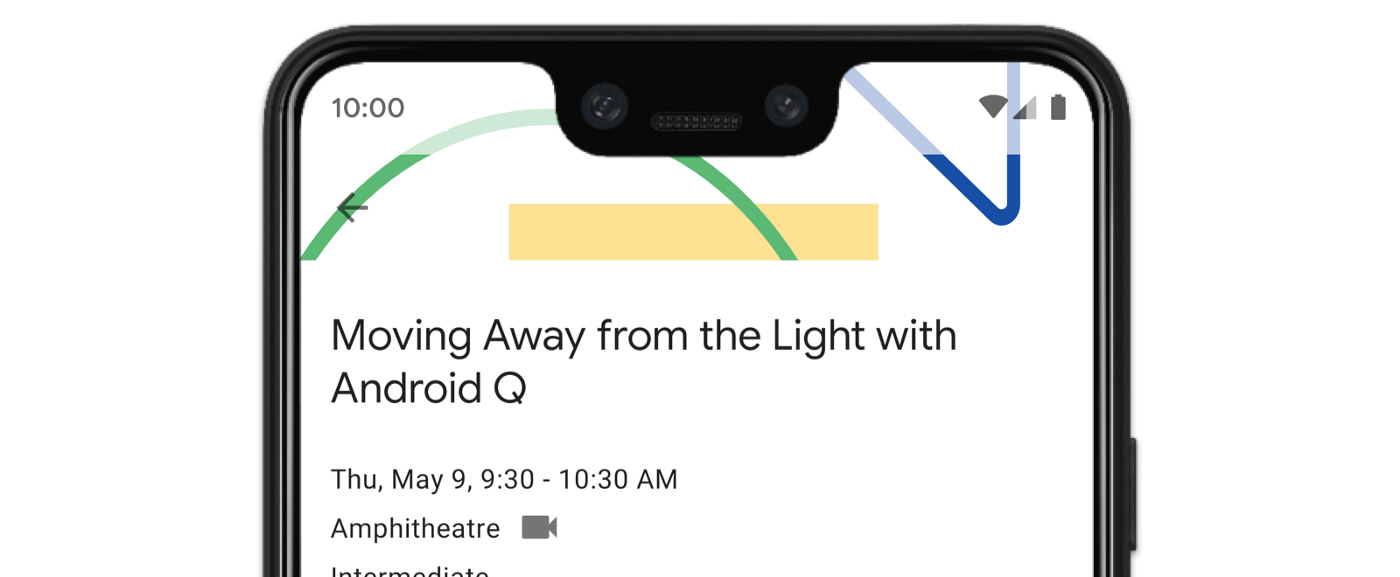
您的某些应用视图可能会在系统栏后面绘制,如图 3 所示。
您可以通过响应内边距来解决重叠问题,内边距指定了屏幕的哪些部分与系统 UI(例如导航栏或状态栏)相交。相交可能意味着在内容上方显示,但它也可以告知您的应用有关系统手势的信息。
适用于应用全屏显示的内边距类型包括
系统栏内边距:最适合可轻触且不得被系统栏视觉遮挡的视图。
显示屏刘海内边距:用于设备形状可能导致屏幕刘海的区域。
系统手势内边距:用于系统优先于您的应用使用的手势导航区域。
系统栏内边距
系统栏内边距是最常用的内边距类型。它们表示系统 UI 在 Z 轴上显示在您的应用上方的区域。它们最适合用于移动或填充应用中可轻触且不得被系统栏视觉遮挡的视图。
例如,图 3 中的浮动操作按钮 (FAB) 被导航栏部分遮挡
为了避免在手势模式或按钮模式下出现这种视觉重叠,您可以使用 getInsets(int) 和 WindowInsetsCompat.Type.systemBars() 增加视图的边距。
以下代码示例展示了如何实现系统栏内边距
Kotlin
ViewCompat.setOnApplyWindowInsetsListener(fab) { v, windowInsets ->
  val insets = windowInsets.getInsets(WindowInsetsCompat.Type.systemBars())
  // Apply the insets as a margin to the view. This solution sets
  // only the bottom, left, and right dimensions, but you can apply whichever
  // insets are appropriate to your layout. You can also update the view padding
  // if that's more appropriate.
  v.updateLayoutParams<MarginLayoutParams> {
      leftMargin = insets.left
      bottomMargin = insets.bottom
      rightMargin = insets.right
  }

  // Return CONSUMED if you don't want the window insets to keep passing
  // down to descendant views.
  WindowInsetsCompat.CONSUMED
}
Java
ViewCompat.setOnApplyWindowInsetsListener(fab, (v, windowInsets) -> {
  Insets insets = windowInsets.getInsets(WindowInsetsCompat.Type.systemBars());
  // Apply the insets as a margin to the view. This solution sets only the
  // bottom, left, and right dimensions, but you can apply whichever insets are
  // appropriate to your layout. You can also update the view padding if that's
  // more appropriate.
  MarginLayoutParams mlp = (MarginLayoutParams) v.getLayoutParams();
  mlp.leftMargin = insets.left;
  mlp.bottomMargin = insets.bottom;
  mlp.rightMargin = insets.right;
  v.setLayoutParams(mlp);

  // Return CONSUMED if you don't want the window insets to keep passing
  // down to descendant views.
    return WindowInsetsCompat.CONSUMED;
});
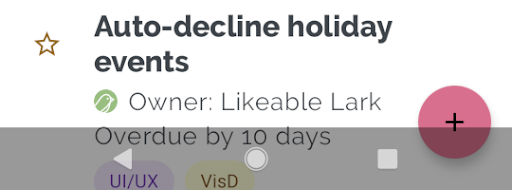
如果将此解决方案应用于图 3 所示的示例,则在按钮模式下不会出现视觉重叠,如图 4 所示
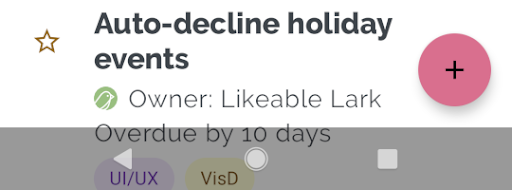
同样适用于手势导航模式,如图 5 所示
显示屏刘海内边距
某些设备具有显示屏刘海。通常,刘海位于屏幕顶部,并包含在状态栏中。当设备屏幕处于横向模式时,刘海可能位于垂直边缘。根据您的应用在屏幕上显示的内容,您应该实现内边距以避免显示屏刘海,因为默认情况下,应用将在显示屏刘海中绘制。
例如,许多应用屏幕显示项目列表。请勿用显示屏刘海或系统栏遮挡列表项。
Kotlin
ViewCompat.setOnApplyWindowInsetsListener(binding.recyclerView) { v, insets ->
  val bars = insets.getInsets(
    WindowInsetsCompat.Type.systemBars()
      or WindowInsetsCompat.Type.displayCutout()
  )
  v.updatePadding(
    left = bars.left,
    top = bars.top,
    right = bars.right,
    bottom = bars.bottom,
  )
  WindowInsetsCompat.CONSUMED
}
Java
ViewCompat.setOnApplyWindowInsetsListener(mBinding.recyclerView, (v, insets) -> {
  Insets bars = insets.getInsets(
    WindowInsetsCompat.Type.systemBars()
    | WindowInsetsCompat.Type.displayCutout()
  );
  v.setPadding(bars.left, bars.top, bars.right, bars.bottom);
  return WindowInsetsCompat.CONSUMED;
});
通过对系统栏和显示屏刘海类型进行逻辑或运算来确定 WindowInsetsCompat 的值。
将 clipToPadding 设置为 RecyclerView,以便内边距与列表项一起滚动。这允许项目在用户滚动时显示在系统栏后面,如以下示例所示。
<androidx.recyclerview.widget.RecyclerView
    android:id="@+id/recycler_view"
    android:layout_width="match_parent"
    android:layout_height="match_parent"
    android:clipToPadding="false"
    app:layoutManager="androidx.recyclerview.widget.LinearLayoutManager" />
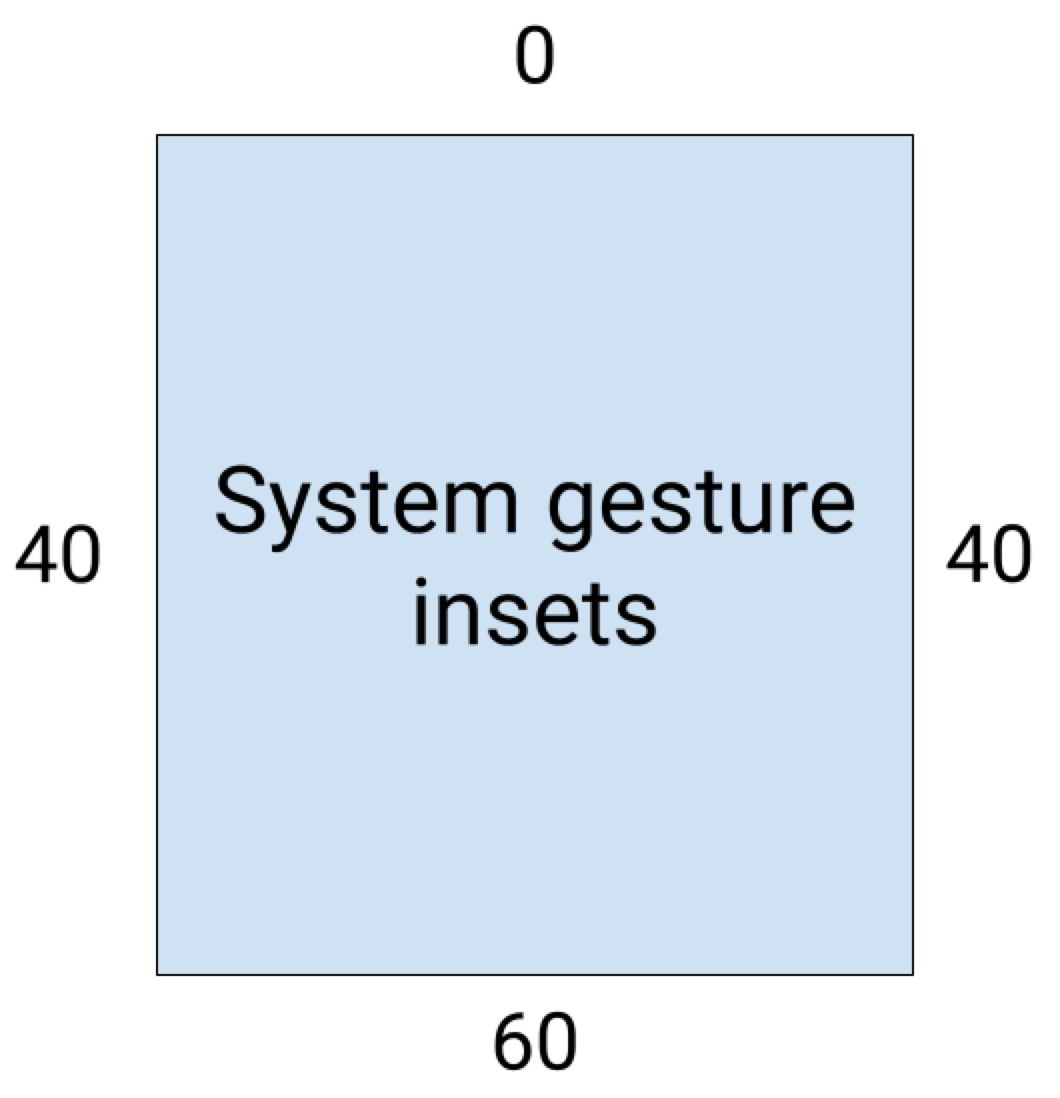
系统手势内边距
系统手势内边距表示窗口中系统手势优先于您的应用的区域。这些区域在图 6 中以橙色显示
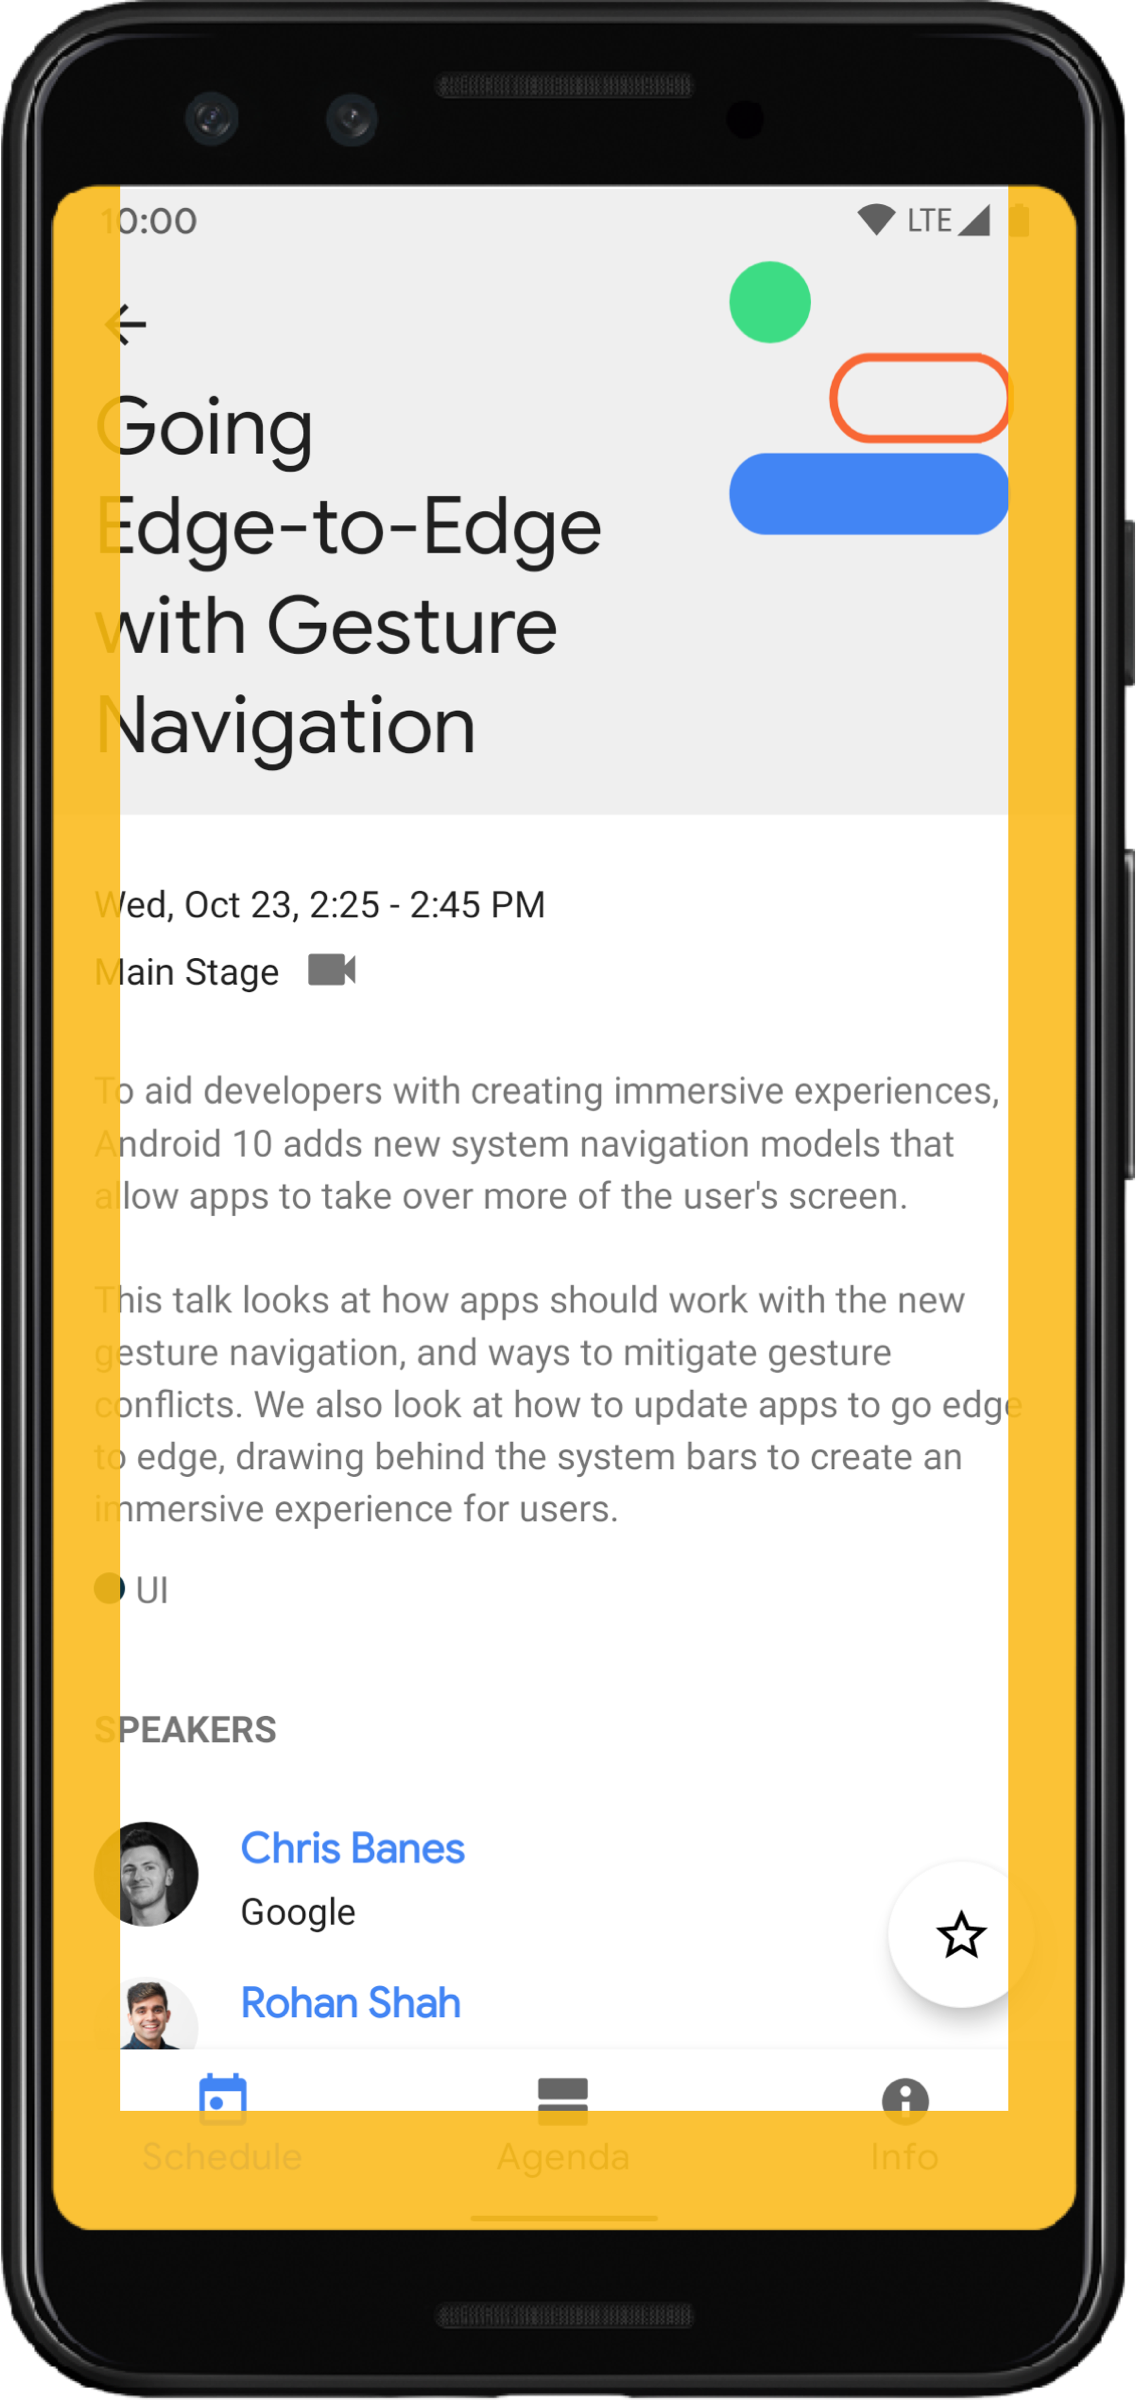
与系统栏内边距类似,您可以使用 getInsets(int) 和 WindowInsetsCompat.Type.systemGestures() 避免与系统手势内边距重叠。
使用这些内边距将可滑动视图移离或填充远离边缘。常见用例包括底部工作表、游戏中的滑动以及使用 ViewPager2 实现的轮播。
在 Android 10 或更高版本上,系统手势内边距包含用于主页手势的底部内边距,以及用于返回手势的左侧和右侧内边距
以下代码示例展示了如何实现系统手势内边距
Kotlin
ViewCompat.setOnApplyWindowInsetsListener(view) { view, windowInsets ->
    val insets = windowInsets.getInsets(WindowInsetsCompat.Type.systemGestures())
    // Apply the insets as padding to the view. Here, set all the dimensions
    // as appropriate to your layout. You can also update the view's margin if
    // more appropriate.
    view.updatePadding(insets.left, insets.top, insets.right, insets.bottom)

    // Return CONSUMED if you don't want the window insets to keep passing down
    // to descendant views.
    WindowInsetsCompat.CONSUMED
}
Java
ViewCompat.setOnApplyWindowInsetsListener(view, (v, windowInsets) -> {
    Insets insets = windowInsets.getInsets(WindowInsetsCompat.Type.systemGestures());
    // Apply the insets as padding to the view. Here, set all the dimensions
    // as appropriate to your layout. You can also update the view's margin if
    // more appropriate.
    view.setPadding(insets.left, insets.top, insets.right, insets.bottom);

    // Return CONSUMED if you don't want the window insets to keep passing down
    // to descendant views.
    return WindowInsetsCompat.CONSUMED;
});
Material Components
许多基于视图的 Android Material Components (com.google.android.material) 会自动处理内边距,包括 BottomAppBar、BottomNavigationView、NavigationRailView 和 NavigationView
但是,AppBarLayout 不会自动处理内边距。添加 android:fitsSystemWindows="true" 以处理顶部内边距。
阅读如何在 Compose 中使用 Material Components 处理内边距。
向后兼容的内边距分发
要停止将内边距分发到子视图并避免过度填充,您可以使用 WindowInsetsCompat.CONSUMED 常量来消耗内边距。但是,在运行 Android 10(API 级别 29 及更早版本)的设备上,调用 WindowInsetsCompat.CONSUMED 后,内边距不会分发到同级视图,这可能导致意外的视觉重叠。
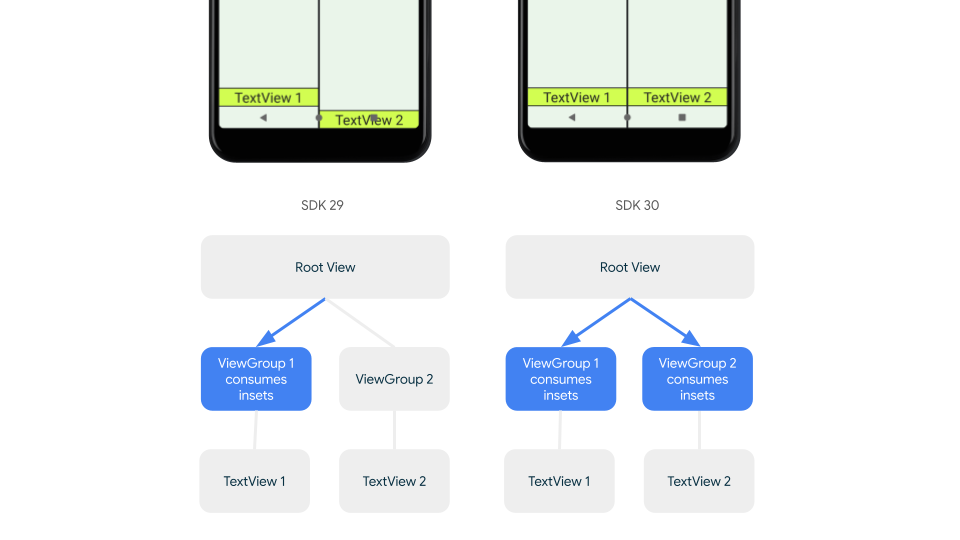
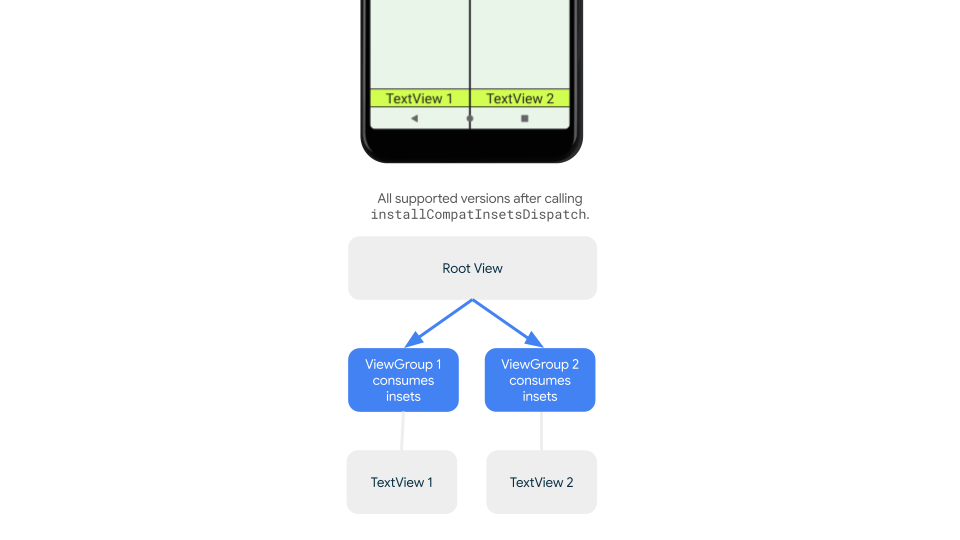
为了确保内边距在所有支持的 Android 版本上都分发到同级视图,请在使用内边距之前使用 ViewGroupCompat#installCompatInsetsDispatch,该功能在 AndroidX Core 和 Core-ktx 1.16.0-alpha01 及更高版本上可用。
Kotlin
// Use the i.d. assigned to your layout's root view, e.g. R.id.main
val rootView = findViewById(R.id.main)
// Call before consuming insets
ViewGroupCompat.installCompatInsetsDispatch(rootView)
Java
// Use the i.d. assigned to your layout's root view, e.g. R.id.main
LinearLayout rootView = findViewById(R.id.main);
// Call before consuming insets
ViewGroupCompat.installCompatInsetsDispatch(rootView);
沉浸模式
某些内容最适合全屏体验,为用户提供更沉浸的体验。您可以使用 WindowInsetsController 和 WindowInsetsControllerCompat 库隐藏系统栏以实现沉浸模式。
Kotlin
val windowInsetsController =
      WindowCompat.getInsetsController(window, window.decorView)

// Hide the system bars.
windowInsetsController.hide(Type.systemBars())

// Show the system bars.
windowInsetsController.show(Type.systemBars())
Java
Window window = getWindow();
WindowInsetsControllerCompat windowInsetsController =
      WindowCompat.getInsetsController(window, window.getDecorView());
if (windowInsetsController == null) {
    return;
  }
// Hide the system bars.
windowInsetsController.hide(WindowInsetsCompat.Type.systemBars());

// Show the system bars.
windowInsetsController.show(WindowInsetsCompat.Type.systemBars());
有关实现此功能的更多信息,请参阅为沉浸模式隐藏系统栏。
系统栏图标
调用 enableEdgeToEdge 可确保在设备主题更改时系统栏图标颜色更新。
在全屏显示时,您可能需要手动更新系统栏图标颜色,使其与应用背景形成对比。例如,要创建浅色状态栏图标
Kotlin
WindowCompat.getInsetsController(window, window.decorView)
    .isAppearanceLightStatusBars = false
Java
WindowCompat.getInsetsController(window, window.getDecorView())
    .setAppearanceLightStatusBars(false);
系统栏保护
一旦您的应用目标 SDK 为 35 或更高版本,将强制执行全屏显示。系统状态栏和手势导航栏是透明的,但三按钮导航栏是半透明的。调用 enableEdgeToEdge 可以使其向后兼容。
但是,系统默认设置可能不适用于所有用例。请查阅 Android 系统栏设计指南和 全屏设计,以确定是使用透明还是半透明系统栏。
创建透明系统栏
通过将目标设置为 Android 15 (SDK 35) 或更高版本,或者通过为早期版本调用带默认参数的 enableEdgeToEdge(),来创建透明状态栏。
通过将目标设置为 Android 15 或更高版本,或者通过为早期版本调用带默认参数的 enableEdgeToEdge(),来创建透明手势导航栏。对于三按钮导航栏,将 Window.setNavigationBarContrastEnforced 设置为 false,否则将应用半透明遮罩。
创建半透明系统栏
要创建半透明状态栏,请执行以下操作
- 将您的
androidx-core依赖项更新到 1.16.0-beta01 或更高版本 - 将您的 XML 布局包装在
androidx.core.view.insets.ProtectionLayout中并分配一个 ID。 - 编程式访问
ProtectionLayout以设置保护,指定状态栏的边和GradientProtection。
<androidx.core.view.insets.ProtectionLayout xmlns:android="http://schemas.android.com/apk/res/android" android:id="@+id/list_protection" android:layout_width="match_parent" android:layout_height="match_parent"> <ScrollView android:id="@+id/item_list" android:clipToPadding="false" android:layout_width="match_parent" android:layout_height="match_parent"> <!--items--> </ScrollView> </androidx.core.view.insets.ProtectionLayout>
val red = 52 val green = 168 val blue = 83 findViewById<ProtectionLayout>(R.id.list_protection) .setProtections( listOf( GradientProtection( WindowInsetsCompat.Side.TOP, // Ideally, this is the pane's background color // alpha = 204 for an 80% gradient Color.argb(204, red, green, blue) ) ) )
确保传递给 GradientProtection 的 ColorInt 与内容背景匹配。例如,在可折叠设备上显示的列表-详情布局可能为列表面板和详情面板提供不同颜色的 GradientProtection。
不要创建半透明手势导航栏。要创建半透明三按钮导航栏,请执行以下操作之一
- 如果您的布局已包装在
ProtectionView中,您可以将额外的ColorProtection或GradientProtection传递给setProtections方法。在此之前,请确保window.isNavigationBarContrastEnforced = false。 - 否则,将
window.isNavigationBarContrastEnforced设置为true。如果您的应用调用enableEdgeToEdge,则window.isNavigationBarContrastEnforced = true是默认值。
其他提示
通过处理内边距并将 clipToPadding 设置为 false,确保 RecyclerView 或 NestedScrollView 中的最后一个列表项不被系统栏遮挡。
以下视频展示了禁用全屏显示(左侧)和启用全屏显示(右侧)的 RecyclerView
有关代码示例,请参阅“使用 RecyclerView 创建动态列表”部分中的代码片段。
更多资源
有关全屏显示的更多信息,请参阅以下参考资料。
博客
设计
其他文档
视频