
集合微件专门用于显示同类型的许多元素,例如图库应用中的图片集、新闻应用中的文章或通信应用中的消息。集合微件通常侧重于两个用例:浏览集合以及打开集合中的元素以查看其详细视图。集合微件可以垂直滚动。
这些微件使用 RemoteViewsService 显示由远程数据(例如 内容提供程序 中的数据)支持的集合。微件使用以下视图类型之一呈现数据,这些类型称为 集合视图
ListView- 以垂直滚动列表显示项的视图。
GridView- 以二维滚动网格显示项的视图。
StackView- 一种堆叠式卡片视图(有点像名片夹),用户可以向上或向下轻拂前面的卡片来分别查看上一张或下一张卡片。
AdapterViewFlipper- 一个由适配器支持的简单
ViewAnimator,用于在两个或多个视图之间进行动画处理。一次只显示一个子视图。
由于这些集合视图显示由远程数据支持的集合,它们使用 Adapter 将其用户界面绑定到数据。 Adapter 将数据集中的单个项绑定到单个 View 对象。
由于这些集合视图由适配器支持,因此 Android 框架必须包含额外的架构来支持它们在微件中的使用。在微件的上下文中,Adapter 由 RemoteViewsFactory 替换,后者是 Adapter 接口的一个薄层包装。当请求集合中的特定项时,RemoteViewsFactory 会创建并返回该集合项作为一个 RemoteViews 对象。要在微件中包含集合视图,请实现 RemoteViewsService 和 RemoteViewsFactory。
RemoteViewsService 是一种服务,允许远程适配器请求 RemoteViews 对象。 RemoteViewsFactory 是一个适配器接口,用于连接集合视图(例如 ListView、GridView 和 StackView)及其底层数据。以下是实现此服务和接口的样板代码示例,摘自 StackWidget 示例
Kotlin
class StackWidgetService : RemoteViewsService() {

    override fun onGetViewFactory(intent: Intent): RemoteViewsFactory {
        return StackRemoteViewsFactory(this.applicationContext, intent)
    }
}

class StackRemoteViewsFactory(
        private val context: Context,
        intent: Intent
) : RemoteViewsService.RemoteViewsFactory {

// See the RemoteViewsFactory API reference for the full list of methods to
// implement.

}
Java
public class StackWidgetService extends RemoteViewsService {
    @Override
    public RemoteViewsFactory onGetViewFactory(Intent intent) {
        return new StackRemoteViewsFactory(this.getApplicationContext(), intent);
    }
}

class StackRemoteViewsFactory implements RemoteViewsService.RemoteViewsFactory {

// See the RemoteViewsFactory API reference for the full list of methods to
// implement.

}
示例应用
本节中的代码摘录也来自 StackWidget 示例
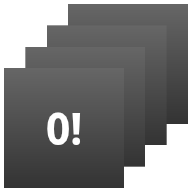
StackWidget。此示例包含一个显示数字 0 到 9 的十个视图堆栈。示例微件具有以下主要行为
用户可以在微件中垂直滑动顶部视图以显示下一个或上一个视图。这是
StackView的内置行为。无需任何用户交互,微件会自动按顺序浏览其视图,就像幻灯片一样。这是由于在
res/xml/stackwidgetinfo.xml文件中设置了android:autoAdvanceViewId="@id/stack_view"。此设置适用于视图 ID,在本例中是堆栈视图的视图 ID。如果用户触摸顶部视图,微件会显示
Toast消息“Touched view n”,其中 n 是被触摸视图的索引(位置)。有关如何实现行为的更多讨论,请参阅为单个项添加行为部分。
实现带集合的微件
要实现带集合的微件,请按照实现任何微件的步骤操作,然后再执行几个附加步骤:修改清单文件、向微件布局添加集合视图,以及修改您的 AppWidgetProvider 子类。
带集合微件的清单
除了 在清单中声明微件 中列出的要求外,您还需要使带集合的微件能够绑定到您的 RemoteViewsService。为此,请在您的清单文件中声明该服务并使用 BIND_REMOTEVIEWS 权限。这可以防止其他应用随意访问您微件的数据。
例如,创建使用 RemoteViewsService 填充集合视图的微件时,清单条目可能如下所示
<service android:name="MyWidgetService"
    android:permission="android.permission.BIND_REMOTEVIEWS" />
在此示例中,android:name="MyWidgetService" 指的是您的 RemoteViewsService 子类。
带集合微件的布局
您的微件布局 XML 文件的主要要求是包含以下集合视图之一:ListView、GridView、StackView 或 AdapterViewFlipper。以下是 StackWidget 示例 的 widget_layout.xml 文件
<FrameLayout xmlns:android="http://schemas.android.com/apk/res/android"
    android:layout_width="match_parent"
    android:layout_height="match_parent">
    <StackView
        android:id="@+id/stack_view"
        android:layout_width="match_parent"
        android:layout_height="match_parent"
        android:gravity="center"
        android:loopViews="true" />
    <TextView
        android:id="@+id/empty_view"
        android:layout_width="match_parent"
        android:layout_height="match_parent"
        android:gravity="center"
        android:background="@drawable/widget_item_background"
        android:textColor="#ffffff"
        android:textStyle="bold"
        android:text="@string/empty_view_text"
        android:textSize="20sp" />
</FrameLayout>
请注意,空视图必须是其代表空状态的集合视图的兄弟视图。
除了整个微件的布局文件外,还需要创建另一个布局文件来定义集合中每个项的布局,例如,图书集合中每本书的布局。StackWidget 示例只有一个项布局文件 widget_item.xml,因为所有项都使用相同的布局。
带集合微件的 AppWidgetProvider 类
与普通微件一样,AppWidgetProvider 子类中的大部分代码通常都在 onUpdate() 中。创建带集合微件时,实现 onUpdate() 的主要区别在于,您必须调用 setRemoteAdapter()。这会告诉集合视图从哪里获取数据。然后,RemoteViewsService 可以返回您的 RemoteViewsFactory 实现,并且微件可以提供适当的数据。调用此方法时,请传递一个指向您的 RemoteViewsService 实现的 Intent 和指定要更新的微件的微件 ID。
例如,以下是 StackWidget 示例实现 onUpdate() 回调方法以将 RemoteViewsService 设置为微件集合的远程适配器的方式
Kotlin
override fun onUpdate(
        context: Context,
        appWidgetManager: AppWidgetManager,
        appWidgetIds: IntArray
) {
    // Update each of the widgets with the remote adapter.
    appWidgetIds.forEach { appWidgetId ->

        // Set up the intent that starts the StackViewService, which
        // provides the views for this collection.
        val intent = Intent(context, StackWidgetService::class.java).apply {
            // Add the widget ID to the intent extras.
            putExtra(AppWidgetManager.EXTRA_APPWIDGET_ID, appWidgetId)
            data = Uri.parse(toUri(Intent.URI_INTENT_SCHEME))
        }
        // Instantiate the RemoteViews object for the widget layout.
        val views = RemoteViews(context.packageName, R.layout.widget_layout).apply {
            // Set up the RemoteViews object to use a RemoteViews adapter.
            // This adapter connects to a RemoteViewsService through the
            // specified intent.
            // This is how you populate the data.
            setRemoteAdapter(R.id.stack_view, intent)

            // The empty view is displayed when the collection has no items.
            // It must be in the same layout used to instantiate the
            // RemoteViews object.
            setEmptyView(R.id.stack_view, R.id.empty_view)
        }

        // Do additional processing specific to this widget.

        appWidgetManager.updateAppWidget(appWidgetId, views)
    }
    super.onUpdate(context, appWidgetManager, appWidgetIds)
}
Java
public void onUpdate(Context context, AppWidgetManager appWidgetManager, int[] appWidgetIds) {
    // Update each of the widgets with the remote adapter.
    for (int i = 0; i < appWidgetIds.length; ++i) {

        // Set up the intent that starts the StackViewService, which
        // provides the views for this collection.
        Intent intent = new Intent(context, StackWidgetService.class);
        // Add the widget ID to the intent extras.
        intent.putExtra(AppWidgetManager.EXTRA_APPWIDGET_ID, appWidgetIds[i]);
        intent.setData(Uri.parse(intent.toUri(Intent.URI_INTENT_SCHEME)));
        // Instantiate the RemoteViews object for the widget layout.
        RemoteViews views = new RemoteViews(context.getPackageName(), R.layout.widget_layout);
        // Set up the RemoteViews object to use a RemoteViews adapter.
        // This adapter connects to a RemoteViewsService through the specified
        // intent.
        // This is how you populate the data.
        views.setRemoteAdapter(R.id.stack_view, intent);

        // The empty view is displayed when the collection has no items.
        // It must be in the same layout used to instantiate the RemoteViews
        // object.
        views.setEmptyView(R.id.stack_view, R.id.empty_view);

        // Do additional processing specific to this widget.

        appWidgetManager.updateAppWidget(appWidgetIds[i], views);
    }
    super.onUpdate(context, appWidgetManager, appWidgetIds);
}
持久化数据
如本页所述,RemoteViewsService 子类提供了用于填充远程集合视图的 RemoteViewsFactory。
具体来说,请执行以下步骤
子类化
RemoteViewsService。RemoteViewsService是一个服务,远程适配器可以通过它请求RemoteViews。在您的
RemoteViewsService子类中,包含一个实现RemoteViewsFactory接口的类。RemoteViewsFactory是一个适配器接口,用于连接远程集合视图(例如ListView、GridView、StackView)及其底层数据。您的实现负责为数据集中的每个项创建一个RemoteViews对象。此接口是Adapter的一个薄层包装。
您不能依赖服务的单个实例或其包含的任何数据来持久化。除非数据是静态的,否则不要将数据存储在 RemoteViewsService 中。如果您希望微件的数据持久化,最佳方法是使用 ContentProvider,其数据在进程生命周期之外持久化。例如,杂货店微件可以将每个购物清单项的状态存储在持久位置,例如 SQL 数据库。
服务实现的 RemoteViewsService 主要内容是其 RemoteViewsFactory,如下一节所述。
RemoteViewsFactory 接口
实现 RemoteViewsFactory 接口的自定义类为微件提供其集合中项的数据。为此,它将您的微件项 XML 布局文件与数据源相结合。数据源可以是任何内容,从数据库到简单数组。在 StackWidget 示例中,数据源是一个 WidgetItem 对象数组。RemoteViewsFactory 用作适配器,将数据连接到远程集合视图。
您需要为 RemoteViewsFactory 子类实现的两个最重要的方法是 onCreate() 和 getViewAt()。
系统在第一次创建您的工厂时调用 onCreate()。您可以在此设置与数据源的任何连接或游标。例如,StackWidget 示例使用 onCreate() 初始化一个 WidgetItem 对象数组。当您的微件处于活动状态时,系统会使用它们在数组中的索引位置访问这些对象,并显示它们包含的文本。
以下是 StackWidget 示例的 RemoteViewsFactory 实现中的一部分,展示了 onCreate() 方法的部分内容
Kotlin
private const val REMOTE_VIEW_COUNT: Int = 10

class StackRemoteViewsFactory(
        private val context: Context
) : RemoteViewsService.RemoteViewsFactory {

    private lateinit var widgetItems: List<WidgetItem>

    override fun onCreate() {
        // In onCreate(), set up any connections or cursors to your data
        // source. Heavy lifting, such as downloading or creating content,
        // must be deferred to onDataSetChanged() or getViewAt(). Taking
        // more than 20 seconds on this call results in an ANR.
        widgetItems = List(REMOTE_VIEW_COUNT) { index -> WidgetItem("$index!") }
        ...
    }
    ...
}
Java
class StackRemoteViewsFactory implements RemoteViewsService.RemoteViewsFactory {
    private static final int REMOTE_VIEW_COUNT = 10;
    private List<WidgetItem> widgetItems = new ArrayList<WidgetItem>();

    public void onCreate() {
        // In onCreate(), setup any connections or cursors to your data
        // source. Heavy lifting, such as downloading or creating content,
        // must be deferred to onDataSetChanged() or getViewAt(). Taking
        // more than 20 seconds on this call results in an ANR.
        for (int i = 0; i < REMOTE_VIEW_COUNT; i++) {
            widgetItems.add(new WidgetItem(i + "!"));
        }
        ...
    }
...
RemoteViewsFactory 方法 getViewAt() 返回与数据集中指定 position 的数据对应的 RemoteViews 对象。以下是 StackWidget 示例的 RemoteViewsFactory 实现中的一部分
Kotlin
override fun getViewAt(position: Int): RemoteViews {
    // Construct a remote views item based on the widget item XML file
    // and set the text based on the position.
    return RemoteViews(context.packageName, R.layout.widget_item).apply {
        setTextViewText(R.id.widget_item, widgetItems[position].text)
    }
}
Java
public RemoteViews getViewAt(int position) {
    // Construct a remote views item based on the widget item XML file
    // and set the text based on the position.
    RemoteViews views = new RemoteViews(context.getPackageName(), R.layout.widget_item);
    views.setTextViewText(R.id.widget_item, widgetItems.get(position).text);
    return views;
}
为单个项添加行为
前面几节介绍了如何将数据绑定到微件集合。但是,如果您想为集合视图中的单个项添加动态行为怎么办?
如 使用 onUpdate() 类处理事件 中所述,您通常使用 setOnClickPendingIntent() 设置对象的点击行为,例如使按钮启动 Activity。但是,对于单个集合项中的子视图,此方法是不允许的。例如,您可以使用 setOnClickPendingIntent() 在 Gmail 微件中设置一个全局按钮来启动应用,但不能应用于单个列表项。
相反,要为集合中的单个项添加点击行为,请使用 setOnClickFillInIntent()。这需要为您的集合视图设置一个待处理 Intent 模板,然后通过您的 RemoteViewsFactory 为集合中的每个项设置一个填充 Intent。
本节使用 StackWidget 示例来描述如何为单个项添加行为。在 StackWidget 示例中,如果用户触摸顶部视图,微件会显示 Toast 消息“Touched view n”,其中 n 是被触摸视图的索引(位置)。其工作原理如下
StackWidgetProvider(一个AppWidgetProvider子类)创建一个带有自定义操作TOAST_ACTION的待处理 Intent。当用户触摸视图时,Intent 被触发并广播
TOAST_ACTION。此广播由
StackWidgetProvider类的onReceive()方法截获,并且微件显示被触摸视图的Toast消息。集合项的数据由RemoteViewsFactory通过RemoteViewsService提供。
设置待处理 Intent 模板
StackWidgetProvider(一个 AppWidgetProvider 子类)设置一个待处理 Intent。集合中的单个项不能设置自己的待处理 Intent。相反,整个集合设置一个待处理 Intent 模板,并且单个项设置一个填充 Intent,以便逐项创建独特的行为。
此类还会接收用户触摸视图时发送的广播。它在其 onReceive() 方法中处理此事件。如果 Intent 的操作是 TOAST_ACTION,则微件会显示当前视图的 Toast 消息。
Kotlin
const val TOAST_ACTION = "com.example.android.stackwidget.TOAST_ACTION"
const val EXTRA_ITEM = "com.example.android.stackwidget.EXTRA_ITEM"

class StackWidgetProvider : AppWidgetProvider() {

    ...

    // Called when the BroadcastReceiver receives an Intent broadcast.
    // Checks whether the intent's action is TOAST_ACTION. If it is, the
    // widget displays a Toast message for the current item.
    override fun onReceive(context: Context, intent: Intent) {
        val mgr: AppWidgetManager = AppWidgetManager.getInstance(context)
        if (intent.action == TOAST_ACTION) {
            val appWidgetId: Int = intent.getIntExtra(
                    AppWidgetManager.EXTRA_APPWIDGET_ID,
                    AppWidgetManager.INVALID_APPWIDGET_ID
            )
            // EXTRA_ITEM represents a custom value provided by the Intent
            // passed to the setOnClickFillInIntent() method to indicate the
            // position of the clicked item. See StackRemoteViewsFactory in
            // Set the fill-in Intent for details.
            val viewIndex: Int = intent.getIntExtra(EXTRA_ITEM, 0)
            Toast.makeText(context, "Touched view $viewIndex", Toast.LENGTH_SHORT).show()
        }
        super.onReceive(context, intent)
    }

    override fun onUpdate(
            context: Context,
            appWidgetManager: AppWidgetManager,
            appWidgetIds: IntArray
    ) {
        // Update each of the widgets with the remote adapter.
        appWidgetIds.forEach { appWidgetId ->

            // Sets up the intent that points to the StackViewService that
            // provides the views for this collection.
            val intent = Intent(context, StackWidgetService::class.java).apply {
                putExtra(AppWidgetManager.EXTRA_APPWIDGET_ID, appWidgetId)
                // When intents are compared, the extras are ignored, so embed
                // the extra sinto the data so that the extras are not ignored.
                data = Uri.parse(toUri(Intent.URI_INTENT_SCHEME))
            }
            val rv = RemoteViews(context.packageName, R.layout.widget_layout).apply {
                setRemoteAdapter(R.id.stack_view, intent)

                // The empty view is displayed when the collection has no items.
                // It must be a sibling of the collection view.
                setEmptyView(R.id.stack_view, R.id.empty_view)
            }

            // This section makes it possible for items to have individualized
            // behavior. It does this by setting up a pending intent template.
            // Individuals items of a collection can't set up their own pending
            // intents. Instead, the collection as a whole sets up a pending
            // intent template, and the individual items set a fillInIntent
            // to create unique behavior on an item-by-item basis.
            val toastPendingIntent: PendingIntent = Intent(
                    context,
                    StackWidgetProvider::class.java
            ).run {
                // Set the action for the intent.
                // When the user touches a particular view, it has the effect of
                // broadcasting TOAST_ACTION.
                action = TOAST_ACTION
                putExtra(AppWidgetManager.EXTRA_APPWIDGET_ID, appWidgetId)
                data = Uri.parse(toUri(Intent.URI_INTENT_SCHEME))

                PendingIntent.getBroadcast(context, 0, this, PendingIntent.FLAG_UPDATE_CURRENT)
            }
            rv.setPendingIntentTemplate(R.id.stack_view, toastPendingIntent)

            appWidgetManager.updateAppWidget(appWidgetId, rv)
        }
        super.onUpdate(context, appWidgetManager, appWidgetIds)
    }
}
Java
public class StackWidgetProvider extends AppWidgetProvider {
    public static final String TOAST_ACTION = "com.example.android.stackwidget.TOAST_ACTION";
    public static final String EXTRA_ITEM = "com.example.android.stackwidget.EXTRA_ITEM";

    ...

    // Called when the BroadcastReceiver receives an Intent broadcast.
    // Checks whether the intent's action is TOAST_ACTION. If it is, the
    // widget displays a Toast message for the current item.
    @Override
    public void onReceive(Context context, Intent intent) {
        AppWidgetManager mgr = AppWidgetManager.getInstance(context);
        if (intent.getAction().equals(TOAST_ACTION)) {
            int appWidgetId = intent.getIntExtra(AppWidgetManager.EXTRA_APPWIDGET_ID,
                AppWidgetManager.INVALID_APPWIDGET_ID);
            // EXTRA_ITEM represents a custom value provided by the Intent
            // passed to the setOnClickFillInIntent() method to indicate the
            // position of the clicked item. See StackRemoteViewsFactory in
            // Set the fill-in Intent for details.
            int viewIndex = intent.getIntExtra(EXTRA_ITEM, 0);
            Toast.makeText(context, "Touched view " + viewIndex, Toast.LENGTH_SHORT).show();
        }
        super.onReceive(context, intent);
    }

    @Override
    public void onUpdate(Context context, AppWidgetManager appWidgetManager, int[] appWidgetIds) {
        // Update each of the widgets with the remote adapter.
        for (int i = 0; i < appWidgetIds.length; ++i) {

            // Sets up the intent that points to the StackViewService that
            // provides the views for this collection.
            Intent intent = new Intent(context, StackWidgetService.class);
            intent.putExtra(AppWidgetManager.EXTRA_APPWIDGET_ID, appWidgetIds[i]);
            // When intents are compared, the extras are ignored, so embed
            // the extras into the data so that the extras are not
            // ignored.
            intent.setData(Uri.parse(intent.toUri(Intent.URI_INTENT_SCHEME)));
            RemoteViews rv = new RemoteViews(context.getPackageName(), R.layout.widget_layout);
            rv.setRemoteAdapter(appWidgetIds[i], R.id.stack_view, intent);

            // The empty view is displayed when the collection has no items. It
            // must be a sibling of the collection view.
            rv.setEmptyView(R.id.stack_view, R.id.empty_view);

            // This section makes it possible for items to have individualized
            // behavior. It does this by setting up a pending intent template.
            // Individuals items of a collection can't set up their own pending
            // intents. Instead, the collection as a whole sets up a pending
            // intent template, and the individual items set a fillInIntent
            // to create unique behavior on an item-by-item basis.
            Intent toastIntent = new Intent(context, StackWidgetProvider.class);
            // Set the action for the intent.
            // When the user touches a particular view, it has the effect of
            // broadcasting TOAST_ACTION.
            toastIntent.setAction(StackWidgetProvider.TOAST_ACTION);
            toastIntent.putExtra(AppWidgetManager.EXTRA_APPWIDGET_ID, appWidgetIds[i]);
            intent.setData(Uri.parse(intent.toUri(Intent.URI_INTENT_SCHEME)));
            PendingIntent toastPendingIntent = PendingIntent.getBroadcast(context, 0, toastIntent,
                PendingIntent.FLAG_UPDATE_CURRENT);
            rv.setPendingIntentTemplate(R.id.stack_view, toastPendingIntent);

            appWidgetManager.updateAppWidget(appWidgetIds[i], rv);
        }
        super.onUpdate(context, appWidgetManager, appWidgetIds);
    }
}
设置填充 Intent
您的 RemoteViewsFactory 必须为集合中的每个项设置一个填充 Intent。这使得区分给定项的单独点击操作成为可能。然后,填充 Intent 与 PendingIntent 模板结合,以确定轻触项时执行的最终 Intent。
Kotlin
private const val REMOTE_VIEW_COUNT: Int = 10

class StackRemoteViewsFactory(
        private val context: Context,
        intent: Intent
) : RemoteViewsService.RemoteViewsFactory {

    private lateinit var widgetItems: List<WidgetItem>
    private val appWidgetId: Int = intent.getIntExtra(
            AppWidgetManager.EXTRA_APPWIDGET_ID,
            AppWidgetManager.INVALID_APPWIDGET_ID
    )

    override fun onCreate() {
        // In onCreate(), set up any connections or cursors to your data source.
        // Heavy lifting, such as downloading or creating content, must be
        // deferred to onDataSetChanged() or getViewAt(). Taking more than 20
        // seconds on this call results in an ANR.
        widgetItems = List(REMOTE_VIEW_COUNT) { index -> WidgetItem("$index!") }
        ...
    }
    ...

    override fun getViewAt(position: Int): RemoteViews {
        // Construct a remote views item based on the widget item XML file
        // and set the text based on the position.
        return RemoteViews(context.packageName, R.layout.widget_item).apply {
            setTextViewText(R.id.widget_item, widgetItems[position].text)

            // Set a fill-intent to fill in the pending intent template.
            // that is set on the collection view in StackWidgetProvider.
            val fillInIntent = Intent().apply {
                Bundle().also { extras ->
                    extras.putInt(EXTRA_ITEM, position)
                    putExtras(extras)
                }
            }
            // Make it possible to distinguish the individual on-click
            // action of a given item.
            setOnClickFillInIntent(R.id.widget_item, fillInIntent)
            ...
        }
    }
    ...
}
Java
public class StackWidgetService extends RemoteViewsService {
    @Override
    public RemoteViewsFactory onGetViewFactory(Intent intent) {
        return new StackRemoteViewsFactory(this.getApplicationContext(), intent);
    }
}

class StackRemoteViewsFactory implements RemoteViewsService.RemoteViewsFactory {
    private static final int count = 10;
    private List<WidgetItem> widgetItems = new ArrayList<WidgetItem>();
    private Context context;
    private int appWidgetId;

    public StackRemoteViewsFactory(Context context, Intent intent) {
        this.context = context;
        appWidgetId = intent.getIntExtra(AppWidgetManager.EXTRA_APPWIDGET_ID,
                AppWidgetManager.INVALID_APPWIDGET_ID);
    }

    // Initialize the data set.
    public void onCreate() {
        // In onCreate(), set up any connections or cursors to your data
        // source. Heavy lifting, such as downloading or creating
        // content, must be deferred to onDataSetChanged() or
        // getViewAt(). Taking more than 20 seconds on this call results
        // in an ANR.
        for (int i = 0; i < count; i++) {
            widgetItems.add(new WidgetItem(i + "!"));
        }
        ...
    }

    // Given the position (index) of a WidgetItem in the array, use the
    // item's text value in combination with the widget item XML file to
    // construct a RemoteViews object.
    public RemoteViews getViewAt(int position) {
        // Position always ranges from 0 to getCount() - 1.

        // Construct a RemoteViews item based on the widget item XML
        // file and set the text based on the position.
        RemoteViews rv = new RemoteViews(context.getPackageName(), R.layout.widget_item);
        rv.setTextViewText(R.id.widget_item, widgetItems.get(position).text);

        // Set a fill-intent to fill in the pending
        // intent template that is set on the collection view in
        // StackWidgetProvider.
        Bundle extras = new Bundle();
        extras.putInt(StackWidgetProvider.EXTRA_ITEM, position);
        Intent fillInIntent = new Intent();
        fillInIntent.putExtras(extras);
        // Make it possible to distinguish the individual on-click
        // action of a given item.
        rv.setOnClickFillInIntent(R.id.widget_item, fillInIntent);

        // Return the RemoteViews object.
        return rv;
    }
    ...
}
保持集合数据最新
图 2 演示了使用集合的微件中的更新流程。它展示了微件代码如何与 RemoteViewsFactory 交互以及如何触发更新
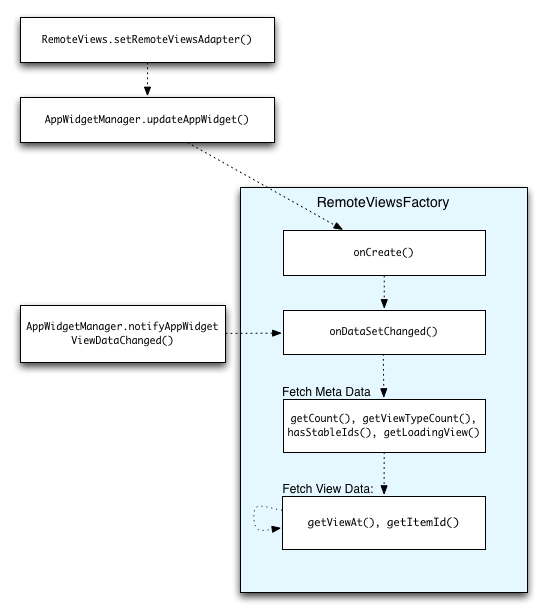
RemoteViewsFactory 的交互。使用集合的微件可以为用户提供最新内容。例如,Gmail 微件可以向用户显示其收件箱的快照。为了实现这一点,请触发您的 RemoteViewsFactory 和集合视图来获取并显示新数据。
为此,请使用 AppWidgetManager 调用 notifyAppWidgetViewDataChanged()。此调用会导致回调到您的 RemoteViewsFactory 对象的 onDataSetChanged() 方法,该方法允许您获取任何新数据。
您可以在 onDataSetChanged() 回调中同步执行处理密集型操作。保证在此调用完成之后,才会从 RemoteViewsFactory 获取元数据或视图数据。您也可以在 getViewAt() 方法中执行处理密集型操作。如果此调用花费时间较长,集合视图中相应位置会显示加载视图(由 RemoteViewsFactory 对象的 getLoadingView() 方法指定),直到其返回。
使用 RemoteCollectionItems 直接传递集合
Android 12(API 级别 31)添加了 setRemoteAdapter(int viewId, RemoteViews.RemoteCollectionItems items) 方法,该方法允许您的应用在填充集合视图时直接传递集合。如果使用此方法设置适配器,则无需实现 RemoteViewsFactory,也无需调用 notifyAppWidgetViewDataChanged()。
除了使填充适配器更容易外,此方法还消除了用户向下滚动列表以显示新项时填充新项的延迟。只要您的集合项集相对较小,此设置适配器的方法就值得推荐。但是,例如,如果您的集合包含大量要传递给 setImageViewBitmap 的 Bitmap,此方法就无法很好地工作。
如果集合不使用固定的布局集(即,某些项有时才存在),请使用 setViewTypeCount 指定集合可以包含的唯一布局的最大数量。这样,适配器可以在更新您的应用微件时重复使用。
以下是实现简化 RemoteViews 集合的示例。
Kotlin
val itemLayouts = listOf(
        R.layout.item_type_1,
        R.layout.item_type_2,
        ...
)

remoteView.setRemoteAdapter(
        R.id.list_view,
        RemoteViews.RemoteCollectionItems.Builder()
            .addItem(/* id= */ ID_1, RemoteViews(context.packageName, R.layout.item_type_1))
            .addItem(/* id= */ ID_2, RemoteViews(context.packageName, R.layout.item_type_2))
            ...
            .setViewTypeCount(itemLayouts.count())
            .build()
)
Java
List<Integer> itemLayouts = Arrays.asList(
    R.layout.item_type_1,
    R.layout.item_type_2,
    ...
);

remoteView.setRemoteAdapter(
    R.id.list_view,
    new RemoteViews.RemoteCollectionItems.Builder()
        .addItem(/* id= */ ID_1, new RemoteViews(context.getPackageName(), R.layout.item_type_1))
        .addItem(/* id= */ ID_2, new RemoteViews(context.getPackageName(), R.layout.item_type_2))
        ...
        .setViewTypeCount(itemLayouts.size())
        .build()
);