
能够在 OpenGL ES 视图中定义要绘制的形状是为您的应用创建高端图形的第一步。如果不了解 OpenGL ES 期望您如何定义图形对象的一些基本知识,使用 OpenGL ES 进行绘制可能会有点棘手。
本课程解释了相对于 Android 设备屏幕的 OpenGL ES 坐标系,定义形状、形状面的基础知识,以及如何定义三角形和正方形。
定义三角形
OpenGL ES 允许您使用三维空间中的坐标定义绘制的对象。因此,在绘制三角形之前,您必须定义其坐标。在 OpenGL 中,通常通过为坐标定义一个浮点数顶点数组来完成此操作。为了获得最大效率,您将这些坐标写入一个 ByteBuffer,该缓冲区将传递到 OpenGL ES 图形流水线进行处理。
Kotlin
// number of coordinates per vertex in this array
const val COORDS_PER_VERTEX = 3
var triangleCoords = floatArrayOf(     // in counterclockwise order:
        0.0f, 0.622008459f, 0.0f,      // top
        -0.5f, -0.311004243f, 0.0f,    // bottom left
        0.5f, -0.311004243f, 0.0f      // bottom right
)

class Triangle {

    // Set color with red, green, blue and alpha (opacity) values
    val color = floatArrayOf(0.63671875f, 0.76953125f, 0.22265625f, 1.0f)

    private var vertexBuffer: FloatBuffer =
            // (number of coordinate values * 4 bytes per float)
            ByteBuffer.allocateDirect(triangleCoords.size * 4).run {
                // use the device hardware's native byte order
                order(ByteOrder.nativeOrder())

                // create a floating point buffer from the ByteBuffer
                asFloatBuffer().apply {
                    // add the coordinates to the FloatBuffer
                    put(triangleCoords)
                    // set the buffer to read the first coordinate
                    position(0)
                }
            }
}
Java
public class Triangle {

    private FloatBuffer vertexBuffer;

    // number of coordinates per vertex in this array
    static final int COORDS_PER_VERTEX = 3;
    static float triangleCoords[] = {   // in counterclockwise order:
             0.0f,  0.622008459f, 0.0f, // top
            -0.5f, -0.311004243f, 0.0f, // bottom left
             0.5f, -0.311004243f, 0.0f  // bottom right
    };

    // Set color with red, green, blue and alpha (opacity) values
    float color[] = { 0.63671875f, 0.76953125f, 0.22265625f, 1.0f };

    public Triangle() {
        // initialize vertex byte buffer for shape coordinates
        ByteBuffer bb = ByteBuffer.allocateDirect(
                // (number of coordinate values * 4 bytes per float)
                triangleCoords.length * 4);
        // use the device hardware's native byte order
        bb.order(ByteOrder.nativeOrder());

        // create a floating point buffer from the ByteBuffer
        vertexBuffer = bb.asFloatBuffer();
        // add the coordinates to the FloatBuffer
        vertexBuffer.put(triangleCoords);
        // set the buffer to read the first coordinate
        vertexBuffer.position(0);
    }
}
默认情况下,OpenGL ES 假定一个坐标系,其中 [0,0,0] (X,Y,Z) 指定 GLSurfaceView 框架的中心,[1,1,0] 是框架的右上角,[-1,-1,0] 是框架的左下角。有关此坐标系的图示,请参阅OpenGL ES 开发者指南。
请注意,此形状的坐标按逆时针顺序定义。绘制顺序很重要,因为它定义了形状的正面(您通常希望绘制的一面)和背面(您可以使用 OpenGL ES 面剔除功能选择不绘制的一面)。有关面和剔除的更多信息,请参阅OpenGL ES 开发者指南。
定义正方形
在 OpenGL 中定义三角形非常简单,但如果您想要更复杂一些的形状怎么办?例如,一个正方形?有很多方法可以做到这一点,但在 OpenGL ES 中绘制此类形状的典型方法是使用两个三角形组合绘制
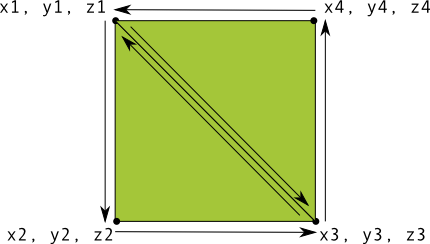
图 1. 使用两个三角形绘制一个正方形。
同样,对于表示此形状的两个三角形,您应该按逆时针顺序定义顶点,并将值放入 ByteBuffer 中。为了避免重复定义两个三角形共享的两个坐标,请使用绘制列表告知 OpenGL ES 图形流水线如何绘制这些顶点。下面是此形状的代码
Kotlin
// number of coordinates per vertex in this array
const val COORDS_PER_VERTEX = 3
var squareCoords = floatArrayOf(
        -0.5f,  0.5f, 0.0f,      // top left
        -0.5f, -0.5f, 0.0f,      // bottom left
         0.5f, -0.5f, 0.0f,      // bottom right
         0.5f,  0.5f, 0.0f       // top right
)

class Square2 {

    private val drawOrder = shortArrayOf(0, 1, 2, 0, 2, 3) // order to draw vertices

    // initialize vertex byte buffer for shape coordinates
    private val vertexBuffer: FloatBuffer =
            // (# of coordinate values * 4 bytes per float)
            ByteBuffer.allocateDirect(squareCoords.size * 4).run {
                order(ByteOrder.nativeOrder())
                asFloatBuffer().apply {
                    put(squareCoords)
                    position(0)
                }
            }

    // initialize byte buffer for the draw list
    private val drawListBuffer: ShortBuffer =
            // (# of coordinate values * 2 bytes per short)
            ByteBuffer.allocateDirect(drawOrder.size * 2).run {
                order(ByteOrder.nativeOrder())
                asShortBuffer().apply {
                    put(drawOrder)
                    position(0)
                }
            }
}
Java
public class Square {

    private FloatBuffer vertexBuffer;
    private ShortBuffer drawListBuffer;

    // number of coordinates per vertex in this array
    static final int COORDS_PER_VERTEX = 3;
    static float squareCoords[] = {
            -0.5f,  0.5f, 0.0f,   // top left
            -0.5f, -0.5f, 0.0f,   // bottom left
             0.5f, -0.5f, 0.0f,   // bottom right
             0.5f,  0.5f, 0.0f }; // top right

    private short drawOrder[] = { 0, 1, 2, 0, 2, 3 }; // order to draw vertices

    public Square() {
        // initialize vertex byte buffer for shape coordinates
        ByteBuffer bb = ByteBuffer.allocateDirect(
        // (# of coordinate values * 4 bytes per float)
                squareCoords.length * 4);
        bb.order(ByteOrder.nativeOrder());
        vertexBuffer = bb.asFloatBuffer();
        vertexBuffer.put(squareCoords);
        vertexBuffer.position(0);

        // initialize byte buffer for the draw list
        ByteBuffer dlb = ByteBuffer.allocateDirect(
        // (# of coordinate values * 2 bytes per short)
                drawOrder.length * 2);
        dlb.order(ByteOrder.nativeOrder());
        drawListBuffer = dlb.asShortBuffer();
        drawListBuffer.put(drawOrder);
        drawListBuffer.position(0);
    }
}
此示例让您了解使用 OpenGL 创建更复杂形状所需的步骤。通常,您使用三角形集合来绘制对象。在下一课中,您将学习如何在屏幕上绘制这些形状。