Android 最重要的功能之一是应用能够根据其想要执行的“操作”将用户发送到另一个应用。例如,如果您的应用拥有您想在地图上显示的某个企业的地址,您无需在应用中构建一个显示地图的活动。相反,您可以使用 Intent 创建一个查看地址的请求。然后,Android 系统会启动能够在地图上显示地址的应用。
正如第一课 构建您的第一个应用 中所述,您必须使用意图在您自己的应用中的活动之间导航。您通常使用显式意图来完成此操作,显式意图定义了您要启动的组件的精确类名。但是,当您希望另一个应用执行某个操作(例如“查看地图”)时,您必须使用隐式意图。
本课将向您展示如何为特定操作创建隐式意图,以及如何使用它启动另一个应用中执行该操作的活动。此外,还可以观看此处嵌入的视频,以了解为什么必须为隐式意图包含运行时检查。
构建隐式意图
隐式意图不声明要启动的组件的类名,而是声明要执行的操作。操作指定了您想要执行的操作,例如查看、编辑、发送或获取某些内容。
将意图操作与数据关联
意图通常还会包含与操作关联的数据,例如您要查看的地址或您要发送的电子邮件。根据您要创建的意图,数据可能是 Uri,其他几种数据类型之一,或者意图可能根本不需要数据。
如果您的数据是 Uri,则可以使用一个简单的 Intent() 构造函数来定义操作和数据。
例如,以下是如何使用 Uri 数据创建意图以发起电话呼叫,并指定电话号码
Kotlin
val callIntent: Intent = Uri.parse("tel:5551234").let { number ->
    Intent(Intent.ACTION_DIAL, number)
}
Java
Uri number = Uri.parse("tel:5551234");
Intent callIntent = new Intent(Intent.ACTION_DIAL, number);
当您的应用通过调用 startActivity() 来调用此意图时,电话应用会发起对指定电话号码的呼叫。
以下是几个其他意图及其操作和 Uri 数据对
查看地图
Kotlin
// Map point based on address
val mapIntent: Intent = Uri.parse(
        "geo:0,0?q=1600+Amphitheatre+Parkway,+Mountain+View,+California"
).let { location ->
    // Or map point based on latitude/longitude
    // val location: Uri = Uri.parse("geo:37.422219,-122.08364?z=14") // z param is zoom level
    Intent(Intent.ACTION_VIEW, location)
}
Java
// Map point based on address
Uri location = Uri.parse("geo:0,0?q=1600+Amphitheatre+Parkway,+Mountain+View,+California");
// Or map point based on latitude/longitude
// Uri location = Uri.parse("geo:37.422219,-122.08364?z=14"); // z param is zoom level
Intent mapIntent = new Intent(Intent.ACTION_VIEW, location);
查看网页
Kotlin
val webIntent: Intent = Uri.parse("https://www.android.com").let { webpage ->
    Intent(Intent.ACTION_VIEW, webpage)
}
Java
Uri webpage = Uri.parse("https://www.android.com");
Intent webIntent = new Intent(Intent.ACTION_VIEW, webpage);
向意图添加额外数据
其他类型的隐式意图需要“额外”数据来提供不同的数据类型,例如字符串。您可以使用各种 putExtra() 方法添加一个或多个额外数据。
默认情况下,系统会根据包含的 Uri 数据来确定意图所需的 MIME 类型。如果意图中不包含 Uri,通常应该使用 setType() 来指定与意图相关联的数据类型。设置 MIME 类型可以进一步指定哪些类型的活动应该接收意图。
以下是一些添加额外数据以指定所需操作的意图:
发送带有附件的电子邮件
Kotlin
Intent(Intent.ACTION_SEND).apply {
    // The intent does not have a URI, so declare the "text/plain" MIME type
    type = "text/plain"
    putExtra(Intent.EXTRA_EMAIL, arrayOf("[email protected]")) // recipients
    putExtra(Intent.EXTRA_SUBJECT, "Email subject")
    putExtra(Intent.EXTRA_TEXT, "Email message text")
    putExtra(Intent.EXTRA_STREAM, Uri.parse("content://path/to/email/attachment"))
    // You can also attach multiple items by passing an ArrayList of Uris
}
Java
Intent emailIntent = new Intent(Intent.ACTION_SEND);
// The intent does not have a URI, so declare the "text/plain" MIME type
emailIntent.setType(HTTP.PLAIN_TEXT_TYPE);
emailIntent.putExtra(Intent.EXTRA_EMAIL, new String[] {"[email protected]"}); // recipients
emailIntent.putExtra(Intent.EXTRA_SUBJECT, "Email subject");
emailIntent.putExtra(Intent.EXTRA_TEXT, "Email message text");
emailIntent.putExtra(Intent.EXTRA_STREAM, Uri.parse("content://path/to/email/attachment"));
// You can also attach multiple items by passing an ArrayList of Uris
创建日历事件
注意:此日历事件意图仅在 API 等级 14 及更高版本中受支持。
Kotlin
// Event is on January 23, 2021 -- from 7:30 AM to 10:30 AM.
Intent(Intent.ACTION_INSERT, Events.CONTENT_URI).apply {
    val beginTime: Calendar = Calendar.getInstance().apply {
        set(2021, 0, 23, 7, 30)
    }
    val endTime = Calendar.getInstance().apply {
        set(2021, 0, 23, 10, 30)
    }
    putExtra(CalendarContract.EXTRA_EVENT_BEGIN_TIME, beginTime.timeInMillis)
    putExtra(CalendarContract.EXTRA_EVENT_END_TIME, endTime.timeInMillis)
    putExtra(Events.TITLE, "Ninja class")
    putExtra(Events.EVENT_LOCATION, "Secret dojo")
}
Java
// Event is on January 23, 2021 -- from 7:30 AM to 10:30 AM.
Intent calendarIntent = new Intent(Intent.ACTION_INSERT, Events.CONTENT_URI);
Calendar beginTime = Calendar.getInstance();
beginTime.set(2021, 0, 23, 7, 30);
Calendar endTime = Calendar.getInstance();
endTime.set(2021, 0, 23, 10, 30);
calendarIntent.putExtra(CalendarContract.EXTRA_EVENT_BEGIN_TIME, beginTime.getTimeInMillis());
calendarIntent.putExtra(CalendarContract.EXTRA_EVENT_END_TIME, endTime.getTimeInMillis());
calendarIntent.putExtra(Events.TITLE, "Ninja class");
calendarIntent.putExtra(Events.EVENT_LOCATION, "Secret dojo");
注意:定义 Intent 时,应尽可能具体。例如,如果您想使用 ACTION_VIEW 意图显示图像,则应指定 image/* 的 MIME 类型。这可以防止可以“查看”其他类型数据(例如地图应用程序)的应用程序被意图触发。
使用意图启动活动
创建 Intent 并设置额外信息后,请调用 startActivity() 将其发送到系统。
Kotlin
startActivity(intent)
Java
startActivity(intent);
处理没有应用程序可以接收意图的情况
虽然许多意图可以由设备上安装的另一个应用程序(例如电话、电子邮件或日历应用程序)成功处理,但您的应用程序应为没有活动可以处理应用程序意图的情况做好准备。每当您调用意图时,请准备好捕获 ActivityNotFoundException,如果不存在其他可以处理应用程序意图的活动,就会发生此异常。
Kotlin
try {
    startActivity(intent)
} catch (e: ActivityNotFoundException) {
    // Define what your app should do if no activity can handle the intent.
}
Java
try {
    startActivity(intent);
} catch (ActivityNotFoundException e) {
    // Define what your app should do if no activity can handle the intent.
}
捕获此异常后,请决定应用程序接下来应该做什么。此后续步骤取决于您尝试调用的意图的特定特征。例如,如果您知道可以处理该意图的特定应用程序,请为用户提供一个下载该应用程序的链接。详细了解如何 链接到 Google Play 上的产品。
消歧对话框
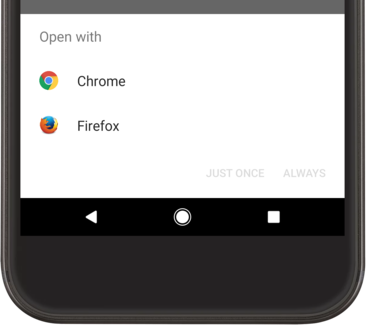
如果系统识别出多个可以处理意图的活动,它将显示一个对话框(有时称为“消歧对话框”,供用户选择要使用的应用程序,如图 1 所示。如果只有一个活动可以处理该意图,则系统将立即启动它。

图 1. 当多个应用程序可以处理意图时出现的选择对话框的示例。
完整示例
以下是一个完整示例,演示了如何创建意图以查看地图,验证是否存在应用程序来处理意图,然后启动它。
Kotlin
// Build the intent.
val location = Uri.parse("geo:0,0?q=1600+Amphitheatre+Parkway,+Mountain+View,+California")
val mapIntent = Intent(Intent.ACTION_VIEW, location)

// Try to invoke the intent.
try {
    startActivity(mapIntent)
} catch (e: ActivityNotFoundException) {
    // Define what your app should do if no activity can handle the intent.
}
Java
// Build the intent.
Uri location = Uri.parse("geo:0,0?q=1600+Amphitheatre+Parkway,+Mountain+View,+California");
Intent mapIntent = new Intent(Intent.ACTION_VIEW, location);

// Try to invoke the intent.
try {
    startActivity(mapIntent);
} catch (ActivityNotFoundException e) {
    // Define what your app should do if no activity can handle the intent.
}
显示应用程序选择器

图 2. 选择器对话框。
请注意,当您通过将 Intent 传递给 startActivity() 来启动活动,并且有多个应用程序响应该意图时,用户可以选择默认情况下使用哪个应用程序(通过选中对话框底部的复选框;请参见图 1)。这在执行用户通常希望每次使用相同应用程序的操作时很有用,例如打开网页(用户可能只使用一个网页浏览器)或拍照(用户可能更喜欢一个相机)。
但是,如果要执行的操作可以由多个应用程序处理,并且用户每次可能更喜欢不同的应用程序(例如“共享”操作,用户可能通过多个应用程序共享项目),则应明确显示选择器对话框,如图 2 所示。选择器对话框强制用户每次选择要用于该操作的应用程序(用户无法为该操作选择默认应用程序)。
若要显示选择器,请使用 createChooser() 创建一个 Intent,然后将其传递给 startActivity()。例如
Kotlin
val intent = Intent(Intent.ACTION_SEND)

// Create intent to show chooser
val chooser = Intent.createChooser(intent, /* title */ null)

// Try to invoke the intent.
try {
    startActivity(chooser)
} catch (e: ActivityNotFoundException) {
    // Define what your app should do if no activity can handle the intent.
}
Java
Intent intent = new Intent(Intent.ACTION_SEND);

// Create intent to show chooser
Intent chooser = Intent.createChooser(intent, /* title */ null);

// Try to invoke the intent.
try {
    startActivity(chooser);
} catch (ActivityNotFoundException e) {
    // Define what your app should do if no activity can handle the intent.
}
这将显示一个对话框,其中包含一个响应传递给 createChooser() 方法的意图的应用程序列表。如果该操作不是 ACTION_SEND 或 ACTION_SEND_MULTIPLE,则可以提供 title 参数。
