
Dagger 基础知识页面解释了 Dagger 如何帮助您在应用中自动执行依赖注入。使用 Dagger,您无需编写繁琐且易出错的样板代码。
最佳实践摘要
- 尽可能使用带
@Inject的构造函数注入,将类型添加到 Dagger 图中。如果无法实现,则应- 使用
@Binds告诉 Dagger 接口应具有哪个实现。 - 使用
@Provides告诉 Dagger 如何提供您的项目不拥有的类。
- 使用
- 您应该在组件中只声明一次模块。
- 根据注解的使用生命周期来命名作用域注解。示例包括
@ApplicationScope、@LoggedUserScope和@ActivityScope。
添加依赖项
要在项目中使用 Dagger,请在 build.gradle 文件中将这些依赖项添加到您的应用中。您可以在此 GitHub 项目中找到 Dagger 的最新版本。
Kotlin
plugins {
  id 'kotlin-kapt'
}

dependencies {
    implementation 'com.google.dagger:dagger:2.x'
    kapt 'com.google.dagger:dagger-compiler:2.x'
}
Java
dependencies {
    implementation 'com.google.dagger:dagger:2.x'
    annotationProcessor 'com.google.dagger:dagger-compiler:2.x'
}
Android 中的 Dagger
考虑一个示例 Android 应用,其依赖关系图如图 1 所示。
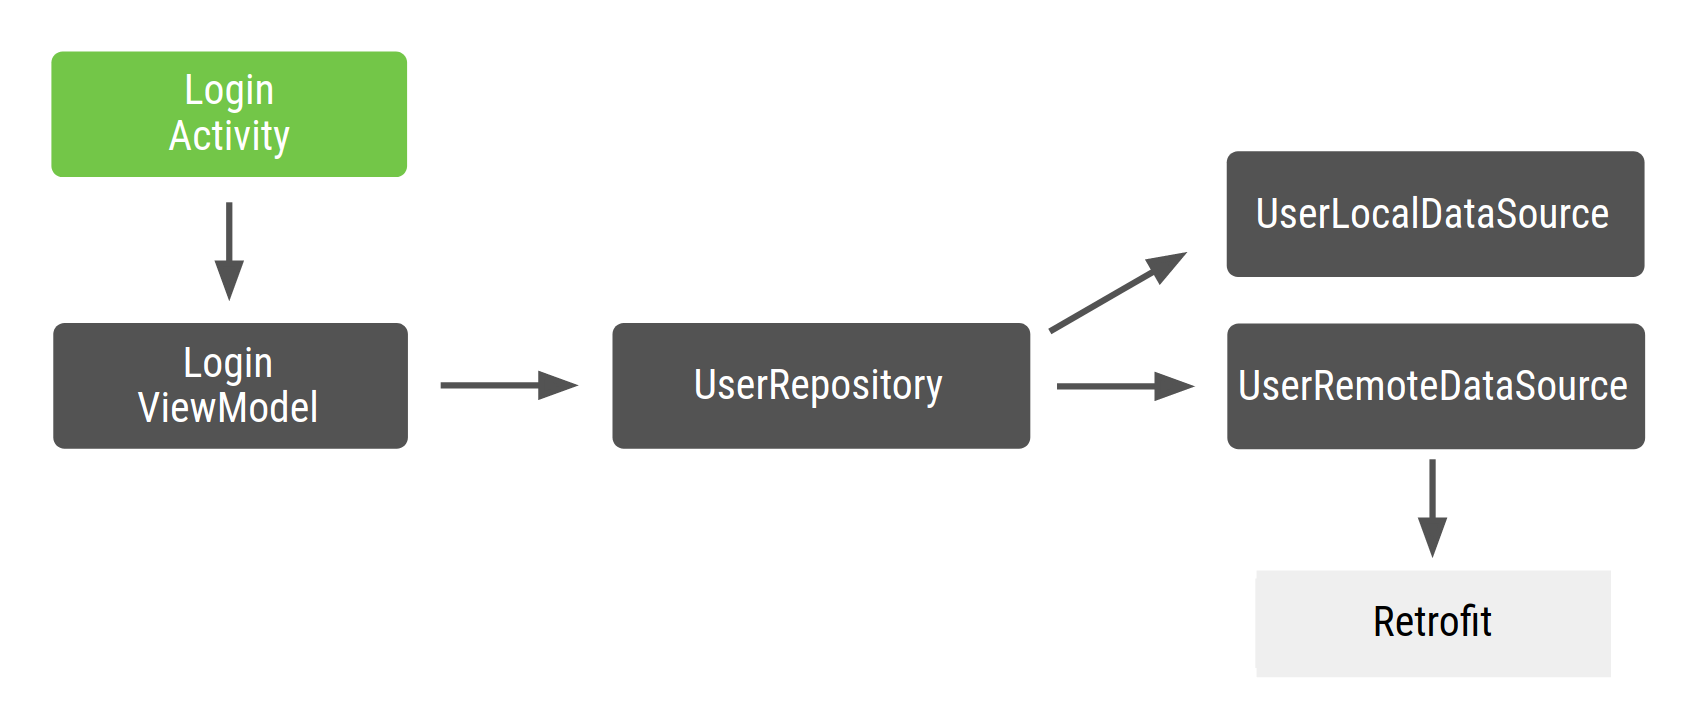
图 1. 示例代码的依赖关系图
在 Android 中,您通常会在应用类中创建 Dagger 图,因为您希望图的实例在应用运行期间一直存在于内存中。这样,图就与应用生命周期相关联。在某些情况下,您可能还希望应用上下文在图中可用。为此,您还需要将图放在 Application 类中。这种方法的一个优点是图可供其他 Android 框架类使用。此外,它还允许您在测试中使用自定义的 Application 类,从而简化了测试。
由于生成图的接口使用 @Component 进行注解,因此您可以将其命名为 ApplicationComponent 或 ApplicationGraph。您通常会将该组件的实例保存在自定义的 Application 类中,并在每次需要应用图时调用它,如以下代码段所示
Kotlin
// Definition of the Application graph
@Component
interface ApplicationComponent { ... }

// appComponent lives in the Application class to share its lifecycle
class MyApplication: Application() {
    // Reference to the application graph that is used across the whole app
    val appComponent = DaggerApplicationComponent.create()
}
Java
// Definition of the Application graph
@Component
public interface ApplicationComponent {
}

// appComponent lives in the Application class to share its lifecycle
public class MyApplication extends Application {

    // Reference to the application graph that is used across the whole app
    ApplicationComponent appComponent = DaggerApplicationComponent.create();
}
由于某些 Android 框架类(例如 Activity 和 Fragment)是由系统实例化的,因此 Dagger 无法为您创建它们。特别是对于 Activity,任何初始化代码都需要放入 onCreate() 方法中。这意味着您不能像之前的示例那样在类的构造函数中使用 @Inject 注解(构造函数注入)。相反,您必须使用字段注入。
您不希望在 onCreate() 方法中创建 Activity 所需的依赖项,而是希望 Dagger 为您填充这些依赖项。对于字段注入,您可以将 @Inject 注解应用于要从 Dagger 图中获取的字段。
Kotlin
class LoginActivity: Activity() {
    // You want Dagger to provide an instance of LoginViewModel from the graph
    @Inject lateinit var loginViewModel: LoginViewModel
}
Java
public class LoginActivity extends Activity {

    // You want Dagger to provide an instance of LoginViewModel from the graph
    @Inject
    LoginViewModel loginViewModel;
}
为简单起见,LoginViewModel 不是 Android Architecture Components ViewModel;它只是一个充当 ViewModel 的常规类。有关如何注入这些类的更多信息,请查看官方 Android Blueprints Dagger 实现中 dev-dagger 分支中的代码。
使用 Dagger 时的一个注意事项是,注入的字段不能是私有的。它们至少需要像上述代码那样具有包私有可见性。
注入 Activity
Dagger 需要知道 LoginActivity 必须访问图才能提供其所需的 ViewModel。在 Dagger 基础知识页面中,您使用 @Component 接口,通过公开具有您想要从图中获取的返回类型的函数来获取图中的对象。在本例中,您需要告诉 Dagger 一个需要注入依赖项的对象(本例中为 LoginActivity)。为此,您可以公开一个将请求注入的对象作为参数的函数。
Kotlin
@Component
interface ApplicationComponent {
    // This tells Dagger that LoginActivity requests injection so the graph needs to
    // satisfy all the dependencies of the fields that LoginActivity is requesting.
    fun inject(activity: LoginActivity)
}
Java
@Component
public interface ApplicationComponent {
    // This tells Dagger that LoginActivity requests injection so the graph needs to
    // satisfy all the dependencies of the fields that LoginActivity is injecting.
    void inject(LoginActivity loginActivity);
}
此函数告诉 Dagger,LoginActivity 想要访问图并请求注入。Dagger 需要满足 LoginActivity 所需的所有依赖项(LoginViewModel 及其自身的依赖项)。如果您有多个类请求注入,则必须在组件中明确声明所有这些类及其确切类型。例如,如果您有 LoginActivity 和 RegistrationActivity 请求注入,则会有两个 inject() 方法,而不是一个涵盖两种情况的通用方法。通用的 inject() 方法不会告诉 Dagger 需要提供什么。接口中的函数可以有任何名称,但当它们接收要注入的对象作为参数时,将其命名为 inject() 是 Dagger 中的惯例。
要在 Activity 中注入对象,您可以使用 Application 类中定义的 appComponent,并调用 inject() 方法,传入请求注入的 Activity 实例。
使用 Activity 时,请在 Activity 的 onCreate() 方法中注入 Dagger,并且在调用 super.onCreate() 之前注入,以避免 Fragment 恢复问题。在 super.onCreate() 的恢复阶段,Activity 会附加可能希望访问 Activity 绑定的 Fragment。
使用 Fragment 时,在 Fragment 的 onAttach() 方法中注入 Dagger。在这种情况下,可以在调用 super.onAttach() 之前或之后进行。
Kotlin
class LoginActivity: Activity() {
    // You want Dagger to provide an instance of LoginViewModel from the graph
    @Inject lateinit var loginViewModel: LoginViewModel

    override fun onCreate(savedInstanceState: Bundle?) {
        // Make Dagger instantiate @Inject fields in LoginActivity
        (applicationContext as MyApplication).appComponent.inject(this)
        // Now loginViewModel is available

        super.onCreate(savedInstanceState)
    }
}

// @Inject tells Dagger how to create instances of LoginViewModel
class LoginViewModel @Inject constructor(
    private val userRepository: UserRepository
) { ... }
Java
public class LoginActivity extends Activity {

    // You want Dagger to provide an instance of LoginViewModel from the graph
    @Inject
    LoginViewModel loginViewModel;

    @Override
    protected void onCreate(Bundle savedInstanceState) {
        // Make Dagger instantiate @Inject fields in LoginActivity
        ((MyApplication) getApplicationContext()).appComponent.inject(this);
        // Now loginViewModel is available

        super.onCreate(savedInstanceState);
    }
}

public class LoginViewModel {

    private final UserRepository userRepository;

    // @Inject tells Dagger how to create instances of LoginViewModel
    @Inject
    public LoginViewModel(UserRepository userRepository) {
        this.userRepository = userRepository;
    }
}
现在让我们告诉 Dagger 如何提供其余依赖项以构建图
Kotlin
class UserRepository @Inject constructor(
    private val localDataSource: UserLocalDataSource,
    private val remoteDataSource: UserRemoteDataSource
) { ... }

class UserLocalDataSource @Inject constructor() { ... }
class UserRemoteDataSource @Inject constructor(
    private val loginService: LoginRetrofitService
) { ... }
Java
public class UserRepository {

    private final UserLocalDataSource userLocalDataSource;
    private final UserRemoteDataSource userRemoteDataSource;

    @Inject
    public UserRepository(UserLocalDataSource userLocalDataSource, UserRemoteDataSource userRemoteDataSource) {
        this.userLocalDataSource = userLocalDataSource;
        this.userRemoteDataSource = userRemoteDataSource;
    }
}

public class UserLocalDataSource {

    @Inject
    public UserLocalDataSource() {}
}

public class UserRemoteDataSource {

    private final LoginRetrofitService loginRetrofitService;

    @Inject
    public UserRemoteDataSource(LoginRetrofitService loginRetrofitService) {
        this.loginRetrofitService = loginRetrofitService;
    }
}
Dagger 模块
在本示例中,您使用的是 Retrofit 网络库。UserRemoteDataSource 依赖于 LoginRetrofitService。但是,创建 LoginRetrofitService 实例的方式与您之前所做的方式不同。它不是类的实例化;它是调用 Retrofit.Builder() 并传入不同参数以配置登录服务的结果。
除了 @Inject 注解之外,还有另一种方法可以告诉 Dagger 如何提供类的实例:Dagger 模块中的信息。Dagger 模块是用 @Module 注解的类。在那里,您可以使用 @Provides 注解定义依赖项。
Kotlin
// @Module informs Dagger that this class is a Dagger Module
@Module
class NetworkModule {

    // @Provides tell Dagger how to create instances of the type that this function
    // returns (i.e. LoginRetrofitService).
    // Function parameters are the dependencies of this type.
    @Provides
    fun provideLoginRetrofitService(): LoginRetrofitService {
        // Whenever Dagger needs to provide an instance of type LoginRetrofitService,
        // this code (the one inside the @Provides method) is run.
        return Retrofit.Builder()
                .baseUrl("https://example.com")
                .build()
                .create(LoginService::class.java)
    }
}
Java
// @Module informs Dagger that this class is a Dagger Module
@Module
public class NetworkModule {

    // @Provides tell Dagger how to create instances of the type that this function
    // returns (i.e. LoginRetrofitService).
    // Function parameters are the dependencies of this type.
    @Provides
    public LoginRetrofitService provideLoginRetrofitService() {
        // Whenever Dagger needs to provide an instance of type LoginRetrofitService,
        // this code (the one inside the @Provides method) is run.
        return new Retrofit.Builder()
                .baseUrl("https://example.com")
                .build()
                .create(LoginService.class);
    }
}
模块是一种在语义上封装如何提供对象信息的方式。如您所见,您将该类命名为 NetworkModule,以将提供与网络相关的对象的逻辑分组。如果应用扩展,您还可以在此处添加如何提供 OkHttpClient,或者如何配置 Gson 或 Moshi。
@Provides 方法的依赖项是该方法的参数。对于之前的方法,LoginRetrofitService 可以无依赖项提供,因为该方法没有参数。如果您已将 OkHttpClient 声明为参数,Dagger 将需要从图中提供一个 OkHttpClient 实例来满足 LoginRetrofitService 的依赖项。例如
Kotlin
@Module
class NetworkModule {
    // Hypothetical dependency on LoginRetrofitService
    @Provides
    fun provideLoginRetrofitService(
        okHttpClient: OkHttpClient
    ): LoginRetrofitService { ... }
}
Java
@Module
public class NetworkModule {

    @Provides
    public LoginRetrofitService provideLoginRetrofitService(OkHttpClient okHttpClient) {
        ...
    }
}
为了让 Dagger 图知道此模块,您必须按如下方式将其添加到 @Component 接口中
Kotlin
// The "modules" attribute in the @Component annotation tells Dagger what Modules
// to include when building the graph
@Component(modules = [NetworkModule::class])
interface ApplicationComponent {
    ...
}
Java
// The "modules" attribute in the @Component annotation tells Dagger what Modules
// to include when building the graph
@Component(modules = NetworkModule.class)
public interface ApplicationComponent {
    ...
}
将类型添加到 Dagger 图中的推荐方法是使用构造函数注入(即在类的构造函数上使用 @Inject 注解)。有时,这不可行,您必须使用 Dagger 模块。一个示例是当您希望 Dagger 使用计算结果来确定如何创建对象实例时。每当 Dagger 必须提供该类型的实例时,它都会运行 @Provides 方法中的代码。
这是示例中 Dagger 图现在的样子
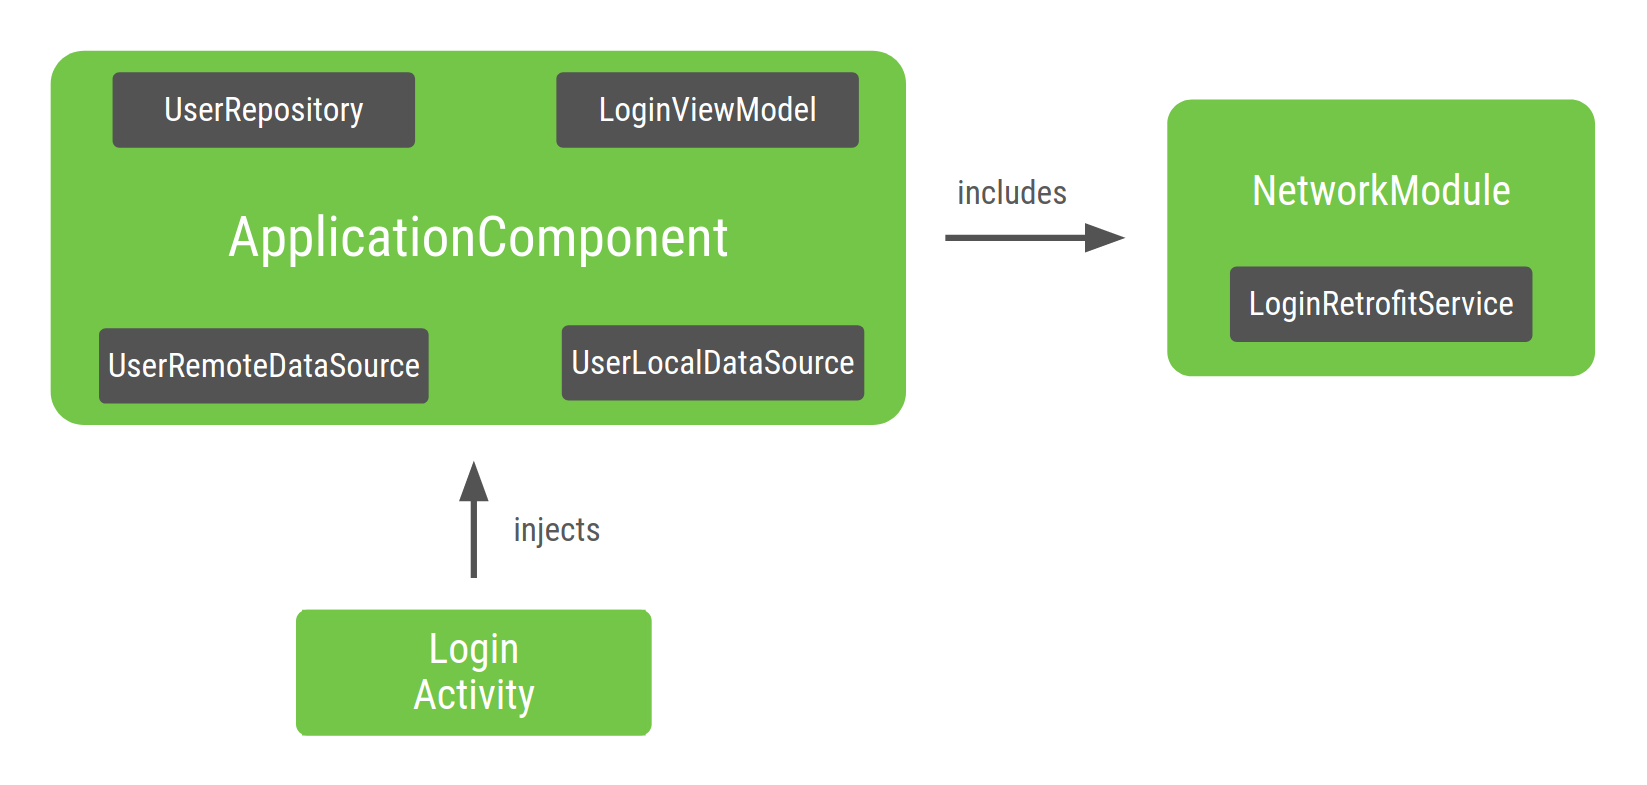
图 2. Dagger 注入 LoginActivity 的图表示
图的入口点是 LoginActivity。由于 LoginActivity 注入了 LoginViewModel,Dagger 会构建一个知道如何提供 LoginViewModel 实例及其依赖项的图。Dagger 之所以知道如何执行此操作,是因为类构造函数上的 @Inject 注解。
在 Dagger 生成的 ApplicationComponent 中,有一个工厂类型的方法可以获取它知道如何提供的所有类的实例。在本示例中,Dagger 将获取 LoginRetrofitService 实例的任务委托给 ApplicationComponent 中包含的 NetworkModule。
Dagger 作用域
Dagger 基础知识页面提到了作用域,作为在组件中拥有唯一类型实例的一种方式。这就是 将类型作用域限定为组件生命周期 的含义。
由于您可能希望在应用的其他功能中使用 UserRepository,并且可能不希望每次需要时都创建一个新对象,因此您可以将其指定为整个应用的唯一实例。对于 LoginRetrofitService 也是如此:它的创建成本可能很高,而且您也希望重复使用该对象的唯一实例。创建 UserRemoteDataSource 的实例并不昂贵,因此没有必要将其作用域限定为组件的生命周期。
@Singleton 是 javax.inject 软件包中唯一的范围注解。您可以使用它来注解 ApplicationComponent 和您希望在整个应用中重用的对象。
Kotlin
@Singleton
@Component(modules = [NetworkModule::class])
interface ApplicationComponent {
    fun inject(activity: LoginActivity)
}

@Singleton
class UserRepository @Inject constructor(
    private val localDataSource: UserLocalDataSource,
    private val remoteDataSource: UserRemoteDataSource
) { ... }

@Module
class NetworkModule {
    // Way to scope types inside a Dagger Module
    @Singleton
    @Provides
    fun provideLoginRetrofitService(): LoginRetrofitService { ... }
}
Java
@Singleton
@Component(modules = NetworkModule.class)
public interface ApplicationComponent {
    void inject(LoginActivity loginActivity);
}

@Singleton
public class UserRepository {

    private final UserLocalDataSource userLocalDataSource;
    private final UserRemoteDataSource userRemoteDataSource;

    @Inject
    public UserRepository(UserLocalDataSource userLocalDataSource, UserRemoteDataSource userRemoteDataSource) {
        this.userLocalDataSource = userLocalDataSource;
        this.userRemoteDataSource = userRemoteDataSource;
    }
}

@Module
public class NetworkModule {

    @Singleton
    @Provides
    public LoginRetrofitService provideLoginRetrofitService() { ... }
}
在对对象应用作用域时,请注意不要引入内存泄漏。只要作用域组件在内存中,创建的对象也在内存中。由于 ApplicationComponent 在应用启动时(在 Application 类中)创建,因此当应用被销毁时,它也会被销毁。因此,UserRepository 的唯一实例将始终保留在内存中,直到应用被销毁。
Dagger 子组件
如果您的登录流程(由单个 LoginActivity 管理)包含多个 Fragment,您应该在所有 Fragment 中重用 LoginViewModel 的相同实例。@Singleton 无法注解 LoginViewModel 以重用实例,原因如下:
LoginViewModel的实例在流程结束后仍会保留在内存中。您希望每个登录流程都有一个不同的
LoginViewModel实例。例如,如果用户退出登录,您会希望获得一个不同的LoginViewModel实例,而不是用户首次登录时使用的相同实例。
要将 LoginViewModel 的作用域限定为 LoginActivity 的生命周期,您需要为登录流程创建一个新组件(一个新子图)和一个新作用域。
让我们创建一个特定于登录流程的图。
Kotlin
@Component
interface LoginComponent {}
Java
@Component
public interface LoginComponent {
}
现在,LoginActivity 应该从 LoginComponent 获取注入,因为它具有登录特定的配置。这消除了 ApplicationComponent 类注入 LoginActivity 的责任。
Kotlin
@Component
interface LoginComponent {
    fun inject(activity: LoginActivity)
}
Java
@Component
public interface LoginComponent {
    void inject(LoginActivity loginActivity);
}
LoginComponent 必须能够访问 ApplicationComponent 中的对象,因为 LoginViewModel 依赖于 UserRepository。告诉 Dagger 您希望新组件使用另一个组件的一部分的方式是使用 Dagger 子组件。新组件必须是包含共享资源的组件的子组件。
子组件 是继承和扩展父组件对象图的组件。因此,父组件中提供的所有对象也会在子组件中提供。通过这种方式,子组件中的对象可以依赖于父组件提供的对象。
要创建子组件的实例,您需要父组件的实例。因此,父组件提供给子组件的对象仍然限定在父组件的作用域内。
在本例中,您必须将 LoginComponent 定义为 ApplicationComponent 的子组件。为此,请使用 @Subcomponent 注解 LoginComponent
Kotlin
// @Subcomponent annotation informs Dagger this interface is a Dagger Subcomponent
@Subcomponent
interface LoginComponent {

    // This tells Dagger that LoginActivity requests injection from LoginComponent
    // so that this subcomponent graph needs to satisfy all the dependencies of the
    // fields that LoginActivity is injecting
    fun inject(loginActivity: LoginActivity)
}
Java
// @Subcomponent annotation informs Dagger this interface is a Dagger Subcomponent
@Subcomponent
public interface LoginComponent {

    // This tells Dagger that LoginActivity requests injection from LoginComponent
    // so that this subcomponent graph needs to satisfy all the dependencies of the
    // fields that LoginActivity is injecting
    void inject(LoginActivity loginActivity);
}
您还必须在 LoginComponent 中定义一个子组件工厂,以便 ApplicationComponent 知道如何创建 LoginComponent 的实例。
Kotlin
@Subcomponent
interface LoginComponent {

    // Factory that is used to create instances of this subcomponent
    @Subcomponent.Factory
    interface Factory {
        fun create(): LoginComponent
    }

    fun inject(loginActivity: LoginActivity)
}
Java
@Subcomponent
public interface LoginComponent {

    // Factory that is used to create instances of this subcomponent
    @Subcomponent.Factory
    interface Factory {
        LoginComponent create();
    }

    void inject(LoginActivity loginActivity);
}
要告诉 Dagger LoginComponent 是 ApplicationComponent 的子组件,您必须通过以下方式指示:
创建一个新的 Dagger 模块(例如
SubcomponentsModule),将子组件的类传递给注解的subcomponents属性。Kotlin
// The "subcomponents" attribute in the @Module annotation tells Dagger what
// Subcomponents are children of the Component this module is included in.
@Module(subcomponents = LoginComponent::class)
class SubcomponentsModule {}
Java
// The "subcomponents" attribute in the @Module annotation tells Dagger what
// Subcomponents are children of the Component this module is included in.
@Module(subcomponents = LoginComponent.class)
public class SubcomponentsModule {
}
将新模块(即
SubcomponentsModule)添加到ApplicationComponentKotlin
// Including SubcomponentsModule, tell ApplicationComponent that
// LoginComponent is its subcomponent.
@Singleton
@Component(modules = [NetworkModule::class, SubcomponentsModule::class])
interface ApplicationComponent {
}
Java
// Including SubcomponentsModule, tell ApplicationComponent that
// LoginComponent is its subcomponent.
@Singleton
@Component(modules = {NetworkModule.class, SubcomponentsModule.class})
public interface ApplicationComponent {
}
请注意,
ApplicationComponent不再需要注入LoginActivity,因为该责任现在属于LoginComponent,因此您可以从ApplicationComponent中移除inject()方法。ApplicationComponent的消费者需要知道如何创建LoginComponent的实例。父组件必须在其接口中添加一个方法,以允许消费者从父组件的实例中创建子组件的实例在接口中公开创建
LoginComponent实例的工厂Kotlin
@Singleton
@Component(modules = [NetworkModule::class, SubcomponentsModule::class])
interface ApplicationComponent {
// This function exposes the LoginComponent Factory out of the graph so consumers
// can use it to obtain new instances of LoginComponent
fun loginComponent(): LoginComponent.Factory
}
Java
@Singleton
@Component(modules = { NetworkModule.class, SubcomponentsModule.class} )
public interface ApplicationComponent {
// This function exposes the LoginComponent Factory out of the graph so consumers
// can use it to obtain new instances of LoginComponent
LoginComponent.Factory loginComponent();
}
为子组件分配作用域
如果您构建项目,可以创建 ApplicationComponent 和 LoginComponent 的实例。ApplicationComponent 附加到应用的生命周期,因为您希望只要应用在内存中就使用该图的相同实例。
LoginComponent 的生命周期是什么?您需要 LoginComponent 的原因之一是,您需要在登录相关的 Fragment 之间共享 LoginViewModel 的相同实例。但同时,您也希望在每次有新的登录流程时都获得不同的 LoginViewModel 实例。LoginActivity 是 LoginComponent 的正确生命周期:对于每个新的 Activity,您都需要一个新的 LoginComponent 实例以及可以使用该 LoginComponent 实例的 Fragment。
由于 LoginComponent 附加到 LoginActivity 的生命周期,您必须在 Activity 中保留对组件的引用,就像您在 Application 类中保留对 applicationComponent 的引用一样。这样,Fragment 就可以访问它。
Kotlin
class LoginActivity: Activity() {
    // Reference to the Login graph
    lateinit var loginComponent: LoginComponent
    ...
}
Java
public class LoginActivity extends Activity {

    // Reference to the Login graph
    LoginComponent loginComponent;

    ...
}
请注意,变量 loginComponent 未用 @Inject 注解,因为您不期望该变量由 Dagger 提供。
您可以使用 ApplicationComponent 获取 LoginComponent 的引用,然后按如下方式注入 LoginActivity
Kotlin
class LoginActivity: Activity() {
    // Reference to the Login graph
    lateinit var loginComponent: LoginComponent

    // Fields that need to be injected by the login graph
    @Inject lateinit var loginViewModel: LoginViewModel

    override fun onCreate(savedInstanceState: Bundle?) {
        // Creation of the login graph using the application graph
        loginComponent = (applicationContext as MyDaggerApplication)
                            .appComponent.loginComponent().create()

        // Make Dagger instantiate @Inject fields in LoginActivity
        loginComponent.inject(this)

        // Now loginViewModel is available

        super.onCreate(savedInstanceState)
    }
}
Java
public class LoginActivity extends Activity {

    // Reference to the Login graph
    LoginComponent loginComponent;

    // Fields that need to be injected by the login graph
    @Inject
    LoginViewModel loginViewModel;

    @Override
    protected void onCreate(Bundle savedInstanceState) {
        // Creation of the login graph using the application graph
        loginComponent = ((MyApplication) getApplicationContext())
                                .appComponent.loginComponent().create();

        // Make Dagger instantiate @Inject fields in LoginActivity
        loginComponent.inject(this);

        // Now loginViewModel is available

        super.onCreate(savedInstanceState);
    }
}
LoginComponent 在 Activity 的 onCreate() 方法中创建,当 Activity 被销毁时,它也会被隐式销毁。
LoginComponent 每次请求时都必须提供相同的 LoginViewModel 实例。您可以通过创建一个自定义注解作用域并用它注解 LoginComponent 和 LoginViewModel 来确保这一点。请注意,您不能使用 @Singleton 注解,因为它已被父组件使用,并且会使对象成为应用单例(整个应用的唯一实例)。您需要创建一个不同的注解作用域。
在这种情况下,您本可以将其作用域称为 @LoginScope,但这并不是一个好的做法。作用域注解的名称不应明确其所实现的目的。相反,它应该根据其生命周期来命名,因为注解可以被兄弟组件(如 RegistrationComponent 和 SettingsComponent)重用。这就是为什么您应该将其称为 @ActivityScope 而不是 @LoginScope。
Kotlin
// Definition of a custom scope called ActivityScope
@Scope
@Retention(value = AnnotationRetention.RUNTIME)
annotation class ActivityScope

// Classes annotated with @ActivityScope are scoped to the graph and the same
// instance of that type is provided every time the type is requested.
@ActivityScope
@Subcomponent
interface LoginComponent { ... }

// A unique instance of LoginViewModel is provided in Components
// annotated with @ActivityScope
@ActivityScope
class LoginViewModel @Inject constructor(
    private val userRepository: UserRepository
) { ... }
Java
// Definition of a custom scope called ActivityScope
@Scope
@Retention(RetentionPolicy.RUNTIME)
public @interface ActivityScope {}

// Classes annotated with @ActivityScope are scoped to the graph and the same
// instance of that type is provided every time the type is requested.
@ActivityScope
@Subcomponent
public interface LoginComponent { ... }

// A unique instance of LoginViewModel is provided in Components
// annotated with @ActivityScope
@ActivityScope
public class LoginViewModel {

    private final UserRepository userRepository;

    @Inject
    public LoginViewModel(UserRepository userRepository) {
        this.userRepository = userRepository;
    }
}
现在,如果您有两个 Fragment 都需要 LoginViewModel,那么它们都将获得相同的实例。例如,如果您有一个 LoginUsernameFragment 和一个 LoginPasswordFragment,它们都需要由 LoginComponent 注入
Kotlin
@ActivityScope
@Subcomponent
interface LoginComponent {

    @Subcomponent.Factory
    interface Factory {
        fun create(): LoginComponent
    }

    // All LoginActivity, LoginUsernameFragment and LoginPasswordFragment
    // request injection from LoginComponent. The graph needs to satisfy
    // all the dependencies of the fields those classes are injecting
    fun inject(loginActivity: LoginActivity)
    fun inject(usernameFragment: LoginUsernameFragment)
    fun inject(passwordFragment: LoginPasswordFragment)
}
Java
@ActivityScope
@Subcomponent
public interface LoginComponent {

    @Subcomponent.Factory
    interface Factory {
        LoginComponent create();
    }

    // All LoginActivity, LoginUsernameFragment and LoginPasswordFragment
    // request injection from LoginComponent. The graph needs to satisfy
    // all the dependencies of the fields those classes are injecting
    void inject(LoginActivity loginActivity);
    void inject(LoginUsernameFragment loginUsernameFragment);
    void inject(LoginPasswordFragment loginPasswordFragment);
}
组件访问位于 LoginActivity 对象中的组件实例。LoginUserNameFragment 的示例代码显示在以下代码段中
Kotlin
class LoginUsernameFragment: Fragment() {

    // Fields that need to be injected by the login graph
    @Inject lateinit var loginViewModel: LoginViewModel

    override fun onAttach(context: Context) {
        super.onAttach(context)

        // Obtaining the login graph from LoginActivity and instantiate
        // the @Inject fields with objects from the graph
        (activity as LoginActivity).loginComponent.inject(this)

        // Now you can access loginViewModel here and onCreateView too
        // (shared instance with the Activity and the other Fragment)
    }
}
Java
public class LoginUsernameFragment extends Fragment {

    // Fields that need to be injected by the login graph
    @Inject
    LoginViewModel loginViewModel;

    @Override
    public void onAttach(Context context) {
        super.onAttach(context);

        // Obtaining the login graph from LoginActivity and instantiate
        // the @Inject fields with objects from the graph
        ((LoginActivity) getActivity()).loginComponent.inject(this);

        // Now you can access loginViewModel here and onCreateView too
        // (shared instance with the Activity and the other Fragment)
    }
}
对于 LoginPasswordFragment 也是如此
Kotlin
class LoginPasswordFragment: Fragment() {

    // Fields that need to be injected by the login graph
    @Inject lateinit var loginViewModel: LoginViewModel

    override fun onAttach(context: Context) {
        super.onAttach(context)

        (activity as LoginActivity).loginComponent.inject(this)

        // Now you can access loginViewModel here and onCreateView too
        // (shared instance with the Activity and the other Fragment)
    }
}
Java
public class LoginPasswordFragment extends Fragment {

    // Fields that need to be injected by the login graph
    @Inject
    LoginViewModel loginViewModel;

    @Override
    public void onAttach(Context context) {
        super.onAttach(context);

        ((LoginActivity) getActivity()).loginComponent.inject(this);

        // Now you can access loginViewModel here and onCreateView too
        // (shared instance with the Activity and the other Fragment)
    }
}
图 3 展示了包含新子组件的 Dagger 图。带有白点的类(UserRepository、LoginRetrofitService 和 LoginViewModel)是作用域限定到其各自组件的唯一实例。
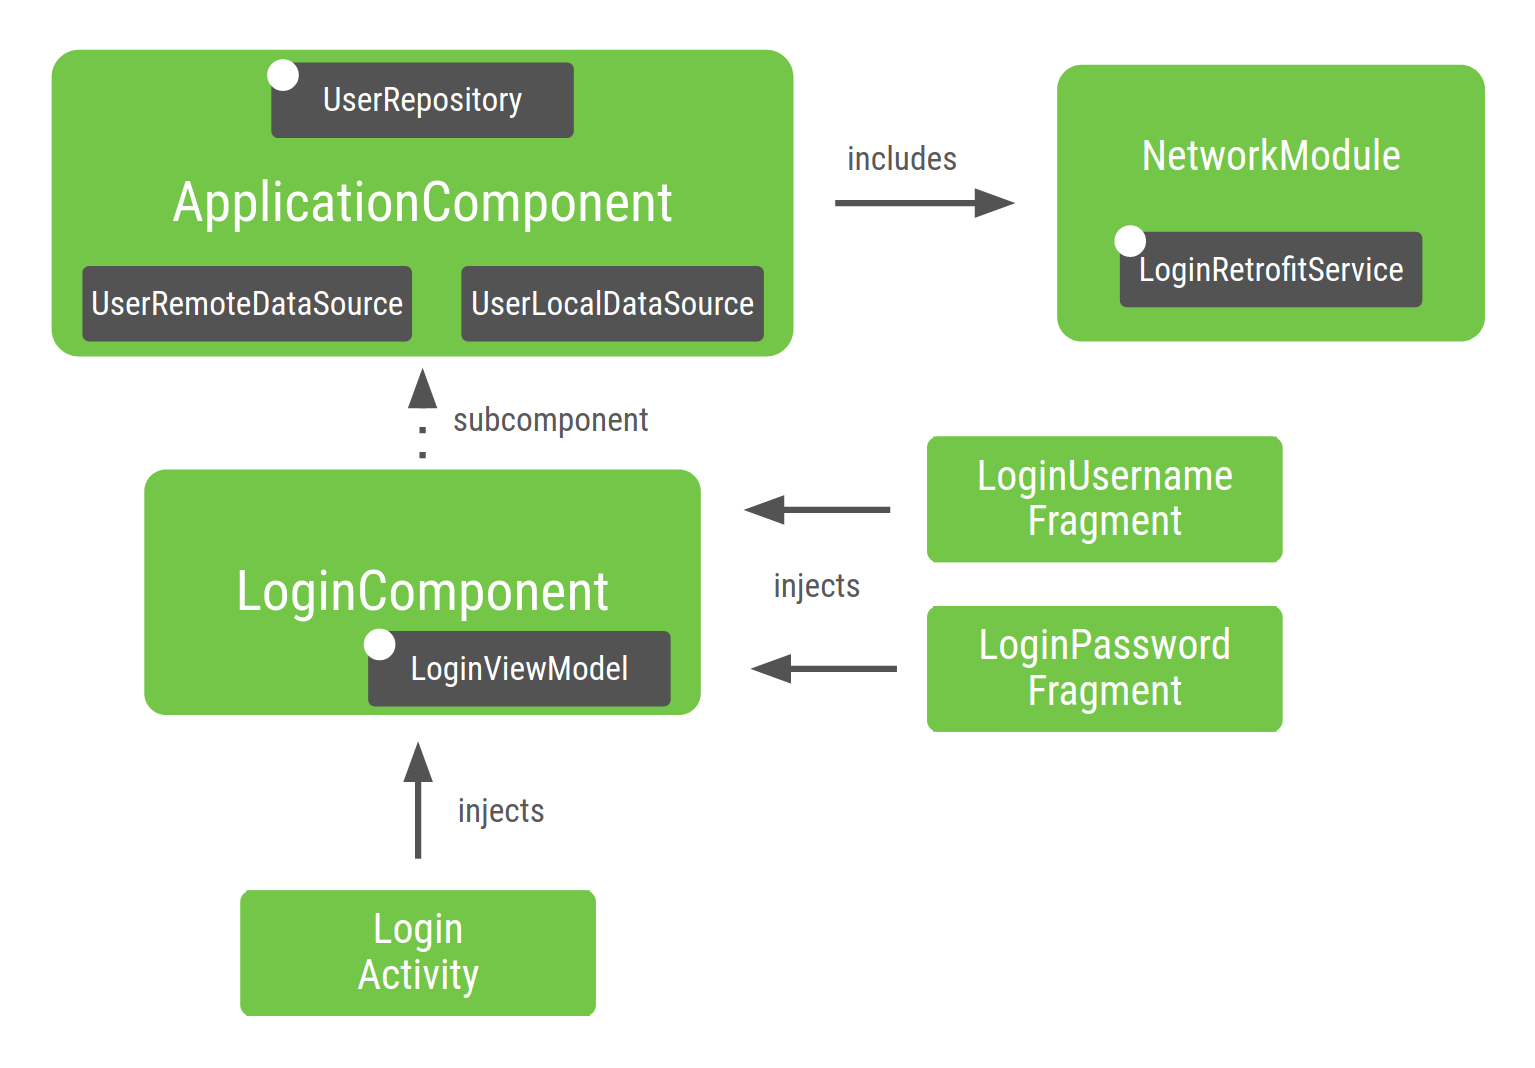
图 3. 您为 Android 应用示例构建的图的表示
让我们分解一下图的各个部分
NetworkModule(以及因此而来的LoginRetrofitService)包含在ApplicationComponent中,因为您在组件中指定了它。UserRepository仍保留在ApplicationComponent中,因为它的作用域限定为ApplicationComponent。如果项目增长,您希望在不同的功能(例如注册)之间共享相同的实例。由于
UserRepository是ApplicationComponent的一部分,因此其依赖项(即UserLocalDataSource和UserRemoteDataSource)也需要在此组件中,以便能够提供UserRepository的实例。LoginViewModel包含在LoginComponent中,因为它仅由LoginComponent注入的类所需。LoginViewModel未包含在ApplicationComponent中,因为ApplicationComponent中的任何依赖项都不需要LoginViewModel。同样,如果您没有将
UserRepository的作用域限定为ApplicationComponent,Dagger 将自动将UserRepository及其依赖项作为LoginComponent的一部分,因为目前UserRepository仅在此处使用。
除了将对象作用域限定为不同的生命周期外,创建子组件是将应用程序的不同部分相互封装的良好实践。
根据您的应用流程构建您的应用以创建不同的 Dagger 子图,有助于实现更高性能和可扩展的应用,无论是在内存还是启动时间方面。
构建 Dagger 图时的最佳实践
构建应用的 Dagger 图时
创建组件时,您应该考虑哪个元素负责该组件的生命周期。在本例中,
Application类负责ApplicationComponent,而LoginActivity负责LoginComponent。仅在有意义时使用作用域。过度使用作用域可能会对应用运行时性能产生负面影响:只要组件在内存中,对象就会在内存中,并且获取作用域对象成本更高。当 Dagger 提供对象时,它会使用
DoubleCheck锁定而不是工厂类型提供程序。
测试使用 Dagger 的项目
使用 Dagger 等依赖注入框架的好处之一是它使测试代码变得更容易。
单元测试
您不必为 单元测试 使用 Dagger。当测试一个使用构造函数注入的类时,您不需要使用 Dagger 来实例化该类。您可以直接调用其构造函数,直接传入伪造或模拟依赖项,就像它们没有被注解一样。
例如,在测试 LoginViewModel 时
Kotlin
@ActivityScope
class LoginViewModel @Inject constructor(
    private val userRepository: UserRepository
) { ... }

class LoginViewModelTest {

    @Test
    fun `Happy path`() {
        // You don't need Dagger to create an instance of LoginViewModel
        // You can pass a fake or mock UserRepository
        val viewModel = LoginViewModel(fakeUserRepository)
        assertEquals(...)
    }
}
Java
@ActivityScope
public class LoginViewModel {

    private final UserRepository userRepository;

    @Inject
    public LoginViewModel(UserRepository userRepository) {
        this.userRepository = userRepository;
    }
}

public class LoginViewModelTest {

    @Test
    public void happyPath() {
        // You don't need Dagger to create an instance of LoginViewModel
        // You can pass a fake or mock UserRepository
        LoginViewModel viewModel = new LoginViewModel(fakeUserRepository);
        assertEquals(...);
    }
}
端到端测试
对于 集成测试,一个好的做法是创建一个用于测试的 TestApplicationComponent。生产和测试使用不同的组件配置。
这需要在应用中进行更多前期模块设计。测试组件扩展生产组件并安装一组不同的模块。
Kotlin
// TestApplicationComponent extends from ApplicationComponent to have them both
// with the same interface methods. You need to include the modules of the
// component here as well, and you can replace the ones you want to override.
// This sample uses FakeNetworkModule instead of NetworkModule
@Singleton
@Component(modules = [FakeNetworkModule::class, SubcomponentsModule::class])
interface TestApplicationComponent : ApplicationComponent {
}
Java
// TestApplicationComponent extends from ApplicationComponent to have them both
// with the same interface methods. You need to include the modules of the
// Component here as well, and you can replace the ones you want to override.
// This sample uses FakeNetworkModule instead of NetworkModule
@Singleton
@Component(modules = {FakeNetworkModule.class, SubcomponentsModule.class})
public interface TestApplicationComponent extends ApplicationComponent {
}
FakeNetworkModule 具有原始 NetworkModule 的伪实现。您可以在其中提供您想要替换的任何内容的伪实例或模拟。
Kotlin
// In the FakeNetworkModule, pass a fake implementation of LoginRetrofitService
// that you can use in your tests.
@Module
class FakeNetworkModule {
    @Provides
    fun provideLoginRetrofitService(): LoginRetrofitService {
        return FakeLoginService()
    }
}
Java
// In the FakeNetworkModule, pass a fake implementation of LoginRetrofitService
// that you can use in your tests.
@Module
public class FakeNetworkModule {

    @Provides
    public LoginRetrofitService provideLoginRetrofitService() {
        return new FakeLoginService();
    }
}
在您的集成测试或端到端测试中,您将使用一个创建 TestApplicationComponent 而不是 ApplicationComponent 的 TestApplication。
Kotlin
// Your test application needs an instance of the test graph
class MyTestApplication: MyApplication() {
    override val appComponent = DaggerTestApplicationComponent.create()
}
Java
// Your test application needs an instance of the test graph
public class MyTestApplication extends MyApplication {
    ApplicationComponent appComponent = DaggerTestApplicationComponent.create();
}
然后,此测试应用将用于自定义 TestRunner 中,您将使用它来运行插桩测试。有关此内容的更多信息,请查看在 Android 应用中使用 Dagger 动手实验。
使用 Dagger 模块
Dagger 模块是一种以语义方式封装如何提供对象的方法。您可以在组件中包含模块,也可以在其他模块中包含模块。这功能强大,但也容易被误用。
一旦模块已添加到组件或其他模块中,它就已存在于 Dagger 图中;Dagger 可以在该组件中提供这些对象。在添加模块之前,请通过检查它是否已添加到组件中,或者通过编译项目并查看 Dagger 是否可以找到该模块所需的依赖项,来检查该模块是否已是 Dagger 图的一部分。
良好实践要求模块在组件中只声明一次(特定高级 Dagger 用例除外)。
假设您以这种方式配置了您的图。ApplicationComponent 包含 Module1 和 Module2,并且 Module1 包含 ModuleX。
Kotlin
@Component(modules = [Module1::class, Module2::class])
interface ApplicationComponent { ... }

@Module(includes = [ModuleX::class])
class Module1 { ... }

@Module
class Module2 { ... }
Java
@Component(modules = {Module1.class, Module2.class})
public interface ApplicationComponent { ... }

@Module(includes = {ModuleX.class})
public class Module1 { ... }

@Module
public class Module2 { ... }
如果现在 Module2 依赖于 ModuleX 提供的类。将 ModuleX 包含在 Module2 中是一种不良实践,因为 ModuleX 在图中被包含两次,如以下代码片段所示
Kotlin
// Bad practice: ModuleX is declared multiple times in this Dagger graph
@Component(modules = [Module1::class, Module2::class])
interface ApplicationComponent { ... }

@Module(includes = [ModuleX::class])
class Module1 { ... }

@Module(includes = [ModuleX::class])
class Module2 { ... }
Java
// Bad practice: ModuleX is declared multiple times in this Dagger graph.
@Component(modules = {Module1.class, Module2.class})
public interface ApplicationComponent { ... }

@Module(includes = ModuleX.class)
public class Module1 { ... }

@Module(includes = ModuleX.class)
public class Module2 { ... }
相反,您应该执行以下操作之一
- 重构模块并将公共模块提取到组件中。
- 创建一个包含两个模块共享的对象的全新模块,并将其提取到组件中。
不以这种方式重构会导致许多模块相互包含,而没有明确的组织结构,从而更难看出每个依赖项的来源。
良好实践(选项 1):ModuleX 在 Dagger 图中只声明一次。
Kotlin
@Component(modules = [Module1::class, Module2::class, ModuleX::class])
interface ApplicationComponent { ... }

@Module
class Module1 { ... }

@Module
class Module2 { ... }
Java
@Component(modules = {Module1.class, Module2.class, ModuleX.class})
public interface ApplicationComponent { ... }

@Module
public class Module1 { ... }

@Module
public class Module2 { ... }
良好实践(选项 2):将 Module1 和 Module2 在 ModuleX 中的共同依赖项提取到一个名为 ModuleXCommon 的新模块中,并将其包含在组件中。然后创建另外两个名为 ModuleXWithModule1Dependencies 和 ModuleXWithModule2Dependencies 的模块,其中包含每个模块特有的依赖项。所有模块都在 Dagger 图中只声明一次。
Kotlin
@Component(modules = [Module1::class, Module2::class, ModuleXCommon::class])
interface ApplicationComponent { ... }

@Module
class ModuleXCommon { ... }

@Module
class ModuleXWithModule1SpecificDependencies { ... }

@Module
class ModuleXWithModule2SpecificDependencies { ... }

@Module(includes = [ModuleXWithModule1SpecificDependencies::class])
class Module1 { ... }

@Module(includes = [ModuleXWithModule2SpecificDependencies::class])
class Module2 { ... }
Java
@Component(modules = {Module1.class, Module2.class, ModuleXCommon.class})
public interface ApplicationComponent { ... }

@Module
public class ModuleXCommon { ... }

@Module
public class ModuleXWithModule1SpecificDependencies { ... }

@Module
public class ModuleXWithModule2SpecificDependencies { ... }

@Module(includes = ModuleXWithModule1SpecificDependencies.class)
public class Module1 { ... }

@Module(includes = ModuleXWithModule2SpecificDependencies.class)
public class Module2 { ... }
辅助注入
辅助注入是一种 DI 模式,用于构造对象,其中一些参数可由 DI 框架提供,而另一些参数必须由用户在创建时传入。
在 Android 中,此模式在 详情 屏幕中很常见,其中要显示的元素的 ID 仅在运行时才可知,而不是在 Dagger 生成 DI 图的编译时已知。要详细了解 Dagger 的辅助注入,请参阅 Dagger 文档。
总结
如果您还没有,请查看最佳实践部分。要了解如何在 Android 应用中使用 Dagger,请参阅在 Android 应用中使用 Dagger 动手实验。