
响应式界面和导航
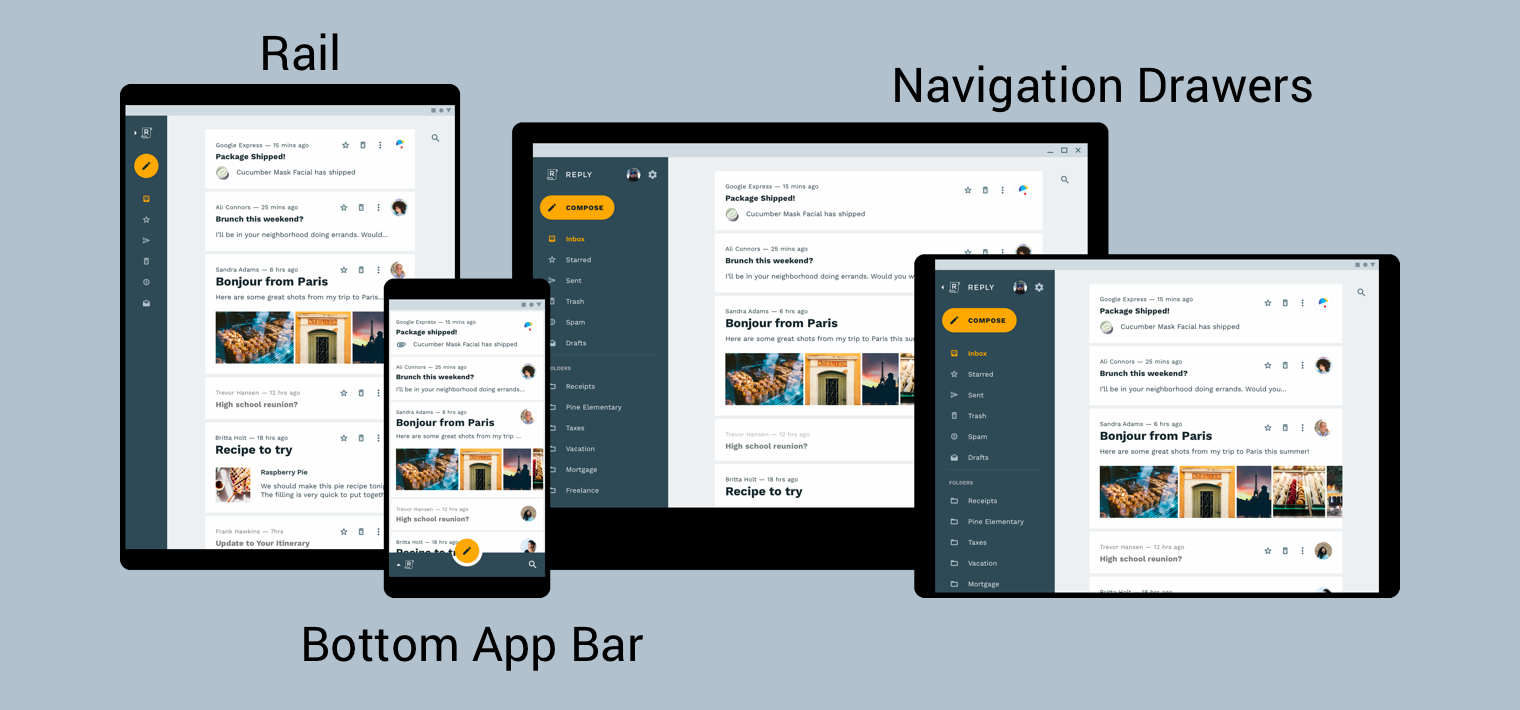
为了向用户提供最佳导航体验,您应该提供一个根据用户设备的宽度、高度和最小宽度定制的导航界面。您可以考虑使用底部应用栏、常驻或可折叠的导航抽屉式菜单、侧边导航栏,或者根据可用的屏幕空间和您应用的独特风格,采用全新的设计。
Material Design 产品架构指南提供了构建响应式界面的更多背景信息和注意事项,响应式界面是指能够动态适应环境变化的界面。环境变化的一些例子包括宽度、高度、方向和用户语言偏好的调整。这些环境属性统称为设备的配置。
当这些属性中的一个或多个在运行时发生变化时,Android 操作系统会通过销毁然后重新创建您应用的 activity 和 fragment 来响应。因此,为了在 Android 上支持响应式界面,您能做的最好的事情是确保在适当的地方使用资源配置限定符,并避免使用硬编码的布局大小。
在响应式界面中实现全局导航
在响应式界面中实现全局导航首先从承载导航图的 Activity 开始。有关实践示例,请查看导航 Codelab。该 Codelab 使用 NavigationView 来显示导航菜单,如图 2 所示。当在渲染宽度至少为 960dp 的设备上运行时,此 NavigationView 始终显示在屏幕上。
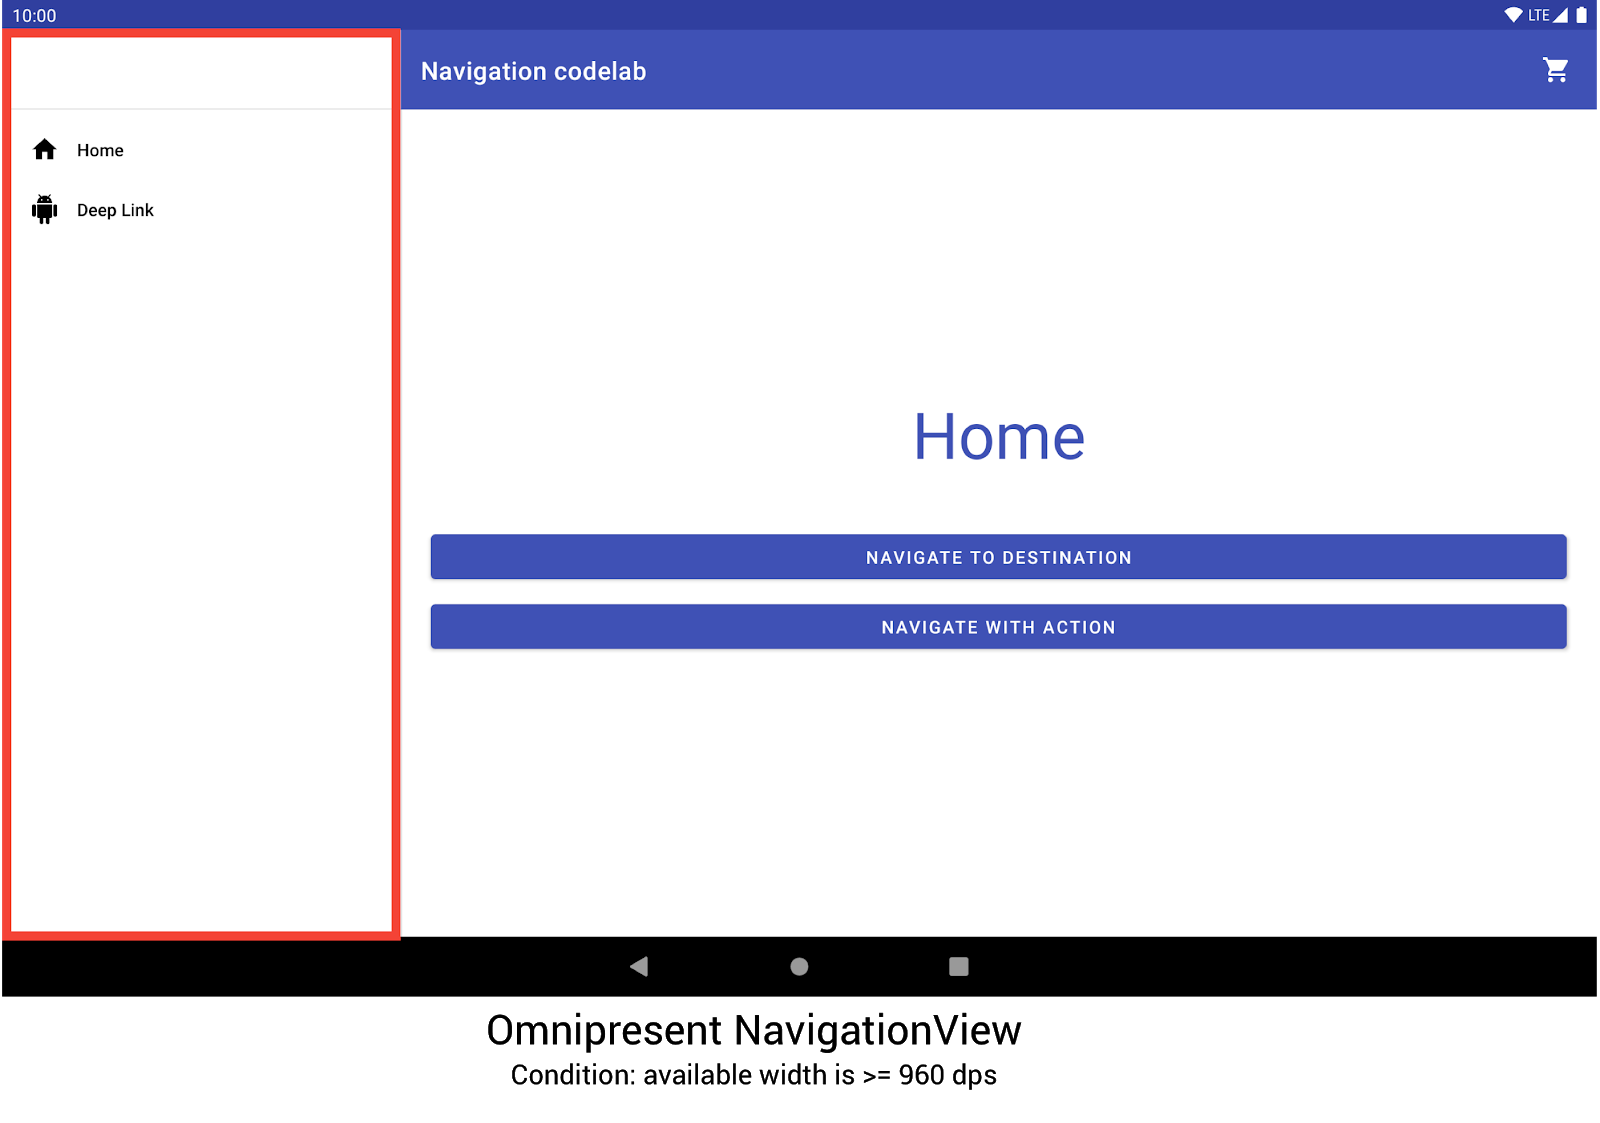
NavigationView 显示导航菜单。其他设备尺寸和方向会根据需要动态切换 DrawerLayout 或 BottomNavigationView。
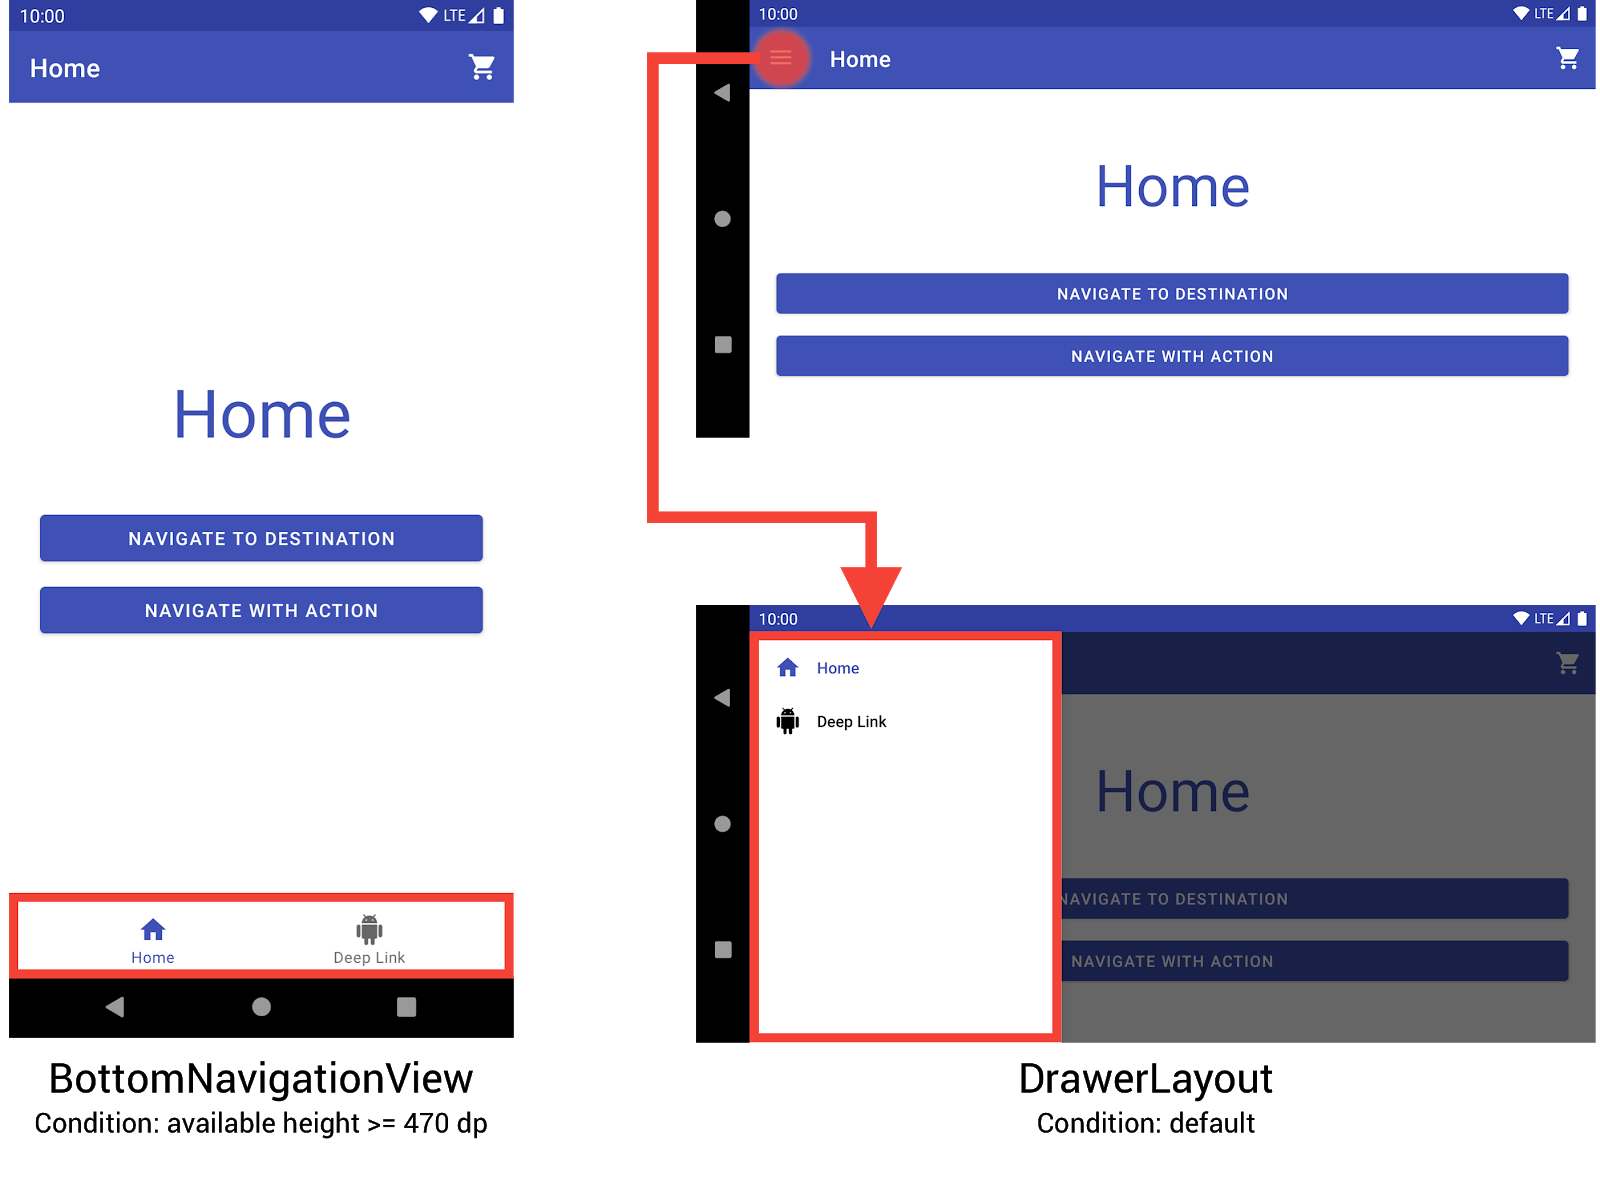
BottomNavigationView 和 DrawerLayout 在较小设备上显示导航菜单。您可以通过创建三个不同的布局来实现此行为,其中每个布局根据当前设备配置定义所需的导航元素和视图层次结构。
每个布局所应用的配置由布局文件所在的目录结构决定。例如,NavigationView 布局文件位于 res/layout-w960dp 目录中。
<!-- res/layout-w960dp/navigation_activity.xml -->
<RelativeLayout
   xmlns:android="http://schemas.android.com/apk/res/android"
   xmlns:app="http://schemas.android.com/apk/res-auto"
   xmlns:tools="http://schemas.android.com/tools"
   android:layout_width="match_parent"
   android:layout_height="match_parent"
   tools:context="com.example.android.codelabs.navigation.MainActivity">

   <com.google.android.material.navigation.NavigationView
       android:id="@+id/nav_view"
       android:layout_width="wrap_content"
       android:layout_height="match_parent"
       android:layout_alignParentStart="true"
       app:elevation="0dp"
       app:headerLayout="@layout/nav_view_header"
       app:menu="@menu/nav_drawer_menu" />

   <View
       android:layout_width="1dp"
       android:layout_height="match_parent"
       android:layout_toEndOf="@id/nav_view"
       android:background="?android:attr/listDivider" />

   <androidx.appcompat.widget.Toolbar
       android:id="@+id/toolbar"
       android:layout_width="match_parent"
       android:layout_height="wrap_content"
       android:layout_alignParentTop="true"
       android:layout_toEndOf="@id/nav_view"
       android:background="@color/colorPrimary"
       android:theme="@style/ThemeOverlay.MaterialComponents.Dark.ActionBar" />

   <androidx.fragment.app.FragmentContainerView
       android:id="@+id/my_nav_host_fragment"
       android:name="androidx.navigation.fragment.NavHostFragment"
       android:layout_width="match_parent"
       android:layout_height="match_parent"
       android:layout_below="@id/toolbar"
       android:layout_toEndOf="@id/nav_view"
       app:defaultNavHost="true"
       app:navGraph="@navigation/mobile_navigation" />
</RelativeLayout>
底部导航视图位于 res/layout-h470dp 目录中
<!-- res/layout-h470dp/navigation_activity.xml -->
<LinearLayout
   xmlns:android="http://schemas.android.com/apk/res/android"
   xmlns:app="http://schemas.android.com/apk/res-auto"
   xmlns:tools="http://schemas.android.com/tools"
   android:layout_width="match_parent"
   android:layout_height="match_parent"
   android:orientation="vertical"
   tools:context="com.example.android.codelabs.navigation.MainActivity">

   <androidx.appcompat.widget.Toolbar
       android:id="@+id/toolbar"
       android:layout_width="match_parent"
       android:layout_height="wrap_content"
       android:background="@color/colorPrimary"
       android:theme="@style/ThemeOverlay.MaterialComponents.Dark.ActionBar" />

   <androidx.fragment.app.FragmentContainerView
       android:id="@+id/my_nav_host_fragment"
       android:name="androidx.navigation.fragment.NavHostFragment"
       android:layout_width="match_parent"
       android:layout_height="0dp"
       android:layout_weight="1"
       app:defaultNavHost="true"
       app:navGraph="@navigation/mobile_navigation" />

   <com.google.android.material.bottomnavigation.BottomNavigationView
       android:id="@+id/bottom_nav_view"
       android:layout_width="match_parent"
       android:layout_height="wrap_content"
       app:menu="@menu/bottom_nav_menu" />
</LinearLayout>
抽屉式布局位于 res/layout 目录中。此目录用于没有特定配置限定符的默认布局
<!-- res/layout/navigation_activity.xml -->
<androidx.drawerlayout.widget.DrawerLayout
   xmlns:android="http://schemas.android.com/apk/res/android"
   xmlns:app="http://schemas.android.com/apk/res-auto"
   xmlns:tools="http://schemas.android.com/tools"
   android:id="@+id/drawer_layout"
   android:layout_width="match_parent"
   android:layout_height="match_parent"
   tools:context="com.example.android.codelabs.navigation.MainActivity">

   <LinearLayout
       android:layout_width="match_parent"
       android:layout_height="match_parent"
       android:orientation="vertical">

       <androidx.appcompat.widget.Toolbar
           android:id="@+id/toolbar"
           android:layout_width="match_parent"
           android:layout_height="wrap_content"
           android:background="@color/colorPrimary"
           android:theme="@style/ThemeOverlay.MaterialComponents.Dark.ActionBar" />

       <androidx.fragment.app.FragmentContainerView
           android:id="@+id/my_nav_host_fragment"
           android:name="androidx.navigation.fragment.NavHostFragment"
           android:layout_width="match_parent"
           android:layout_height="match_parent"
           app:defaultNavHost="true"
           app:navGraph="@navigation/mobile_navigation" />
   </LinearLayout>

   <com.google.android.material.navigation.NavigationView
       android:id="@+id/nav_view"
       android:layout_width="wrap_content"
       android:layout_height="match_parent"
       android:layout_gravity="start"
       app:menu="@menu/nav_drawer_menu" />
</androidx.drawerlayout.widget.DrawerLayout>
Android 在确定应用哪些资源时遵循优先级顺序。具体到这个例子,-w960dp(或可用宽度 >= 960dp)优先于 -h470dp(或可用高度 >= 470)。如果设备配置不匹配这些条件中的任何一个,则使用默认布局资源(res/layout/navigation_activity.xml)。
在处理导航事件时,您只需要连接与当前存在的微件相对应的事件,如下例所示。
Kotlin
class MainActivity : AppCompatActivity() {

   private lateinit var appBarConfiguration : AppBarConfiguration

   override fun onCreate(savedInstanceState: Bundle?) {
      super.onCreate(savedInstanceState)
      setContentView(R.layout.navigation_activity)
      val drawerLayout : DrawerLayout? = findViewById(R.id.drawer_layout)
      appBarConfiguration = AppBarConfiguration(
                  setOf(R.id.home_dest, R.id.deeplink_dest),
                  drawerLayout)

      ...

      // Initialize the app bar with the navigation drawer if present.
      // If the drawerLayout is not null here, a Navigation button will be added
      // to the app bar whenever the user is on a top-level destination.
      setupActionBarWithNavController(navController, appBarConfig)

      // Initialize the NavigationView if it is present,
      // so that clicking an item takes
      // the user to the appropriate destination.
      val sideNavView = findViewById<NavigationView>(R.id.nav_view)
      sideNavView?.setupWithNavController(navController)

      // Initialize the BottomNavigationView if it is present,
      // so that clicking an item takes
      // the user to the appropriate destination.
      val bottomNav = findViewById<BottomNavigationView>(R.id.bottom_nav_view)
      bottomNav?.setupWithNavController(navController)

      ...
    }

    ...
}
Java
public class MainActivity extends AppCompatActivity {

   private AppBarConfiguration appBarConfiguration;

   @Override
   protected void onCreate(@Nullable Bundle savedInstanceState) {
       super.onCreate(savedInstanceState);
       setContentView(R.layout.navigation_activity);
       NavHostFragment host = (NavHostFragment) getSupportFragmentManager()
               .findFragmentById(R.id.my_nav_host_fragment);
       NavController navController = host.getNavController();

       DrawerLayout drawerLayout = findViewById(R.id.drawer_layout);
       appBarConfiguration = new AppBarConfiguration.Builder(
               R.id.home_dest, R.id.deeplink_dest)
               .setDrawerLayout(drawerLayout)
               .build();

       // Initialize the app bar with the navigation drawer if present.
       // If the drawerLayout is not null here, a Navigation button will be added to
       // the app bar whenever the user is on a top-level destination.
       NavigationUI.setupActionBarWithNavController(
               this, navController, appBarConfiguration);


       // Initialize the NavigationView if it is present,
       // so that clicking an item takes
       // the user to the appropriate destination.
       NavigationView sideNavView = findViewById(R.id.nav_view);
       if(sideNavView != null) {
           NavigationUI.setupWithNavController(sideNavView, navController);
       }

       // Initialize the BottomNavigationView if it is present,
       // so that clicking an item takes
       // the user to the appropriate destination.
       BottomNavigationView bottomNav = findViewById(R.id.bottom_nav_view);
       if(bottomNav != null) {
           NavigationUI.setupWithNavController(bottomNav, navController);
       }

   }
}
如果设备配置发生变化,除非明确另行配置,否则 Android 会销毁旧配置中的 activity 及其关联的视图。然后,它会使用为新配置设计的资源重新创建 activity。被销毁并重新创建的 activity 会在 onCreate() 中自动连接正确的全局导航元素。
考虑分屏布局的替代方案
分屏布局,或称主/详情布局,曾是设计平板电脑及其他大屏设备的流行且推荐的方式。
自 Android 平板电脑推出以来,设备生态系统迅速发展。极大地影响大屏设备设计空间的一个因素是多窗口模式的引入,特别是完全可调整大小的自由形式窗口,例如 ChromeOS 设备上的窗口。这使得应用中的每个屏幕都必须具有响应性,而不是根据屏幕尺寸改变导航结构,这一点变得尤为重要。
虽然可以使用导航库实现分屏布局界面,但您应该考虑其他替代方案。
目标名称
如果您在图中使用 android:label 属性提供目标名称,请务必始终使用资源值,以便您的内容仍可本地化。
<navigation ...>
    <fragment
        android:id="@+id/my_dest"
        android:name="com.example.MyFragment"
        android:label="@string/my_dest_label"
        tools:layout="@layout/my_fragment" />
    ...
使用资源值,无论您的配置何时更改,您的目标都会自动应用最合适的资源。