自动填充服务是一种应用,它通过将数据注入其他应用的视图中,使用户更轻松地填写表单。自动填充服务还可以从应用视图中检索用户数据,并存储起来供以后使用。自动填充服务通常由管理用户数据的应用(例如密码管理器)提供。
借助 Android 8.0(API 级别 26)及更高版本中提供的自动填充框架,Android 使填写表单变得更加容易。用户只有在其设备上提供了自动填充服务的应用时,才能利用自动填充功能。
本页面介绍了如何在您的应用中实现自动填充服务。如果您正在寻找如何实现服务的代码示例,请参阅 Java 或 Kotlin 中的 AutofillFramework 示例。有关自动填充服务如何工作的更多详细信息,请参阅 AutofillService 和 AutofillManager 类的参考页面。
清单声明和权限
提供自动填充服务的应用必须包含描述服务实现的声明。要指定声明,请在应用清单中包含一个 <service> 元素。<service> 元素必须包含以下属性和元素
android:name属性,指向应用中实现服务的AutofillService子类。android:permission属性,声明BIND_AUTOFILL_SERVICE权限。<intent-filter>元素,其强制子元素<action>指定android.service.autofill.AutofillService操作。- 可选的
<meta-data>元素,您可以使用它为服务提供额外的配置参数。
以下示例显示了自动填充服务声明
<service
    android:name=".MyAutofillService"
    android:label="My Autofill Service"
    android:permission="android.permission.BIND_AUTOFILL_SERVICE">
    <intent-filter>
        <action android:name="android.service.autofill.AutofillService" />
    </intent-filter>
    <meta-data
        android:name="android.autofill"
        android:resource="@xml/service_configuration" />
</service>
<meta-data> 元素包含一个 android:resource 属性,指向一个 XML 资源,其中包含有关服务的更多详细信息。上一个示例中的 service_configuration 资源指定了一个允许用户配置服务的 Activity。以下示例显示了 service_configuration XML 资源
<autofill-service
  xmlns:android="http://schemas.android.com/apk/res/android"
  android:settingsActivity="com.example.android.SettingsActivity" />
有关 XML 资源的更多信息,请参阅应用资源概览。
提示启用服务
应用声明 BIND_AUTOFILL_SERVICE 权限并在用户在设备设置中启用后,即可用作自动填充服务。应用可以通过调用 AutofillManager 类的 hasEnabledAutofillServices() 方法来验证它是否是当前启用的服务。
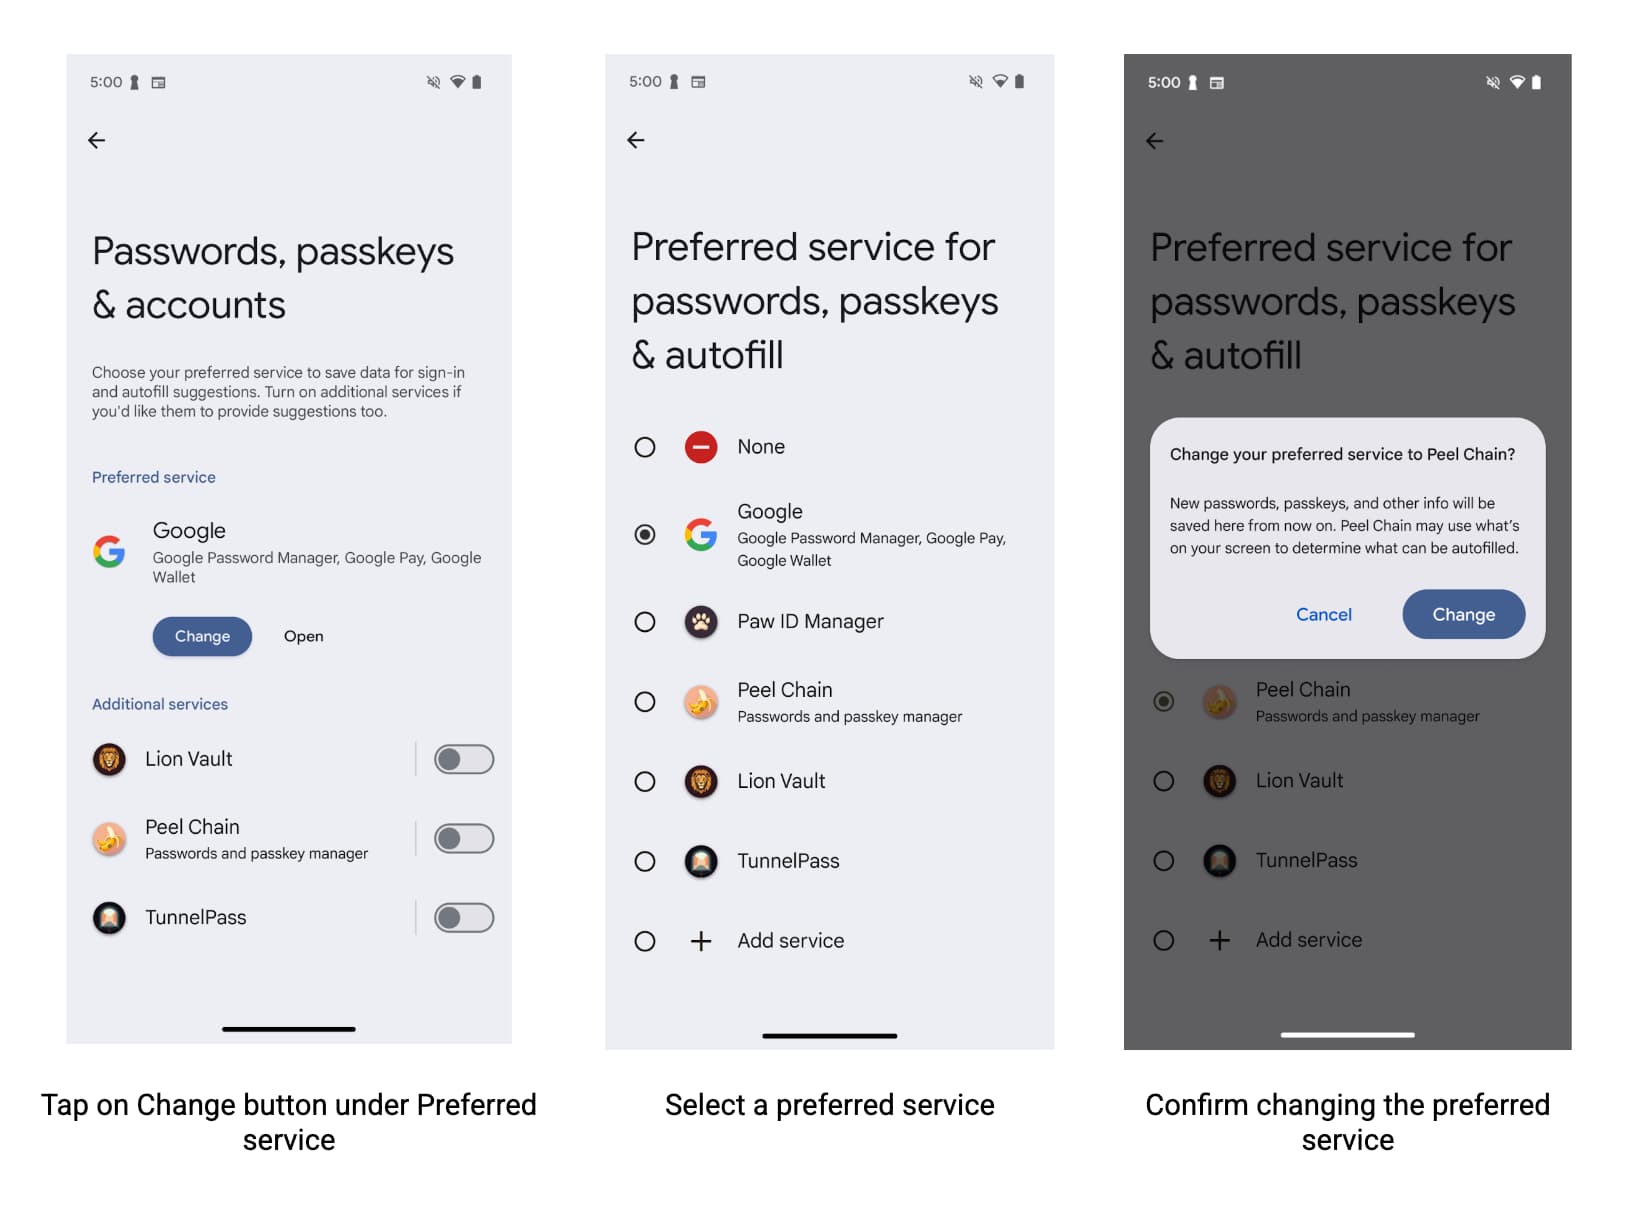
如果应用不是当前自动填充服务,则可以使用 ACTION_REQUEST_SET_AUTOFILL_SERVICE Intent 请求用户更改自动填充设置。如果用户选择与调用者包匹配的自动填充服务,则该 Intent 返回 RESULT_OK 值。
填充客户端视图
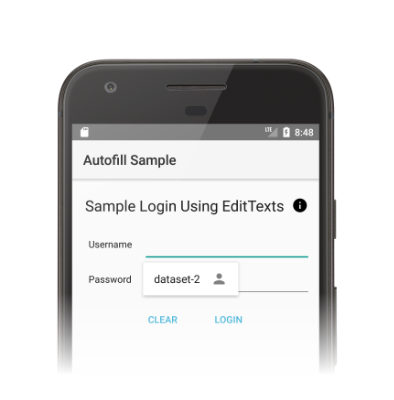
当用户与其他应用交互时,自动填充服务会收到填充客户端视图的请求。如果自动填充服务拥有满足请求的用户数据,则会在响应中发送数据。Android 系统会显示包含可用数据的自动填充 UI,如图 1 所示

图 1. 显示数据集的自动填充 UI。
自动填充框架定义了一个填充视图的工作流程,旨在最大限度地缩短 Android 系统绑定到自动填充服务的时间。在每个请求中,Android 系统通过调用 onFillRequest() 方法,向服务发送一个 AssistStructure 对象。
自动填充服务检查它是否可以使用先前存储的用户数据满足请求。如果可以满足请求,则服务将数据打包到 Dataset 对象中。服务调用 onSuccess() 方法,传递一个包含 Dataset 对象的 FillResponse 对象。如果服务没有数据来满足请求,则将 null 传递给 onSuccess() 方法。
如果在处理请求时出错,服务会改为调用 onFailure() 方法。有关工作流程的详细说明,请参阅AutofillService 参考页面上的描述。
以下代码显示了 onFillRequest() 方法的示例
Kotlin
override fun onFillRequest(
    request: FillRequest,
    cancellationSignal: CancellationSignal,
    callback: FillCallback
) {
    // Get the structure from the request
    val context: List<FillContext> = request.fillContexts
    val structure: AssistStructure = context[context.size - 1].structure

    // Traverse the structure looking for nodes to fill out
    val parsedStructure: ParsedStructure = parseStructure(structure)

    // Fetch user data that matches the fields
    val (username: String, password: String) = fetchUserData(parsedStructure)

    // Build the presentation of the datasets
    val usernamePresentation = RemoteViews(packageName, android.R.layout.simple_list_item_1)
    usernamePresentation.setTextViewText(android.R.id.text1, "my_username")
    val passwordPresentation = RemoteViews(packageName, android.R.layout.simple_list_item_1)
    passwordPresentation.setTextViewText(android.R.id.text1, "Password for my_username")

    // Add a dataset to the response
    val fillResponse: FillResponse = FillResponse.Builder()
            .addDataset(Dataset.Builder()
                    .setValue(
                            parsedStructure.usernameId,
                            AutofillValue.forText(username),
                            usernamePresentation
                    )
                    .setValue(
                            parsedStructure.passwordId,
                            AutofillValue.forText(password),
                            passwordPresentation
                    )
                    .build())
            .build()

    // If there are no errors, call onSuccess() and pass the response
    callback.onSuccess(fillResponse)
}

data class ParsedStructure(var usernameId: AutofillId, var passwordId: AutofillId)

data class UserData(var username: String, var password: String)
Java
@Override
public void onFillRequest(FillRequest request, CancellationSignal cancellationSignal, FillCallback callback) {
    // Get the structure from the request
    List<FillContext> context = request.getFillContexts();
    AssistStructure structure = context.get(context.size() - 1).getStructure();

    // Traverse the structure looking for nodes to fill out
    ParsedStructure parsedStructure = parseStructure(structure);

    // Fetch user data that matches the fields
    UserData userData = fetchUserData(parsedStructure);

    // Build the presentation of the datasets
    RemoteViews usernamePresentation = new RemoteViews(getPackageName(), android.R.layout.simple_list_item_1);
    usernamePresentation.setTextViewText(android.R.id.text1, "my_username");
    RemoteViews passwordPresentation = new RemoteViews(getPackageName(), android.R.layout.simple_list_item_1);
    passwordPresentation.setTextViewText(android.R.id.text1, "Password for my_username");

    // Add a dataset to the response
    FillResponse fillResponse = new FillResponse.Builder()
            .addDataset(new Dataset.Builder()
                    .setValue(parsedStructure.usernameId,
                            AutofillValue.forText(userData.username), usernamePresentation)
                    .setValue(parsedStructure.passwordId,
                            AutofillValue.forText(userData.password), passwordPresentation)
                    .build())
            .build();

    // If there are no errors, call onSuccess() and pass the response
    callback.onSuccess(fillResponse);
}

class ParsedStructure {
    AutofillId usernameId;
    AutofillId passwordId;
}

class UserData {
    String username;
    String password;
}
一个服务可以有多个满足请求的数据集。在这种情况下,Android 系统在自动填充 UI 中显示多个选项——每个数据集一个选项。以下代码示例显示了如何在响应中提供多个数据集
Kotlin
// Add multiple datasets to the response
val fillResponse: FillResponse = FillResponse.Builder()
        .addDataset(Dataset.Builder()
                .setValue(parsedStructure.usernameId,
                        AutofillValue.forText(user1Data.username), username1Presentation)
                .setValue(parsedStructure.passwordId,
                        AutofillValue.forText(user1Data.password), password1Presentation)
                .build())
        .addDataset(Dataset.Builder()
                .setValue(parsedStructure.usernameId,
                        AutofillValue.forText(user2Data.username), username2Presentation)
                .setValue(parsedStructure.passwordId,
                        AutofillValue.forText(user2Data.password), password2Presentation)
                .build())
        .build()
Java
// Add multiple datasets to the response
FillResponse fillResponse = new FillResponse.Builder()
        .addDataset(new Dataset.Builder()
                .setValue(parsedStructure.usernameId,
                        AutofillValue.forText(user1Data.username), username1Presentation)
                .setValue(parsedStructure.passwordId,
                        AutofillValue.forText(user1Data.password), password1Presentation)
                .build())
        .addDataset(new Dataset.Builder()
                .setValue(parsedStructure.usernameId,
                        AutofillValue.forText(user2Data.username), username2Presentation)
                .setValue(parsedStructure.passwordId,
                        AutofillValue.forText(user2Data.password), password2Presentation)
                .build())
        .build();
自动填充服务可以导航 AssistStructure 中的 ViewNode 对象,以检索满足请求所需的自动填充数据。服务可以使用 ViewNode 类的方法(例如 getAutofillId())来检索自动填充数据。
服务必须能够描述视图的内容,以检查是否可以满足请求。使用 autofillHints 属性是服务必须用于描述视图内容的第一种方法。但是,客户端应用必须在其视图中明确提供该属性,然后服务才能使用它。
如果客户端应用未提供 autofillHints 属性,则服务必须使用其自己的启发式方法来描述内容。服务可以使用其他类的方法(例如 getText() 或 getHint())来获取有关视图内容的信息。更多信息,请参阅为自动填充提供提示。
以下示例展示了如何遍历 AssistStructure 并从 ViewNode 对象中检索自动填充数据
Kotlin
fun traverseStructure(structure: AssistStructure) {
    val windowNodes: List<AssistStructure.WindowNode> =
            structure.run {
                (0 until windowNodeCount).map { getWindowNodeAt(it) }
            }

    windowNodes.forEach { windowNode: AssistStructure.WindowNode ->
        val viewNode: ViewNode? = windowNode.rootViewNode
        traverseNode(viewNode)
    }
}

fun traverseNode(viewNode: ViewNode?) {
    if (viewNode?.autofillHints?.isNotEmpty() == true) {
        // If the client app provides autofill hints, you can obtain them using
        // viewNode.getAutofillHints();
    } else {
        // Or use your own heuristics to describe the contents of a view
        // using methods such as getText() or getHint()
    }

    val children: List<ViewNode>? =
            viewNode?.run {
                (0 until childCount).map { getChildAt(it) }
            }

    children?.forEach { childNode: ViewNode ->
        traverseNode(childNode)
    }
}
Java
public void traverseStructure(AssistStructure structure) {
    int nodes = structure.getWindowNodeCount();

    for (int i = 0; i < nodes; i++) {
        WindowNode windowNode = structure.getWindowNodeAt(i);
        ViewNode viewNode = windowNode.getRootViewNode();
        traverseNode(viewNode);
    }
}

public void traverseNode(ViewNode viewNode) {
    if(viewNode.getAutofillHints() != null && viewNode.getAutofillHints().length > 0) {
        // If the client app provides autofill hints, you can obtain them using
        // viewNode.getAutofillHints();
    } else {
        // Or use your own heuristics to describe the contents of a view
        // using methods such as getText() or getHint()
    }

    for(int i = 0; i < viewNode.getChildCount(); i++) {
        ViewNode childNode = viewNode.getChildAt(i);
        traverseNode(childNode);
    }
}
保存用户数据
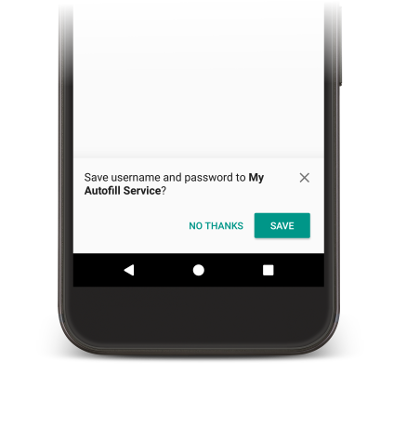
自动填充服务需要用户数据来填充应用中的视图。当用户手动填写视图时,系统会提示他们将数据保存到当前的自动填充服务,如图 2 所示。

图 2. 自动填充保存 UI。
要保存数据,服务必须表明它有兴趣存储数据供将来使用。在 Android 系统发送保存数据的请求之前,会有一个填充请求,服务可以在其中有机会填充视图。为了表明它有兴趣保存数据,服务会在对填充请求的响应中包含一个 SaveInfo 对象。SaveInfo 对象至少包含以下数据
- 保存的用户数据类型。有关可用
SAVE_DATA值的列表,请参阅SaveInfo。 - 触发保存请求所需的最小视图集合。例如,登录表单通常需要用户更新
username和password视图才能触发保存请求。
一个 SaveInfo 对象与一个 FillResponse 对象关联,如以下代码示例所示
Kotlin
override fun onFillRequest(
    request: FillRequest,
    cancellationSignal: CancellationSignal,
    callback: FillCallback
) {
    ...
    // Builder object requires a non-null presentation
    val notUsed = RemoteViews(packageName, android.R.layout.simple_list_item_1)

    val fillResponse: FillResponse = FillResponse.Builder()
            .addDataset(
                    Dataset.Builder()
                            .setValue(parsedStructure.usernameId, null, notUsed)
                            .setValue(parsedStructure.passwordId, null, notUsed)
                            .build()
            )
            .setSaveInfo(
                    SaveInfo.Builder(
                            SaveInfo.SAVE_DATA_TYPE_USERNAME or SaveInfo.SAVE_DATA_TYPE_PASSWORD,
                            arrayOf(parsedStructure.usernameId, parsedStructure.passwordId)
                    ).build()
            )
            .build()
    ...
}
Java
@Override
public void onFillRequest(FillRequest request, CancellationSignal cancellationSignal, FillCallback callback) {
    ...
    // Builder object requires a non-null presentation
    RemoteViews notUsed = new RemoteViews(getPackageName(), android.R.layout.simple_list_item_1);

    FillResponse fillResponse = new FillResponse.Builder()
            .addDataset(new Dataset.Builder()
                    .setValue(parsedStructure.usernameId, null, notUsed)
                    .setValue(parsedStructure.passwordId, null, notUsed)
                    .build())
            .setSaveInfo(new SaveInfo.Builder(
                    SaveInfo.SAVE_DATA_TYPE_USERNAME | SaveInfo.SAVE_DATA_TYPE_PASSWORD,
                    new AutofillId[] {parsedStructure.usernameId, parsedStructure.passwordId})
                    .build())
            .build();
    ...
}
自动填充服务可以在 onSaveRequest() 方法中实现逻辑来持久化用户数据,该方法通常在客户端 Activity 完成或客户端应用调用 commit() 后调用。以下代码显示了 onSaveRequest() 方法的示例
Kotlin
override fun onSaveRequest(request: SaveRequest, callback: SaveCallback) {
    // Get the structure from the request
    val context: List<FillContext> = request.fillContexts
    val structure: AssistStructure = context[context.size - 1].structure

    // Traverse the structure looking for data to save
    traverseStructure(structure)

    // Persist the data - if there are no errors, call onSuccess()
    callback.onSuccess()
}
Java
@Override
public void onSaveRequest(SaveRequest request, SaveCallback callback) {
    // Get the structure from the request
    List<FillContext> context = request.getFillContexts();
    AssistStructure structure = context.get(context.size() - 1).getStructure();

    // Traverse the structure looking for data to save
    traverseStructure(structure);

    // Persist the data - if there are no errors, call onSuccess()
    callback.onSuccess();
}
自动填充服务在持久化敏感数据之前必须对其进行加密。然而,用户数据可以包括非敏感标签或数据。例如,用户账户可以包括一个标签,将数据标记为“工作”或“个人”账户。服务不得加密标签。通过不加密标签,服务可以在用户未进行身份验证的情况下在呈现视图中使用这些标签。然后,服务可以在用户进行身份验证后用实际数据替换这些标签。
延迟自动填充保存 UI
从 Android 10 开始,如果您使用多个屏幕来实现自动填充工作流(例如,一个屏幕用于用户名,另一个用于密码),您可以使用 SaveInfo.FLAG_DELAY_SAVE 标志来延迟自动填充保存 UI。
如果设置了此标志,则在提交与 SaveInfo 响应关联的自动填充上下文时,不会触发自动填充保存 UI。相反,您可以使用同一任务中的另一个 Activity 来处理未来的填充请求,然后通过保存请求显示 UI。更多信息,请参阅 SaveInfo.FLAG_DELAY_SAVE。
需要用户身份验证
自动填充服务可以通过要求用户在填充视图之前进行身份验证来提供额外的安全层。以下场景是实现用户身份验证的良好选择
- 应用中的用户数据需要使用主密码或指纹扫描来解锁。
- 特定数据集需要解锁,例如使用卡验证码 (CVC) 解锁信用卡详细信息。
在服务需要用户身份验证才能解锁数据的场景中,服务可以显示样板数据或标签,并指定负责身份验证的 Intent。如果您在身份验证流程完成后需要额外的数据来处理请求,可以将此类数据添加到 intent。然后,您的身份验证 Activity 可以将数据返回到应用中的 AutofillService 类。
以下代码示例显示了如何指定请求需要身份验证
Kotlin
val authPresentation = RemoteViews(packageName, android.R.layout.simple_list_item_1).apply {
    setTextViewText(android.R.id.text1, "requires authentication")
}
val authIntent = Intent(this, AuthActivity::class.java).apply {
    // Send any additional data required to complete the request
    putExtra(MY_EXTRA_DATASET_NAME, "my_dataset")
}

val intentSender: IntentSender = PendingIntent.getActivity(
        this,
        1001,
        authIntent,
        PendingIntent.FLAG_CANCEL_CURRENT
).intentSender

// Build a FillResponse object that requires authentication
val fillResponse: FillResponse = FillResponse.Builder()
        .setAuthentication(autofillIds, intentSender, authPresentation)
        .build()
Java
RemoteViews authPresentation = new RemoteViews(getPackageName(), android.R.layout.simple_list_item_1);
authPresentation.setTextViewText(android.R.id.text1, "requires authentication");
Intent authIntent = new Intent(this, AuthActivity.class);

// Send any additional data required to complete the request
authIntent.putExtra(MY_EXTRA_DATASET_NAME, "my_dataset");
IntentSender intentSender = PendingIntent.getActivity(
                this,
                1001,
                authIntent,
                PendingIntent.FLAG_CANCEL_CURRENT
        ).getIntentSender();

// Build a FillResponse object that requires authentication
FillResponse fillResponse = new FillResponse.Builder()
        .setAuthentication(autofillIds, intentSender, authPresentation)
        .build();
Activity 完成身份验证流程后,必须调用 setResult() 方法,传递 RESULT_OK 值,并将 EXTRA_AUTHENTICATION_RESULT 额外信息设置为包含已填充数据集的 FillResponse 对象。以下代码显示了身份验证流程完成后如何返回结果的示例
Kotlin
// The data sent by the service and the structure are included in the intent
val datasetName: String? = intent.getStringExtra(MY_EXTRA_DATASET_NAME)
val structure: AssistStructure = intent.getParcelableExtra(EXTRA_ASSIST_STRUCTURE)
val parsedStructure: ParsedStructure = parseStructure(structure)
val (username, password) = fetchUserData(parsedStructure)

// Build the presentation of the datasets
val usernamePresentation =
        RemoteViews(packageName, android.R.layout.simple_list_item_1).apply {
            setTextViewText(android.R.id.text1, "my_username")
        }
val passwordPresentation =
        RemoteViews(packageName, android.R.layout.simple_list_item_1).apply {
            setTextViewText(android.R.id.text1, "Password for my_username")
        }

// Add the dataset to the response
val fillResponse: FillResponse = FillResponse.Builder()
        .addDataset(Dataset.Builder()
                .setValue(
                        parsedStructure.usernameId,
                        AutofillValue.forText(username),
                        usernamePresentation
                )
                .setValue(
                        parsedStructure.passwordId,
                        AutofillValue.forText(password),
                        passwordPresentation
                )
                .build()
        ).build()

val replyIntent = Intent().apply {
    // Send the data back to the service
    putExtra(MY_EXTRA_DATASET_NAME, datasetName)
    putExtra(EXTRA_AUTHENTICATION_RESULT, fillResponse)
}

setResult(Activity.RESULT_OK, replyIntent)
Java
Intent intent = getIntent();

// The data sent by the service and the structure are included in the intent
String datasetName = intent.getStringExtra(MY_EXTRA_DATASET_NAME);
AssistStructure structure = intent.getParcelableExtra(EXTRA_ASSIST_STRUCTURE);
ParsedStructure parsedStructure = parseStructure(structure);
UserData userData = fetchUserData(parsedStructure);

// Build the presentation of the datasets
RemoteViews usernamePresentation = new RemoteViews(getPackageName(), android.R.layout.simple_list_item_1);
usernamePresentation.setTextViewText(android.R.id.text1, "my_username");
RemoteViews passwordPresentation = new RemoteViews(getPackageName(), android.R.layout.simple_list_item_1);
passwordPresentation.setTextViewText(android.R.id.text1, "Password for my_username");

// Add the dataset to the response
FillResponse fillResponse = new FillResponse.Builder()
        .addDataset(new Dataset.Builder()
                .setValue(parsedStructure.usernameId,
                        AutofillValue.forText(userData.username), usernamePresentation)
                .setValue(parsedStructure.passwordId,
                        AutofillValue.forText(userData.password), passwordPresentation)
                .build())
        .build();

Intent replyIntent = new Intent();

// Send the data back to the service
replyIntent.putExtra(MY_EXTRA_DATASET_NAME, datasetName);
replyIntent.putExtra(EXTRA_AUTHENTICATION_RESULT, fillResponse);

setResult(RESULT_OK, replyIntent);
在需要解锁信用卡数据集的场景中,服务可以显示要求输入 CVC 的 UI。您可以通过呈现样板数据(例如银行名称和信用卡号后四位)来隐藏数据,直到数据集解锁。以下示例展示了如何要求对数据集进行身份验证,并在用户提供 CVC 之前隐藏数据
Kotlin
// Parse the structure and fetch payment data
val parsedStructure: ParsedStructure = parseStructure(structure)
val paymentData: Payment = fetchPaymentData(parsedStructure)

// Build the presentation that shows the bank and the last four digits of the
// credit card number, such as 'Bank-1234'
val maskedPresentation: String = "${paymentData.bank}-" +
        paymentData.creditCardNumber.substring(paymentData.creditCardNumber.length - 4)
val authPresentation = RemoteViews(packageName, android.R.layout.simple_list_item_1).apply {
    setTextViewText(android.R.id.text1, maskedPresentation)
}

// Prepare an intent that displays the UI that asks for the CVC
val cvcIntent = Intent(this, CvcActivity::class.java)
val cvcIntentSender: IntentSender = PendingIntent.getActivity(
        this,
        1001,
        cvcIntent,
        PendingIntent.FLAG_CANCEL_CURRENT
).intentSender

// Build a FillResponse object that includes a Dataset that requires authentication
val fillResponse: FillResponse = FillResponse.Builder()
        .addDataset(
                Dataset.Builder()
                        // The values in the dataset are replaced by the actual
                        // data once the user provides the CVC
                        .setValue(parsedStructure.creditCardId, null, authPresentation)
                        .setValue(parsedStructure.expDateId, null, authPresentation)
                        .setAuthentication(cvcIntentSender)
                        .build()
        ).build()
Java
// Parse the structure and fetch payment data
ParsedStructure parsedStructure = parseStructure(structure);
Payment paymentData = fetchPaymentData(parsedStructure);

// Build the presentation that shows the bank and the last four digits of the
// credit card number, such as 'Bank-1234'
String maskedPresentation = paymentData.bank + "-" +
    paymentData.creditCardNumber.subString(paymentData.creditCardNumber.length - 4);
RemoteViews authPresentation = new RemoteViews(getPackageName(), android.R.layout.simple_list_item_1);
authPresentation.setTextViewText(android.R.id.text1, maskedPresentation);

// Prepare an intent that displays the UI that asks for the CVC
Intent cvcIntent = new Intent(this, CvcActivity.class);
IntentSender cvcIntentSender = PendingIntent.getActivity(
        this,
        1001,
        cvcIntent,
        PendingIntent.FLAG_CANCEL_CURRENT
).getIntentSender();

// Build a FillResponse object that includes a Dataset that requires authentication
FillResponse fillResponse = new FillResponse.Builder()
        .addDataset(new Dataset.Builder()
                // The values in the dataset are replaced by the actual
                // data once the user provides the CVC
                .setValue(parsedStructure.creditCardId, null, authPresentation)
                .setValue(parsedStructure.expDateId, null, authPresentation)
                .setAuthentication(cvcIntentSender)
                .build())
        .build();
Activity 验证 CVC 后,应调用 setResult() 方法,传递 RESULT_OK 值,并将 EXTRA_AUTHENTICATION_RESULT 额外信息设置为包含信用卡号和到期日期的 Dataset 对象。新数据集会替换需要身份验证的数据集,视图会立即填充。以下代码显示了用户提供 CVC 后如何返回数据集的示例
Kotlin
// Parse the structure and fetch payment data.
val parsedStructure: ParsedStructure = parseStructure(structure)
val paymentData: Payment = fetchPaymentData(parsedStructure)

// Build a non-null RemoteViews object to use as the presentation when
// creating the Dataset object. This presentation isn't actually used, but the
// Builder object requires a non-null presentation.
val notUsed = RemoteViews(packageName, android.R.layout.simple_list_item_1)

// Create a dataset with the credit card number and expiration date.
val responseDataset: Dataset = Dataset.Builder()
        .setValue(
                parsedStructure.creditCardId,
                AutofillValue.forText(paymentData.creditCardNumber),
                notUsed
        )
        .setValue(
                parsedStructure.expDateId,
                AutofillValue.forText(paymentData.expirationDate),
                notUsed
        )
        .build()

val replyIntent = Intent().apply {
    putExtra(EXTRA_AUTHENTICATION_RESULT, responseDataset)
}
Java
// Parse the structure and fetch payment data.
ParsedStructure parsedStructure = parseStructure(structure);
Payment paymentData = fetchPaymentData(parsedStructure);

// Build a non-null RemoteViews object to use as the presentation when
// creating the Dataset object. This presentation isn't actually used, but the
// Builder object requires a non-null presentation.
RemoteViews notUsed = new RemoteViews(getPackageName(), android.R.layout.simple_list_item_1);

// Create a dataset with the credit card number and expiration date.
Dataset responseDataset = new Dataset.Builder()
        .setValue(parsedStructure.creditCardId,
                AutofillValue.forText(paymentData.creditCardNumber), notUsed)
        .setValue(parsedStructure.expDateId,
                AutofillValue.forText(paymentData.expirationDate), notUsed)
        .build();

Intent replyIntent = new Intent();
replyIntent.putExtra(EXTRA_AUTHENTICATION_RESULT, responseDataset);
按逻辑组组织数据
自动填充服务必须按逻辑组组织数据,以隔离来自不同域的概念。在本页面中,这些逻辑组称为“分区”。以下列表显示了分区的典型示例和字段
- 凭据,包括用户名和密码字段。
- 地址,包括街道、城市、州/省和邮政编码字段。
- 支付信息,包括信用卡号、到期日期和验证码字段。
正确分区数据的自动填充服务能够更好地保护其用户的数据,因为它在数据集中不会暴露多个分区的数据。例如,包含凭据的数据集不需要包含支付信息。将数据组织到分区中,您的服务可以公开满足请求所需的最少相关信息。
将数据组织到分区中,服务可以填充包含多个分区视图的 Activity,同时将最少量的相关数据发送到客户端应用。例如,考虑一个包含用户名、密码、街道和城市的视图的 Activity,以及一个拥有以下数据的自动填充服务
| 分区 | 字段 1 | 字段 2 |
|---|---|---|
| 凭据 | work_username | work_password |
| personal_username | personal_password | |
| 地址 | work_street | work_city |
| personal_street | personal_city |
服务可以为工作账户和个人账户准备包含凭据分区的数据集。当用户选择一个数据集时,随后的自动填充响应可以提供工作地址或个人地址,具体取决于用户的第一次选择。
服务可以通过在遍历 AssistStructure 对象时调用 isFocused() 方法来识别发起请求的字段。这使得服务能够准备包含适当分区数据的 FillResponse。
短信一次性代码自动填充
您的自动填充服务可以使用短信 Retriever API 帮助用户填写通过短信发送的一次性代码。
要使用此功能,必须满足以下要求
- 自动填充服务在 Android 9(API 级别 28)或更高版本上运行。
- 用户授权您的自动填充服务读取短信中的一次性代码。
- 您为其提供自动填充的应用尚未在使用短信 Retriever API 读取一次性代码。
您的自动填充服务可以使用 Google Play 服务 19.0.56 或更高版本中通过调用 SmsCodeRetriever.getAutofillClient() 获取的 SmsCodeAutofillClient。
在自动填充服务中使用此 API 的主要步骤是
- 在自动填充服务中,使用
SmsCodeAutofillClient中的hasOngoingSmsRequest来确定您正在自动填充的应用的包名是否有任何活动的请求。仅当此方法返回false时,您的自动填充服务才应显示建议提示。 - 在自动填充服务中,使用
SmsCodeAutofillClient中的checkPermissionState来检查自动填充服务是否有自动填充一次性代码的权限。此权限状态可以是NONE、GRANTED或DENIED。自动填充服务必须为NONE和GRANTED状态显示建议提示。 - 在自动填充身份验证 Activity 中,使用
SmsRetriever.SEND_PERMISSION权限注册一个监听SmsCodeRetriever.SMS_CODE_RETRIEVED_ACTION的BroadcastReceiver,以便在短信代码可用时接收结果。 在
SmsCodeAutofillClient上调用startSmsCodeRetriever以开始监听通过短信发送的一次性代码。如果用户授权您的自动填充服务检索短信中的一次性代码,此方法会查找从现在起过去一到五分钟内收到的短信。如果您的自动填充服务需要请求用户权限来读取一次性代码,则由
startSmsCodeRetriever返回的Task可能会因返回ResolvableApiException而失败。如果发生这种情况,您需要调用ResolvableApiException.startResolutionForResult()方法以显示权限请求的同意对话框。从 intent 中接收短信代码结果,然后将短信代码作为自动填充响应返回。
在 Chrome 上启用自动填充
Chrome 允许第三方自动填充服务原生自动填充表单,为用户提供更流畅、更简单的用户体验。要使用第三方自动填充服务来自动填充密码、通行密钥以及地址和付款数据等其他信息,用户必须在 Chrome 设置中选择使用其他服务自动填充。

为确保用户在 Android 上的 Chrome 中使用您的服务获得最佳自动填充体验,自动填充服务提供商应鼓励其用户在 Chrome 设置中指定他们首选的服务提供商。
为了帮助用户开启开关,开发者可以:
- 查询 Chrome 设置并了解用户是否希望使用第三方自动填充服务。
- 深层链接到 Chrome 设置页面,用户可以在其中启用第三方自动填充服务。
读取 Chrome 设置
任何应用都可以读取 Chrome 是否使用允许其使用 Android 自动填充的 3P 自动填充模式。Chrome 使用 Android 的 ContentProvider 来通信该信息。在您的 Android 清单中声明您要从中读取设置的渠道
<uses-permission android:name="android.permission.READ_USER_DICTIONARY"/>
<queries>
 <!-- To Query Chrome Beta: -->
 <package android:name="com.chrome.beta" />

 <!-- To Query Chrome Stable: -->
 <package android:name="com.android.chrome" />
</queries>
然后,使用 Android 的 ContentResolver 通过构建内容 URI 来请求该信息
Kotlin
val CHROME_CHANNEL_PACKAGE = "com.android.chrome" // Chrome Stable.
val CONTENT_PROVIDER_NAME = ".AutofillThirdPartyModeContentProvider"
val THIRD_PARTY_MODE_COLUMN = "autofill_third_party_state"
val THIRD_PARTY_MODE_ACTIONS_URI_PATH = "autofill_third_party_mode"

val uri = Uri.Builder()
    .scheme(ContentResolver.SCHEME_CONTENT)
    .authority(CHROME_CHANNEL_PACKAGE + CONTENT_PROVIDER_NAME)
    .path(THIRD_PARTY_MODE_ACTIONS_URI_PATH)
    .build()

val cursor = contentResolver.query(
    uri,
    arrayOf(THIRD_PARTY_MODE_COLUMN), // projection
    null, // selection
    null, // selectionArgs
    null  // sortOrder
)

if (cursor == null) {
  // Terminate now! Older versions of Chromium don't provide this information.
}

cursor?.use { // Use the safe call operator and the use function for auto-closing
    if (it.moveToFirst()) { // Check if the cursor has any rows
        val index = it.getColumnIndex(THIRD_PARTY_MODE_COLUMN)
        if (index != -1) { // Check if the column exists
          val value = it.getInt(index)
          if (0 == value) {
              // 0 means that the third party mode is turned off. Chrome uses its built-in
              // password manager. This is the default for new users.
          } else {
              // 1 means that the third party mode is turned on. Chrome uses forwards all
              // autofill requests to Android Autofill. Users have to opt-in for this.
          }
        } else {
          // Handle the case where the column doesn't exist.  Log a warning, perhaps.
          Log.w("Autofill", "Column $THIRD_PARTY_MODE_COLUMN not found in cursor")
        }
    }
} // The cursor is automatically closed here
Java
final String CHROME_CHANNEL_PACKAGE = "com.android.chrome";  // Chrome Stable.
final String CONTENT_PROVIDER_NAME = ".AutofillThirdPartyModeContentProvider";
final String THIRD_PARTY_MODE_COLUMN = "autofill_third_party_state";
final String THIRD_PARTY_MODE_ACTIONS_URI_PATH = "autofill_third_party_mode";

final Uri uri = new Uri.Builder()
                  .scheme(ContentResolver.SCHEME_CONTENT)
                  .authority(CHROME_CHANNEL_PACKAGE + CONTENT_PROVIDER_NAME)
                  .path(THIRD_PARTY_MODE_ACTIONS_URI_PATH)
                  .build();

final Cursor cursor = getContentResolver().query(
                  uri,
                  /*projection=*/new String[] {THIRD_PARTY_MODE_COLUMN},
                  /*selection=*/ null,
                  /*selectionArgs=*/ null,
                  /*sortOrder=*/ null);

if (cursor == null) {
  // Terminate now! Older versions of Chromium don't provide this information.
}

cursor.moveToFirst(); // Retrieve the result;

int index = cursor.getColumnIndex(THIRD_PARTY_MODE_COLUMN);

if (0 == cursor.getInt(index)) {
  // 0 means that the third party mode is turned off. Chrome uses its built-in
  // password manager. This is the default for new users.
} else {
  // 1 means that the third party mode is turned on. Chrome uses forwards all
  // autofill requests to Android Autofill. Users have to opt-in for this.
}
深层链接到 Chrome 设置
要深层链接到用户可以在其中启用第三方自动填充服务的 Chrome 设置页面,请使用 Android Intent。务必按照此示例所示配置操作和类别
Kotlin
val autofillSettingsIntent = Intent(Intent.ACTION_APPLICATION_PREFERENCES)
autofillSettingsIntent.addCategory(Intent.CATEGORY_DEFAULT)
autofillSettingsIntent.addCategory(Intent.CATEGORY_APP_BROWSER)
autofillSettingsIntent.addCategory(Intent.CATEGORY_PREFERENCE)

// Invoking the intent with a chooser allows users to select the channel they
// want to configure. If only one browser reacts to the intent, the chooser is
// skipped.
val chooser = Intent.createChooser(autofillSettingsIntent, "Pick Chrome Channel")
startActivity(chooser)

// If the caller knows which Chrome channel they want to configure,
// they can instead add a package hint to the intent, e.g.
val specificChromeIntent = Intent(Intent.ACTION_APPLICATION_PREFERENCES) // Create a *new* intent
specificChromeIntent.addCategory(Intent.CATEGORY_DEFAULT)
specificChromeIntent.addCategory(Intent.CATEGORY_APP_BROWSER)
specificChromeIntent.addCategory(Intent.CATEGORY_PREFERENCE)
specificChromeIntent.setPackage("com.android.chrome") // Set the package on the *new* intent
startActivity(specificChromeIntent) // Start the *new* intent
Java
Intent autofillSettingsIntent = new Intent(Intent.ACTION_APPLICATION_PREFERENCES);
autofillSettingsIntent.addCategory(Intent.CATEGORY_DEFAULT);
autofillSettingsIntent.addCategory(Intent.CATEGORY_APP_BROWSER);
autofillSettingsIntent.addCategory(Intent.CATEGORY_PREFERENCE);

// Invoking the intent with a chooser allows users to select the channel they
// want to configure. If only one browser reacts to the intent, the chooser is
// skipped.
Intent chooser = Intent.createChooser(autofillSettingsIntent, "Pick Chrome Channel");
startActivity(chooser);

// If the caller knows which Chrome channel they want to configure,
// they can instead add a package hint to the intent, e.g.
autofillSettingsIntent.setPackage("com.android.chrome");
startActivity(autofillSettingsInstent);
高级自动填充场景
- 与键盘集成
- 从 Android 11 开始,平台允许键盘和其他输入法编辑器 (IME) 内嵌显示自动填充建议,而不是使用下拉菜单。有关您的自动填充服务如何支持此功能的更多信息,请参阅将自动填充与键盘集成。
- 数据集分页
- 大型自动填充响应可能会超过表示处理请求所需远程对象的
Binder对象的允许事务大小。为了防止 Android 系统在此类场景中抛出异常,您可以通过一次添加不超过 20 个Dataset对象来保持FillResponse的大小较小。如果您的响应需要更多数据集,您可以添加一个数据集,让用户知道还有更多信息,并在选中时检索下一组数据集。更多信息,请参阅addDataset(Dataset)。 - 保存拆分到多个屏幕的数据
应用通常会将用户数据拆分到同一 Activity 中的多个屏幕中,尤其是在用于创建新用户账户的 Activity 中。例如,第一个屏幕要求输入用户名,如果用户名可用,第二个屏幕要求输入密码。在这种情况下,自动填充服务必须等到用户输入这两个字段后才能显示自动填充保存 UI。请按照以下步骤处理此类场景
- 在第一个填充请求中,在响应中添加一个客户端状态包,其中包含屏幕中存在的部分字段的自动填充 ID。
- 在第二个填充请求中,检索客户端状态包,从客户端状态中获取先前请求中设置的自动填充 ID,并将这些 ID 和
FLAG_SAVE_ON_ALL_VIEWS_INVISIBLE标志添加到第二个响应中使用的SaveInfo对象中。 - 在保存请求中,使用适当的
FillContext对象来获取每个字段的值。每个填充请求有一个填充上下文。
更多信息,请参阅数据拆分到多个屏幕时进行保存。
- 为每个请求提供初始化和清理逻辑
每次有自动填充请求时,Android 系统都会绑定到服务并调用其
onConnected()方法。服务处理完请求后,Android 系统会调用onDisconnected()方法并解除与服务的绑定。您可以实现onConnected()以提供在处理请求之前运行的代码,并实现onDisconnected()以提供在处理请求之后运行的代码。- 自定义自动填充保存 UI
自动填充服务可以自定义自动填充保存 UI,以帮助用户决定是否允许服务保存其数据。服务可以通过简单的文本或自定义视图提供有关保存内容的额外信息。服务还可以更改取消保存请求按钮的外观,并在用户点击该按钮时收到通知。更多信息,请参阅
SaveInfo参考页面。- 兼容模式
兼容模式允许自动填充服务出于自动填充目的使用无障碍虚拟结构。它对于在未明确实现自动填充 API 的浏览器中提供自动填充功能特别有用。
要使用兼容模式测试您的自动填充服务,请明确将需要兼容模式的浏览器或应用添加到白名单。您可以通过运行以下命令检查哪些包已添加到白名单
$ adb shell settings get global autofill_compat_mode_allowed_packages
如果您要测试的包不在列表中,请通过运行以下命令添加它,其中
pkgX是应用的包$ adb shell settings put global autofill_compat_mode_allowed_packages pkg1[resId1]:pkg2[resId1,resId2]
如果应用是浏览器,则使用
resIdx指定包含渲染页面 URL 的输入字段的资源 ID。
兼容模式有以下限制:
- 当服务使用
FLAG_SAVE_ON_ALL_VIEWS_INVISIBLE标志或调用setTrigger()方法时,将触发保存请求。在使用兼容模式时,FLAG_SAVE_ON_ALL_VIEWS_INVISIBLE默认设置为 true。 - 节点文本值在
onSaveRequest(SaveRequest, SaveCallback)方法中可能不可用。
有关兼容模式的更多信息,包括与之相关的限制,请参阅 AutofillService 类参考。
