
AndroidJUnitRunner 类是一个 JUnit 测试运行器,可让您在 Android 设备上运行插桩 JUnit 4 测试,包括使用 Espresso、UI Automator 和 Compose 测试框架的测试。
测试运行器负责将您的测试包和受测应用加载到设备上,运行您的测试,并报告测试结果。
此测试运行器支持多项常见测试任务,包括以下内容:
编写 JUnit 测试
以下代码段显示了如何编写插桩 JUnit 4 测试来验证 ChangeTextBehavior 类中的 changeText 操作是否正常工作:
Kotlin
@RunWith(AndroidJUnit4::class)
@LargeTest // Optional runner annotation
class ChangeTextBehaviorTest {
 val stringToBeTyped = "Espresso"
 // ActivityTestRule accesses context through the runner
 @get:Rule
 val activityRule = ActivityTestRule(MainActivity::class.java)

 @Test fun changeText_sameActivity() {
 // Type text and then press the button.
 onView(withId(R.id.editTextUserInput))
 .perform(typeText(stringToBeTyped), closeSoftKeyboard())
 onView(withId(R.id.changeTextBt)).perform(click())

 // Check that the text was changed.
 onView(withId(R.id.textToBeChanged))
 .check(matches(withText(stringToBeTyped)))
 }
}
Java
@RunWith(AndroidJUnit4.class)
@LargeTest // Optional runner annotation
public class ChangeTextBehaviorTest {

    private static final String stringToBeTyped = "Espresso";

    @Rule
    public ActivityTestRule<MainActivity>; activityRule =
            new ActivityTestRule<>;(MainActivity.class);

    @Test
    public void changeText_sameActivity() {
        // Type text and then press the button.
        onView(withId(R.id.editTextUserInput))
                .perform(typeText(stringToBeTyped), closeSoftKeyboard());
        onView(withId(R.id.changeTextBt)).perform(click());

        // Check that the text was changed.
        onView(withId(R.id.textToBeChanged))
                .check(matches(withText(stringToBeTyped)));
    }
}
访问应用的上下文
当您使用 AndroidJUnitRunner 运行测试时,可以通过调用静态 ApplicationProvider.getApplicationContext() 方法访问受测应用的上下文。如果您的应用中创建了 Application 的自定义子类,此方法将返回您的自定义子类的上下文。
如果您是工具实现者,可以使用 InstrumentationRegistry 类访问低级测试 API。此类包括 Instrumentation 对象、目标应用 Context 对象、测试应用 Context 对象以及传递给测试的命令行参数。
过滤测试
在您的 JUnit 4.x 测试中,您可以使用注解来配置测试运行。此功能最大限度地减少了在测试中添加样板和条件代码的需要。除了 JUnit 4 支持的标准注解之外,测试运行器还支持Android 专用注解,包括以下内容:
@RequiresDevice:指定测试只能在实体设备上运行,不能在模拟器上运行。@SdkSuppress:禁止测试在低于给定级别的 Android API 级别上运行。例如,要禁止在所有低于 23 的 API 级别上运行测试,请使用注解@SDKSuppress(minSdkVersion=23)。@SmallTest、@MediumTest和@LargeTest:分类测试运行所需的时间,以及因此您可以运行测试的频率。您可以使用此注解来过滤要运行的测试,设置android.testInstrumentationRunnerArguments.size属性。
-Pandroid.testInstrumentationRunnerArguments.size=small
分片测试
如果您需要并行执行测试,将它们分摊到多个服务器以加快运行速度,您可以将它们分成组,或称为“分片”。测试运行器支持将单个测试套件拆分为多个分片,因此您可以轻松地将属于同一分片的测试作为一组一起运行。每个分片都由一个索引号标识。运行测试时,使用 -e numShards 选项指定要创建的独立分片数量,使用 -e shardIndex 选项指定要运行的分片。
例如,要将测试套件拆分为 10 个分片,并且仅运行分组在第二个分片中的测试,请使用以下 adb 命令:
adb shell am instrument -w -e numShards 10 -e shardIndex 2
使用 Android Test Orchestrator
Android Test Orchestrator 允许您在自己的 Instrumentation 调用中运行应用的每个测试。当使用 AndroidJUnitRunner 1.0 或更高版本时,您可以使用 Android Test Orchestrator。
Android Test Orchestrator 为您的测试环境提供以下优势:
- 最小化共享状态:每个测试都在其自己的
Instrumentation实例中运行。因此,如果您的测试共享应用状态,则在每个测试之后,大部分共享状态都会从设备的 CPU 或内存中移除。要在每个测试之后从设备的 CPU 和内存中移除*所有*共享状态,请使用clearPackageData标志。有关示例,请参阅从 Gradle 启用部分。 - 崩溃隔离:即使一个测试崩溃,它也只会导致其自身的
Instrumentation实例崩溃。这意味着您套件中的其他测试仍会运行,从而提供完整的测试结果。
这种隔离可能导致测试执行时间增加,因为 Android Test Orchestrator 在每次测试后会重新启动应用程序。
Android Studio 和 Firebase Test Lab 都预装了 Android Test Orchestrator,但您需要在 Android Studio 中启用该功能。
从 Gradle 启用
要使用 Gradle 命令行工具启用 Android Test Orchestrator,请完成以下步骤:
- 步骤 1:修改 gradle 文件。将以下语句添加到项目的
build.gradle文件中:
android {
 defaultConfig {
  ...
  testInstrumentationRunner "androidx.test.runner.AndroidJUnitRunner"

  // The following argument makes the Android Test Orchestrator run its
  // "pm clear" command after each test invocation. This command ensures
  // that the app's state is completely cleared between tests.
  testInstrumentationRunnerArguments clearPackageData: 'true'
 }

 testOptions {
  execution 'ANDROIDX_TEST_ORCHESTRATOR'
 }
}

dependencies {
 androidTestImplementation 'androidx.test:runner:1.1.0'
 androidTestUtil 'androidx.test:orchestrator:1.1.0'
}
- 步骤 2:执行以下命令运行 Android Test Orchestrator:
./gradlew connectedCheck
从 Android Studio 启用
要在 Android Studio 中启用 Android Test Orchestrator,请将从 Gradle 启用中所示的语句添加到应用的 build.gradle 文件中。
从命令行启用
要在命令行上使用 Android Test Orchestrator,请在终端窗口中运行以下命令:
DEVICE_API_LEVEL=$(adb shell getprop ro.build.version.sdk)

FORCE_QUERYABLE_OPTION=""
if [[ $DEVICE_API_LEVEL -ge 30 ]]; then
   FORCE_QUERYABLE_OPTION="--force-queryable"
fi

# uninstall old versions
adb uninstall androidx.test.services
adb uninstall androidx.test.orchestrator

# Install the test orchestrator.
adb install $FORCE_QUERYABLE_OPTION -r path/to/m2repository/androidx/test/orchestrator/1.4.2/orchestrator-1.4.2.apk

# Install test services.
adb install $FORCE_QUERYABLE_OPTION -r path/to/m2repository/androidx/test/services/test-services/1.4.2/test-services-1.4.2.apk

# Replace "com.example.test" with the name of the package containing your tests.
# Add "-e clearPackageData true" to clear your app's data in between runs.
adb shell 'CLASSPATH=$(pm path androidx.test.services) app_process / \
 androidx.test.services.shellexecutor.ShellMain am instrument -w -e \
 targetInstrumentation com.example.test/androidx.test.runner.AndroidJUnitRunner \
 androidx.test.orchestrator/.AndroidTestOrchestrator'
正如命令语法所示,您先安装 Android Test Orchestrator,然后直接使用它。
adb shell pm list instrumentation
使用不同的工具链
如果您使用不同的工具链来测试您的应用,您仍然可以通过完成以下步骤来使用 Android Test Orchestrator:
架构
Orchestrator 服务 APK 存储在一个与测试 APK 和受测应用 APK 分离的进程中。
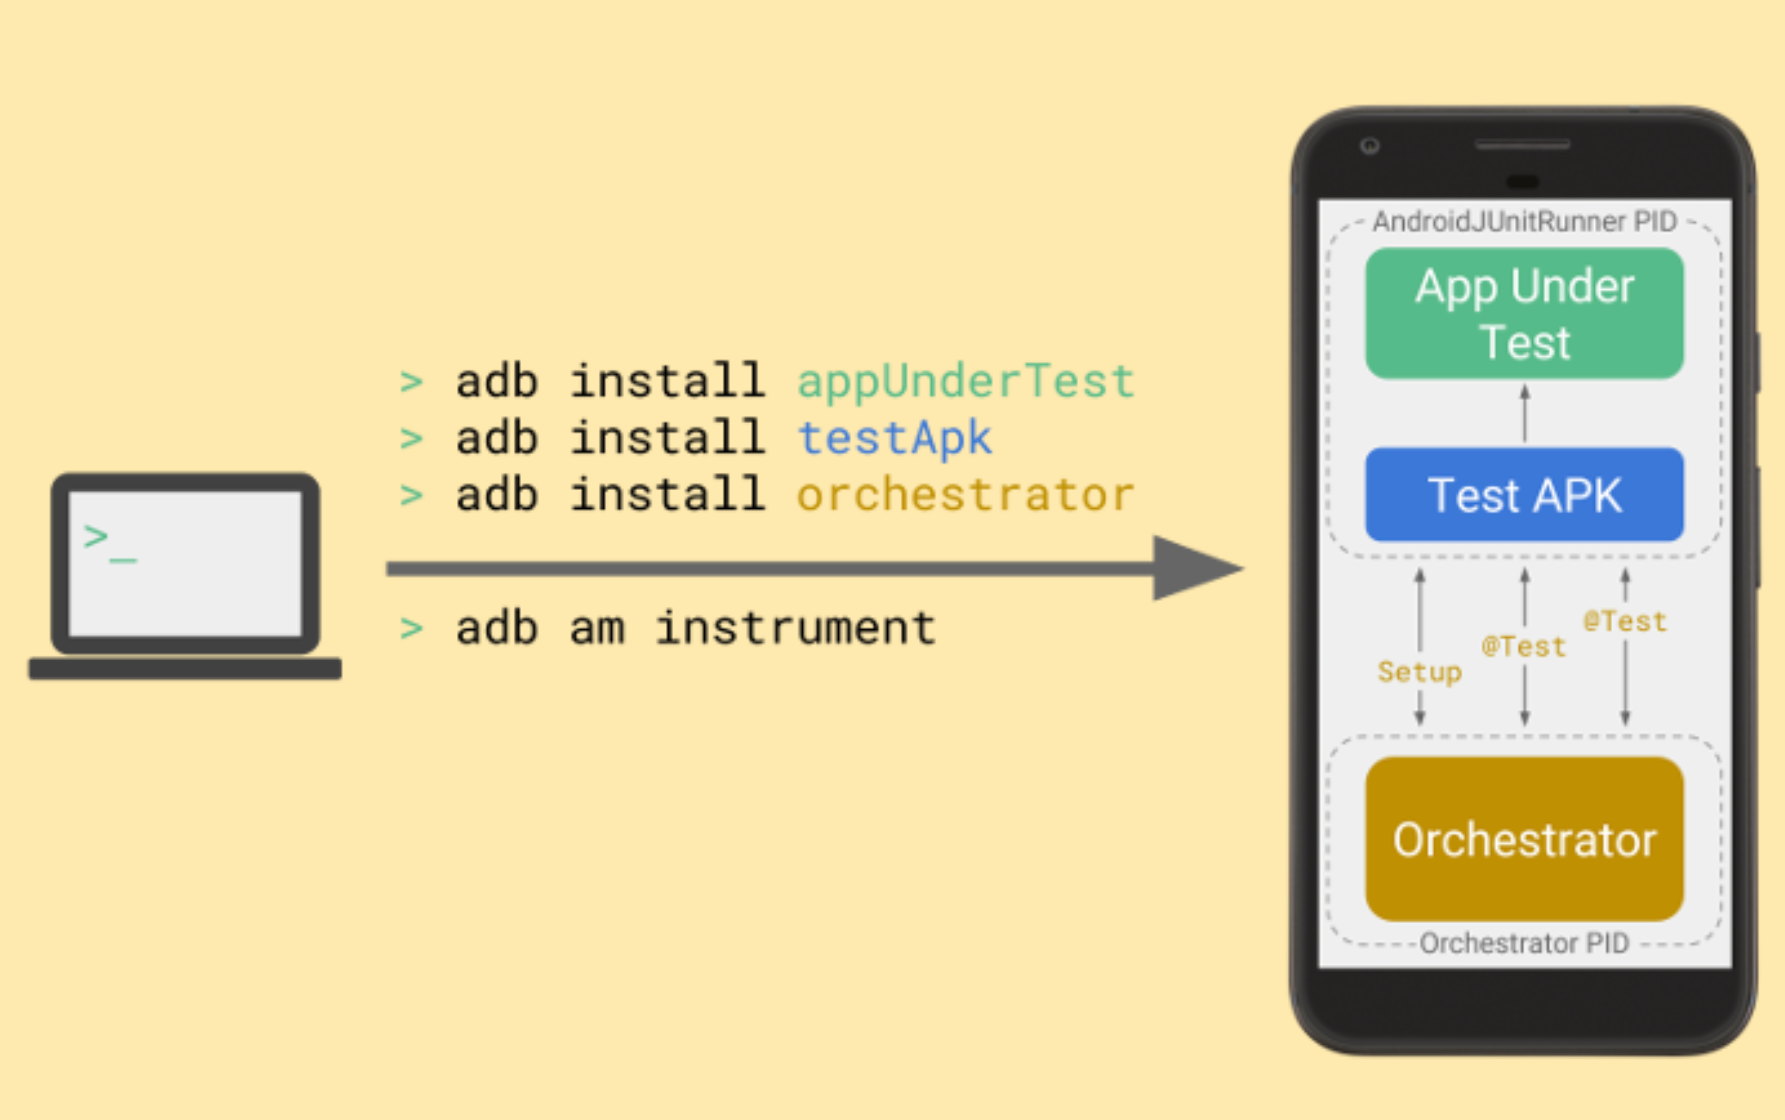
Android Test Orchestrator 在测试套件运行开始时收集 JUnit 测试,但随后在各自的 Instrumentation 实例中单独执行每个测试。
更多信息
要了解有关使用 AndroidJUnitRunner 的更多信息,请参阅 API 参考。
其他资源
有关使用 AndroidJUnitRunner 的更多信息,请查阅以下资源。
示例
- AndroidJunitRunnerSample:展示测试注解、参数化测试和测试套件创建。