从 Android 8.0(API 级别 26)开始,所有通知都必须分配给一个渠道。对于每个渠道,您可以设置应用于该渠道中所有通知的视觉和听觉行为。用户可以更改这些设置,并决定您的应用中的哪些通知渠道可以具有干扰性或可见性。
请观看以下视频,了解 Android 8.0 中关于渠道和其他通知功能的概览。
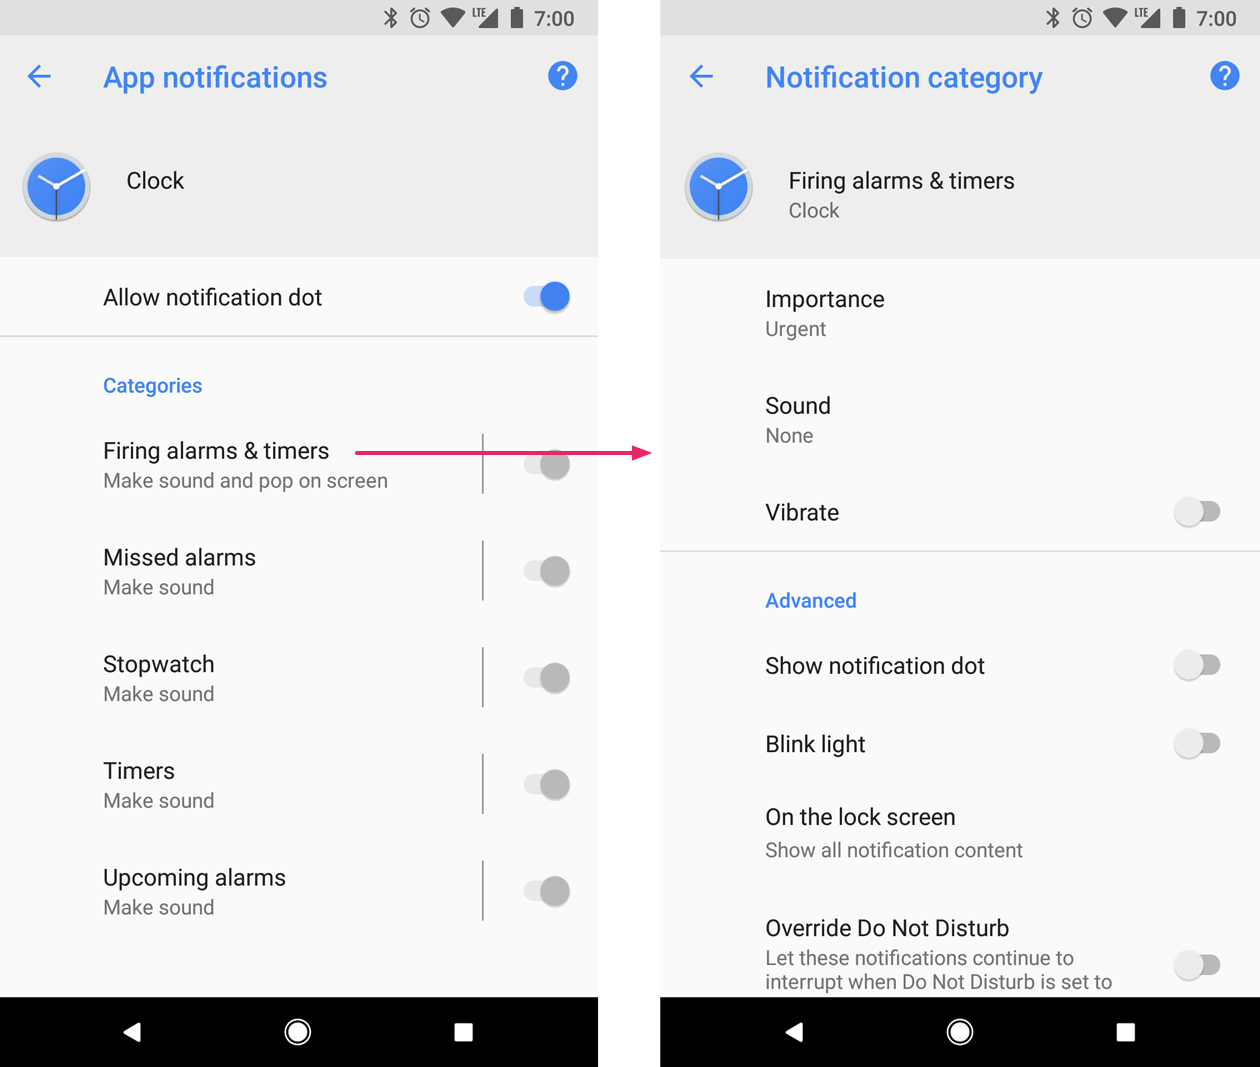
每个应用的通知渠道用户设置都可以在系统设置中找到,如图 1 所示。

图 1. “时钟”应用的通知设置及其其中一个渠道的设置。
创建通知渠道后,您无法更改通知行为。此时,用户拥有完全的控制权。但是,您仍然可以更改渠道的名称和描述。
为您需要发送的每种类型的通知创建一个渠道。您还可以创建通知渠道来反映用户的选择。例如,您可以为用户在消息应用中创建的每个会话组设置单独的通知渠道。
当您的应用目标平台是 Android 8.0(API 级别 26)或更高版本时,您必须实现一个或多个通知渠道。如果您的 targetSdkVersion 设置为 25 或更低版本,当您的应用在 Android 8.0(API 级别 26)或更高版本上运行时,其行为与在运行 Android 7.1(API 级别 25)或更低版本的设备上相同。
创建通知渠道
要创建通知渠道,请按照以下步骤操作
使用唯一的渠道 ID、用户可见的名称和重要程度构造一个
NotificationChannel对象。您可以选择使用
setDescription()指定用户在系统设置中看到的描述。通过将其传递给
createNotificationChannel()注册通知渠道。
以下示例展示了如何创建和注册通知渠道
Kotlin
if (Build.VERSION.SDK_INT >= Build.VERSION_CODES.O) {
    // Create the NotificationChannel.
    val name = getString(R.string.channel_name)
    val descriptionText = getString(R.string.channel_description)
    val importance = NotificationManager.IMPORTANCE_DEFAULT
    val mChannel = NotificationChannel(CHANNEL_ID, name, importance)
    mChannel.description = descriptionText
    // Register the channel with the system. You can't change the importance
    // or other notification behaviors after this.
    val notificationManager = getSystemService(NOTIFICATION_SERVICE) as NotificationManager
    notificationManager.createNotificationChannel(mChannel)
}
Java
private void createNotificationChannel() {
    // Create the NotificationChannel, but only on API 26+ because
    // the NotificationChannel class is not in the Support Library.
    if (Build.VERSION.SDK_INT >= Build.VERSION_CODES.O) {
        CharSequence name = getString(R.string.channel_name);
        String description = getString(R.string.channel_description);
        int importance = NotificationManager.IMPORTANCE_DEFAULT;
        NotificationChannel channel = new NotificationChannel(CHANNEL_ID, name, importance);
        channel.setDescription(description);
        // Register the channel with the system. You can't change the importance
        // or other notification behaviors after this.
        NotificationManager notificationManager = getSystemService(NotificationManager.class);
        notificationManager.createNotificationChannel(channel);
    }
}
使用原始值重新创建现有通知渠道不会执行任何操作,因此在应用启动时调用此代码是安全的。
默认情况下,发布到给定渠道的所有通知都会使用 NotificationManagerCompat 类中重要程度定义视觉和听觉行为,例如 IMPORTANCE_DEFAULT 或 IMPORTANCE_HIGH。有关重要程度的更多信息,请参阅下一节。
如果您想进一步自定义渠道的默认通知行为,可以在 NotificationChannel 上调用 enableLights()、setLightColor() 和 setVibrationPattern() 等方法。请记住,一旦创建了渠道,您就无法更改这些设置,用户对这些行为是否激活拥有最终控制权。
您还可以通过调用 createNotificationChannels() 在单个操作中创建多个通知渠道。
设置重要程度
渠道重要程度会影响在该渠道中发布的所有通知的中断级别。在 NotificationChannel 构造函数中指定它,使用五个重要程度级别之一,范围从 IMPORTANCE_NONE(0) 到 IMPORTANCE_HIGH(4)。
为了支持运行 Android 7.1(API 级别 25)或更低版本的设备,您还必须使用 NotificationCompat 类中的优先级常量为每个通知调用 setPriority()。
重要程度(NotificationManager.IMPORTANCE_*)和优先级(NotificationCompat.PRIORITY_*)常量与用户可见的重要程度选项映射,如下表所示。
| 用户可见的重要程度级别 | 重要程度(Android 8.0 及更高版本) | 优先级(Android 7.1 及更低版本) |
|---|---|---|
| 紧急 发出声音并显示为浮动通知。 |
IMPORTANCE_HIGH |
PRIORITY_HIGH 或 PRIORITY_MAX |
| 高 发出声音。 |
IMPORTANCE_DEFAULT |
PRIORITY_DEFAULT |
| 中 不发出声音。 |
IMPORTANCE_LOW |
PRIORITY_LOW |
| 低 不发出声音,也不显示在状态栏中。 |
IMPORTANCE_MIN |
PRIORITY_MIN |
| 无 不发出声音,也不显示在状态栏或通知抽屉中。 |
IMPORTANCE_NONE |
不适用 |
所有通知,无论重要程度如何,都会出现在非中断性系统 UI 位置,例如通知抽屉中以及作为启动器图标上的徽章显示,尽管您可以修改通知徽章的外观。
将渠道提交给 NotificationManager 后,您无法更改重要程度。但是,用户可以随时更改他们对您的应用渠道的偏好设置。
有关选择适当优先级的信息,请参阅 通知设计指南中的“优先级级别”。
读取通知渠道设置
用户可以修改通知渠道的设置,包括震动和提示音等行为。如果您想了解用户对您的通知渠道应用的设置,请按照以下步骤操作
通过调用
getNotificationChannel()或getNotificationChannels()获取NotificationChannel对象。查询特定的渠道设置,例如
getVibrationPattern()、getSound()和getImportance()。
如果您发现某个渠道设置阻止了您应用预期的行为,您可以建议用户更改它,并提供一个操作来打开渠道设置,如下一节所示。
打开通知渠道设置
创建通知渠道后,您无法通过编程方式更改通知渠道的视觉和听觉行为。只有用户可以通过系统设置更改渠道行为。为了让您的用户轻松访问这些通知设置,请在您应用的设置 UI 中添加一个项,该项可以打开这些系统设置。
您可以使用一个使用 ACTION_CHANNEL_NOTIFICATION_SETTINGS 操作的 Intent 来打开通知渠道的系统设置。
例如,以下示例代码展示了如何将用户重定向到通知渠道的设置
Kotlin
val intent = Intent(Settings.ACTION_CHANNEL_NOTIFICATION_SETTINGS).apply {
    putExtra(Settings.EXTRA_APP_PACKAGE, packageName)
    putExtra(Settings.EXTRA_CHANNEL_ID, myNotificationChannel.getId())
}
startActivity(intent)
Java
Intent intent = new Intent(Settings.ACTION_CHANNEL_NOTIFICATION_SETTINGS);
intent.putExtra(Settings.EXTRA_APP_PACKAGE, getPackageName());
intent.putExtra(Settings.EXTRA_CHANNEL_ID, myNotificationChannel.getId());
startActivity(intent);
请注意,该 intent 需要两个 extra,用于指定您应用的包名(也称为应用 ID)以及要编辑的渠道。
删除通知渠道
您可以通过调用 deleteNotificationChannel() 来删除通知渠道。以下示例代码演示了如何完成此过程
Kotlin
// The id of the channel.
val notificationManager = getSystemService(Context.NOTIFICATION_SERVICE) as NotificationManager
val id: String = "my_channel_01"
notificationManager.deleteNotificationChannel(id)
Java
NotificationManager notificationManager =
        (NotificationManager) getSystemService(Context.NOTIFICATION_SERVICE);
// The id of the channel.
String id = "my_channel_01";
notificationManager.deleteNotificationChannel(id);
创建通知渠道分组
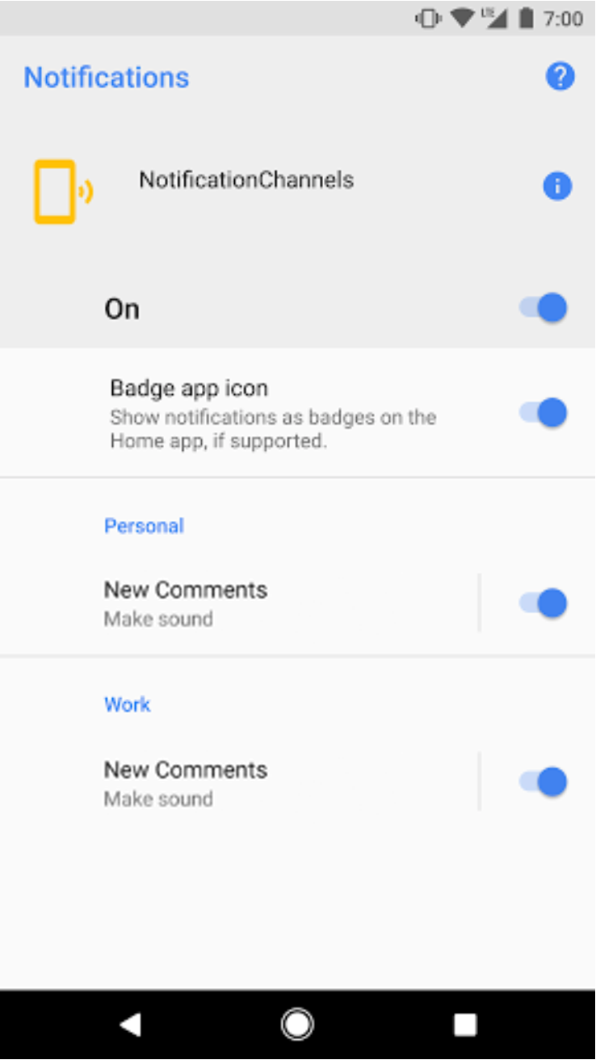
如果您想在设置 UI 中进一步组织渠道的显示方式,您可以创建渠道分组。当您的应用支持多个用户帐号时,例如用于工作资料时,这是一个很好的主意,因为它允许您为每个帐号创建一个通知渠道分组。这样,用户可以轻松识别和控制多个名称相同的通知渠道。

图 2. 包含个人和工作帐号分组的通知渠道设置。
例如,一个社交网络应用可能支持个人和工作帐号。在这种情况下,每个帐号可能需要多个功能和名称相同的通知渠道,例如以下渠道
包含两个渠道的个人帐号
新评论
帖子推荐
包含两个渠道的商业帐号
新评论
帖子推荐
将通知渠道按帐号分组可以帮助用户区分它们。
每个通知渠道分组都需要一个 ID(必须在您的包内唯一)以及一个用户可见的名称。以下代码片段演示了如何创建通知渠道分组。
Kotlin
// The id of the group.
val groupId = "my_group_01"
// The user-visible name of the group.
val groupName = getString(R.string.group_name)
val notificationManager = getSystemService(Context.NOTIFICATION_SERVICE) as NotificationManager
notificationManager.createNotificationChannelGroup(NotificationChannelGroup(groupId, groupName))
Java
// The id of the group.
String groupId = "my_group_01";
// The user-visible name of the group.
CharSequence groupName = getString(R.string.group_name);
NotificationManager notificationManager =
        (NotificationManager) getSystemService(Context.NOTIFICATION_SERVICE);
notificationManager.createNotificationChannelGroup(new NotificationChannelGroup(groupId, groupName));
创建新分组后,您可以调用 setGroup() 将新的 NotificationChannel 对象与该分组关联。
将渠道提交给通知管理器后,您无法更改通知渠道和分组之间的关联。
