Jetpack Compose 实现了 Material You 和 Material 3 Expressive,这是 Material Design 的下一个演进。M3 Expressive 是 Material Design 3 的扩展,包括对主题、组件、动态效果、排版等方面的经过研究支持的更新——所有这些都旨在帮助您制作用户喜爱的、引人入胜的理想产品。它还支持动态颜色等 Material You 个性化功能。M3 Expressive 与 Android 16 视觉风格和系统 UI 相辅相成。
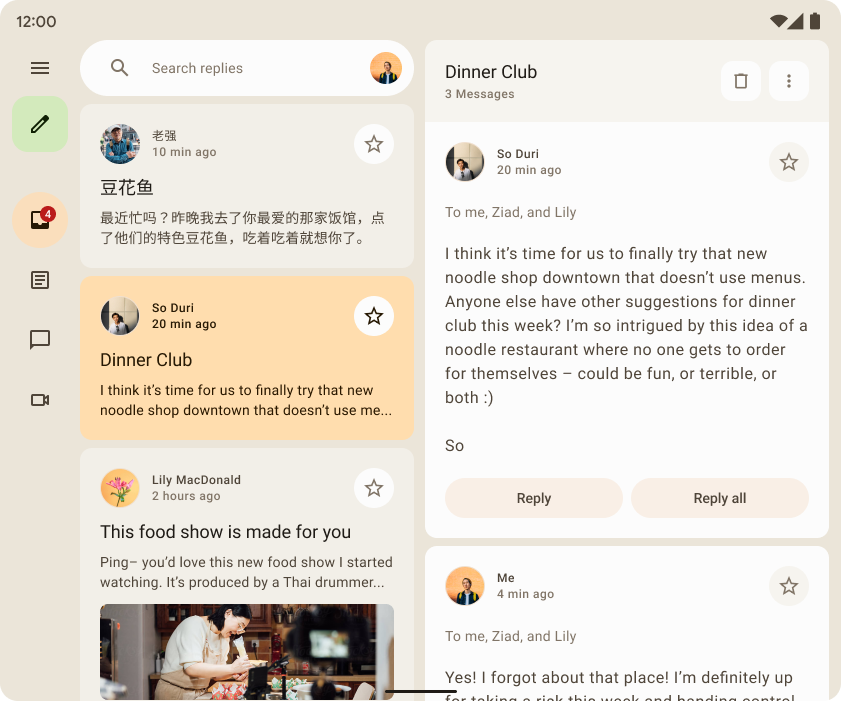
下面,我们以 Reply 示例应用为例,演示 Material Design 3 的实现。Reply 示例完全基于 Material Design 3。
依赖项
要在 Compose 应用中开始使用 Material 3,请将 Compose Material 3 依赖项添加到您的 build.gradle 文件中
implementation "androidx.compose.material3:material3:$material3_version"
添加依赖项后,您可以开始向您的应用添加 Material Design 系统,包括颜色、排版和形状。
实验性 API
一些 M3 API 被认为是实验性的。在这种情况下,您需要使用 ExperimentalMaterial3Api 注解在函数或文件级别选择启用
// import androidx.compose.material3.ExperimentalMaterial3Api @Composable fun AppComposable() { // M3 composables }
Material 主题
M3 主题包含以下子系统:配色方案、排版 和 形状。当您自定义这些值时,您的更改会自动反映在您用于构建应用的 M3 组件中。
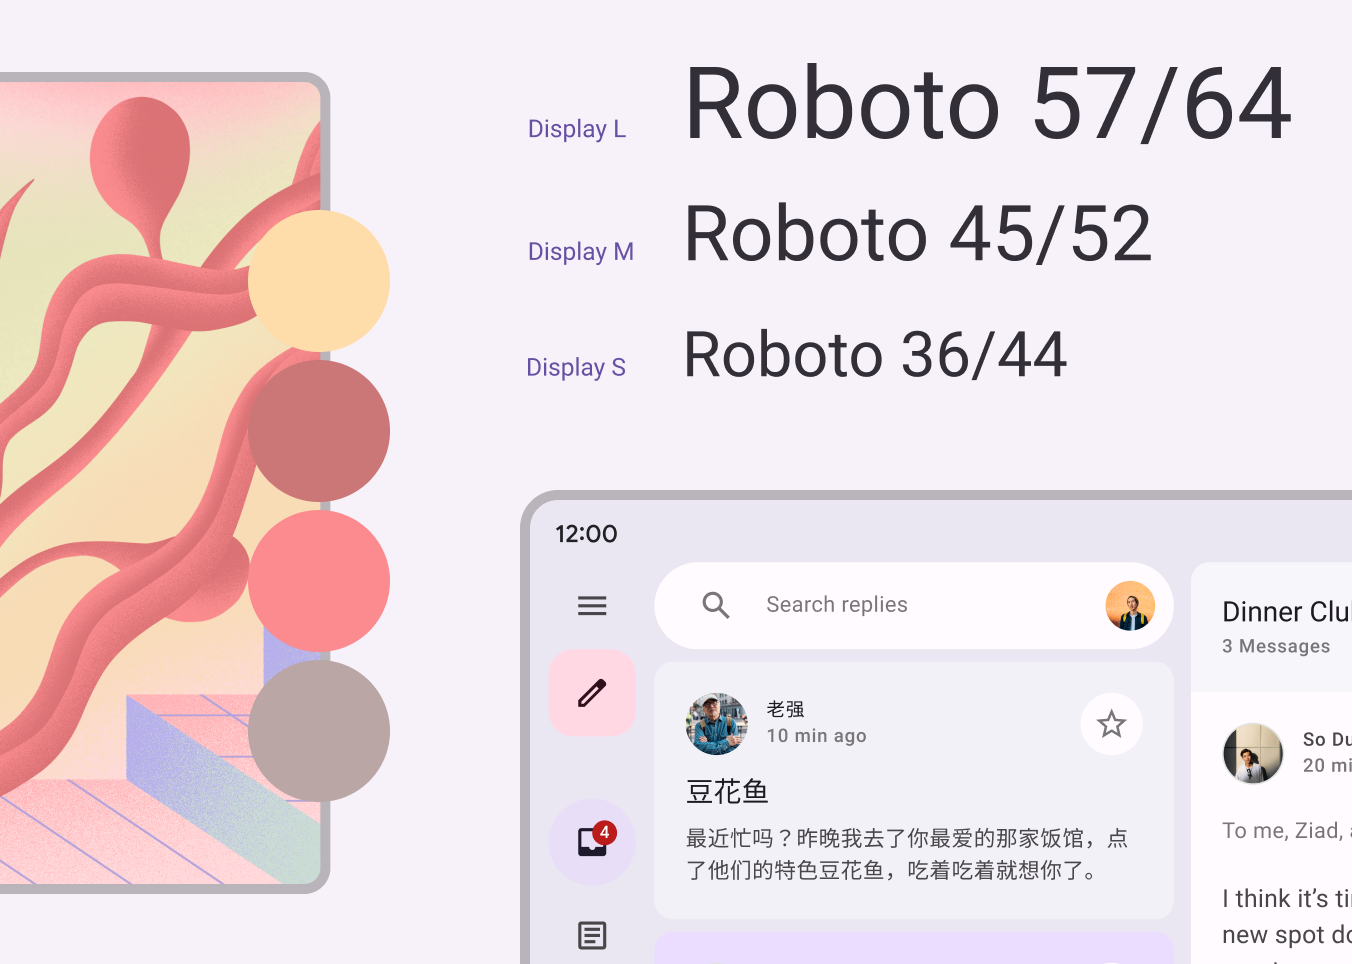
Jetpack Compose 使用 M3 MaterialTheme 可组合项实现了这些概念
MaterialTheme( colorScheme = /* ... typography = /* ... shapes = /* ... ) { // M3 app content }
要为您的应用内容设置主题,请定义您的应用特有的配色方案、排版和形状。
配色方案
配色方案的基础是五种关键颜色。这些颜色中的每一种都与由 13 种色调组成的色调调色板相关,Material 3 组件使用这些色调。例如,这是 Reply 的浅色主题配色方案
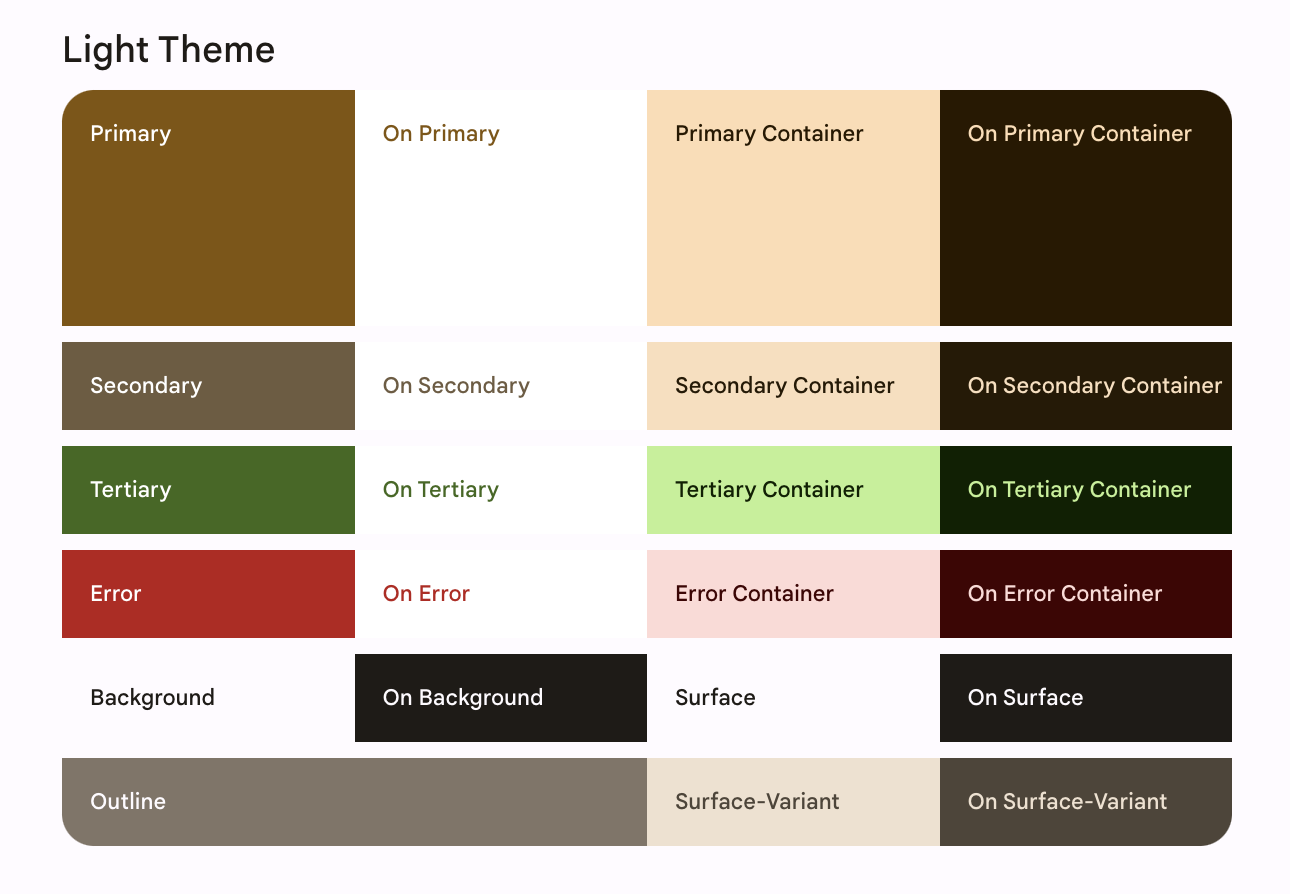
阅读更多关于配色方案和颜色角色的信息。
生成配色方案
虽然您可以手动创建自定义 ColorScheme,但通常使用品牌源颜色生成配色方案会更容易。Material Theme Builder 工具允许您执行此操作,并可选择导出 Compose 主题代码。生成以下文件
Color.kt包含主题的颜色,其中定义了浅色和深色主题颜色的所有角色。
val md_theme_light_primary = Color(0xFF476810) val md_theme_light_onPrimary = Color(0xFFFFFFFF) val md_theme_light_primaryContainer = Color(0xFFC7F089) // .. // .. val md_theme_dark_primary = Color(0xFFACD370) val md_theme_dark_onPrimary = Color(0xFF213600) val md_theme_dark_primaryContainer = Color(0xFF324F00) // .. // ..
Theme.kt包含浅色和深色配色方案以及应用主题的设置。
private val LightColorScheme = lightColorScheme( primary = md_theme_light_primary, onPrimary = md_theme_light_onPrimary, primaryContainer = md_theme_light_primaryContainer, // .. ) private val DarkColorScheme = darkColorScheme( primary = md_theme_dark_primary, onPrimary = md_theme_dark_onPrimary, primaryContainer = md_theme_dark_primaryContainer, // .. ) @Composable fun ReplyTheme( darkTheme: Boolean = isSystemInDarkTheme(), content: @Composable () -> Unit ) { val colorScheme = if (!darkTheme) { LightColorScheme } else { DarkColorScheme } MaterialTheme( colorScheme = colorScheme, content = content ) }
要支持浅色和深色主题,请使用 isSystemInDarkTheme()。根据系统设置,定义要使用的配色方案:浅色或深色。
动态配色方案
动态颜色是 Material You 的关键部分,其中算法从用户的壁纸中提取自定义颜色,并将其应用于其应用和系统 UI。此调色板用作生成浅色和深色配色方案的起点。
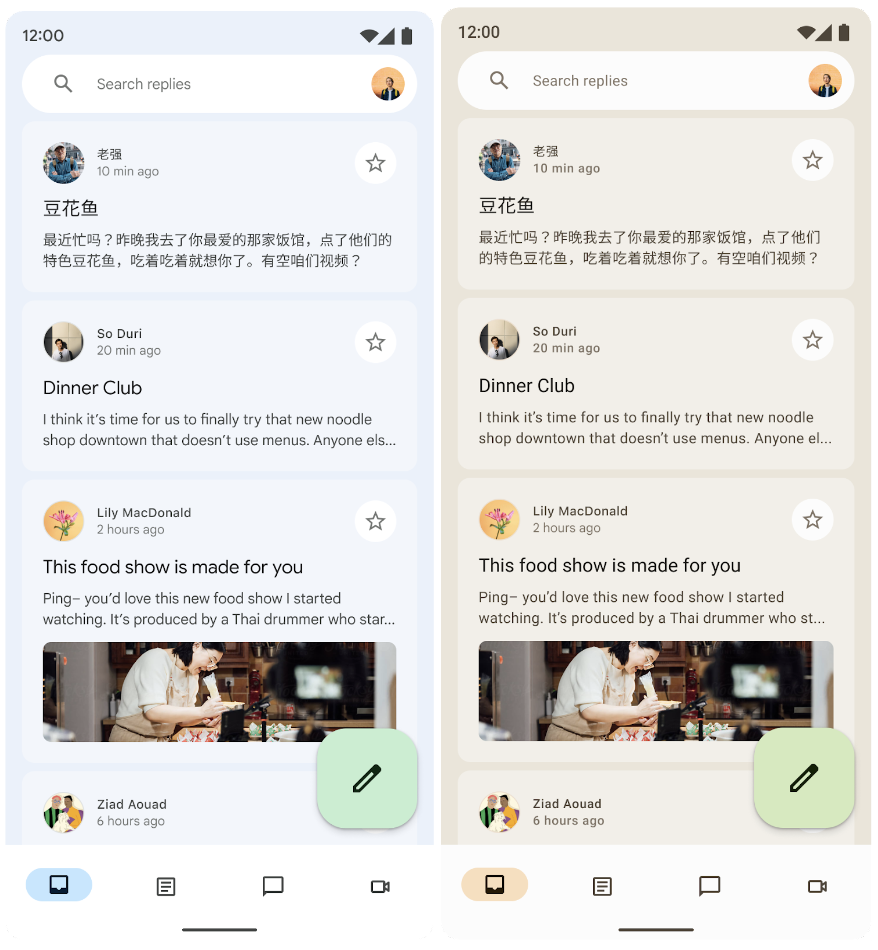
动态颜色在 Android 12 及更高版本上可用。如果动态颜色可用,您可以设置动态 ColorScheme。如果不可用,您应该退回使用自定义的浅色或深色 ColorScheme。
ColorScheme 提供构建器函数来创建动态浅色或深色配色方案
// Dynamic color is available on Android 12+ val dynamicColor = Build.VERSION.SDK_INT >= Build.VERSION_CODES.S val colors = when { dynamicColor && darkTheme -> dynamicDarkColorScheme(LocalContext.current) dynamicColor && !darkTheme -> dynamicLightColorScheme(LocalContext.current) darkTheme -> DarkColorScheme else -> LightColorScheme }
颜色使用
您可以通过 MaterialTheme.colorScheme 在应用中访问 Material 主题颜色
Text( text = "Hello theming", color = MaterialTheme.colorScheme.primary )
每种颜色角色都可以根据组件的状态、突出程度和强调程度在各种地方使用。
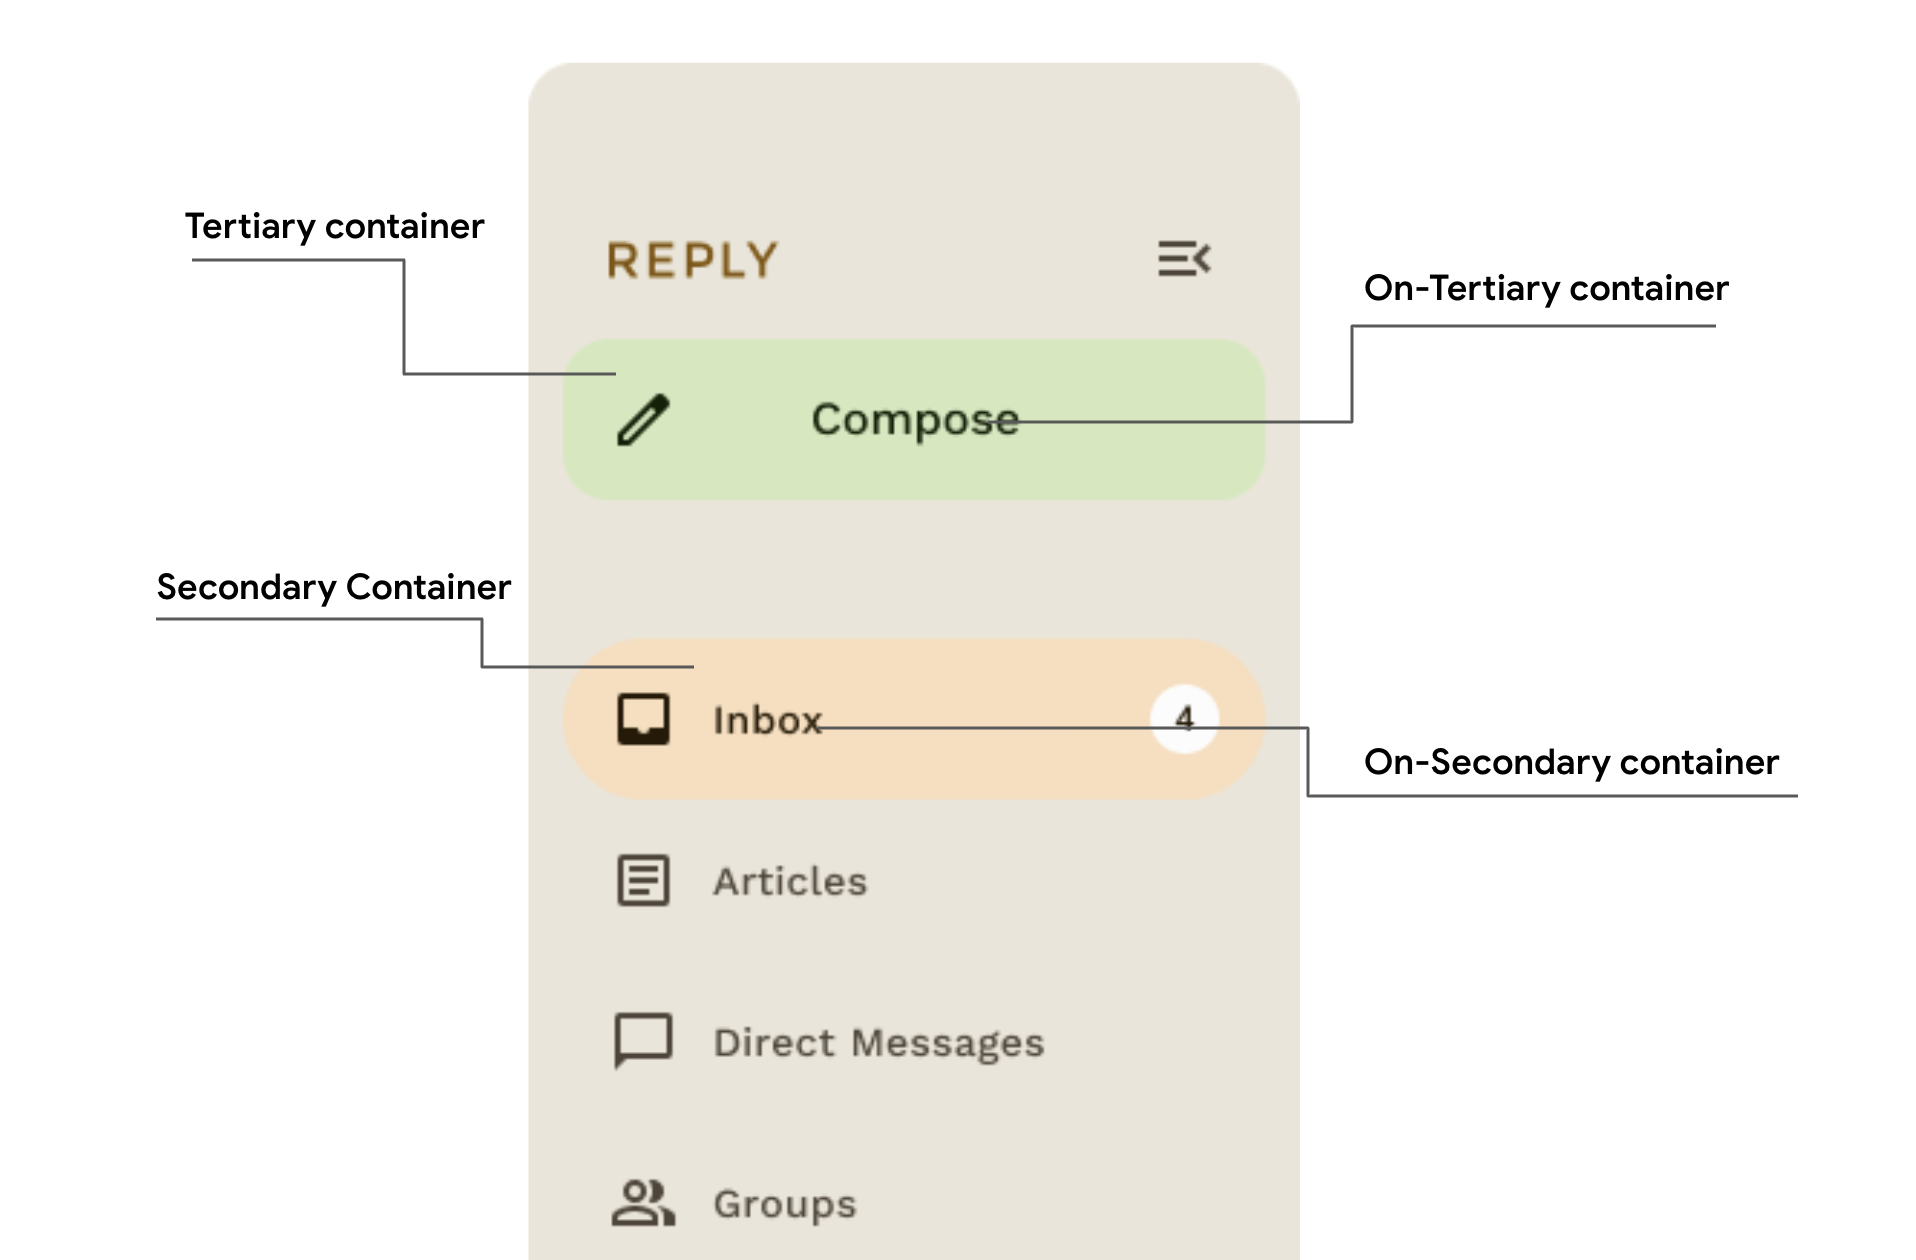
- Primary 是基础颜色,用于主要组件,如突出按钮、活动状态和凸起表面的着色。
- Secondary 关键色用于 UI 中不太突出的组件,如过滤纸片,并扩展了颜色表达的机会。
- Tertiary 关键色用于派生对比度高的强调色角色,可用于平衡 Primary 和 Secondary 颜色,或增强对元素的关注。
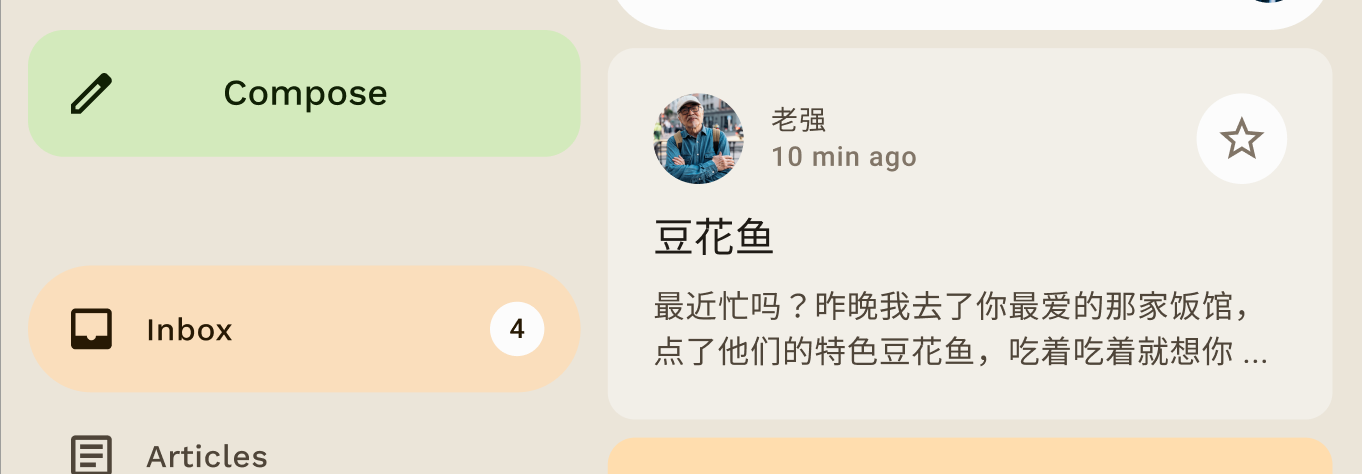
Reply 示例应用设计使用 primary-container 上的 on-primary-container 颜色来强调选定的项目。
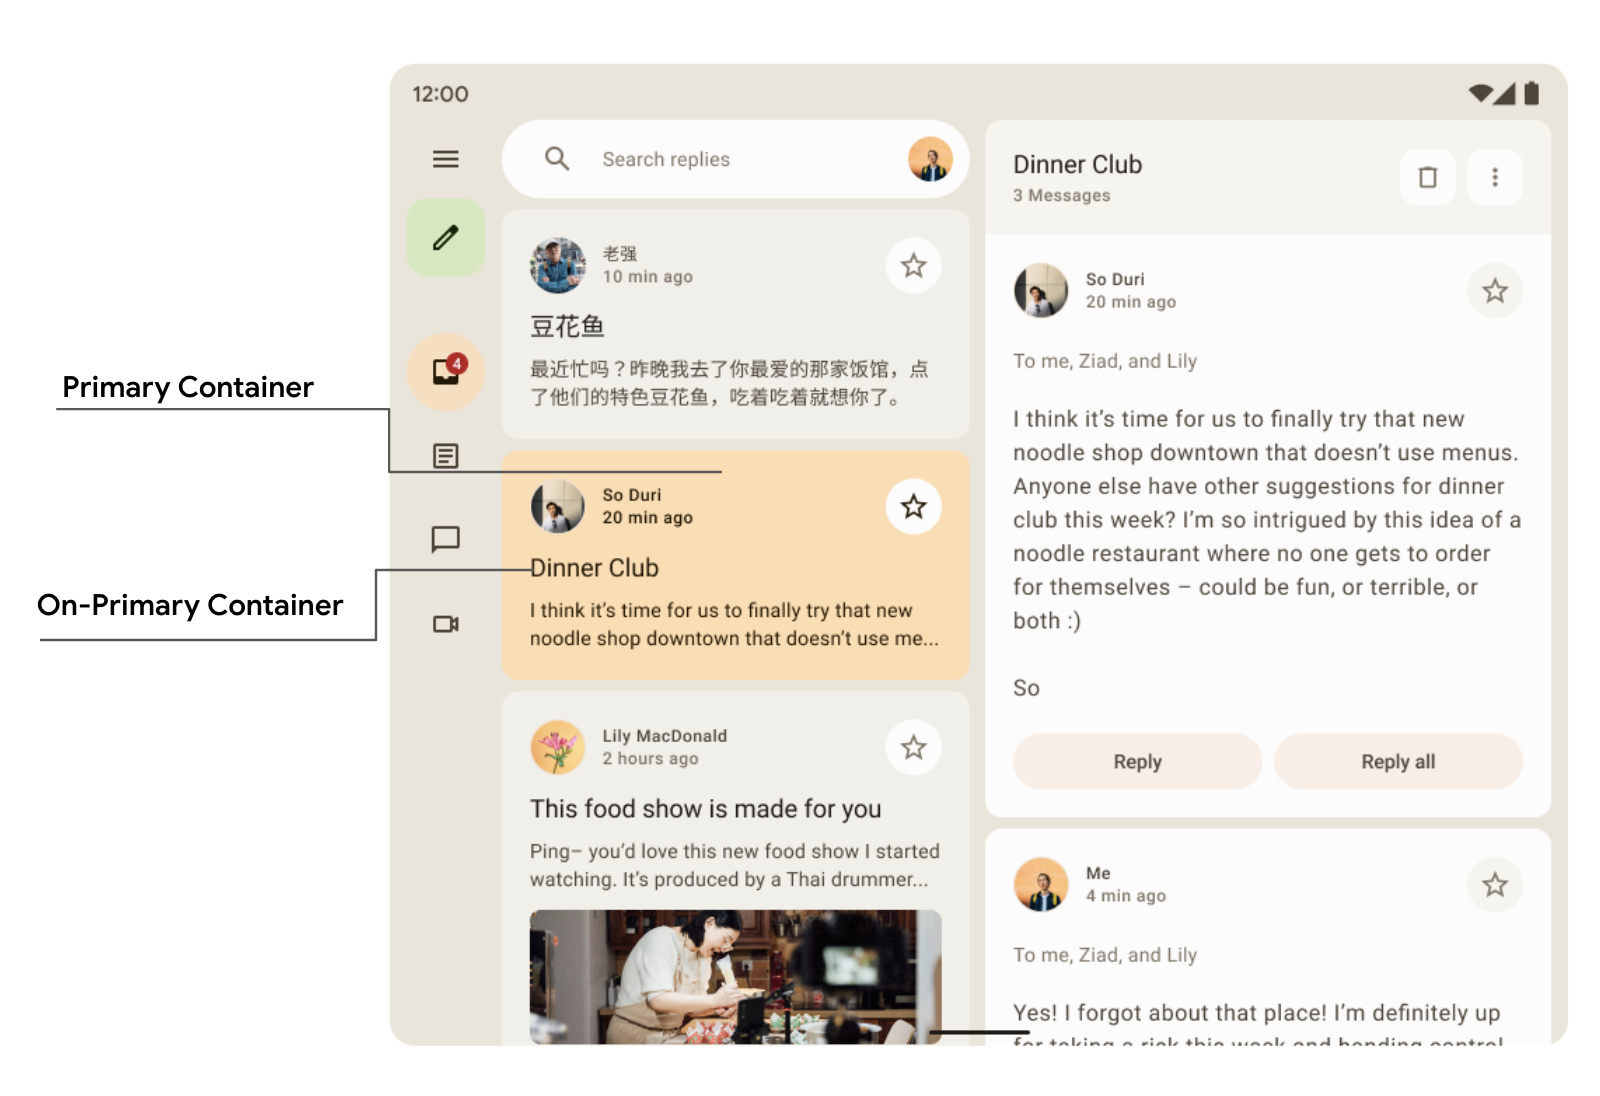
Card( colors = CardDefaults.cardColors( containerColor = if (isSelected) MaterialTheme.colorScheme.primaryContainer else MaterialTheme.colorScheme.surfaceVariant ) ) { Text( text = "Dinner club", style = MaterialTheme.typography.bodyLarge, color = if (isSelected) MaterialTheme.colorScheme.onPrimaryContainer else MaterialTheme.colorScheme.onSurface, ) }
在这里您可以看到在 Reply 导航抽屉式菜单中,secondary 和 tertiary 容器颜色如何对比使用,以创建强调和突出。
排版
Material Design 3 定义了一个字体排版比例,包括从 Material Design 2 调整而来的文本样式。命名和分组已简化为:display、headline、title、body 和 label,每个都有大、中、小尺寸。
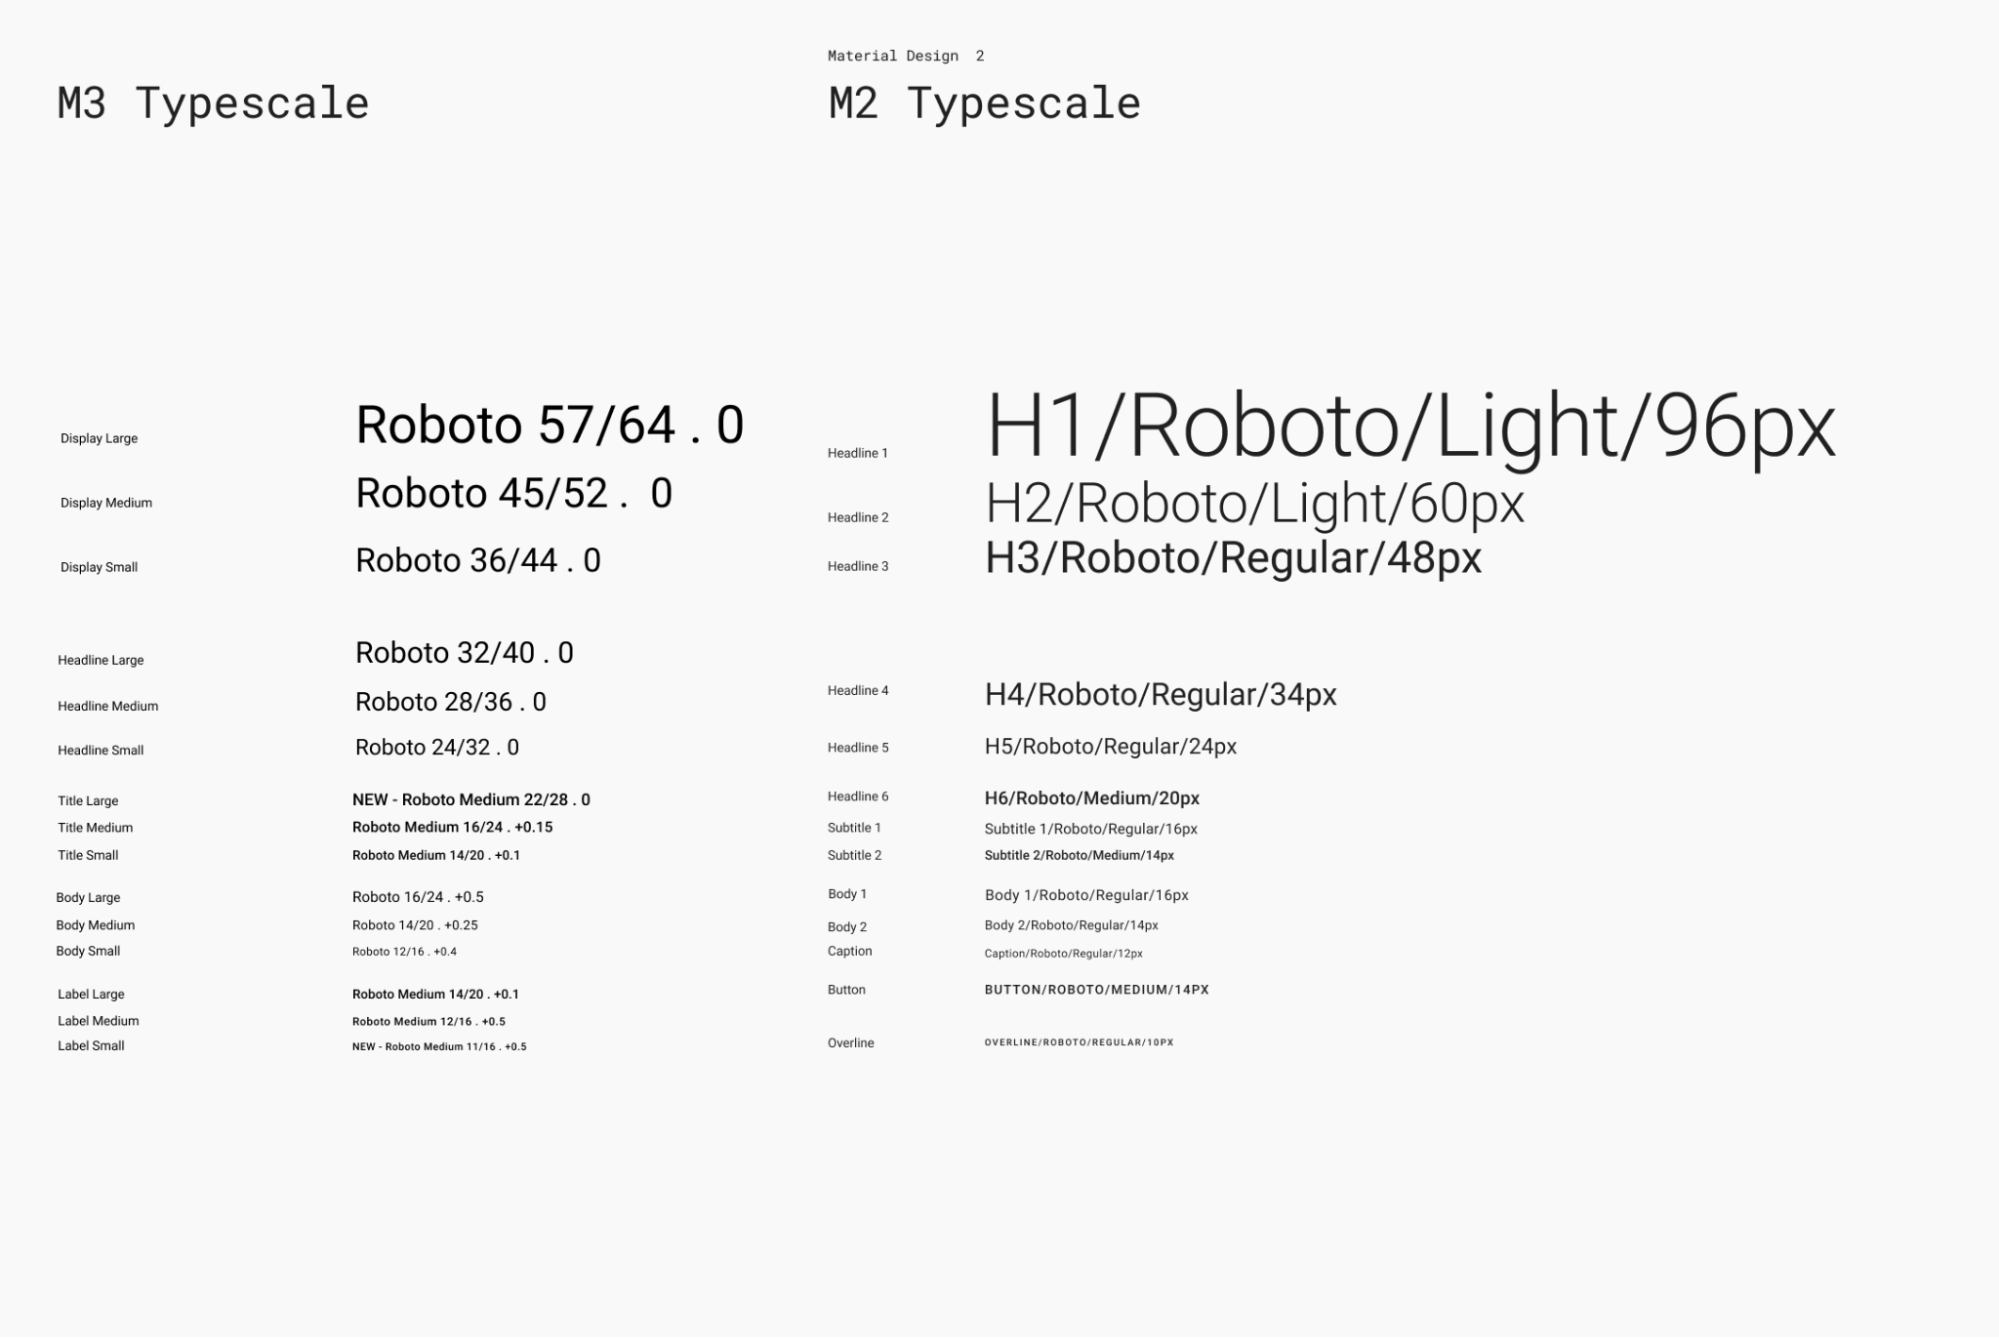
| M3 | 默认字体大小/行高 |
displayLarge |
Roboto 57/64 |
displayMedium |
Roboto 45/52 |
displaySmall |
Roboto 36/44 |
headlineLarge |
Roboto 32/40 |
headlineMedium |
Roboto 28/36 |
headlineSmall |
Roboto 24/32 |
titleLarge |
新版 - Roboto Medium 22/28 |
titleMedium |
Roboto Medium 16/24 |
titleSmall |
Roboto Medium 14/20 |
bodyLarge |
Roboto 16/24 |
bodyMedium |
Roboto 14/20 |
bodySmall |
Roboto 12/16 |
labelLarge |
Roboto Medium 14/20 |
labelMedium |
Roboto Medium 12/16 |
labelSmall |
新版 Roboto Medium, 11/16 |
定义排版
Compose 提供了 M3 Typography 类——以及现有的 TextStyle 和 字体相关 类——来建模 Material 3 字体排版比例。Typography 构造函数为每种样式提供了默认值,因此您可以省略任何不想自定义的参数
val replyTypography = Typography( titleLarge = TextStyle( fontWeight = FontWeight.SemiBold, fontSize = 22.sp, lineHeight = 28.sp, letterSpacing = 0.sp ), titleMedium = TextStyle( fontWeight = FontWeight.SemiBold, fontSize = 16.sp, lineHeight = 24.sp, letterSpacing = 0.15.sp ), // .. ) // ..
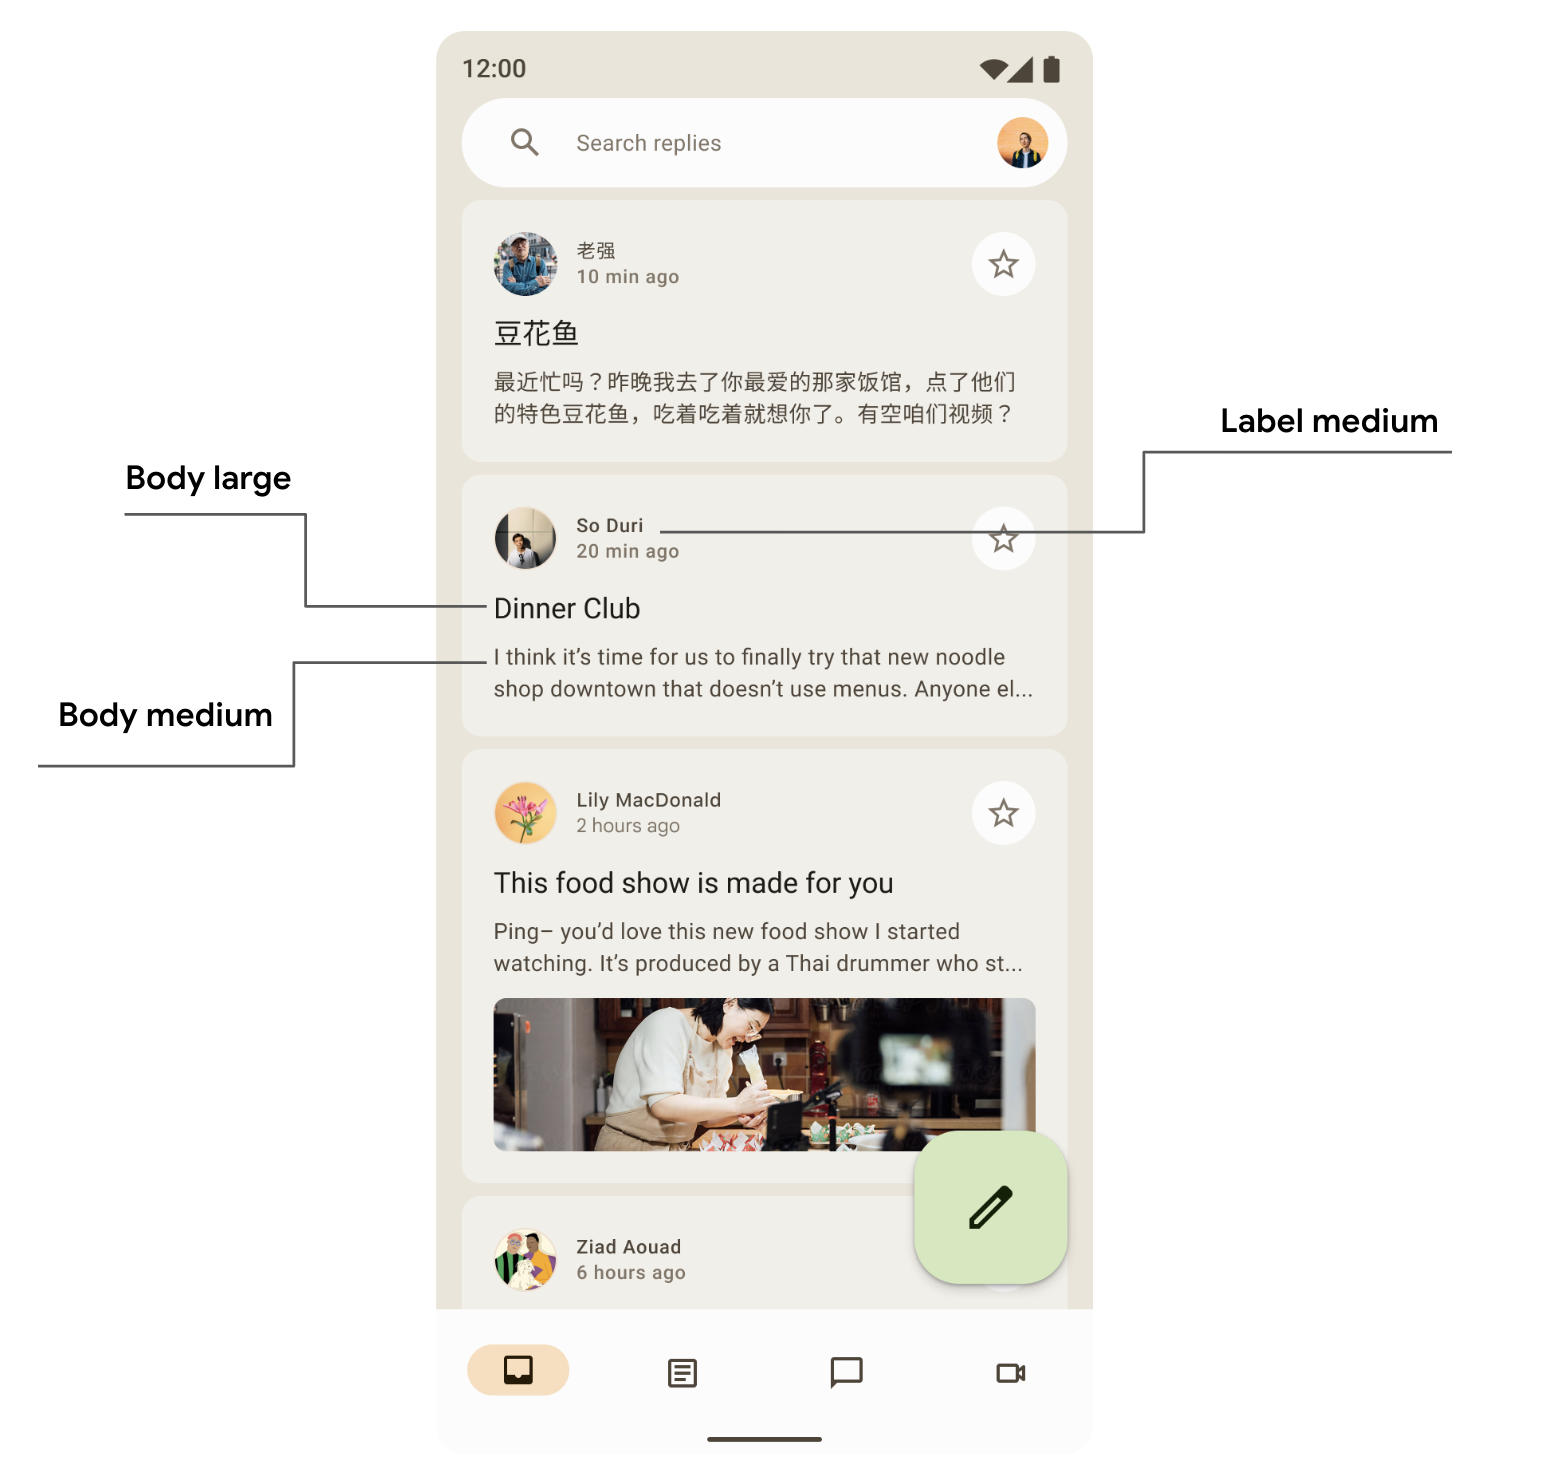
您的产品可能不需要 Material Design 字体排版比例中的所有 15 种默认样式。在此示例中,为减少的集合选择了五种尺寸,其余的则省略。
您可以通过更改 TextStyle 和 字体相关 属性(如 fontFamily 和 letterSpacing)的默认值来自定义排版。
bodyLarge = TextStyle( fontWeight = FontWeight.Normal, fontFamily = FontFamily.SansSerif, fontStyle = FontStyle.Italic, fontSize = 16.sp, lineHeight = 24.sp, letterSpacing = 0.15.sp, baselineShift = BaselineShift.Subscript ),
定义好 Typography 后,将其传递给 M3 MaterialTheme
MaterialTheme( typography = replyTypography, ) { // M3 app Content }
使用文本样式
您可以使用 MaterialTheme.typography 检索提供给 M3 MaterialTheme 可组合项的排版样式
Text( text = "Hello M3 theming", style = MaterialTheme.typography.titleLarge ) Text( text = "you are learning typography", style = MaterialTheme.typography.bodyMedium )
您可以阅读更多关于 Material 指南中应用排版的信息。
形状
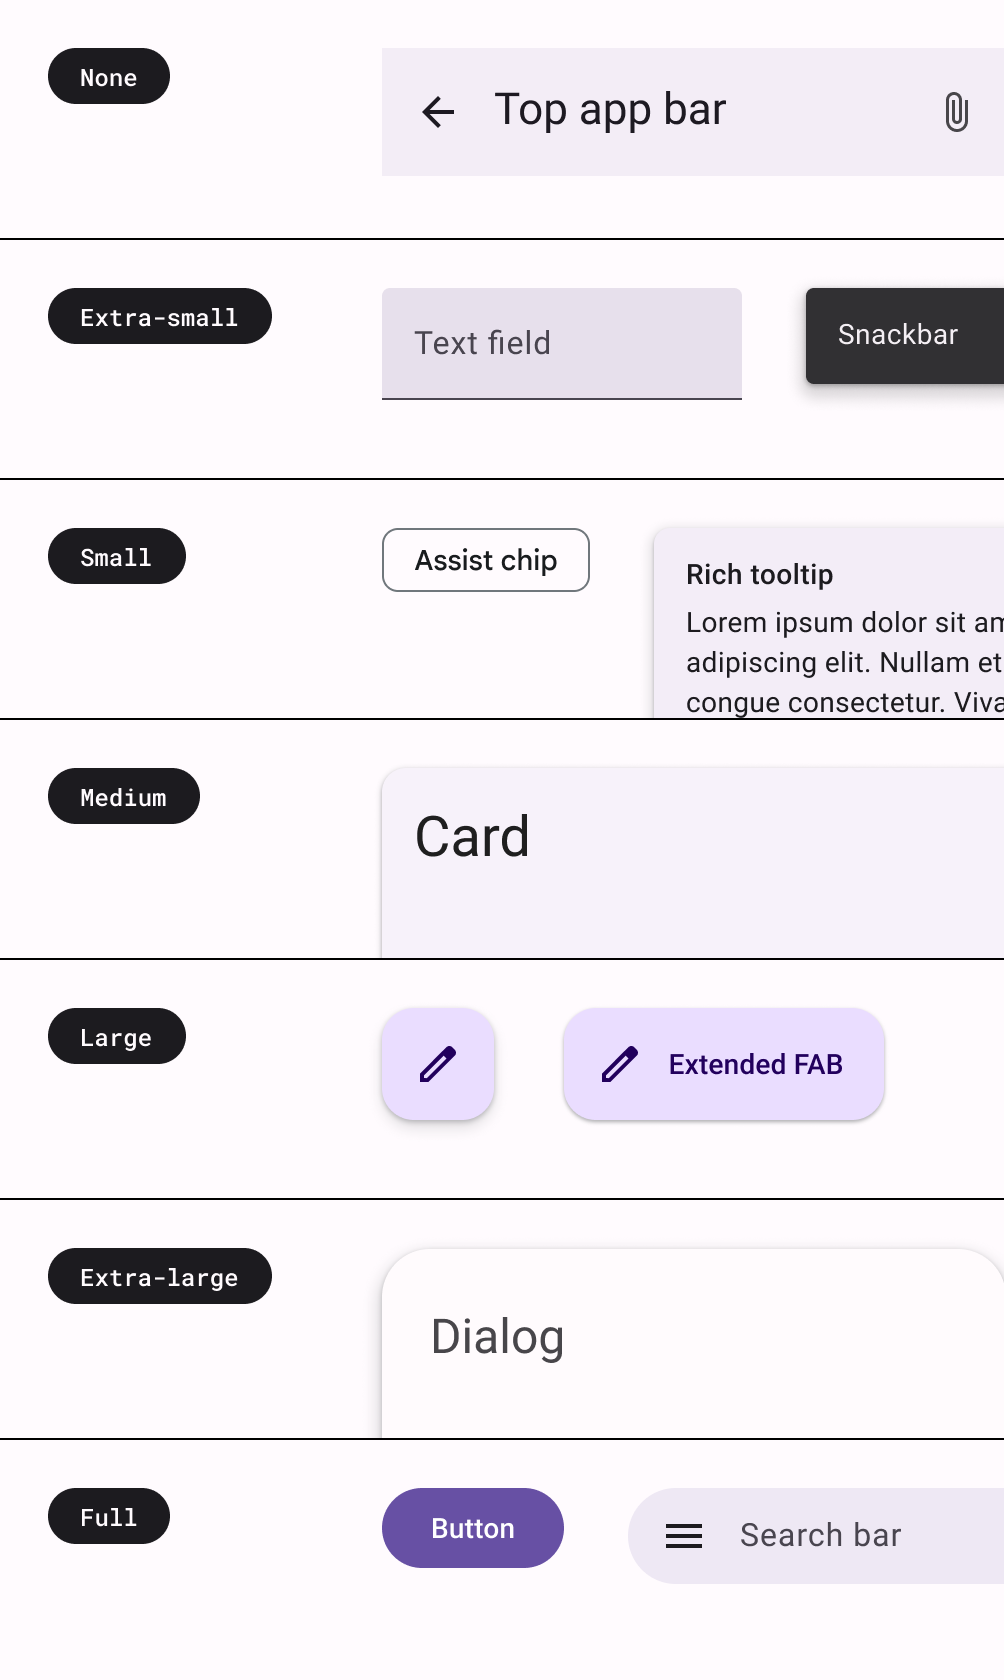
Material 表面可以以不同的形状显示。形状引导注意力、识别组件、传达状态并表达品牌。
形状比例定义了容器圆角的样式,提供从方形到完全圆形的圆角范围。
定义形状
Compose 提供了 M3 Shapes 类,并扩展了参数以支持新的 M3 形状。M3 形状比例更像是字体排版比例,可在整个 UI 中实现富有表现力的形状范围。
有不同尺寸的形状
- 超小
- 小
- 中
- 大
- 超大
默认情况下,每个形状都有一个默认值,但您可以覆盖这些值
val replyShapes = Shapes( extraSmall = RoundedCornerShape(4.dp), small = RoundedCornerShape(8.dp), medium = RoundedCornerShape(12.dp), large = RoundedCornerShape(16.dp), extraLarge = RoundedCornerShape(24.dp) )
定义好 Shapes 后,您可以将其传递给 M3 MaterialTheme
MaterialTheme( shapes = replyShapes, ) { // M3 app Content }
使用形状
您可以为 MaterialTheme 中的所有组件自定义形状比例,也可以按组件自定义。
应用具有默认值的中等和大型形状
Card(shape = MaterialTheme.shapes.medium) { /* card content */ } FloatingActionButton( shape = MaterialTheme.shapes.large, onClick = { } ) { /* fab content */ }
还有两种形状——RectangleShape 和 CircleShape——它们是 Compose 的一部分。RectangleShape 没有边框半径,而 CircleShape 显示完全圆形的边缘
Card(shape = RectangleShape) { /* card content */ } Card(shape = CircleShape) { /* card content */ }
下面的示例演示了应用了默认形状值的一些组件
您可以阅读更多关于 Material 指南中应用形状的信息。
强调
M3 中的强调通过颜色的变化及其“on-color”组合来提供。在 M3 中,有两种方法可以为 UI 添加强调
- 使用来自扩展 M3 颜色系统的 surface、surface-variant 和 background,以及 on-surface、on-surface-variants 颜色。例如,surface 可以与 on-surface-variant 结合使用,而 surface-variant 可以与 on-surface 结合使用,以提供不同程度的强调。

- 为文本使用不同的字重。上面,您已经看到我们可以为我们的字体排版比例提供自定义字重以提供不同的强调。
bodyLarge = TextStyle( fontWeight = FontWeight.Bold ), bodyMedium = TextStyle( fontWeight = FontWeight.Normal )
海拔
Material 3 主要使用色调叠加来表示海拔。这是一种区分容器和表面之间的新方法——增加色调海拔会使用更突出的色调——此外还有阴影。
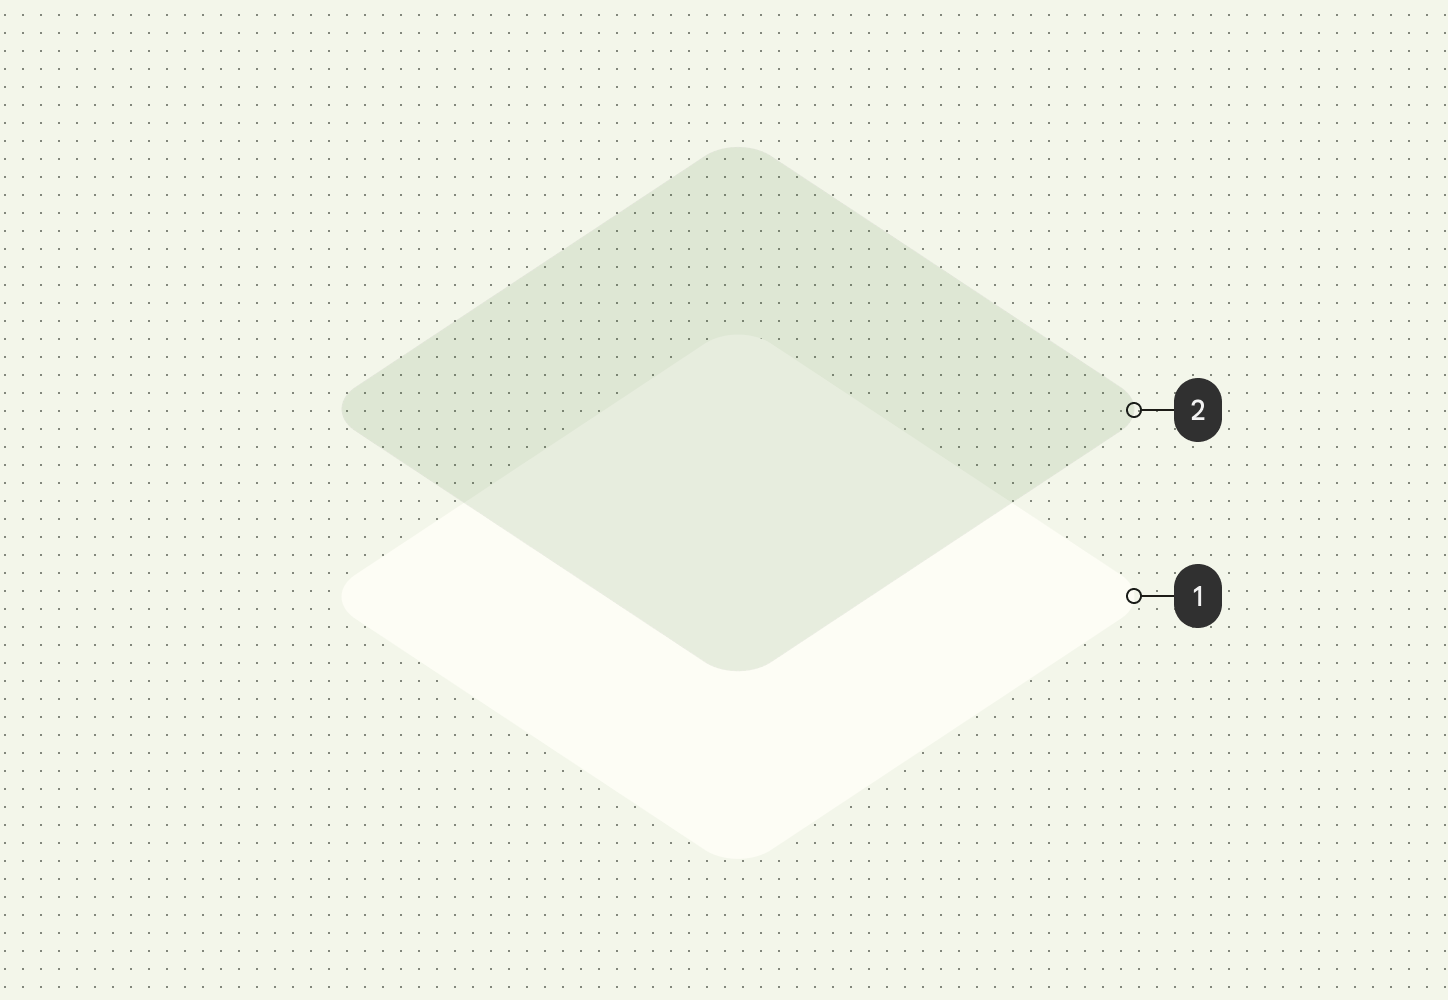
深色主题中的海拔叠加也已在 Material 3 中更改为色调颜色叠加。叠加颜色来自主色调槽位。
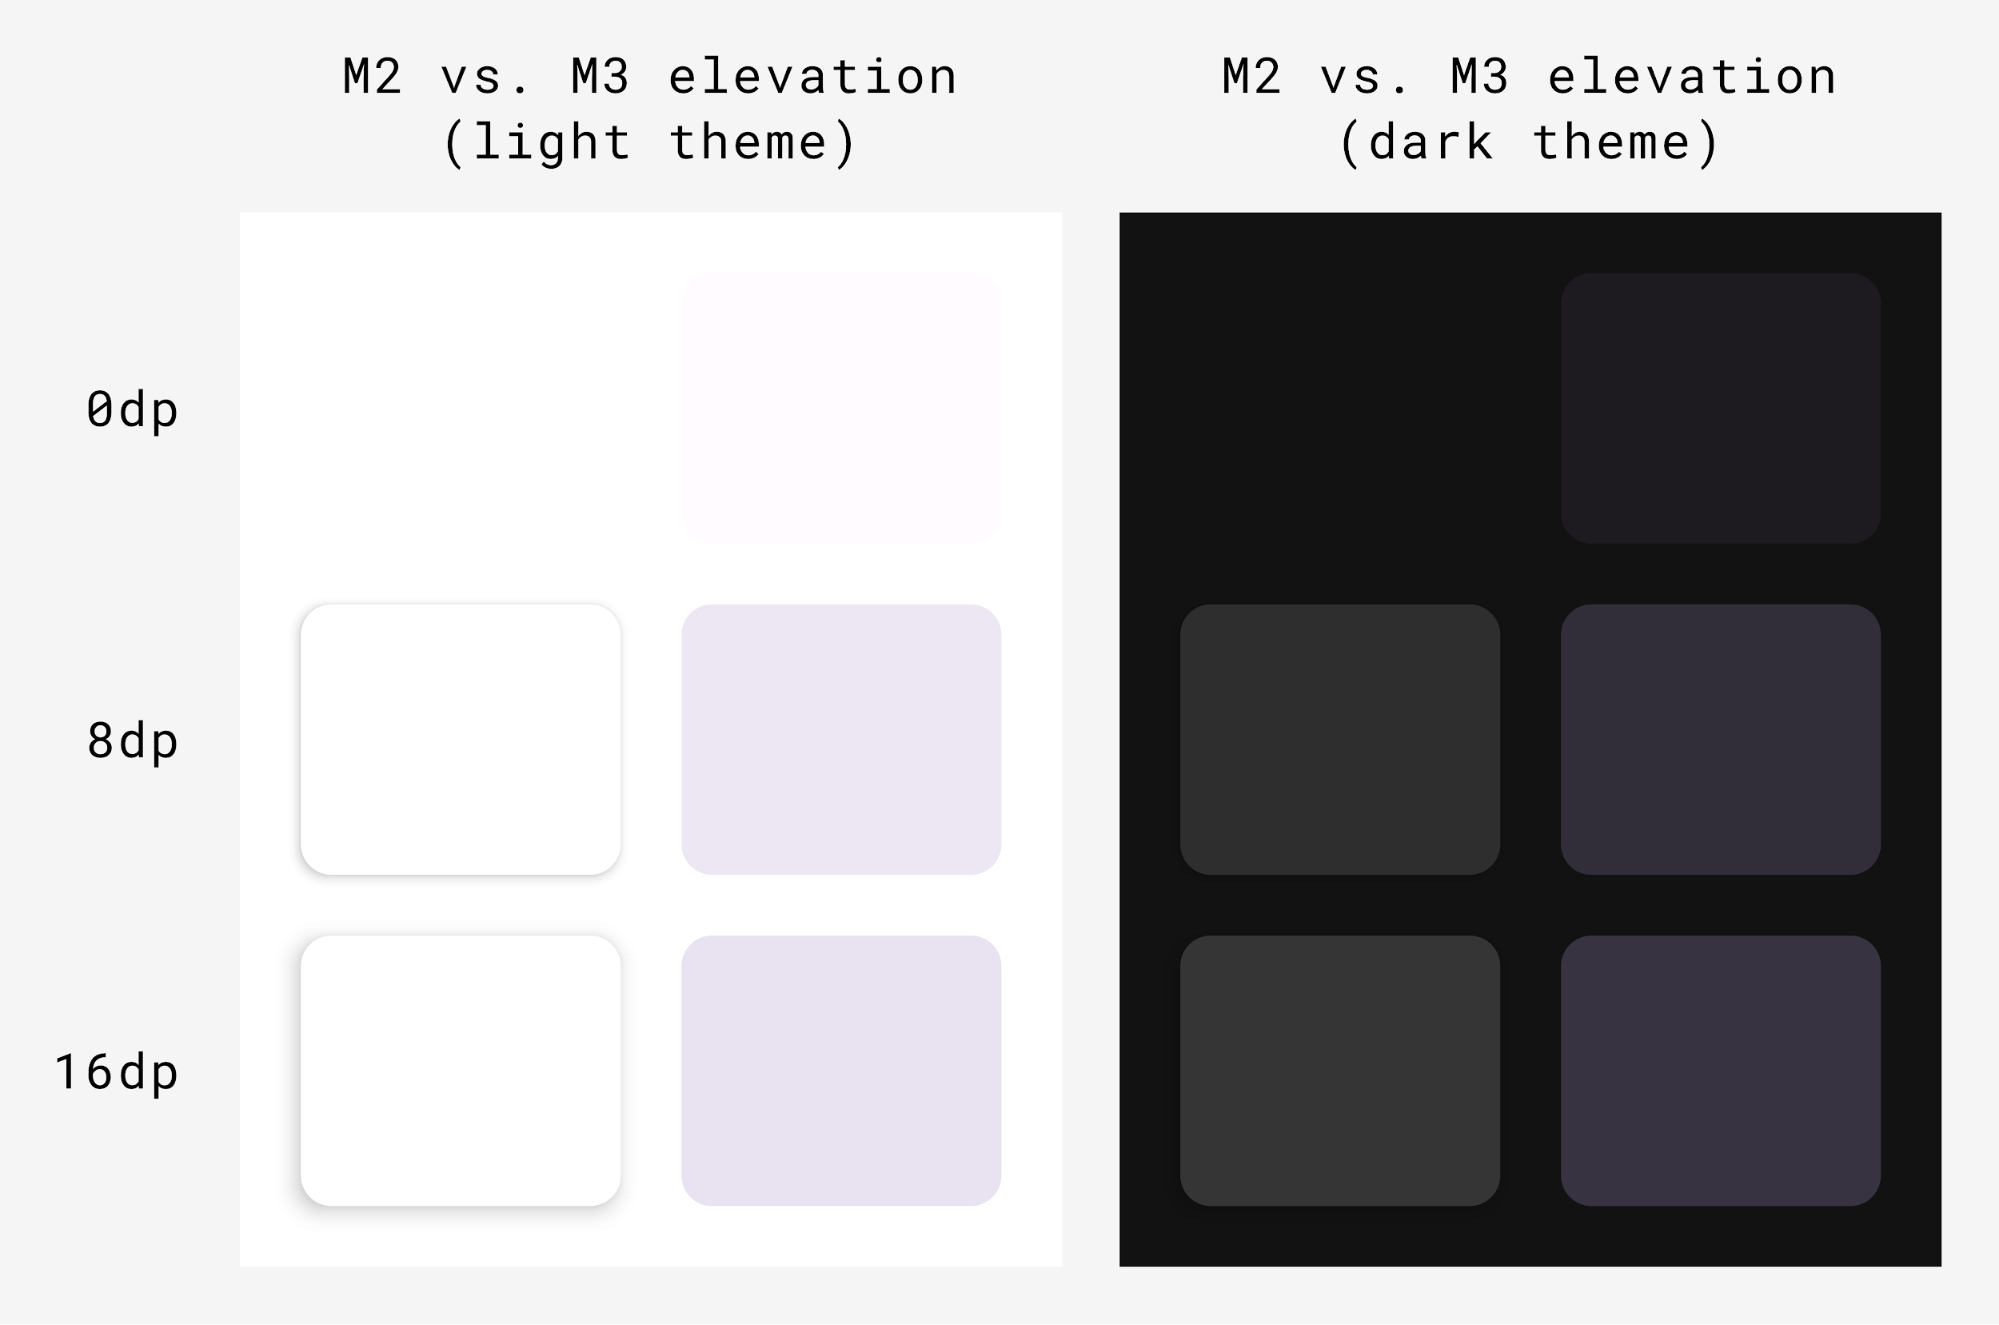
M3 Surface——大多数 M3 组件背后的可组合项——支持色调和阴影海拔
Surface( modifier = Modifier, tonalElevation = /*... shadowElevation = /*... ) { Column(content = content) }
Material 组件
Material Design 附带一套丰富的Material 组件(如按钮、纸片、卡片、导航栏),这些组件已遵循 Material 主题,可帮助您制作精美的 Material Design 应用。您可以直接使用具有默认属性的组件。
Button(onClick = { /*..*/ }) { Text(text = "My Button") }
M3 提供了同一组件的多个版本,以便根据强调和关注点在不同角色中使用。
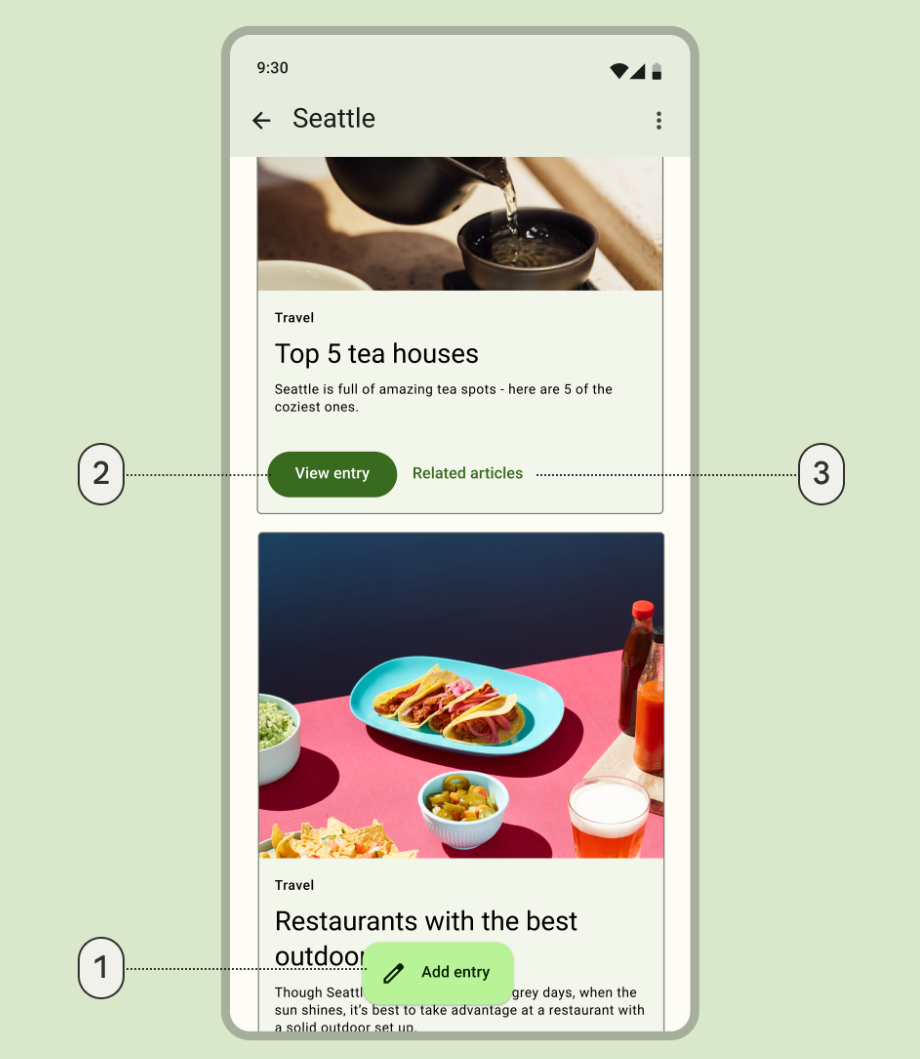
- 用于最高强调动作的扩展浮动操作按钮
ExtendedFloatingActionButton( onClick = { /*..*/ }, modifier = Modifier ) { Icon( imageVector = Icons.Default.Edit, contentDescription = stringResource(id = R.string.edit), ) Text( text = stringResource(id = R.string.add_entry), ) }
- 用于高强调动作的填充按钮
Button(onClick = { /*..*/ }) { Text(text = stringResource(id = R.string.view_entry)) }
- 用于低强调动作的文本按钮
TextButton(onClick = { /*..*/ }) { Text(text = stringResource(id = R.string.replated_articles)) }
您可以阅读更多关于 Material 按钮和其他组件的信息。Material 3 提供了各种各样的组件套件,例如按钮、应用栏、导航组件,它们是专门为不同的用例和屏幕尺寸设计的。
导航组件
Material 还提供了几个导航组件,可帮助您根据不同的屏幕尺寸和状态实现导航。
NavigationBar 用于紧凑型设备,当您想定位 5 个或更少目的地时
NavigationBar(modifier = Modifier.fillMaxWidth()) { Destinations.entries.forEach { replyDestination -> NavigationBarItem( selected = selectedDestination == replyDestination, onClick = { }, icon = { } ) } }
NavigationRail 用于中小型平板电脑或横向模式下的手机。它为用户提供人体工程学,并改善了这些设备的用户体验。
NavigationRail( modifier = Modifier.fillMaxHeight(), ) { Destinations.entries.forEach { replyDestination -> NavigationRailItem( selected = selectedDestination == replyDestination, onClick = { }, icon = { } ) } }
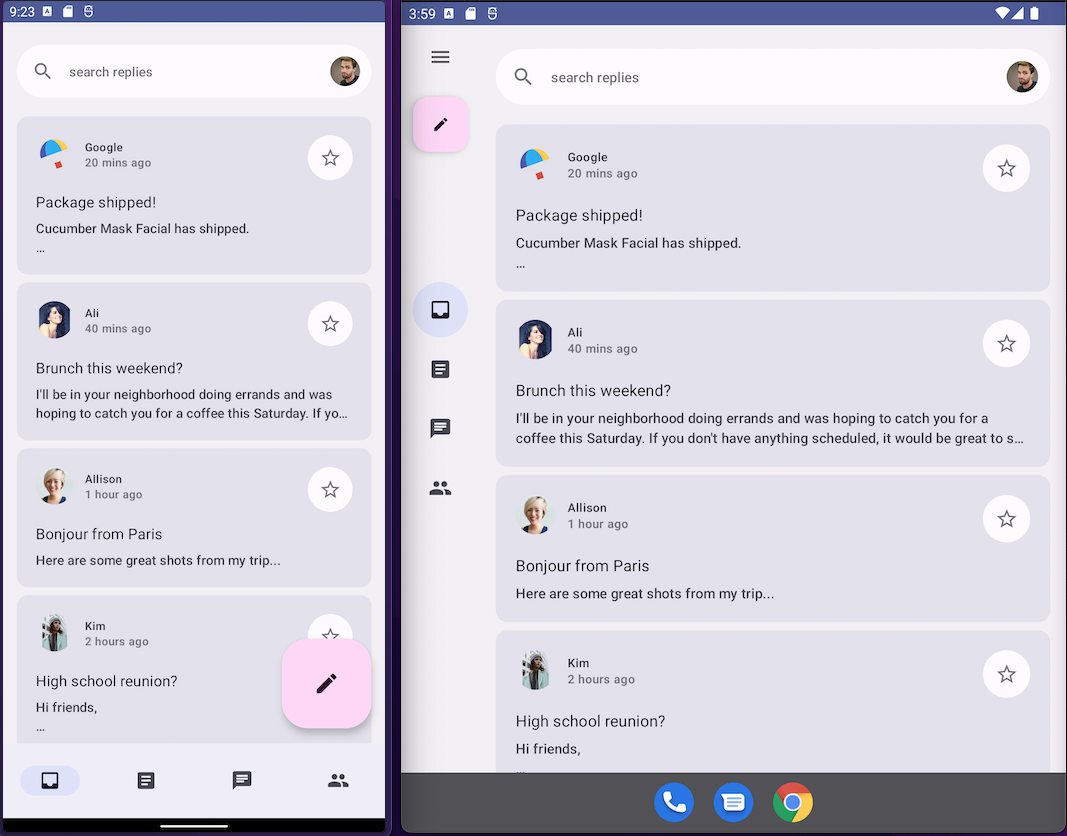
BottomNavigationBar(左)和 NavigationRail(右)的展示Reply 默认主题同时使用两者,为所有设备尺寸提供沉浸式用户体验。
NavigationDrawer 用于中大型平板电脑,其中有足够的空间显示详细信息。您可以将 PermanentNavigationDrawer 或 ModalNavigationDrawer 与 NavigationRail 一起使用。
PermanentNavigationDrawer(modifier = Modifier.fillMaxHeight(), drawerContent = { Destinations.entries.forEach { replyDestination -> NavigationRailItem( selected = selectedDestination == replyDestination, onClick = { }, icon = { }, label = { } ) } }) { }
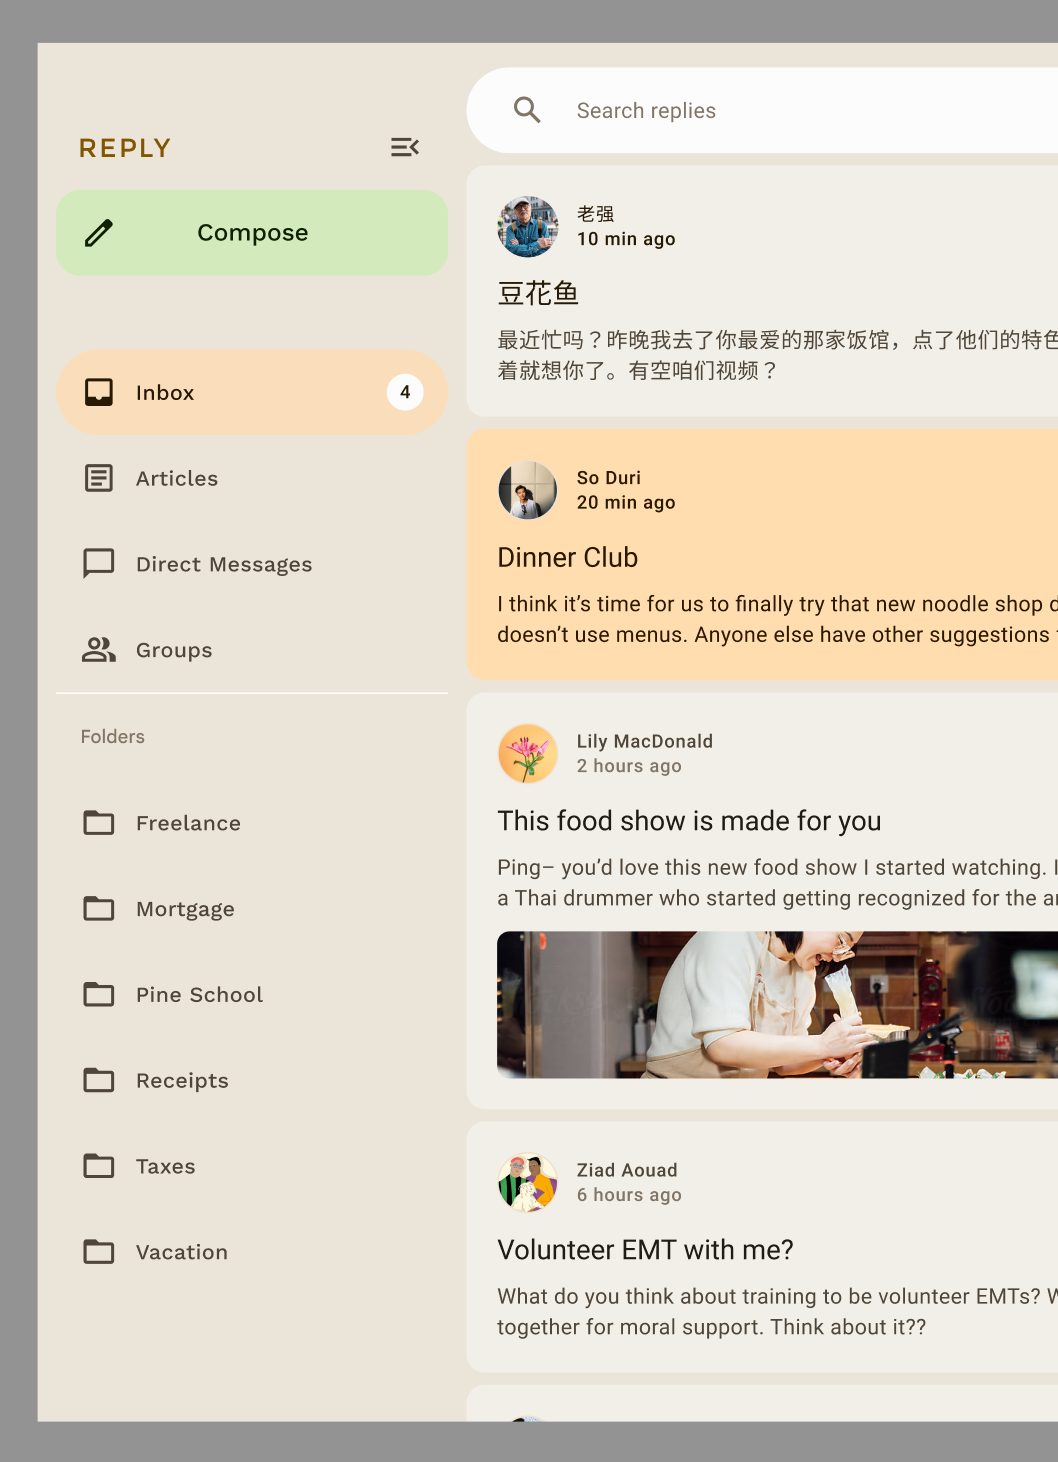
导航选项增强了用户体验、人体工程学和可达性。您可以在Compose 自适应 Codelab 中了解更多关于 Material 导航组件的信息。
自定义组件的主题
M3 鼓励个性化和灵活性。所有组件都应用了默认颜色,但如果需要,它们会公开灵活的 API 来自定义其颜色。
大多数组件,如卡片和按钮,都提供一个默认对象,公开颜色和海拔接口,可以修改这些接口以自定义您的组件
val customCardColors = CardDefaults.cardColors( contentColor = MaterialTheme.colorScheme.primary, containerColor = MaterialTheme.colorScheme.primaryContainer, disabledContentColor = MaterialTheme.colorScheme.surface, disabledContainerColor = MaterialTheme.colorScheme.onSurface, ) val customCardElevation = CardDefaults.cardElevation( defaultElevation = 8.dp, pressedElevation = 2.dp, focusedElevation = 4.dp ) Card( colors = customCardColors, elevation = customCardElevation ) { // m3 card content }
您可以阅读更多关于自定义 Material 3 的信息。
系统界面
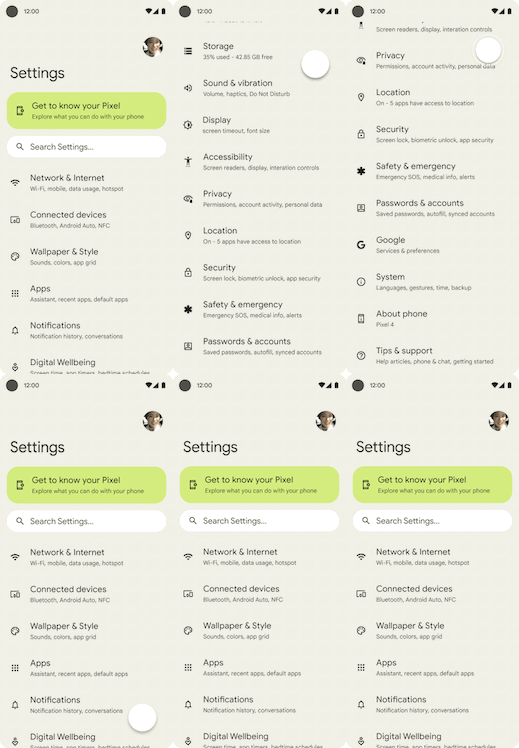
Material You 的某些方面源于 Android 12 及更高版本上的新视觉样式和系统 UI。发生更改的两个关键领域是波纹和过度滚动。无需额外工作即可实现这些更改。
涟漪
现在,涟漪效应在按下时会使用微妙的闪光照亮表面。Compose Material Ripple 在 Android 内部使用平台 RippleDrawable,因此 Android 12 及更高版本的所有 Material 组件都支持闪光涟漪。
过度滚动
过度滚动现在在滚动容器的边缘使用拉伸效果。在 Compose Foundation 1.1.0 及更高版本中,无论 API 级别如何,拉伸过度滚动默认在滚动容器可组合项中启用——例如,LazyColumn、LazyRow 和 LazyVerticalGrid。
无障碍功能
Material 组件内置的无障碍标准旨在为包容性产品设计提供基础。了解产品的无障碍性可以增强所有用户的可用性,包括视力低下、盲人、听力障碍、认知障碍、运动障碍或情境性残疾(例如手臂骨折)的用户。
颜色无障碍性
动态颜色旨在满足颜色对比度的无障碍标准。色调调色板系统对于默认情况下使任何配色方案易于访问至关重要。
Material 的颜色系统提供了标准的色调值和测量值,可用于满足可访问的对比度。
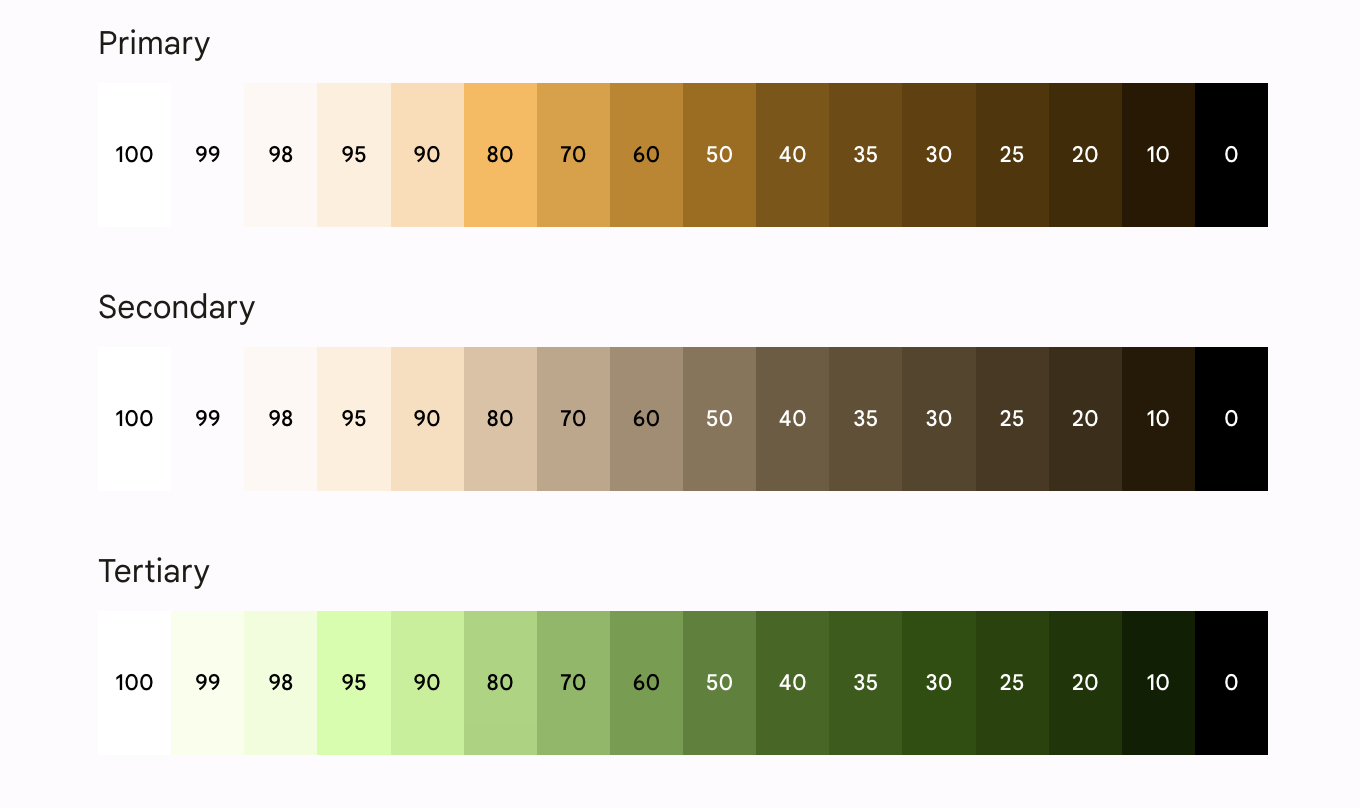
所有 Material 组件和动态主题都已经使用了一组色调调色板中的上述颜色角色,这些颜色角色经过选择以满足无障碍要求。但是,如果您正在自定义组件,请确保使用适当的颜色角色并避免不匹配。
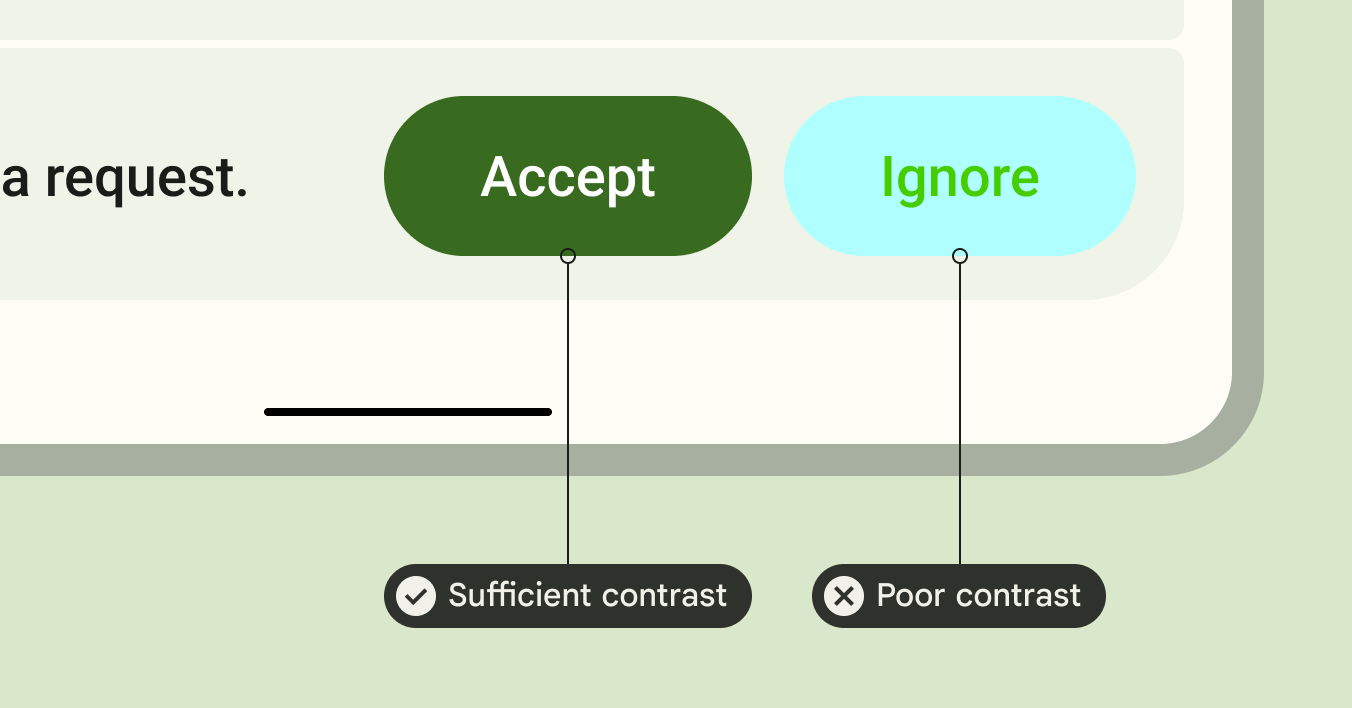
在 primary 上使用 on-primary,在 primary-container 上使用 on-primary-container,其他强调色和中性色也以此类推,以便为用户提供可访问的对比度。
在 primary 上使用 tertiary 容器会给用户带来对比度差的按钮
// ✅ Button with sufficient contrast ratio Button( onClick = { }, colors = ButtonDefaults.buttonColors( containerColor = MaterialTheme.colorScheme.primary, contentColor = MaterialTheme.colorScheme.onPrimary ) ) { } // ❌ Button with poor contrast ratio Button( onClick = { }, colors = ButtonDefaults.buttonColors( containerColor = MaterialTheme.colorScheme.tertiaryContainer, contentColor = MaterialTheme.colorScheme.primaryContainer ) ) { }
排版无障碍性
M3 字体比例更新了静态字体斜坡和值,以提供一个简化但动态的尺寸类别框架,可在不同设备上进行缩放。
例如,在 M3 中,Display Small 可以根据设备上下文(例如手机或平板电脑)分配不同的值。
大屏幕
Material 提供了关于自适应布局和可折叠设备的指导,以使您的应用易于访问并改善使用大型设备的用户的人体工程学。
Material 提供了不同类型的导航,以帮助您为大型设备提供更好的用户体验。
您可以了解更多关于 Android 大屏幕应用质量指南,并查看我们的Reply 示例,了解自适应和无障碍设计。
了解详情
要了解 Compose 中的 Material Theming,请查看以下资源
示例应用
文档
API 参考和源代码
视频
为您推荐
- 注意:禁用 JavaScript 时显示链接文本
- 在 Compose 中从 Material 2 迁移到 Material 3
- Compose 中的 Material Design 2
- Compose 中的自定义设计系统
