
本页面介绍了如何在 Compose 应用中设置字体。
设置字体
Text 具有一个 fontFamily 参数,用于设置可组合项中使用的字体。默认情况下,serif、sans-serif、monospace 和 cursive 字体系列都包含在内。
@Composable fun DifferentFonts() { Column { Text("Hello World", fontFamily = FontFamily.Serif) Text("Hello World", fontFamily = FontFamily.SansSerif) } }

您可以使用 fontFamily 属性来使用在 res/font 文件夹中定义的自定义字体和字体。
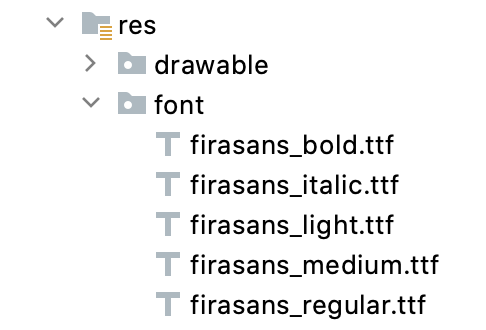
本示例展示了如何根据这些字体文件并使用 Font 函数定义 fontFamily。
val firaSansFamily = FontFamily( Font(R.font.firasans_light, FontWeight.Light), Font(R.font.firasans_regular, FontWeight.Normal), Font(R.font.firasans_italic, FontWeight.Normal, FontStyle.Italic), Font(R.font.firasans_medium, FontWeight.Medium), Font(R.font.firasans_bold, FontWeight.Bold) )
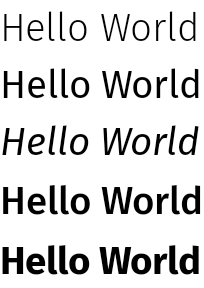
您可以将此 fontFamily 传递给您的 Text 可组合项。由于 fontFamily 可以包含不同的字重,您可以手动设置 fontWeight 来为您的文本选择正确的字重。
Column { Text(text = "text", fontFamily = firaSansFamily, fontWeight = FontWeight.Light) Text(text = "text", fontFamily = firaSansFamily, fontWeight = FontWeight.Normal) Text( text = "text", fontFamily = firaSansFamily, fontWeight = FontWeight.Normal, fontStyle = FontStyle.Italic ) Text(text = "text", fontFamily = firaSansFamily, fontWeight = FontWeight.Medium) Text(text = "text", fontFamily = firaSansFamily, fontWeight = FontWeight.Bold) }
要了解如何在整个应用中设置排版,请参阅 Compose 中的自定义设计系统。
可下载字体
从 Compose 1.2.0 开始,您可以在 Compose 应用中使用可下载字体 API 异步下载 Google 字体并在您的应用中使用它们。
目前不支持由自定义提供商提供的可下载字体。
以编程方式使用可下载字体
要从您的应用内部以编程方式下载字体,请按照以下步骤操作:
- 添加依赖项
Groovy
dependencies {
    ...
    implementation "androidx.compose.ui:ui-text-google-fonts:1.8.1"
}
Kotlin
dependencies {
    ...
    implementation("androidx.compose.ui:ui-text-google-fonts:1.8.1")
}
- 使用 Google 字体凭据初始化
GoogleFont.Provider。val provider = GoogleFont.Provider( providerAuthority = "com.google.android.gms.fonts", providerPackage = "com.google.android.gms", certificates = R.array.com_google_android_gms_fonts_certs )
- Google 字体的字体提供商授权。
- 用于验证提供商身份的字体提供商包。
- 用于验证提供商身份的证书哈希集列表。您可以在 Jetchat 示例应用中的
font_certs.xml文件中找到 Google 字体提供商所需的哈希值。
- 定义一个
FontFamily。// ... import androidx.compose.ui.text.googlefonts.GoogleFont import androidx.compose.ui.text.font.FontFamily import androidx.compose.ui.text.googlefonts.Font // ... val fontName = GoogleFont("Lobster Two") val fontFamily = FontFamily( Font(googleFont = fontName, fontProvider = provider) )
FontWeight和FontStyle分别查询字体的其他参数,如字重和样式。// ... import androidx.compose.ui.text.googlefonts.GoogleFont import androidx.compose.ui.text.font.FontFamily import androidx.compose.ui.text.googlefonts.Font // ... val fontName = GoogleFont("Lobster Two") val fontFamily = FontFamily( Font( googleFont = fontName, fontProvider = provider, weight = FontWeight.Bold, style = FontStyle.Italic ) )
- 配置要在 Text 可组合函数中使用的
FontFamily。
Text( fontFamily = fontFamily, text = "Hello World!" )

您还可以定义 Typography 来使用您的 FontFamily。
val MyTypography = Typography( bodyMedium = TextStyle( fontFamily = fontFamily, fontWeight = FontWeight.Normal, fontSize = 12.sp/*...*/ ), bodyLarge = TextStyle( fontFamily = fontFamily, fontWeight = FontWeight.Bold, letterSpacing = 2.sp, /*...*/ ), headlineMedium = TextStyle( fontFamily = fontFamily, fontWeight = FontWeight.SemiBold/*...*/ ), /*...*/ )
接下来,将 Typography 设置为您的应用主题。
MyAppTheme( typography = MyTypography )/*...*/
有关在 Compose 中结合 Material3 实现可下载字体的应用示例,请参阅 Jetchat 示例应用。
添加备用字体
您可以为您的字体确定一个备用字体链,以防字体未能正确下载。例如,如果您的可下载字体定义如下:
// ... import androidx.compose.ui.text.googlefonts.Font // ... val fontName = GoogleFont("Lobster Two") val fontFamily = FontFamily( Font(googleFont = fontName, fontProvider = provider), Font(googleFont = fontName, fontProvider = provider, weight = FontWeight.Bold) )
您可以为两种字重定义字体的默认值,如下所示:
// ... import androidx.compose.ui.text.font.Font import androidx.compose.ui.text.googlefonts.Font // ... val fontName = GoogleFont("Lobster Two") val fontFamily = FontFamily( Font(googleFont = fontName, fontProvider = provider), Font(resId = R.font.my_font_regular), Font(googleFont = fontName, fontProvider = provider, weight = FontWeight.Bold), Font(resId = R.font.my_font_regular_bold, weight = FontWeight.Bold) )
确保您添加了正确的导入。
像这样定义 FontFamily 会创建一个包含两个链(每个字重一个)的 FontFamily。加载机制将首先尝试解析在线字体,然后是您本地 R.font 资源文件夹中的字体。
调试您的实现
为了帮助您验证字体是否正确下载,您可以定义一个调试协程处理程序。您的处理程序提供了在字体异步加载失败时应采取的操作行为。
首先创建一个 CoroutineExceptionHandler。
val handler = CoroutineExceptionHandler { _, throwable -> // process the Throwable Log.e(TAG, "There has been an issue: ", throwable) }
将其传递给 createFontFamilyResolver 方法,让解析器使用新的处理程序。
CompositionLocalProvider( LocalFontFamilyResolver provides createFontFamilyResolver(LocalContext.current, handler) ) { Column { Text( text = "Hello World!", style = MaterialTheme.typography.bodyMedium ) } }
您还可以使用提供商的 isAvailableOnDevice API 来测试提供商是否可用以及证书是否配置正确。为此,您可以调用 isAvailableOnDevice 方法,如果提供商配置不正确,该方法将返回 false。
val context = LocalContext.current LaunchedEffect(Unit) { if (provider.isAvailableOnDevice(context)) { Log.d(TAG, "Success!") } }
注意事项
Google 字体需要几个月的时间才能在 Android 上提供新字体。从字体添加到 fonts.google.com 到通过可下载字体 API(在 View 系统或 Compose 中)提供,存在时间上的差距。新添加的字体在您的应用中加载时可能会失败,并出现 IllegalStateException。为了帮助开发者区分此错误与其他类型的字体加载错误,我们通过此处更改在 Compose 中为异常添加了描述性消息。如果您发现任何问题,请使用问题跟踪器报告。
使用可变字体
可变字体是一种字体格式,允许一个字体文件包含不同的样式。使用可变字体,您可以修改轴(或参数)以生成您喜欢的样式。这些轴可以是标准轴,例如字重、字宽、倾斜和斜体,也可以是自定义轴,它们在不同的可变字体之间有所不同。
使用可变字体而不是常规字体文件,您只需一个字体文件即可,而不是多个。
有关可变字体的更多背景信息,请参阅 Google 字体知识库、可用可变字体的完整目录,以及每种字体支持的轴的表格。
本文档展示了如何在 Compose 应用中实现可变字体。
加载可变字体
下载您要使用的可变字体(例如 Roboto Flex),并将其放置在您应用的
app/res/font文件夹中。请确保您添加的 .ttf文件是字体的可变字体版本,并且您的字体文件名全部小写且不包含任何特殊字符。要加载可变字体,请使用放置在
res/font/目录中的字体定义FontFamily。// In Typography.kt @OptIn(ExperimentalTextApi::class) val displayLargeFontFamily = FontFamily( Font( R.font.robotoflex_variable, variationSettings = FontVariation.Settings( FontVariation.weight(950), FontVariation.width(30f), FontVariation.slant(-6f), ) ) )
FontVariationAPI 允许您配置标准字体轴,例如字重、字宽和倾斜。这些是任何可变字体都可用的标准轴。您可以根据字体的使用位置创建不同的字体配置。可变字体仅适用于 Android O 及更高版本,因此请添加保护措施并配置适当的备用字体。
// In Typography.kt val default = FontFamily( /* * This can be any font that makes sense */ Font( R.font.robotoflex_static_regular ) ) @OptIn(ExperimentalTextApi::class) val displayLargeFontFamily = if (Build.VERSION.SDK_INT >= Build.VERSION_CODES.O) { FontFamily( Font( R.font.robotoflex_variable, variationSettings = FontVariation.Settings( FontVariation.weight(950), FontVariation.width(30f), FontVariation.slant(-6f), ) ) ) } else { default }
将设置提取到一组常量中,以便于重用,并用这些常量替换字体设置。
// VariableFontDimension.kt object DisplayLargeVFConfig { const val WEIGHT = 950 const val WIDTH = 30f const val SLANT = -6f const val ASCENDER_HEIGHT = 800f const val COUNTER_WIDTH = 500 } @OptIn(ExperimentalTextApi::class) val displayLargeFontFamily = if (Build.VERSION.SDK_INT >= Build.VERSION_CODES.O) { FontFamily( Font( R.font.robotoflex_variable, variationSettings = FontVariation.Settings( FontVariation.weight(DisplayLargeVFConfig.WEIGHT), FontVariation.width(DisplayLargeVFConfig.WIDTH), FontVariation.slant(DisplayLargeVFConfig.SLANT), ) ) ) } else { default }
配置 Material Design 3 排版以使用
FontFamily。// Type.kt val Typography = Typography( displayLarge = TextStyle( fontFamily = displayLargeFontFamily, fontSize = 50.sp, lineHeight = 64.sp, letterSpacing = 0.sp, /***/ ) )
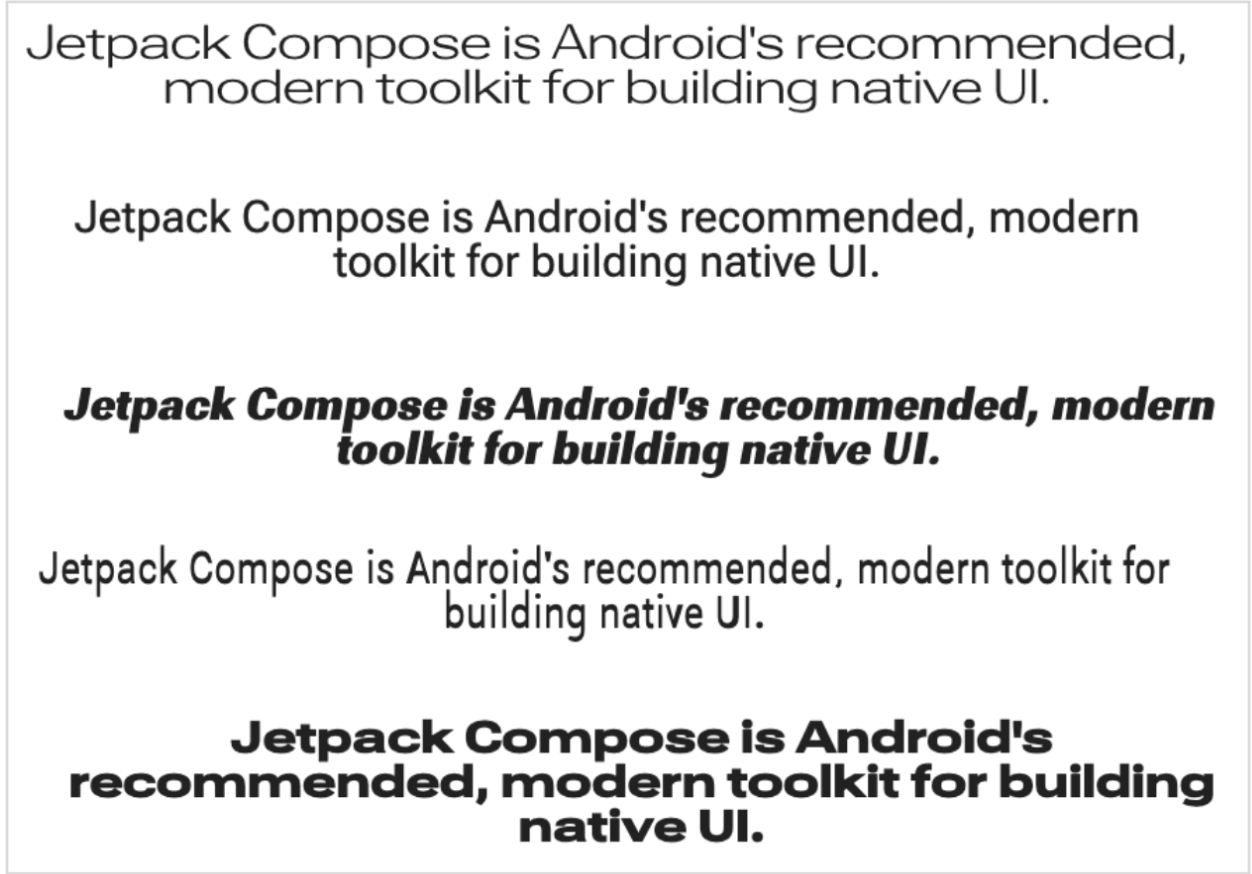
本示例使用
displayLargeMaterial 3 排版,它具有不同的默认字体设置和推荐用法。例如,您应该将displayLarge用于短小、关键的文本,因为它是屏幕上最大的文本。使用 Material 3,您可以更改
TextStyle和fontFamily的默认值来定制您的排版。在上面的代码片段中,您配置了TextStyle实例,为每个字体系列定制字体设置。现在您已经定义了排版,将其传递给 M3
MaterialTheme。MaterialTheme( colorScheme = MaterialTheme.colorScheme, typography = Typography, content = content )
最后,使用
Text可组合项并将样式指定为其中一个定义的排版样式,MaterialTheme.typography.displayLarge。@Composable @Preview fun CardDetails() { MyCustomTheme { Card( shape = RoundedCornerShape(8.dp), elevation = CardDefaults.cardElevation(defaultElevation = 4.dp), modifier = Modifier .fillMaxWidth() .padding(16.dp) ) { Column( modifier = Modifier.padding(16.dp) ) { Text( text = "Compose", style = MaterialTheme.typography.displayLarge, modifier = Modifier.padding(bottom = 8.dp), maxLines = 1 ) Text( text = "Beautiful UIs on Android", style = MaterialTheme.typography.headlineMedium, modifier = Modifier.padding(bottom = 8.dp), maxLines = 2 ) Text( text = "Jetpack Compose is Android’s recommended modern toolkit for building native UI. It simplifies and accelerates UI development on Android. Quickly bring your app to life with less code, powerful tools, and intuitive Kotlin APIs.", style = MaterialTheme.typography.bodyLarge, modifier = Modifier.padding(bottom = 8.dp), maxLines = 3 ) } } } }
每个
Text可组合项都通过其 Material 主题的样式进行配置,并包含不同的可变字体配置。您可以使用MaterialTheme.typography来检索提供给 M3MaterialTheme可组合项的排版。

使用自定义轴
字体也可以有自定义轴。这些轴在字体文件本身中定义。例如,Roboto Flex 字体具有上行笔高度 ("YTAS") 轴,用于调整小写上行笔的高度,而计数器宽度 ("XTRA") 则调整每个字母的宽度。
您可以使用 FontVariation 设置更改这些轴的值。
有关您可以为字体配置的自定义轴的更多信息,请参阅每种字体支持的轴的表格。
要使用自定义轴,请为自定义
ascenderHeight和counterWidth轴定义函数。fun ascenderHeight(ascenderHeight: Float): FontVariation.Setting { require(ascenderHeight in 649f..854f) { "'Ascender Height' must be in 649f..854f" } return FontVariation.Setting("YTAS", ascenderHeight) } fun counterWidth(counterWidth: Int): FontVariation.Setting { require(counterWidth in 323..603) { "'Counter width' must be in 323..603" } return FontVariation.Setting("XTRA", counterWidth.toFloat()) }
这些函数执行以下操作:
- 定义它们可以接受的值的保护机制。如您在可变字体目录中看到的,
ascenderHeight (YTAS)的最小值为649f,最大值为854f。 - 返回字体设置,以便配置可以添加到字体中。
FontVariation.Setting()方法中,轴名称(YTAS, XTRA)是硬编码的,它将值作为参数。
- 定义它们可以接受的值的保护机制。如您在可变字体目录中看到的,
使用带有字体配置的轴,为加载的每个
Font传递附加参数。@OptIn(ExperimentalTextApi::class) val displayLargeFontFamily = if (Build.VERSION.SDK_INT >= Build.VERSION_CODES.O) { FontFamily( Font( R.font.robotoflex_variable, variationSettings = FontVariation.Settings( FontVariation.weight(DisplayLargeVFConfig.WEIGHT), FontVariation.width(DisplayLargeVFConfig.WIDTH), FontVariation.slant(DisplayLargeVFConfig.SLANT), ascenderHeight(DisplayLargeVFConfig.ASCENDER_HEIGHT), counterWidth(DisplayLargeVFConfig.COUNTER_WIDTH) ) ) ) } else { default }
请注意,现在小写字母的上行笔高度增加了,并且其他文本更宽。

其他资源
有关更多信息,请参阅以下关于可变字体的博文:
为您推荐
- 注意:当 JavaScript 关闭时,会显示链接文本。
- Compose 中的资源
- 设置文本样式
- Compose 中的 Material Design 2