
卡片不是应用,因此它们以不同的机制部署和启动。当设备启用开发者选项时(模拟器默认启用这些功能),支持卡片开发的其他功能将可在 Android Studio 和 adb 中使用。
部署卡片
要部署您的卡片,您可以使用 Android Studio 将您的应用安装到实体设备或模拟器上,如构建并运行您的应用中所述。然后,按照与普通用户相同的步骤,手动将卡片添加到卡片轮播界面。
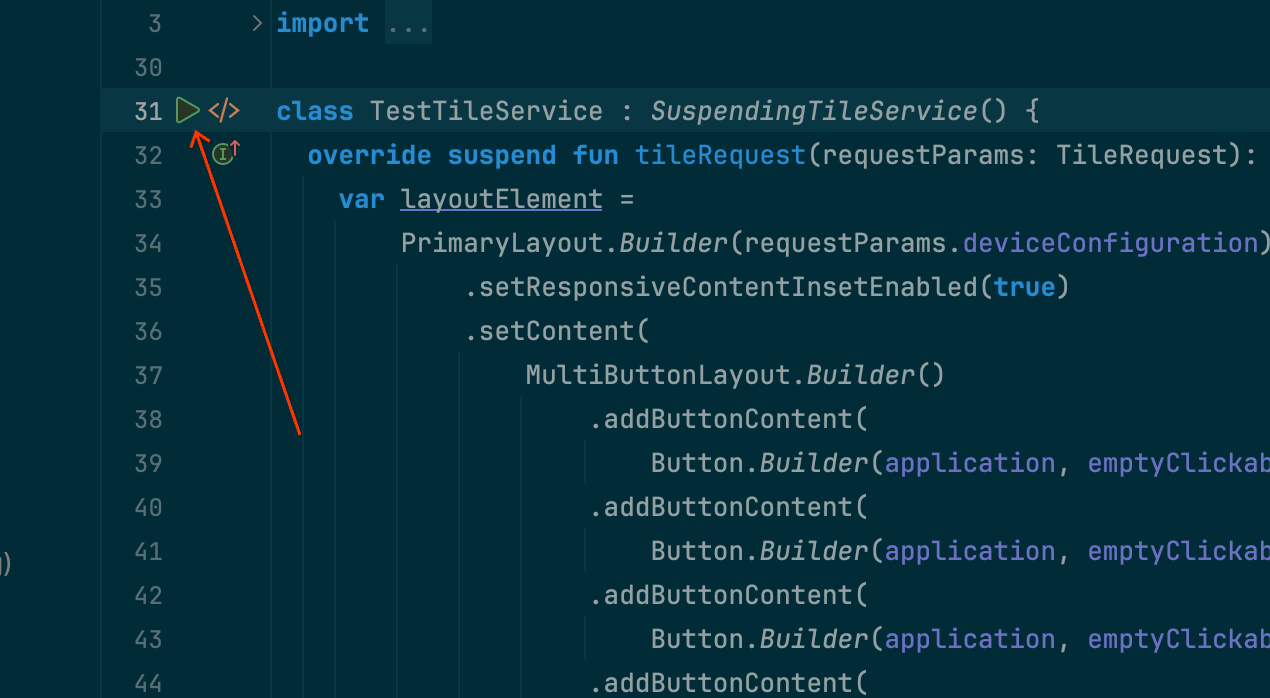
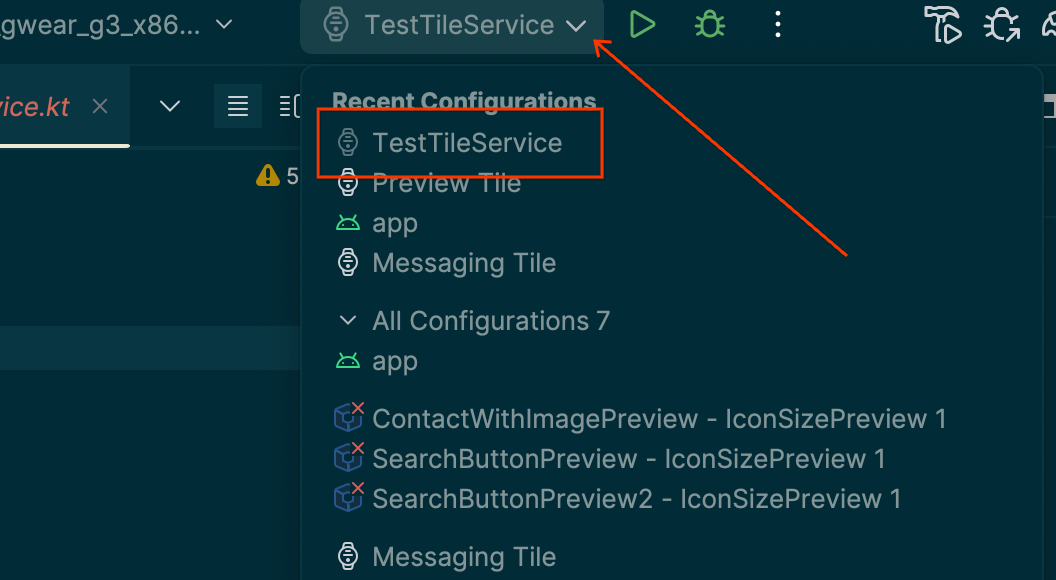
在积极开发期间,您可能会发现使用 Android Studio 的“Wear OS 卡片”运行/调试配置功能更简单、更快捷。此方法会自动部署并激活您的卡片,无需额外的手动步骤即可立即进行互动。
自动创建配置
部署和运行卡片最简单的方法是使用代码编辑区中的“运行服务”图标。如果运行配置尚不存在,此操作会自动创建运行配置。如需了解详情,请参阅Wear OS 运行/调试配置。
手动创建配置
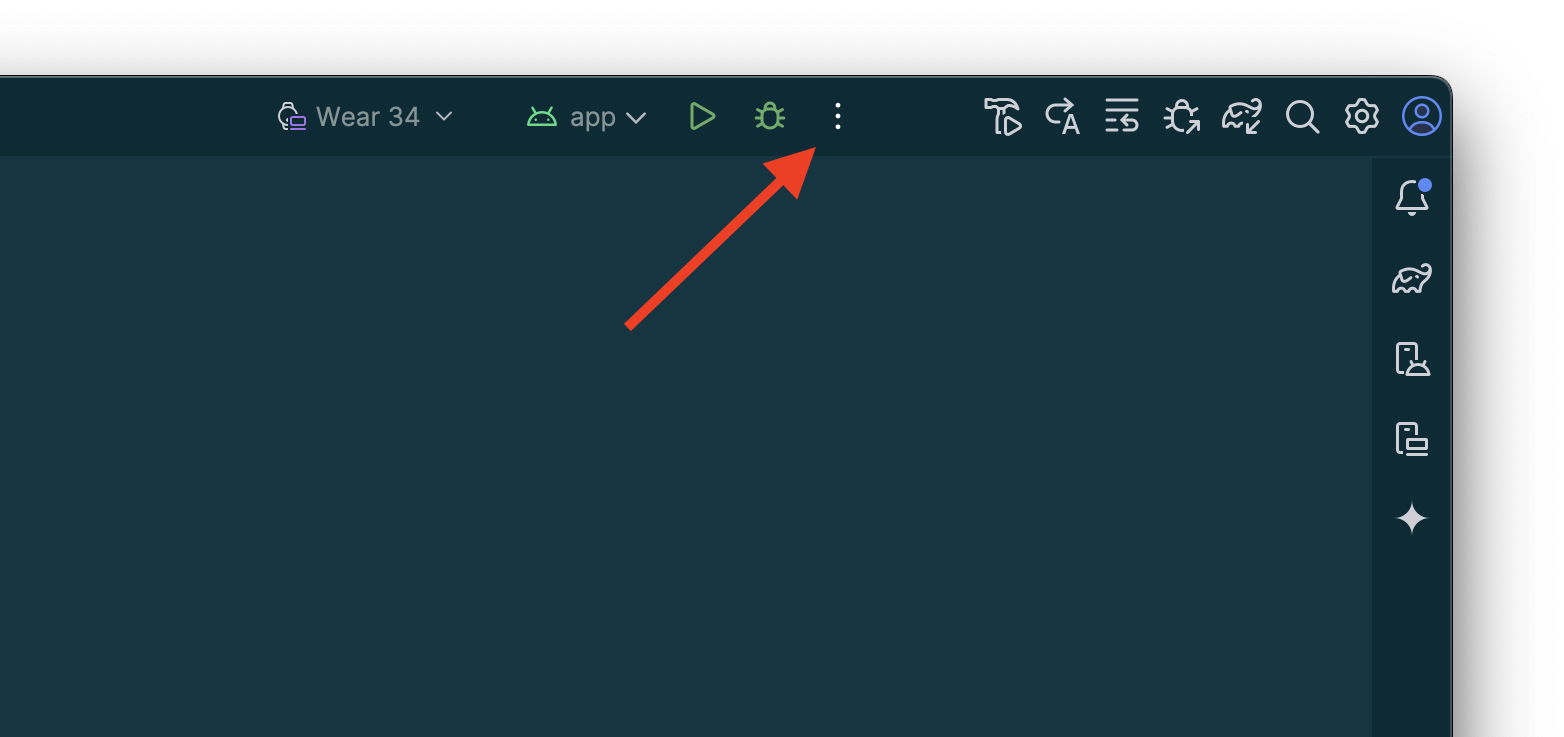
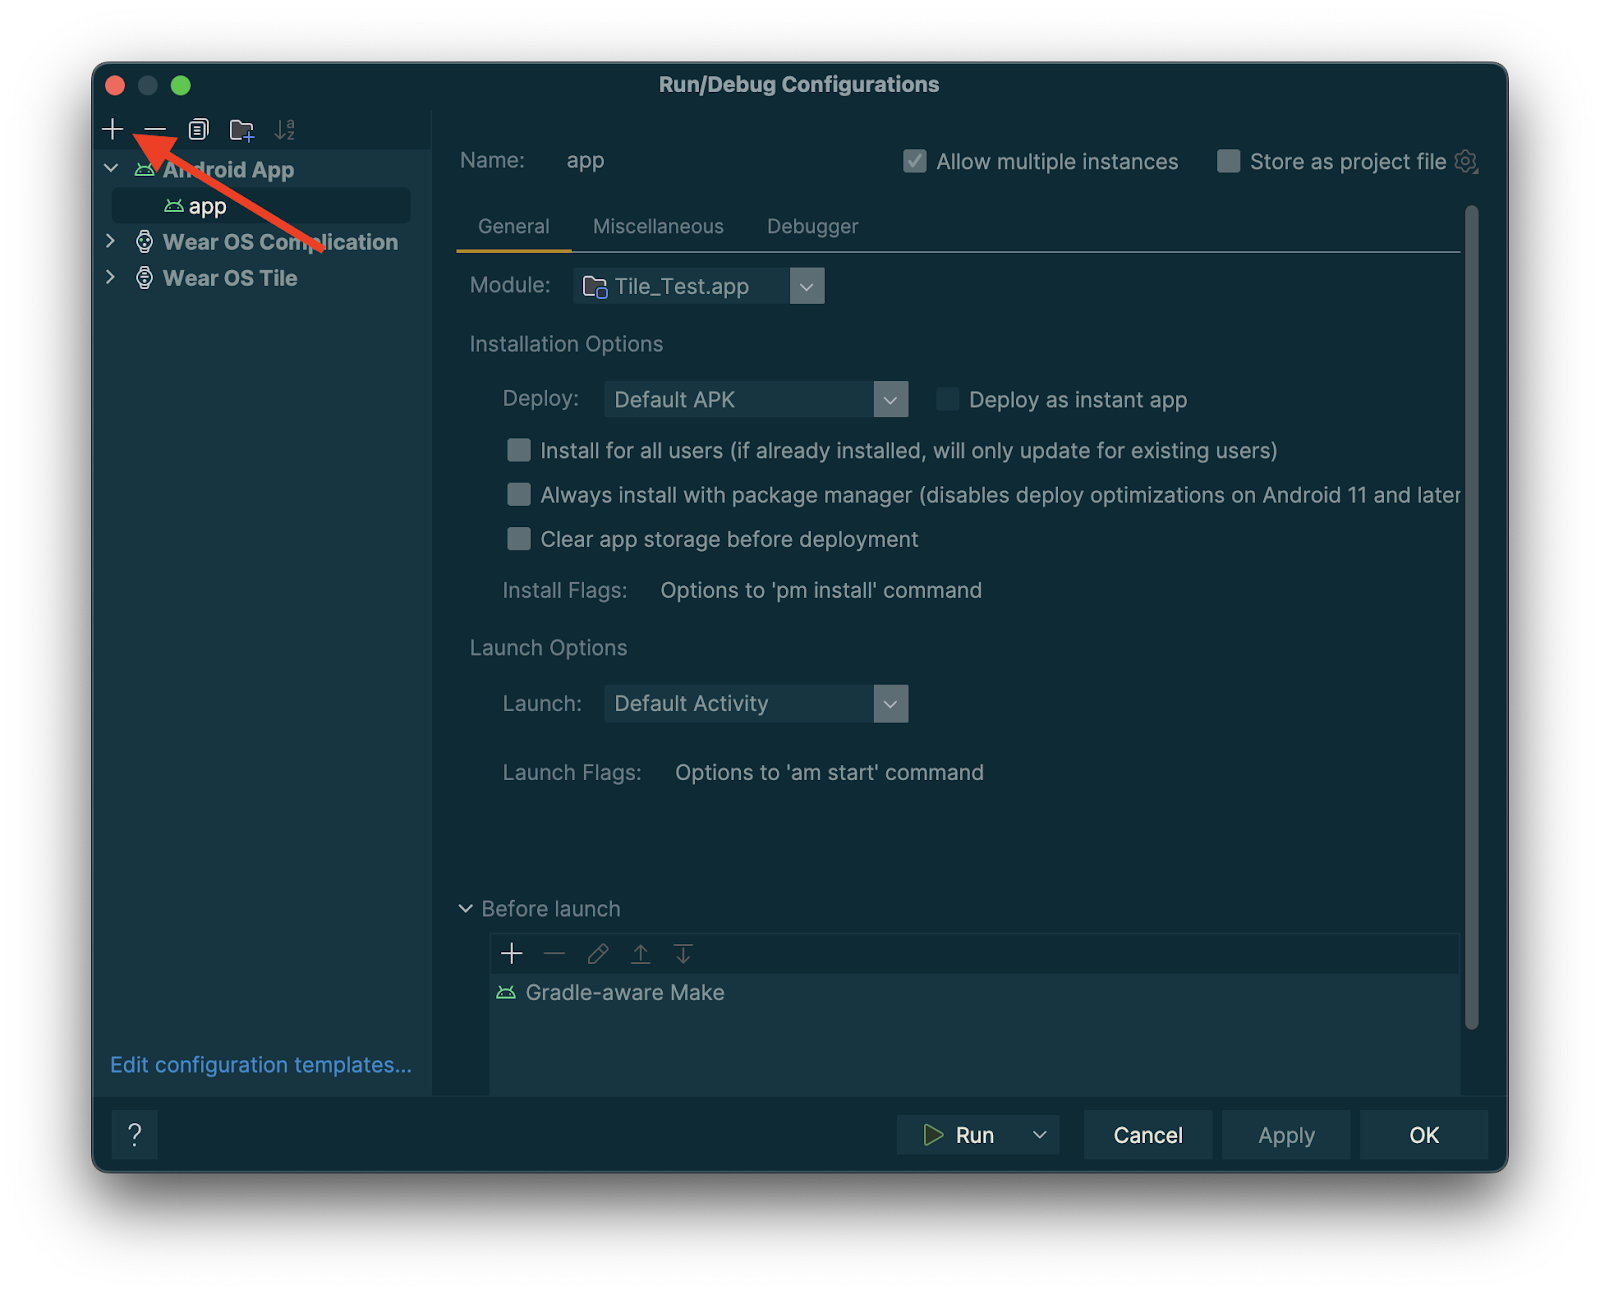
如果自动配置不起作用,或者您希望对结果有更多控制,请参阅以下说明。屏幕截图来自 Android Studio Meerkat (2024.3.1)。
从标题栏中选择“⋮”(“汉堡”)选项。
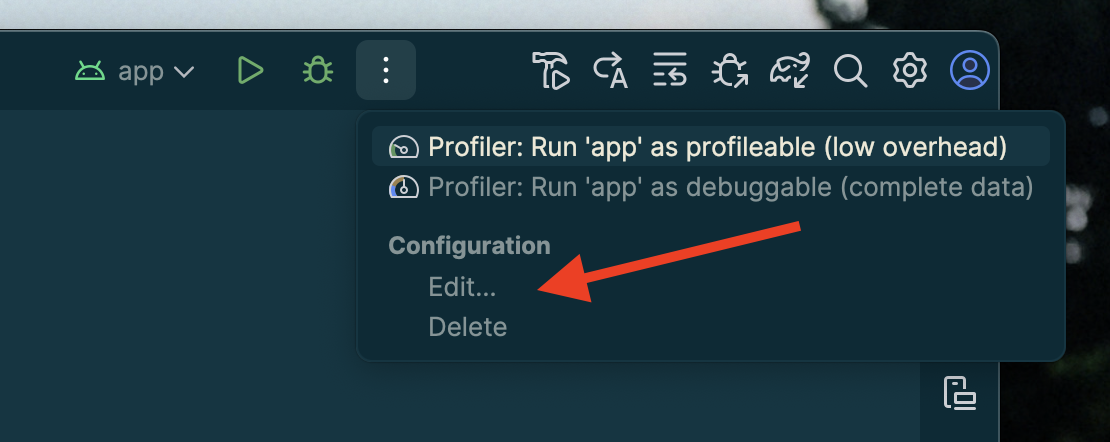
选择“Edit…”。
在出现的对话框中选择“+”以添加配置。
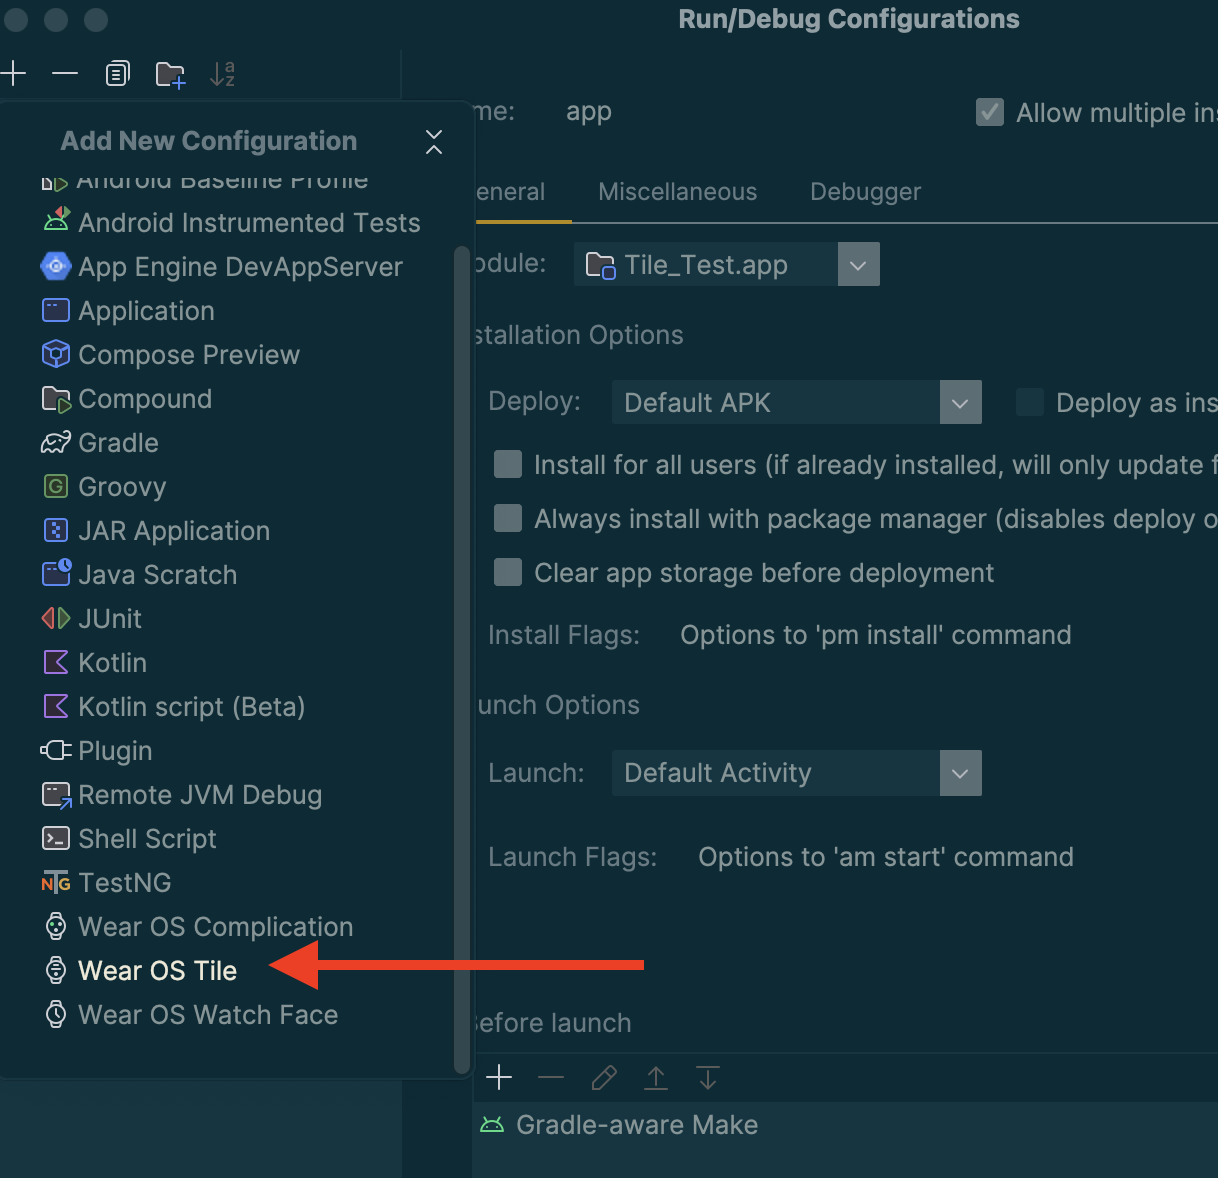
选择“Wear OS 卡片”作为新配置的类型。
输入配置名称,并根据需要选择模块和卡片。
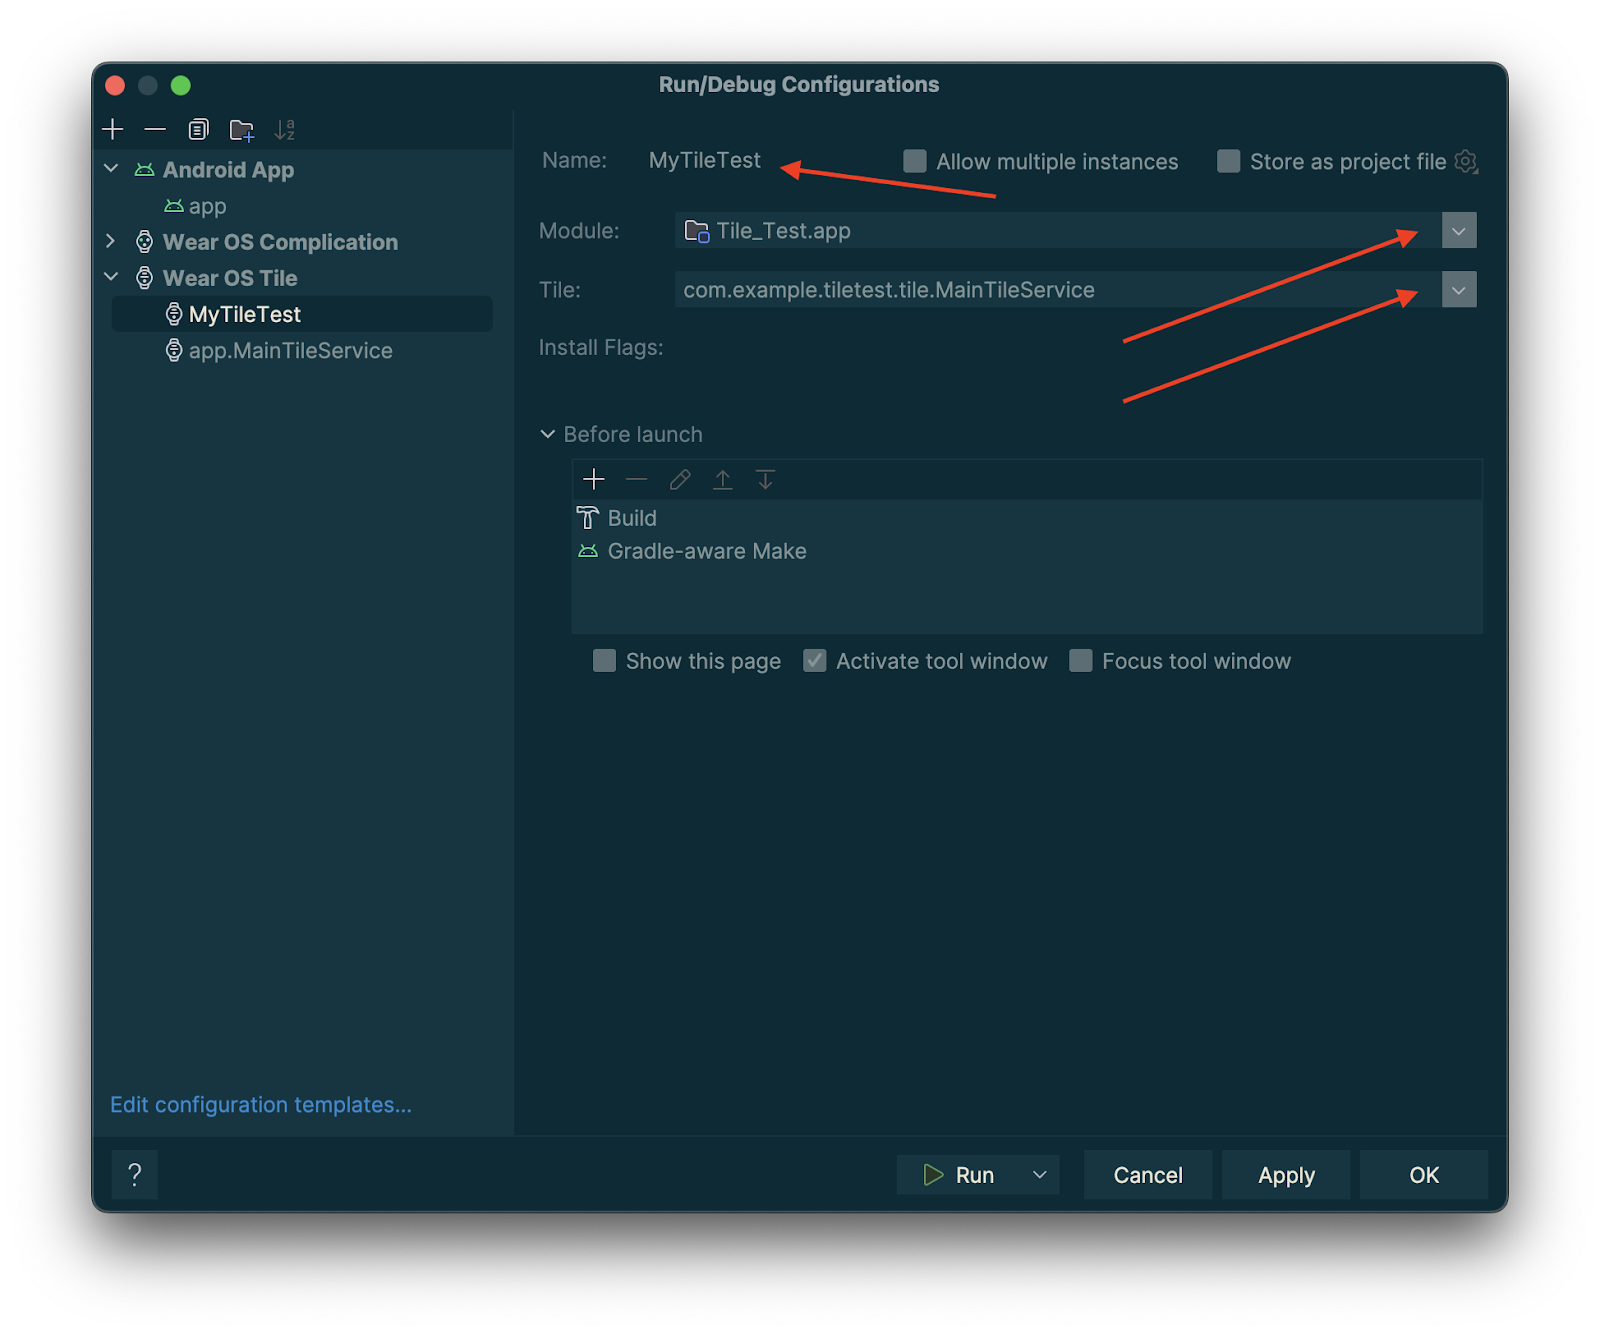
轻触“确定”。您的配置将出现在标题栏中。轻触“▷”(“运行”)按钮,您的卡片将被部署并激活。
在 Android Studio 中预览卡片
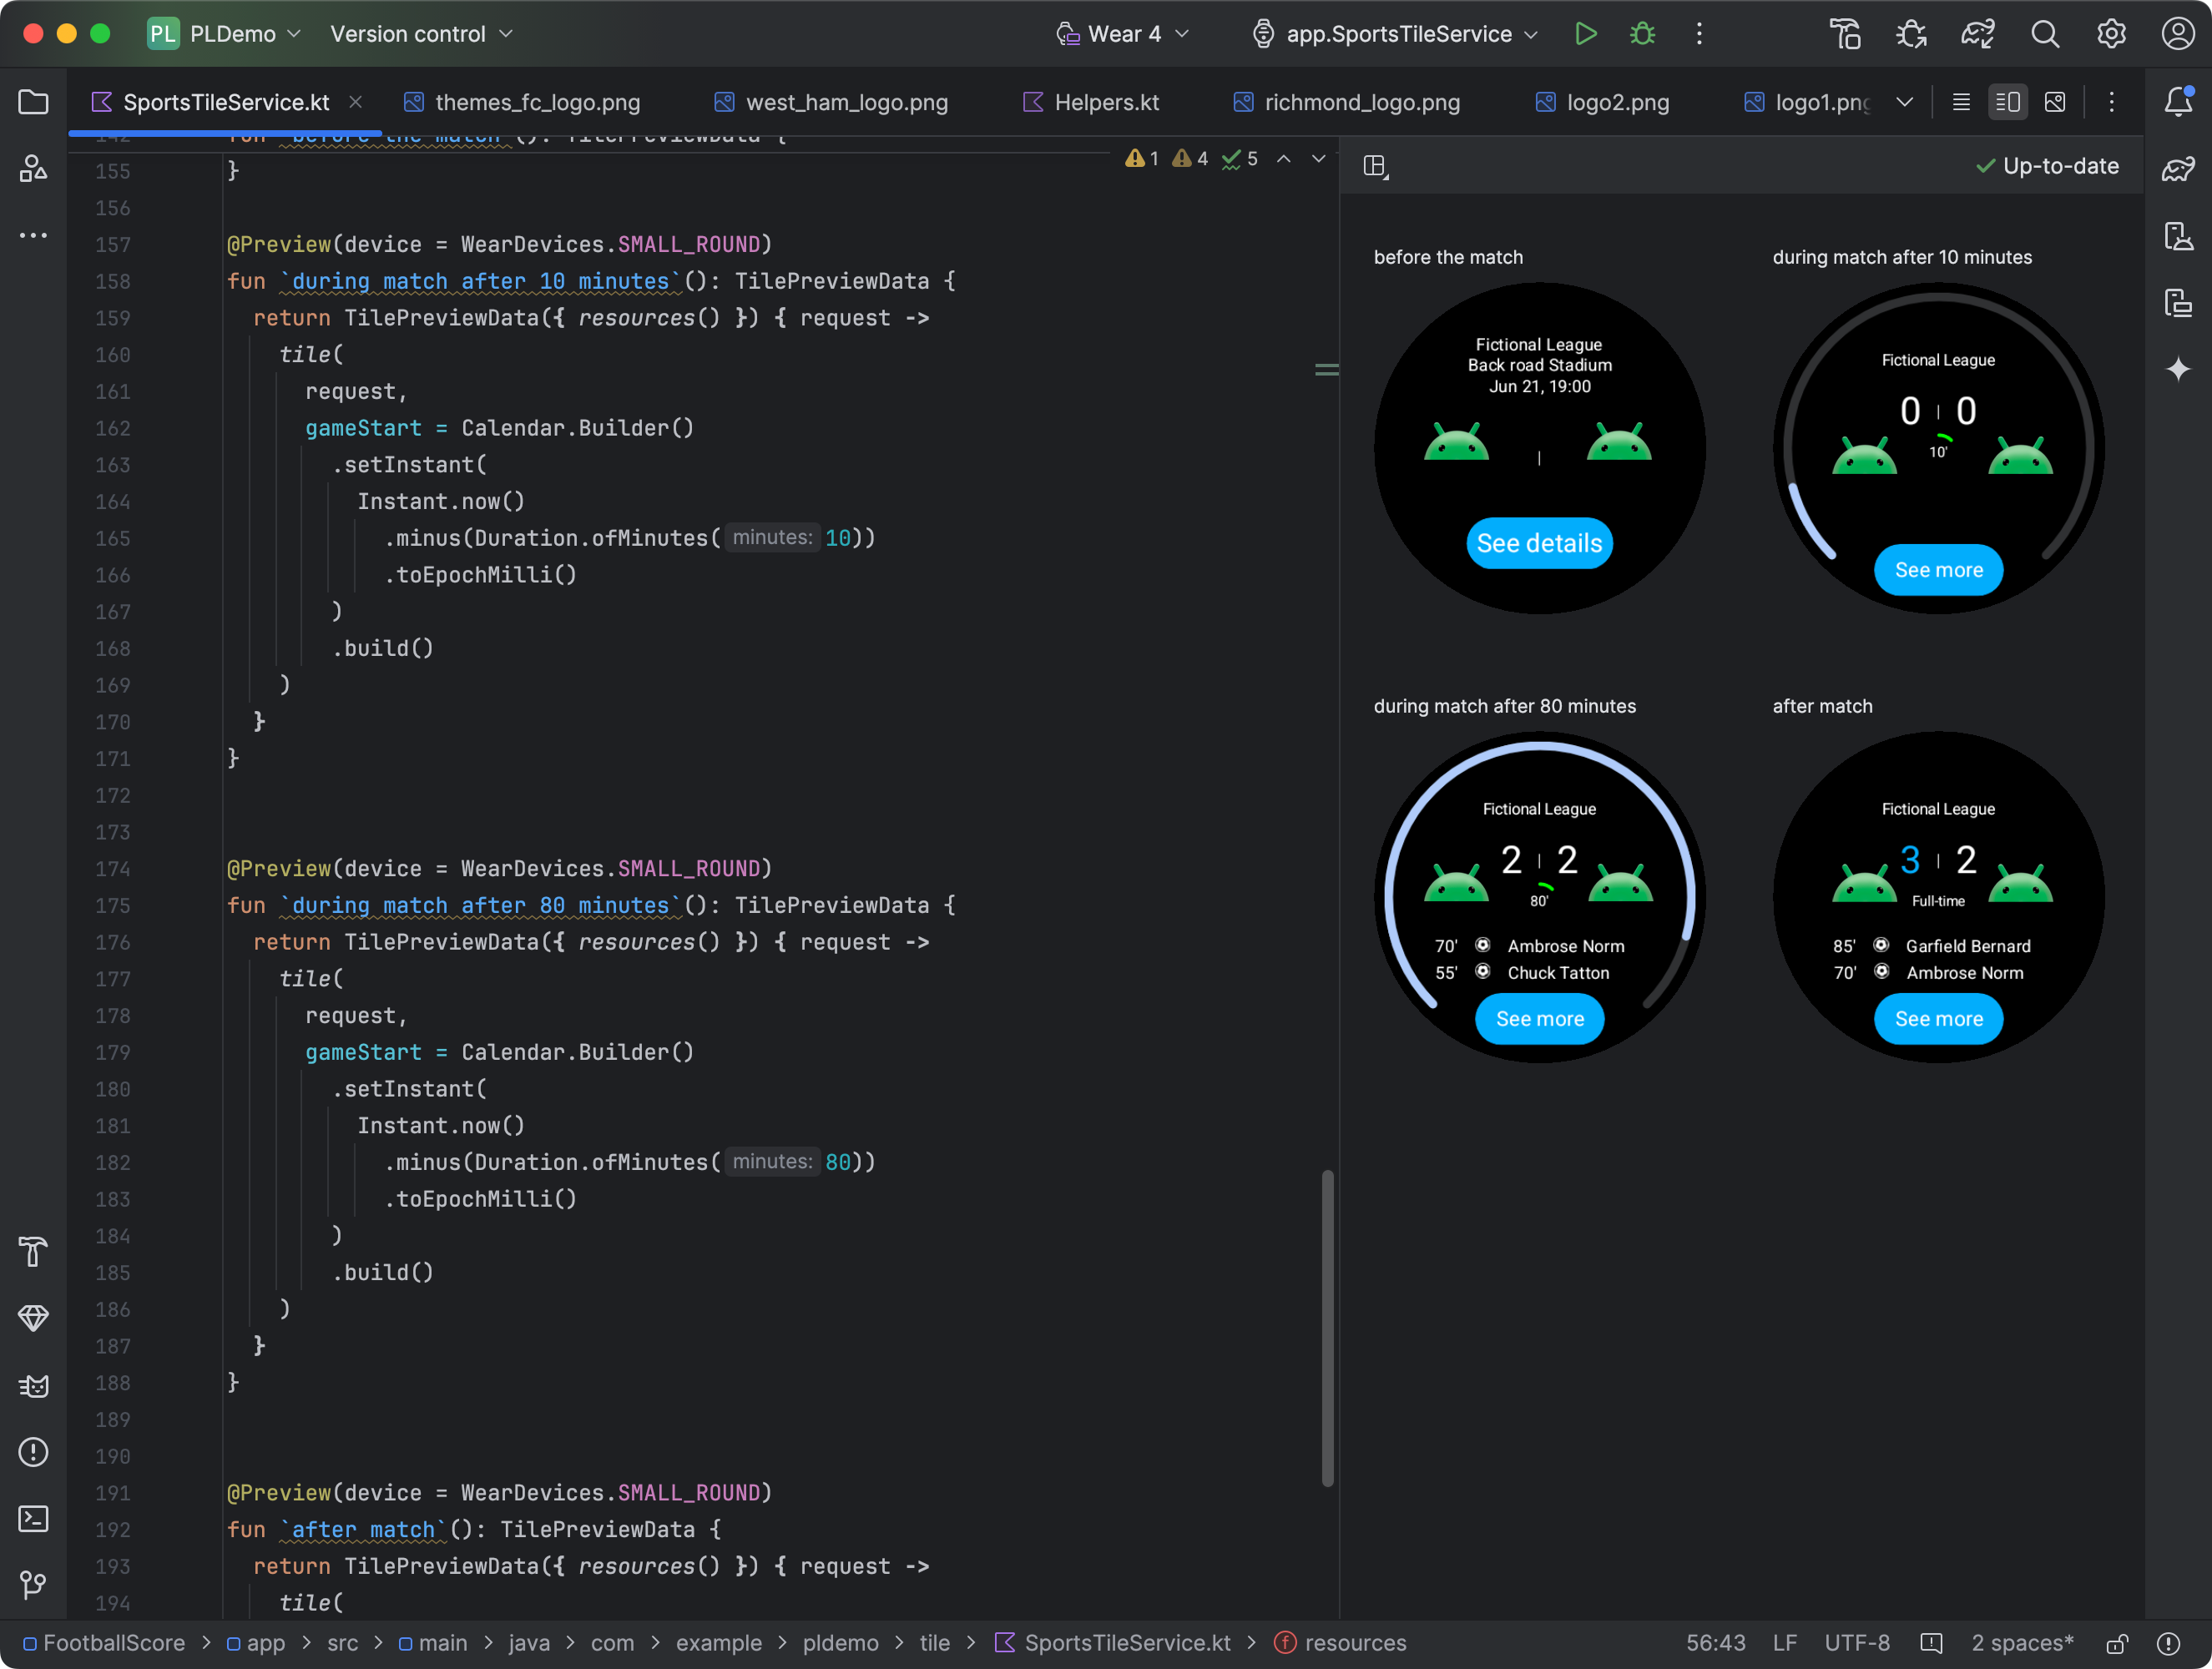
从 Android Studio Koala Feature Drop 开始,您可以查看 Wear OS 应用卡片的快照。如果您的卡片外观会根据条件(例如,因设备显示尺寸不同而显示不同内容,或体育赛事达到中场休息)而变化,则此面板特别有用。
添加依赖项
在应用的 build.gradle.kts 或 build.gradle 文件中包含以下依赖项
dependencies {
    implementation("androidx.wear.tiles:tiles-tooling-preview:1.5.0")
    debugImplementation("androidx.wear.tiles:tiles-tooling:1.5.0")
    implementation("androidx.wear:wear-tooling-preview:1.0.0")
}
配置卡片预览
要查看卡片在不同 Wear OS 显示尺寸上的外观预览,请添加 @Preview 注解,并传入 device 参数。请注意,此 @Preview 注解来自与用于可组合预览的注解不同的软件包。
import androidx.wear.tiles.tooling.preview.Preview

@Preview(device = WearDevices.SMALL_ROUND)
@Preview(device = WearDevices.LARGE_ROUND)
fun tilePreview(context: Context) = TilePreviewData(
    onTileRequest = { request ->
        TilePreviewHelper.singleTimelineEntryTileBuilder(
            buildMyTileLayout()
        ).build()
    }
)
添加和注册资源
如果您的卡片使用 Android 资源,您需要将它们注册到 TilePreviewData 的 onTileResourceRequest 参数中,如以下代码段所示
import androidx.wear.tiles.tooling.preview.Preview

@Preview(device = WearDevices.SMALL_ROUND)
fun previewWithResources(context: Context) = TilePreviewData(
    onTileResourceRequest = { request ->
        Resources.Builder()
            .setVersion(myResourcesVersion)
            .addIdToImageMapping(
                    myImageId, getImageById(R.drawable.myDrawableImageId))
            .build()
    },
    onTileRequest = { request ->
        TilePreviewHelper.singleTimelineEntryTileBuilder(
            buildMyTileLayout()
        ).build()
    }
)

fun getImageById(
    @DrawableRes id: Int,
): ImageResource =
    ImageResource.Builder()
        .setAndroidResourceByResId(
            AndroidImageResourceByResId.Builder()
                .setResourceId(id)
                .build(),
        )
        .build()
显示来自平台数据源的特定值
如果您的卡片使用平台数据(例如心率、卡路里、距离和步数),卡片会显示它们的默认值。
要显示特定值,请在创建 TilePreviewData 对象时设置 platformDataValues 参数,如以下代码段所示
import androidx.wear.tiles.tooling.preview.Preview

@Preview(device = WearDevices.SMALL_ROUND)
fun previewWithPlatformOverride(context: Context) = TilePreviewData(
    platformDataValues = PlatformDataValues.of(
        PlatformHealthSources.Keys.HEART_RATE_BPM,
        DynamicDataBuilders.DynamicDataValue.fromFloat(160f)
    ),
    onTileRequest = { request ->
        TilePreviewHelper.singleTimelineEntryTileBuilder(
            buildMyTileLayout()
        ).build()
    }
)
使用 adb 操作卡片
在开发过程中,可以使用 adb 以编程方式安装、移除和激活卡片。
在以下命令中,ComponentName 是一个由包名和该包中的类组成的字符串,例如 com.example.wear.tiles/com.example.wear.tiles.PreviewTileService。
add-tile
添加由 COMPONENT_NAME 提供的卡片并返回索引。
adb shell am broadcast -a com.google.android.wearable.app.DEBUG_SURFACE --es operation add-tile --ecn component [COMPONENT_NAME]
示例输出
Broadcast completed: result=1, data="Index=[0]"
如果卡片已存在于轮播界面中,它将被移除并重新插入到相同位置。否则,它将插入到 Index[0]。此外,如果轮播界面已达到最大容量,则会移除最后一个卡片以为新卡片腾出空间。
show-tile
激活索引 TILE_INDEX 处的卡片。
adb shell am broadcast -a com.google.android.wearable.app.DEBUG_SYSUI --es operation show-tile --ei index [TILE_INDEX]
示例输出
Broadcast completed: result=1
remove-tile
移除轮播界面上与 COMPONENT_NAME 相关联的所有卡片实例。
adb shell am broadcast -a com.google.android.wearable.app.DEBUG_SURFACE --es operation remove-tile --ecn component [COMPONENT_NAME]
示例输出
result=1, data="Tile(s) removed."
返回值
- result=0:没有广播接收器响应此命令,最可能是因为 Wear OS 版本太旧,或者调试进程未运行。
- result=1:成功。
- result>1:错误。