
在 Wear OS 设备上,图块由两个具有独立版本控制的关键组件呈现。为了确保您的应用图块在所有设备上都能正常运行,了解这种底层架构非常重要。
- Jetpack 图块相关库:这些库(包括 Wear Tiles 和 Wear ProtoLayout)嵌入在您的应用中,作为开发者,您可以控制它们的版本。您的应用使用这些库来构建
TileBuilder.Tile对象(表示您的图块的数据结构),以响应系统的onTileRequest()调用。 - ProtoLayout 渲染器:此系统组件负责在显示屏上渲染
Tile对象并处理用户交互。渲染器的版本不由应用开发者控制,并且在不同设备上可能有所不同,即使是硬件相同的设备也是如此。
图块的外观或行为可能因您的应用 Jetpack Tiles 库版本和用户设备上的 ProtoLayout 渲染器版本而异。例如,某设备可能支持旋转或心率数据显示,而另一设备则不支持。
本文档解释了如何确保您的应用与不同版本的 Tiles 库和 ProtoLayout 渲染器兼容,以及如何迁移到更高的 Jetpack 库版本。
考虑兼容性
要创建在各种设备上都能正常运行的图块,您应该考虑以下几点。
检测渲染器版本
- 使用传递给您的 onTileRequest() 方法的
DeviceParameters对象的getRendererSchemaVersion()方法。此方法返回设备上 ProtoLayout 渲染器的主版本号和次版本号。 - 然后,您可以在
onTileRequest()实现中使用条件逻辑,根据检测到的渲染器版本调整图块的设计或行为。- 例如,如果不支持特定动画,您可以显示静态图片。
@RequiresSchemaVersion 注解
- ProtoLayout 方法上的
@RequiresSchemaVersion注解指示了该方法按文档说明行为所需的最低渲染器架构版本(示例)。- 虽然调用需要更高渲染器版本的方法不会导致您的应用崩溃,但可能会导致内容不显示或功能被忽略。
示例
override fun onTileRequest(
    requestParams: TileService.TileRequest
): ListenableFuture<Tile> {
    val rendererVersion =
        requestParams.deviceConfiguration.rendererSchemaVersion
    val tile = Tile.Builder()

    if (
        rendererVersion.major > 1 ||
            (rendererVersion.major == 1 && rendererVersion.minor >= 300)
    ) {
        // Use a feature supported in renderer version 1.300 or later
        tile.setTileTimeline(/* ... */ )
    } else {
        // Provide fallback content for older renderers
        tile.setTileTimeline(/* ... */ )
    }

    return Futures.immediateFuture(tile.build())
}
使用不同渲染器版本进行测试
要使用不同渲染器版本测试您的图块,请将它们部署到不同版本的 Wear OS 模拟器。(在物理设备上,ProtoLayout 渲染器更新通过 Play 商店或系统更新提供。无法强制安装特定的渲染器版本。)
Android Studio 的图块预览功能利用了嵌入在您的代码所依赖的 Jetpack ProtoLayout 库中的渲染器,因此另一种方法是在测试图块时依赖不同的 Jetpack 库版本。
迁移到 Tiles 1.5 / ProtoLayout 1.3 (Material 3 Expressive)
更新您的 Jetpack 图块库,以利用最新增强功能,包括 UI 更改,使您的图块与系统无缝集成。
Jetpack Tiles 1.5 和 Jetpack ProtoLayout 1.3 引入了多项显著改进和变更。其中包括:
- 类似 Compose 的 UI 描述 API。
- Material 3 Expressive 组件,包括底部紧贴的边缘按钮,并支持增强的视觉效果:Lottie 动画、更多渐变类型和新的弧线样式。 - 注意:其中一些功能也可以在不迁移到新 API 的情况下使用。
建议
- 同时迁移所有图块。 避免在应用中混合使用不同版本的图块。虽然 Material 3 组件位于单独的工件中(
androidx.wear.protolayout:protolayout-material3)——从技术上讲,可以在同一应用中使用 M2.5 和 M3 图块——但我们强烈建议不要采用这种方法,除非绝对必要(例如,如果您的应用有大量图块无法一次性全部迁移)。 - 采用图块用户体验指南。 鉴于图块高度结构化和模板化的特性,请使用现有示例中的设计作为您自己设计的起点。
- 在各种屏幕和字体尺寸下进行测试。 图块通常信息密集,这使得文本(尤其是在按钮上时)容易溢出和剪裁。为了最大程度地减少这种情况,请使用预构建的组件并避免过度自定义。使用 Android Studio 的图块预览功能以及在多台真实设备上进行测试。
迁移过程
更新依赖项
首先,更新您的 build.gradle.kts 文件。更新版本并将 protolayout-material 依赖项更改为 protolayout-material3,如下所示:
// In build.gradle.kts

//val tilesVersion = "1.4.1"
//val protoLayoutVersion = "1.2.1"

// Use these versions for M3.
val tilesVersion = "1.5.0-rc01"
val protoLayoutVersion = "1.3.0-rc01"

 dependencies {
     // Use to implement support for wear tiles
     implementation("androidx.wear.tiles:tiles:$tilesVersion")

     // Use to utilize standard components and layouts in your tiles
     implementation("androidx.wear.protolayout:protolayout:$protoLayoutVersion")

     // Use to utilize components and layouts with Material Design in your tiles
     // implementation("androidx.wear.protolayout:protolayout-material:$protoLayoutVersion")
     implementation("androidx.wear.protolayout:protolayout-material3:$protoLayoutVersion")

     // Use to include dynamic expressions in your tiles
     implementation("androidx.wear.protolayout:protolayout-expression:$protoLayoutVersion")

     // Use to preview wear tiles in your own app
     debugImplementation("androidx.wear.tiles:tiles-renderer:$tilesVersion")

     // Use to fetch tiles from a tile provider in your tests
     testImplementation("androidx.wear.tiles:tiles-testing:$tilesVersion")
 }
TileService 基本保持不变
本次迁移中的主要变更影响 UI 组件。因此,您的 TileService 实现(包括任何资源加载机制)应只需极少甚至无需修改。
主要例外涉及图块活动跟踪:如果您的应用使用 onTileEnterEvent() 或 onTileLeaveEvent(),则应迁移到 onRecentInteractionEventsAsync()。从 API 36 开始,这些事件将进行批量处理。
调整布局生成代码
在 ProtoLayout 1.2 (M2.5) 中,onTileRequest() 方法返回一个 TileBuilders.Tile。此对象包含各种元素,其中包括一个 TimelineBuilders.Timeline,后者又包含描述图块界面的 LayoutElement。
在 ProtoLayout 1.3 (M3) 中,虽然整体数据结构和流程没有变化,但 LayoutElement 现在使用受 Compose 启发的方法构建,其布局基于定义的 *槽位*,这些槽位(从上到下)包括 titleSlot(通常用于主标题或页眉)、mainSlot(用于核心内容)和 bottomSlot(通常用于边缘按钮等操作或短文本等补充信息)。此布局由 primaryLayout() 函数构建。

M2.5 和 M3 布局函数比较
M2.5
fun myLayout(
    context: Context,
    deviceConfiguration: DeviceParametersBuilders.DeviceParameters
) =
    PrimaryLayout.Builder(deviceConfiguration)
        .setResponsiveContentInsetEnabled(true)
        .setContent(
            Text.Builder(context, "Hello World!")
                .setTypography(Typography.TYPOGRAPHY_BODY1)
                .setColor(argb(0xFFFFFFFF.toInt()))
                .build()
        )
        .build()
M3
fun myLayout(
    context: Context,
    deviceConfiguration: DeviceParametersBuilders.DeviceParameters,
) =
    materialScope(context, deviceConfiguration) {
        primaryLayout(mainSlot = { text("Hello, World!".layoutString) })
    }
主要区别如下:
- 取消构建器模式。Material3 UI 组件传统的构建器模式被更具声明性、受 Compose 启发的语法所取代。(非 UI 组件,如 String/Color/Modifiers 也获得了新的 Kotlin 封装器。)
- 标准化初始化和布局函数。M3 布局依赖于标准化的初始化和结构函数:
materialScope()和primaryLayout()。这些强制函数初始化 M3 环境(通过materialScope进行主题设置、组件范围)并定义主要的基于槽位的布局(通过primaryLayout)。每个布局必须且只能调用这两个函数一次。
主题
颜色
Material 3 Expressive 的一个突出特点是“动态主题”:启用此功能的图块(默认开启)将以系统提供的主题显示(可用性取决于用户的设备和配置)。
M3 中的另一个变化是颜色令牌数量的扩展,已从 4 个增加到 29 个。新的颜色令牌可在 ColorScheme 类中找到。
排版
与 M2.5 类似,M3 大量依赖预定义的字体大小常量——不建议直接指定字体大小。这些常量位于 Typography 类中,并提供了略微扩展的更具表现力的选项范围。
有关完整详细信息,请参阅 排版文档。
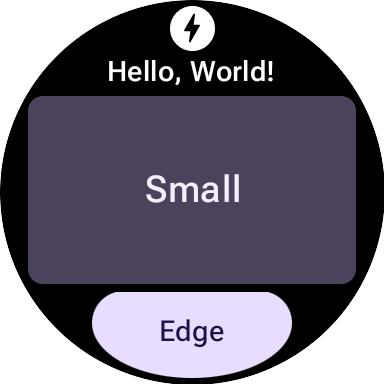
形状
大多数 M3 组件可以在形状和颜色维度上有所不同。
形状为 full 的 textButton(在 mainSlot 中)
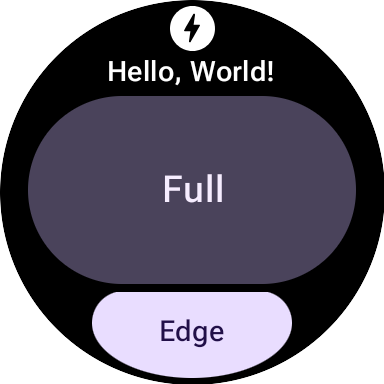
形状为 small 的相同 textButton
组件
M3 组件比 M2.5 组件更灵活且可配置。M2.5 通常需要不同的组件来处理各种视觉效果,而 M3 经常采用通用但高度可配置的“基础”组件,并带有良好的默认值。
此原则适用于“根”布局。在 M2.5 中,这要么是 PrimaryLayout,要么是 EdgeContentLayout。在 M3 中,在建立单个顶级 MaterialScope 之后,调用 primaryLayout() 函数。这会直接返回根布局(无需构建器),并且它接受多个“槽位”的 LayoutElements,例如 titleSlot、mainSlot 和 bottomSlot。这些槽位可以使用具体的 UI 组件(例如 text()、button() 或 card() 返回的组件)或布局结构(例如 LayoutElementBuilders 中的 Row 或 Column)填充。
主题是 M3 的另一个关键增强功能。默认情况下,UI 元素会自动遵循 M3 样式规范并支持动态主题。
| M2.5 | M3 |
|---|---|
| 交互式元素 | |
Button 或 Chip |
|
| 文本 | |
文本 |
text() |
| 进度指示器 | |
CircularProgressIndicator |
circularProgressIndicator() 或 segmentedCircularProgressIndicator() |
| 布局 | |
PrimaryLayout 或 EdgeContentLayout |
primaryLayout() |
| — | buttonGroup() |
| 图片 | |
| — | icon()、avatarImage() 或 backgroundImage() |
修饰符
在 M3 中,用于装饰或增强组件的 Modifiers 更像 Compose。此更改可以通过自动构建适当的内部类型来减少样板代码。(此更改与 M3 UI 组件的使用正交;如有必要,可以将 ProtoLayout 1.2 中的构建器样式修饰符与 M3 UI 组件一起使用,反之亦然。)
M2.5
// A Builder-style modifier to set the opacity of an element to 0.5
fun myModifier(): ModifiersBuilders.Modifiers =
    ModifiersBuilders.Modifiers.Builder()
        .setOpacity(TypeBuilders.FloatProp.Builder(0.5F).build())
        .build()
M3
// The equivalent Compose-like modifier is much simpler
fun myModifier(): LayoutModifier = LayoutModifier.opacity(0.5F)
您可以使用任何一种 API 样式构建修饰符,也可以使用 toProtoLayoutModifiers() 扩展函数将 LayoutModifier 转换为 ModifiersBuilders.Modifier。
辅助函数
虽然 ProtoLayout 1.3 允许使用受 Compose 启发的 API 来表达许多 UI 组件,但像 rows 和 columns 等来自 LayoutElementBuilders 的基础布局元素仍继续使用构建器模式。为了弥合这种风格上的差距并促进与新 M3 组件 API 的一致性,请考虑使用辅助函数。
不使用辅助函数
primaryLayout(
    mainSlot = {
        LayoutElementBuilders.Column.Builder()
            .setWidth(expand())
            .setHeight(expand())
            .addContent(text("A".layoutString))
            .addContent(text("B".layoutString))
            .addContent(text("C".layoutString))
            .build()
    }
)
使用辅助函数
// Function literal with receiver helper function
fun column(builder: Column.Builder.() -> Unit) =
    Column.Builder().apply(builder).build()

primaryLayout(
    mainSlot = {
        column {
            setWidth(expand())
            setHeight(expand())
            addContent(text("A".layoutString))
            addContent(text("B".layoutString))
            addContent(text("C".layoutString))
        }
    }
)
迁移到 Tiles 1.2 / ProtoLayout 1.0
从 1.2 版本开始,大多数 Tiles 布局 API 都在 androidx.wear.protolayout 命名空间中。要使用最新的 API,请在代码中完成以下迁移步骤。
更新依赖项
在您的应用模块构建文件中,进行以下更改:
Groovy
// Removeimplementation 'androidx.wear.tiles:tiles-material:version'// Include additional dependencies implementation "androidx.wear.protolayout:protolayout:1.3.0" implementation "androidx.wear.protolayout:protolayout-material:1.3.0" implementation "androidx.wear.protolayout:protolayout-expression:1.3.0" // Update implementation "androidx.wear.tiles:tiles:1.5.0"
Kotlin
// Removeimplementation("androidx.wear.tiles:tiles-material:version")// Include additional dependencies implementation("androidx.wear.protolayout:protolayout:1.3.0") implementation("androidx.wear.protolayout:protolayout-material:1.3.0") implementation("androidx.wear.protolayout:protolayout-expression:1.3.0") // Update implementation("androidx.wear.tiles:tiles:1.5.0")
更新命名空间
在您的应用的 Kotlin 和 Java 代码文件中,进行以下更新。或者,您可以执行此命名空间重命名脚本。
- 将所有
androidx.wear.tiles.material.*导入替换为androidx.wear.protolayout.material.*。对于androidx.wear.tiles.material.layouts库,也请完成此步骤。 将大多数其他
androidx.wear.tiles.*导入替换为androidx.wear.protolayout.*。androidx.wear.tiles.EventBuilders、androidx.wear.tiles.RequestBuilders、androidx.wear.tiles.TileBuilders和androidx.wear.tiles.TileService的导入应保持不变。重命名 TileService 和 TileBuilder 类中一些已弃用的方法
TileBuilders:将getTimeline()重命名为getTileTimeline(),将setTimeline()重命名为setTileTimeline()TileService:将onResourcesRequest()重命名为onTileResourcesRequest()RequestBuilders.TileRequest:将getDeviceParameters()重命名为getDeviceConfiguration(),将setDeviceParameters()重命名为setDeviceConfiguration(),将getState()重命名为getCurrentState(),将setState()重命名为setCurrentState()