
要了解如何通过修改应用代码来使用 Microbenchmark 库,请参阅快速入门部分。要了解如何通过更复杂的代码库更改来完成完整设置,请参阅完整项目设置部分。
快速入门
本部分介绍如何在无需将代码移入模块的情况下试用基准测试并运行一次性测量。为了获得准确的性能结果,这些步骤涉及在应用中停用调试,因此请将此保留在本地工作副本中,而不要将更改提交到您的源代码控制系统。
要执行一次性基准测试,请执行以下操作:
将库添加到模块的
build.gradle或build.gradle.kts文件中Kotlin
dependencies {
    implementation("androidx.benchmark:benchmark-junit4:1.2.4")
}
Groovy
dependencies {
    implementation 'androidx.benchmark:benchmark-junit4:1.2.4'
}
使用
implementation依赖项而非androidTestImplementation依赖项。如果您使用androidTestImplementation,基准测试将无法运行,因为库的清单不会合并到应用清单中。更新
debug构建类型,使其不可调试Kotlin
android {
    ...
    buildTypes {
        debug {
            isDebuggable = false
        }
    }
}
Groovy
android {
    ...
    buildTypes {
        debug {
            debuggable false
        }
    }
}
将
testInstrumentationRunner更改为AndroidBenchmarkRunnerKotlin
android {
    ...
    defaultConfig {
        testInstrumentationRunner = "androidx.benchmark.junit4.AndroidBenchmarkRunner"
    }
}
Groovy
android {
    ...
    defaultConfig {
        testInstrumentationRunner "androidx.benchmark.junit4.AndroidBenchmarkRunner"
    }
}
在
androidTest目录中的测试文件中添加BenchmarkRule实例以添加您的基准测试。有关编写基准测试的更多信息,请参阅创建 Microbenchmark 类。以下代码段展示了如何向插桩测试添加基准测试:
Kotlin
@RunWith(AndroidJUnit4::class) class SampleBenchmark { @get:Rule val benchmarkRule = BenchmarkRule() @Test fun benchmarkSomeWork() { benchmarkRule.measureRepeated { doSomeWork() } } }
Java
@RunWith(AndroidJUnit4.class)
class SampleBenchmark {
    @Rule
    public BenchmarkRule benchmarkRule = new BenchmarkRule();

    @Test
    public void benchmarkSomeWork() {
            BenchmarkRuleKt.measureRepeated(
                (Function1<BenchmarkRule.Scope, Unit>) scope -> doSomeWork()
            );
       }
    }
}
要了解如何编写基准测试,请跳到创建 Microbenchmark 类。
完整项目设置
为了设置常规基准测试而不是一次性基准测试,请将基准测试隔离到自己的模块中。这有助于确保其配置(例如将 debuggable 设置为 false)与常规测试分离。
由于 Microbenchmark 直接运行您的代码,因此请将您要进行基准测试的代码放入单独的 Gradle 模块中,并设置对该模块的依赖项,如图 1 所示。
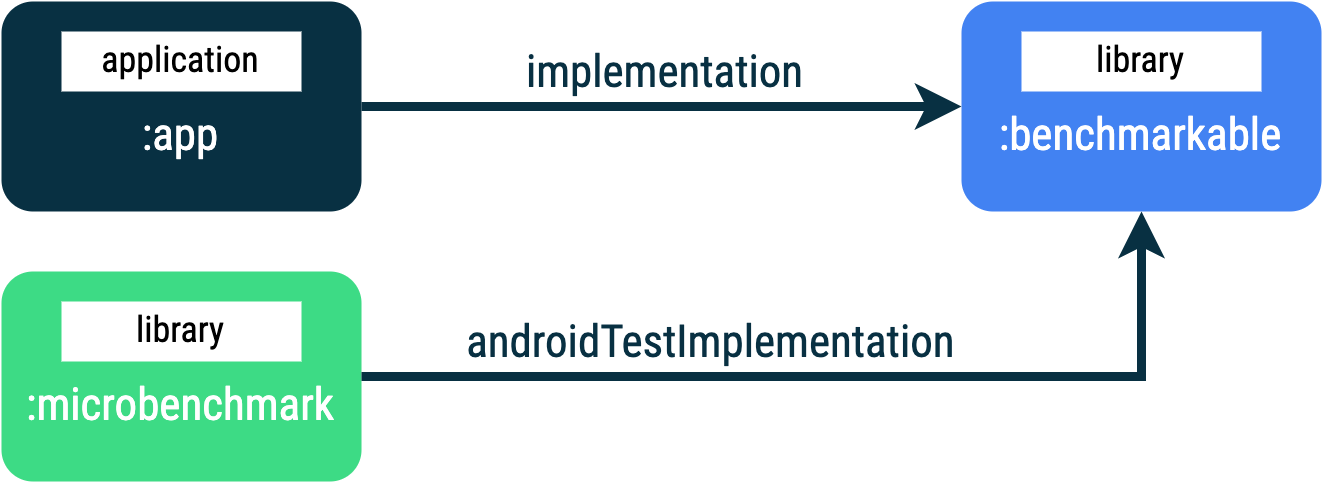
:app、:microbenchmark 和 :benchmarkable Gradle 模块的应用结构,这允许 Microbenchmark 对 :benchmarkable 模块中的代码进行基准测试。要添加新的 Gradle 模块,您可以使用 Android Studio 中的模块向导。该向导会创建一个已预先配置好进行基准测试的模块,其中添加了基准测试目录并将 debuggable 设置为 false。
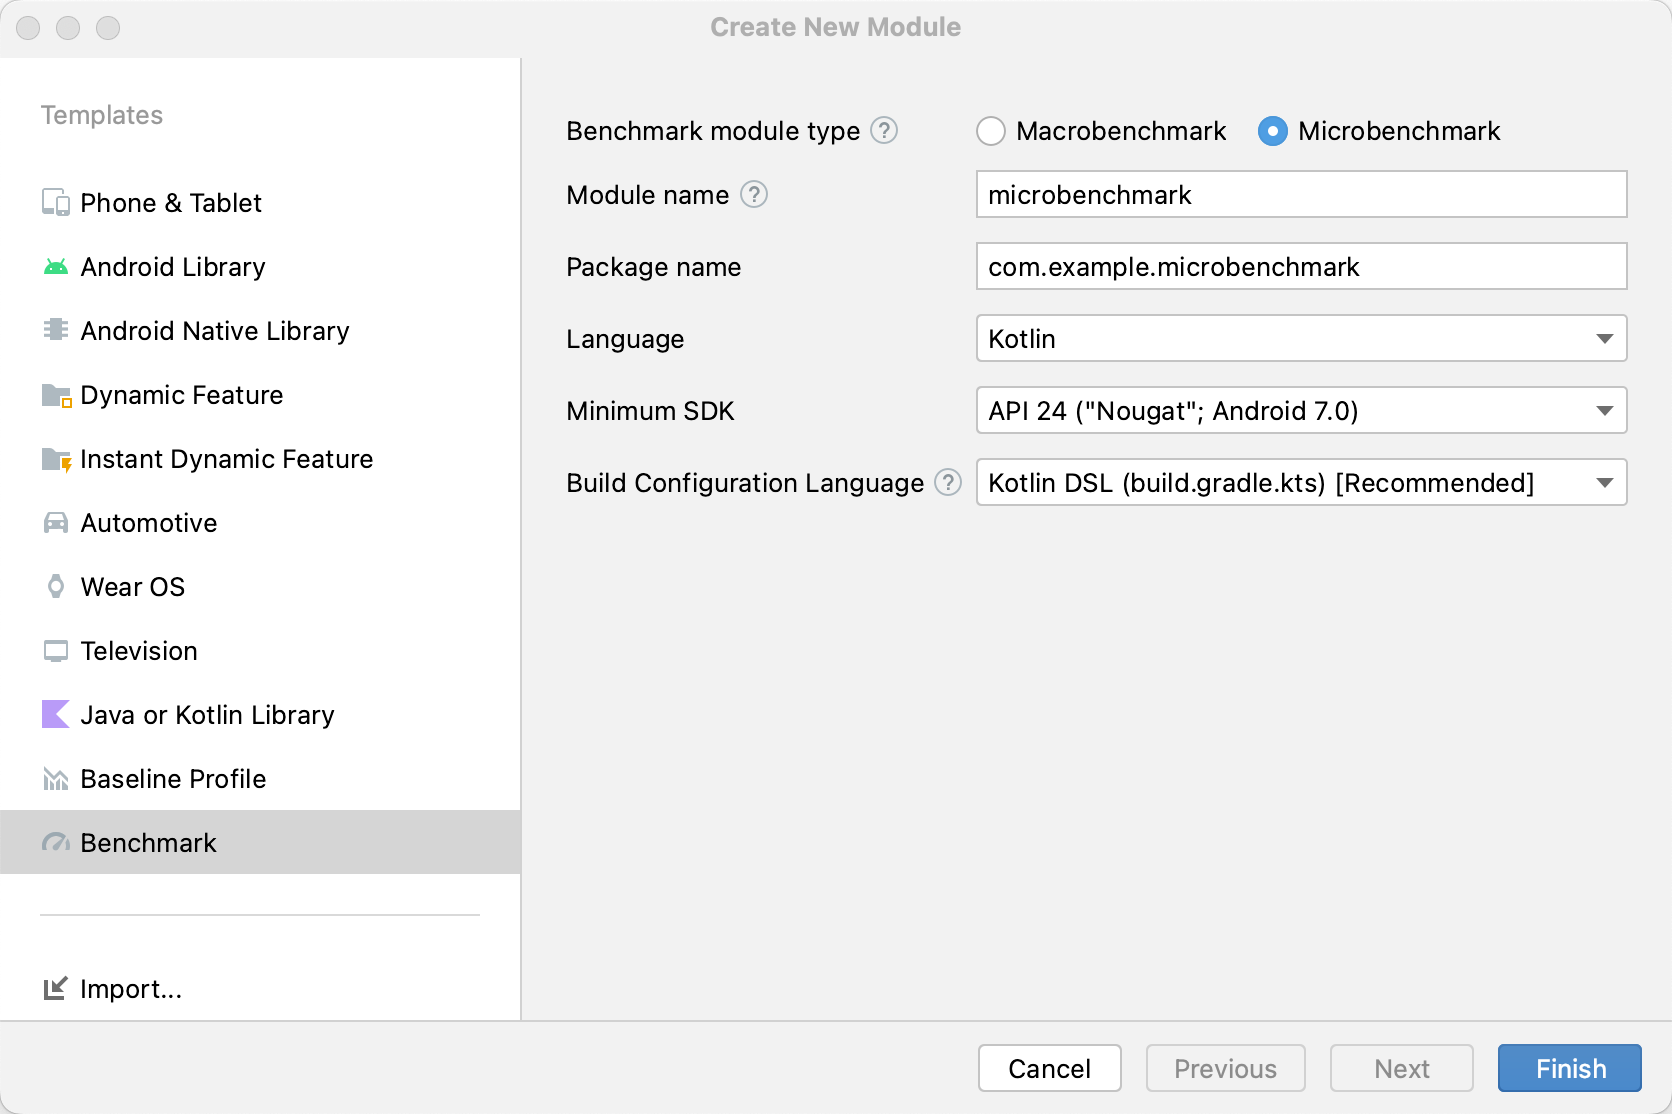
在 Android Studio 的 Project 面板中右键点击您的项目或模块,然后点击 New > Module。
在 Templates 窗格中选择 Benchmark。
选择 Microbenchmark 作为基准测试模块类型。
输入“microbenchmark”作为模块名称。
点击 Finish。
创建模块后,修改其 build.gradle 或 build.gradle.kts 文件,并将 androidTestImplementation 添加到包含要进行基准测试的代码的模块中。
Kotlin
dependencies {
    // The module name might be different.
    androidTestImplementation(project(":benchmarkable"))
}
Groovy
dependencies {
    // The module name might be different.
    androidTestImplementation project(':benchmarkable')
}
创建 Microbenchmark 类
基准测试是标准的插桩测试。要创建基准测试,请使用库提供的 BenchmarkRule 类。要对 Activity 进行基准测试,请使用 ActivityScenario 或 ActivityScenarioRule。要对 UI 代码进行基准测试,请使用 @UiThreadTest。
以下代码展示了一个示例基准测试:
Kotlin
@RunWith(AndroidJUnit4::class) class SampleBenchmark { @get:Rule val benchmarkRule = BenchmarkRule() @Test fun benchmarkSomeWork() { benchmarkRule.measureRepeated { doSomeWork() } } }
Java
@RunWith(AndroidJUnit4.class)
class SampleBenchmark {
    @Rule
    public BenchmarkRule benchmarkRule = new BenchmarkRule();

    @Test
    public void benchmarkSomeWork() {
        final BenchmarkState state = benchmarkRule.getState();
        while (state.keepRunning()) {
            doSomeWork();
        }
    }
}
停用设置的计时
您可以使用 runWithTimingDisabled{} 块停用您不想测量的那部分代码的计时。这些部分通常表示您需要在基准测试的每次迭代中运行的一些代码。
Kotlin
// using random with the same seed, so that it generates the same data every run private val random = Random(0) // create the array once and just copy it in benchmarks private val unsorted = IntArray(10_000) { random.nextInt() } @Test fun benchmark_quickSort() { // ... benchmarkRule.measureRepeated { // copy the array with timing disabled to measure only the algorithm itself listToSort = runWithTimingDisabled { unsorted.copyOf() } // sort the array in place and measure how long it takes SortingAlgorithms.quickSort(listToSort) } // assert only once not to add overhead to the benchmarks assertTrue(listToSort.isSorted) }
Java
private final int[] unsorted = new int[10000];

public SampleBenchmark() {
    // Use random with the same seed, so that it generates the same data every
    // run.
    Random random = new Random(0);

    // Create the array once and copy it in benchmarks.
    Arrays.setAll(unsorted, (index) -> random.nextInt());
}

@Test
public void benchmark_quickSort() {
    final BenchmarkState state = benchmarkRule.getState();

    int[] listToSort = new int[0];

    while (state.keepRunning()) {

        // Copy the array with timing disabled to measure only the algorithm
        // itself.
        state.pauseTiming();
        listToSort = Arrays.copyOf(unsorted, 10000);
        state.resumeTiming();

        // Sort the array in place and measure how long it takes.
        SortingAlgorithms.quickSort(listToSort);
    }

    // Assert only once, not to add overhead to the benchmarks.
    assertTrue(SortingAlgorithmsKt.isSorted(listToSort));
}
尽量减少 measureRepeated 块和 runWithTimingDisabled 内部的工作量。measureRepeated 块会运行多次,这可能会影响运行基准测试所需的总时间。如果您需要验证基准测试的一些结果,可以断言最后一个结果,而不是在基准测试的每次迭代中都进行。
运行基准测试
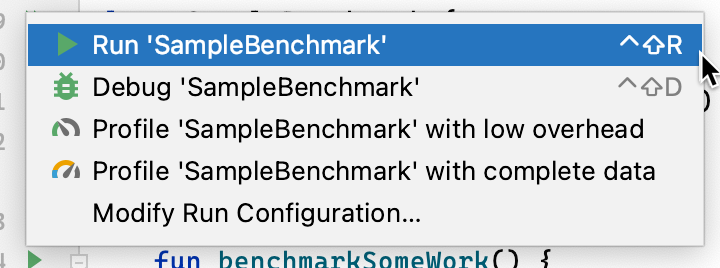
在 Android Studio 中,您可以通过测试类或方法旁边的 gutter 操作运行基准测试,就像运行任何 @Test 一样,如图 3 所示。
或者,从命令行运行 connectedCheck 以运行指定 Gradle 模块中的所有测试。
./gradlew benchmark:connectedCheck或单个测试
./gradlew benchmark:connectedCheck -P android.testInstrumentationRunnerArguments.class=com.example.benchmark.SampleBenchmark#benchmarkSomeWork基准测试结果
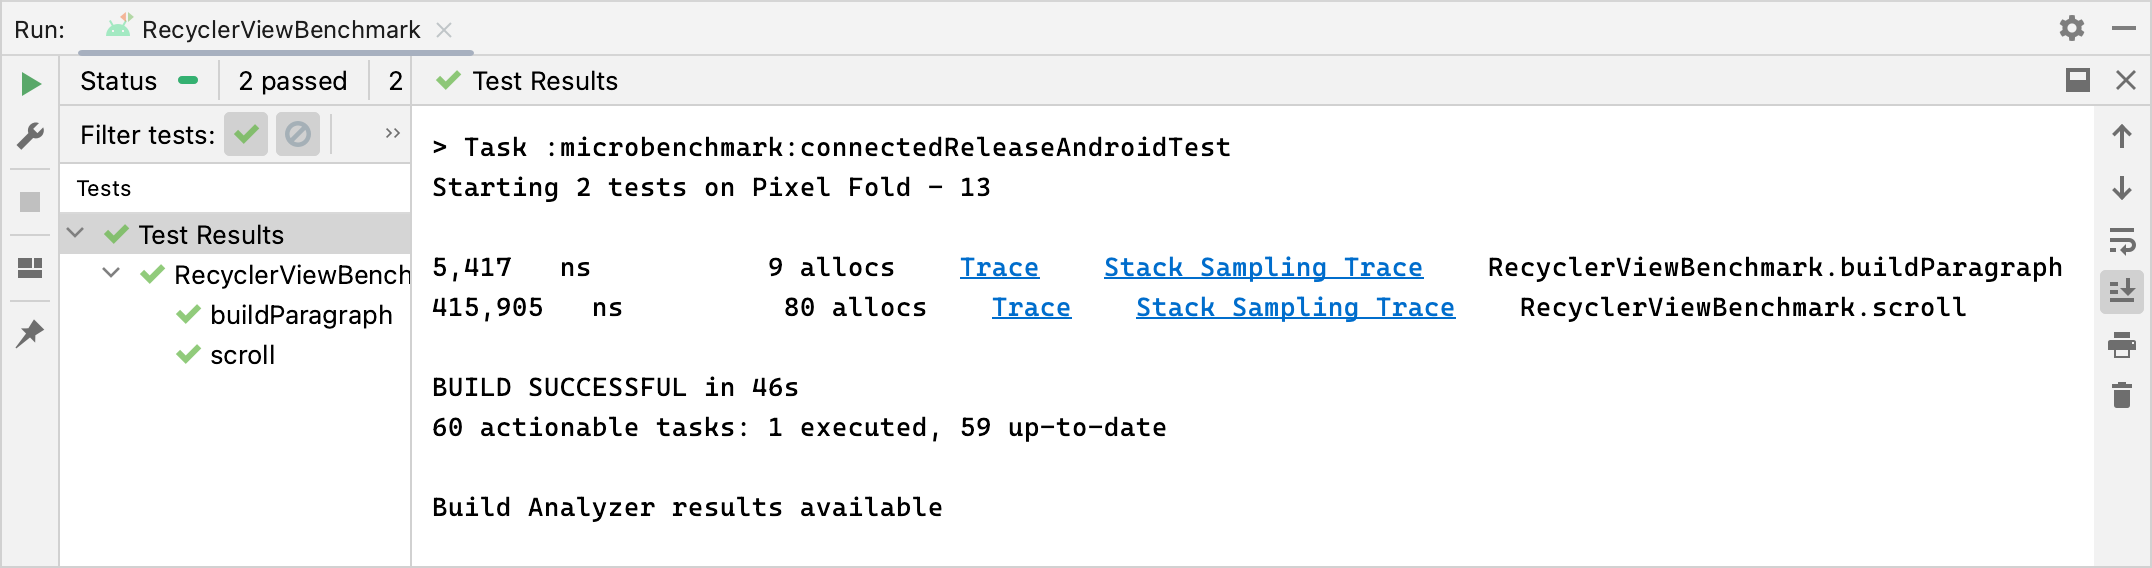
成功运行 Microbenchmark 后,指标会直接显示在 Android Studio 中,并且可以获得包含附加指标和设备信息的完整基准测试报告(JSON 格式)。
JSON 报告和任何分析跟踪也会自动从设备复制到主机。它们写入主机上的以下位置:
project_root/module/build/outputs/connected_android_test_additional_output/debugAndroidTest/connected/device_id/
默认情况下,JSON 报告写入设备上测试 APK 的外部共享媒体文件夹,该文件夹通常位于 /storage/emulated/0/Android/media/**app_id**/**app_id**-benchmarkData.json。
配置错误
库会检测以下条件,以确保您的项目和环境已设置为可实现发布版本准确的性能:
- Debuggable 设置为
false。 - 正在使用物理设备 — 不支持模拟器。
- 如果设备已 Root,则时钟已锁定。
- 设备电池电量充足,至少达到 25%。
如果上述任何一项检查失败,基准测试会报告错误,以避免不准确的测量结果。
要将特定错误类型作为警告抑制并防止它们中止基准测试,请以逗号分隔列表的形式将错误类型传递给插桩参数 androidx.benchmark.suppressErrors。
您可以从 Gradle 脚本中进行设置,如下例所示:
Kotlin
android {
    defaultConfig {
       …
      testInstrumentationRunnerArguments["androidx.benchmark.suppressErrors"] = "DEBUGGABLE,LOW-BATTERY"
    }
}
Groovy
android {
    defaultConfig {
       …
      testInstrumentationRunnerArguments["androidx.benchmark.suppressErrors"] = "DEBUGGABLE,LOW-BATTERY"
    }
}
您也可以从命令行抑制错误。
$ ./gradlew :benchmark:connectedCheck -P andoidtestInstrumentationRunnerArguments.androidx.benchmark.supperssErrors=DEBUGGABLE,LOW-BATTERY
抑制错误允许基准测试在错误配置的状态下运行,并且基准测试的输出会故意通过在测试名称前加上错误名称来重命名。例如,使用上述代码段中的抑制功能运行可调试基准测试时,测试名称前会加上 DEBUGGABLE_。
为您推荐
- 注意:当 JavaScript 关闭时,会显示链接文本
- 编写宏基准测试
- 不使用 Gradle 构建微基准测试
- 创建基准配置文件 {:#creating-profile-rules}