1. 准备工作
本教程不涉及的内容
- 关于如何为 Android Auto 和 Android Automotive OS 创建媒体(音频 - 例如音乐、广播、播客)应用的指南。有关如何构建此类应用的详细信息,请参阅为汽车构建媒体应用。
您将需要
- 最新版本的Android Studio。
- 具备 Kotlin 基础知识的经验。
- 具备创建 Android 虚拟设备和在 Android 模拟器中运行它们的经验。
- 具备 Jetpack Compose 的基础知识。
- 了解副作用
- 基本熟悉窗口内边距。
您将构建
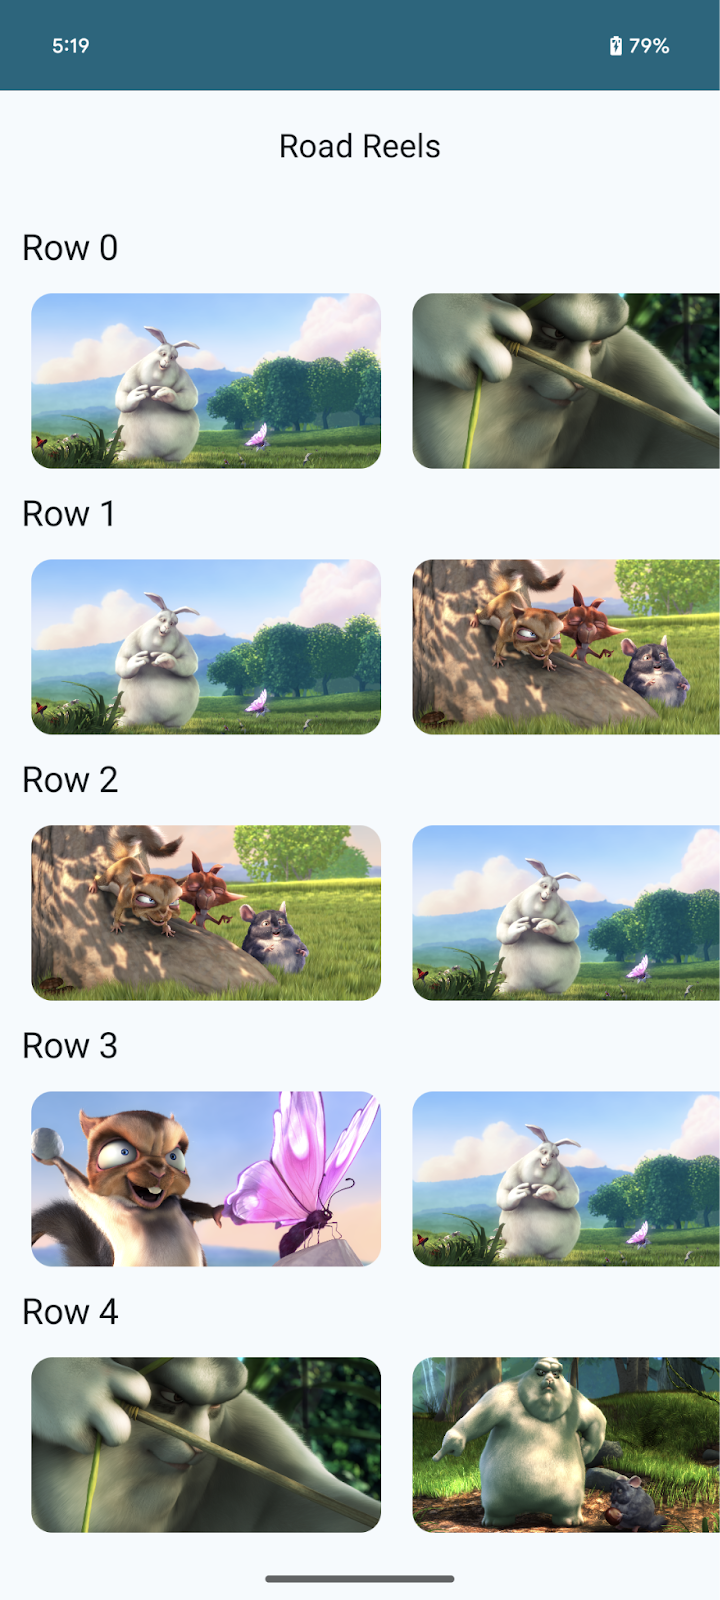
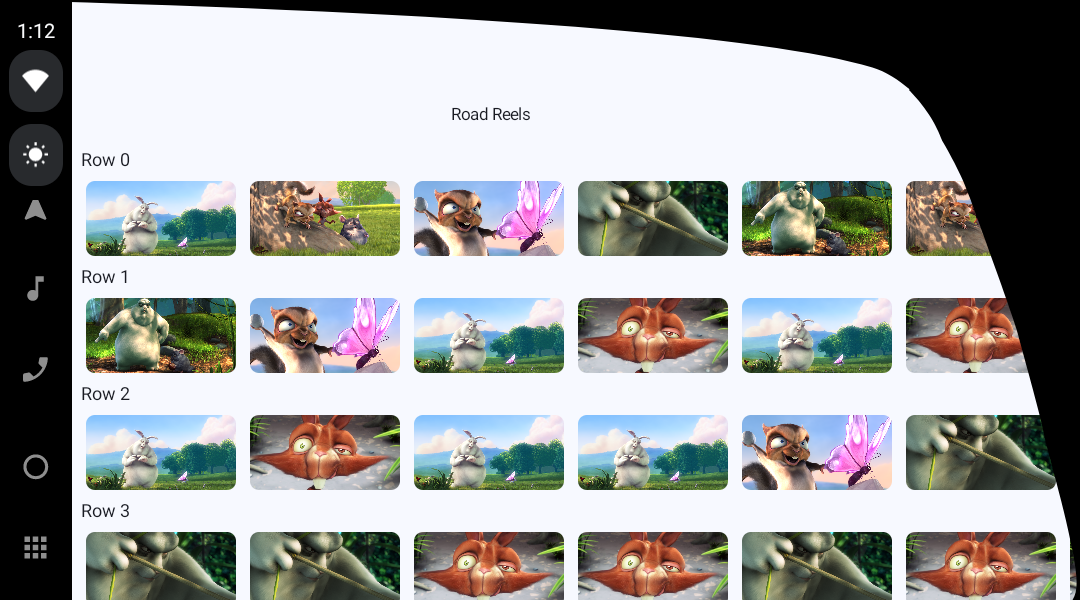
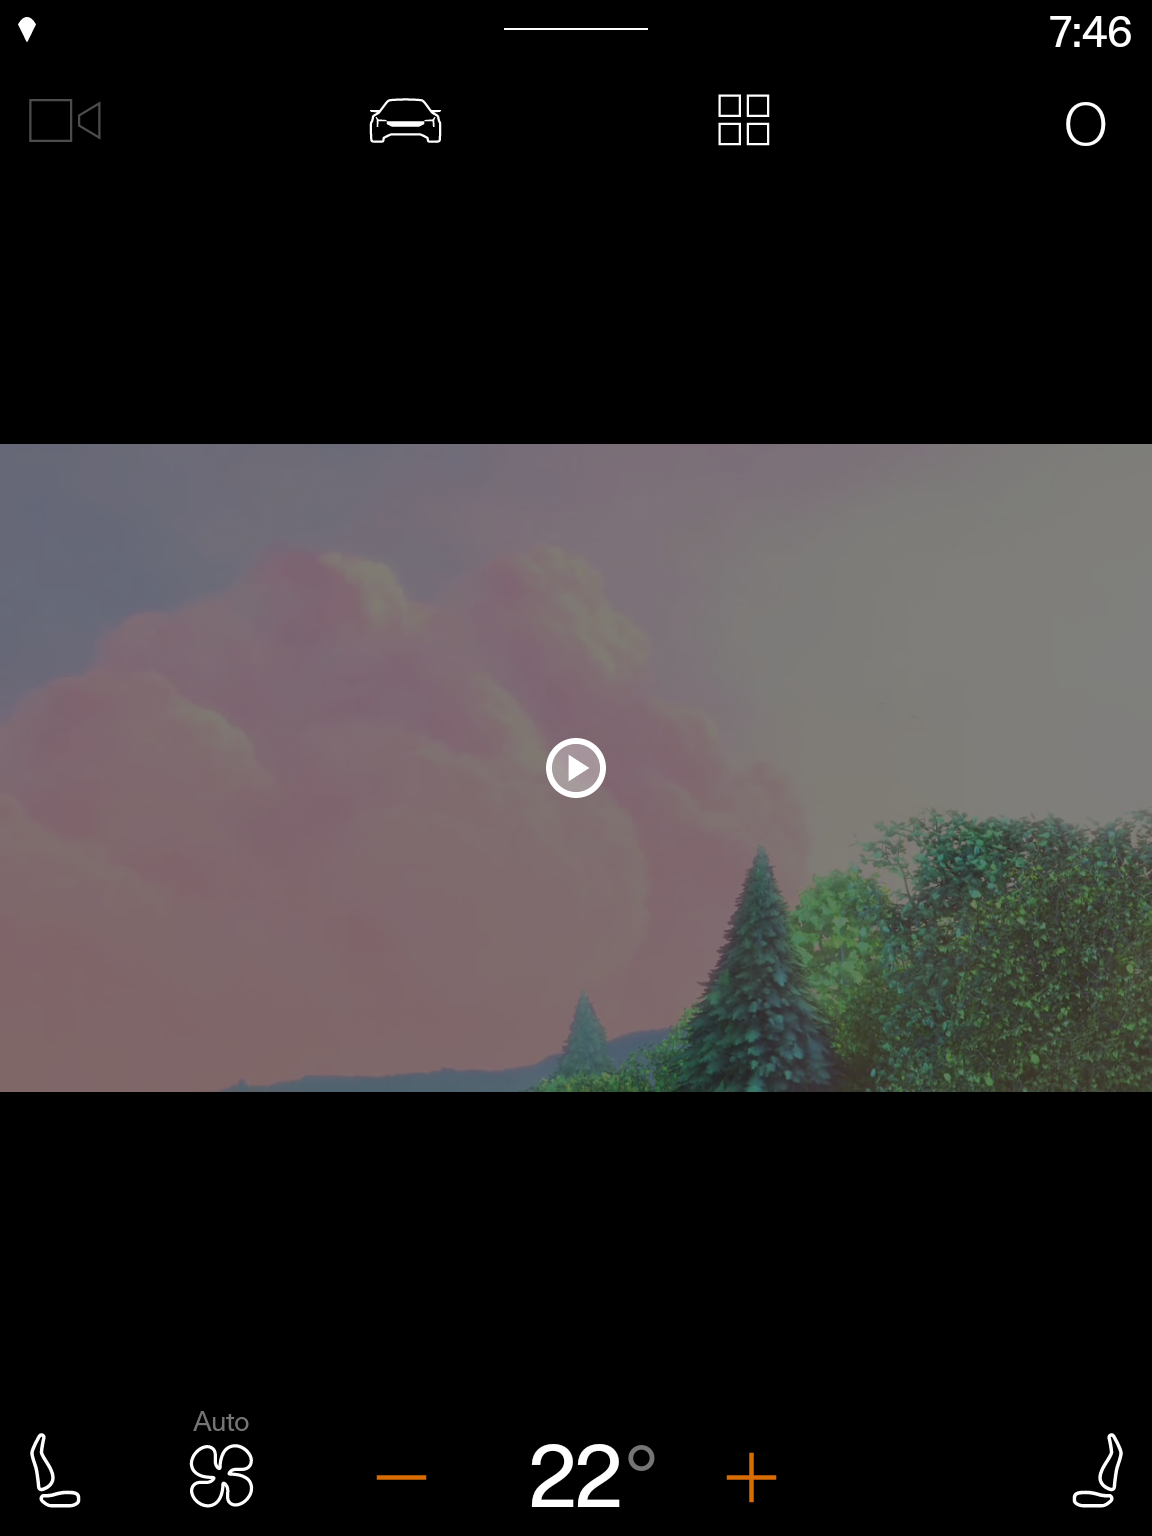
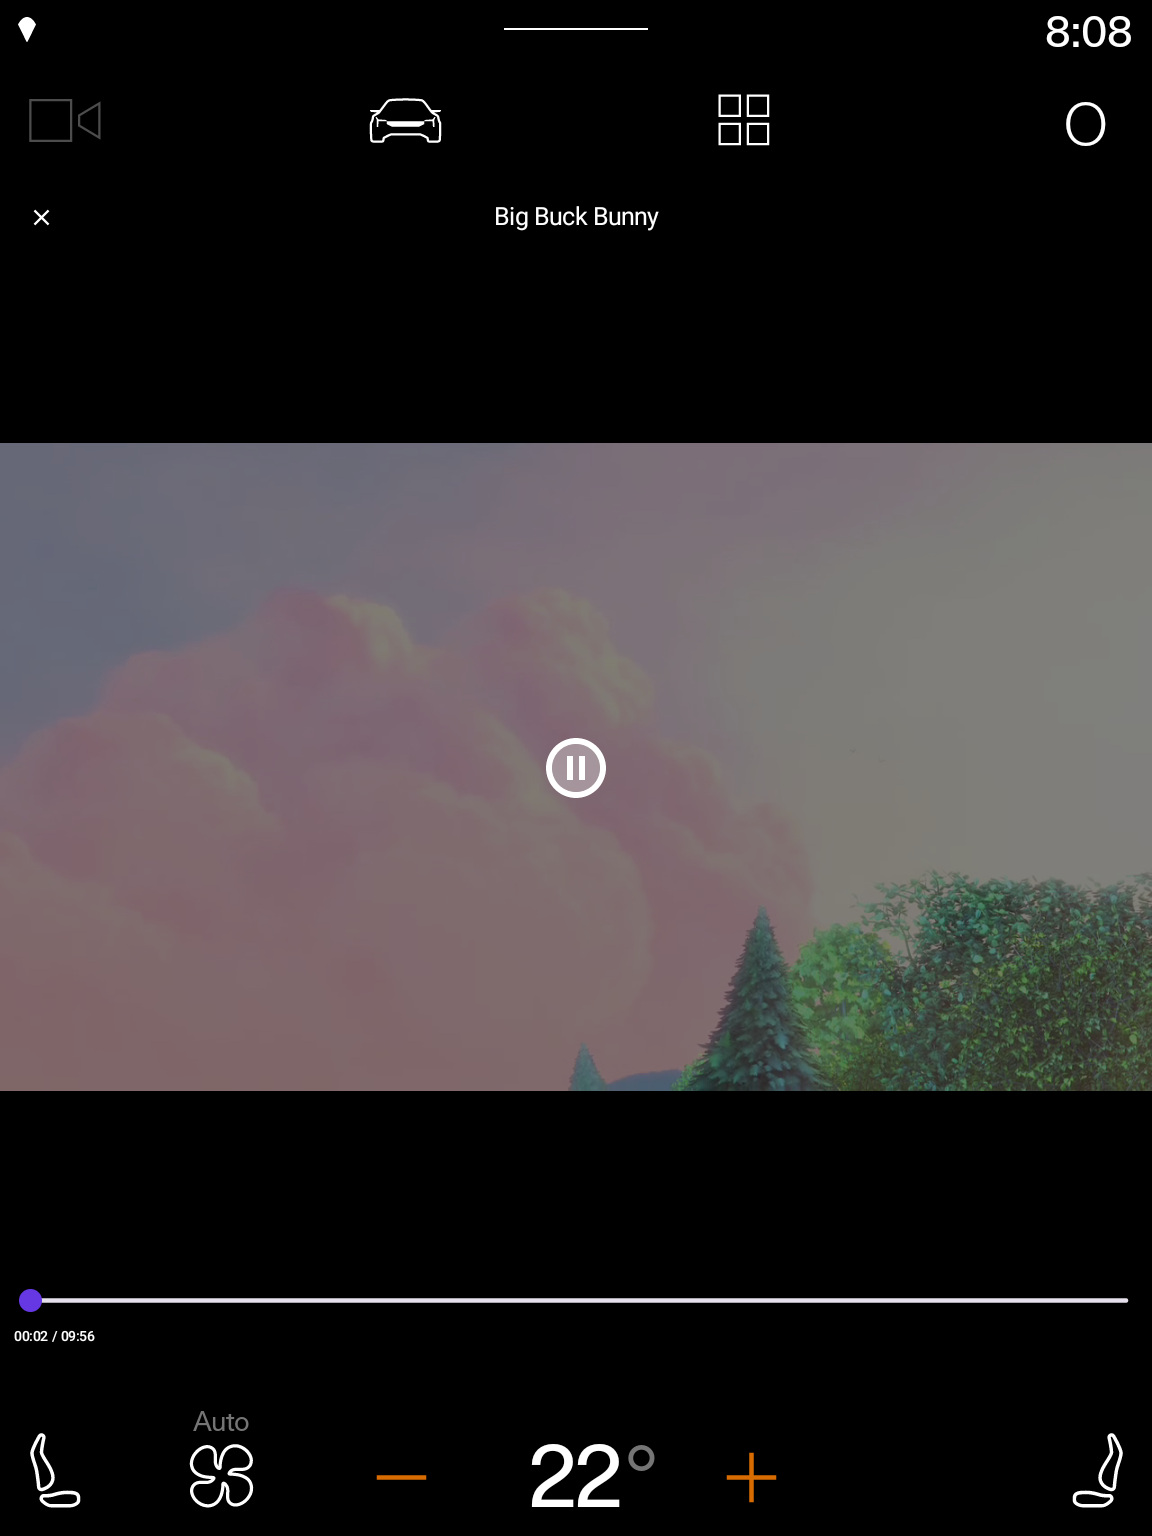
在此 Codelab 中,您将学习如何将现有的视频流移动应用 Road Reels 迁移到 Android Automotive OS。
|
|
应用在手机上运行的起始点版本 | 应用在带有显示屏开孔的 Android Automotive OS 模拟器上运行的完成版本。 |
您将学到什么
- 如何使用 Android Automotive OS 模拟器。
- 如何进行创建 Android Automotive OS 构建所需的更改。
- 在为移动设备开发应用时可能做出的常见假设,这些假设在应用运行在 Android Automotive OS 上时可能会被打破。
- 车载应用的不同质量等级。
- 如何使用媒体会话使其他应用能够控制您应用的播放。
- 与移动设备相比,Android Automotive OS 设备上的系统 UI 和窗口内边距可能有所不同。
2. 设置
获取代码
- 此 Codelab 的代码可在
car-codelabsGitHub 仓库中的build-a-parked-app目录中找到。要克隆它,请运行以下命令
git clone https://github.com/android/car-codelabs.git
- 或者,您可以将仓库下载为 ZIP 文件
打开项目
- 启动 Android Studio 后,导入项目,仅选择
build-a-parked-app/start目录。build-a-parked-app/end目录包含解决方案代码,您可以在任何时候卡住或只是想查看完整项目时进行参考。
熟悉代码
- 在 Android Studio 中打开项目后,花一些时间查看起始代码。
3. 了解 Android Automotive OS 的驻车应用
驻车应用构成了Android Automotive OS 支持的应用类别子集。在撰写本文时,它们包括视频流应用、网页浏览器和游戏。考虑到配备内置 Google 功能的车辆中存在的硬件以及电动汽车日益普及,充电时间为司机和乘客提供了与这些类型的应用互动的绝佳机会,因此这些应用非常适合在汽车中使用。
在许多方面,汽车与其他大屏幕设备(如平板电脑和可折叠设备)类似。它们具有尺寸、分辨率和纵横比相似的触摸屏,并且可以是纵向或横向(尽管与平板电脑不同,它们的屏幕方向是固定的)。它们也是可能进出网络连接的连接设备。考虑到所有这些,对于已经自适应的应用来说,通常只需要最少的工作量即可为汽车带来出色的用户体验,这并不奇怪。
与大屏幕类似,汽车中的应用也存在应用质量等级
- 第 3 级 - 汽车就绪:您的应用与大屏幕兼容,可以在汽车驻车时使用。虽然它可能没有任何针对汽车优化的功能,但用户可以在任何其他大屏幕 Android 设备上体验该应用。符合这些要求的移动应用可以通过汽车就绪移动应用计划按原样分发到汽车。
- 第 2 级 - 汽车优化:您的应用在汽车中控台显示屏上提供出色的体验。为此,您的应用将进行一些针对汽车的工程设计,以包含可根据您的应用类别在驾驶或驻车模式下使用的功能。
- 第 1 级 - 汽车差异化:您的应用旨在跨汽车中的各种硬件工作,并可以根据驾驶和驻车模式调整其体验。它提供针对汽车中不同屏幕(例如中控台、仪表盘和附加屏幕,如许多豪华汽车中出现的全景显示屏)设计的最佳用户体验。
4. 在 Android Automotive OS 模拟器中运行应用
安装带 Play 商店的 Automotive 系统映像
- 首先,在 Android Studio 中打开 SDK 管理器,如果尚未选中,请选择SDK 平台选项卡。在 SDK 管理器窗口的右下角,确保选中显示软件包详细信息复选框。
- 安装添加通用系统映像中列出的 API 33 Android Automotive with Google APIs 模拟器映像。映像只能在与其架构(x86/ARM)相同的机器上运行。
创建 Android Automotive OS Android 虚拟设备
- 打开设备管理器后,在窗口左侧的类别列下选择Automotive。然后,从列表中选择 Automotive (1408p landscape) 捆绑硬件配置文件,然后点击下一步。
- 在下一页,选择上一步中的系统映像。点击下一步,然后选择您想要的任何高级选项,最后点击完成创建 AVD。注意:如果您选择了 API 30 映像,它可能位于推荐选项卡之外的其他选项卡下。
运行应用
使用现有 app 运行配置,在您刚创建的模拟器上运行应用。试用该应用,浏览不同的屏幕,并比较其与在手机或平板电脑模拟器上运行时的行为差异。

5. 更新清单以声明对 Android Automotive OS 的支持
尽管该应用“正常运行”,但仍需进行一些小改动,才能使其在 Android Automotive OS 上良好运行,并满足在 Play 商店上发布的要求。这些更改可以以相同 APK 或 App Bundle 既支持移动设备又支持 Android Automotive OS 设备的方式进行。第一组更改是更新 AndroidManifest.xml 文件,以表明该应用支持 Android Automotive OS 设备且是一个视频应用。
声明车载硬件功能
要表明您的应用支持 Android Automotive OS 设备,请在 AndroidManifest.xml 文件中添加以下 <uses-feature> 元素
AndroidManifest.xml
<manifest xmlns:android="http://schemas.android.com/apk/res/android">
    ...
    <uses-feature
        android:name="android.hardware.type.automotive"
        android:required="false" />
    ...
</manifest>
将 android:required 属性的值设置为 false,可以使生成的 APK 或 App Bundle 能够分发到 Android Automotive OS 设备和移动设备。有关详细信息,请参阅选择 Android Automotive OS 的跟踪类型。
将应用标记为视频应用
需要添加的最后一条元数据是 automotive_app_desc.xml 文件。此文件用于在车载 Android 的上下文中声明您的应用类别,并且独立于您在 Play 管理中心中为应用选择的类别。
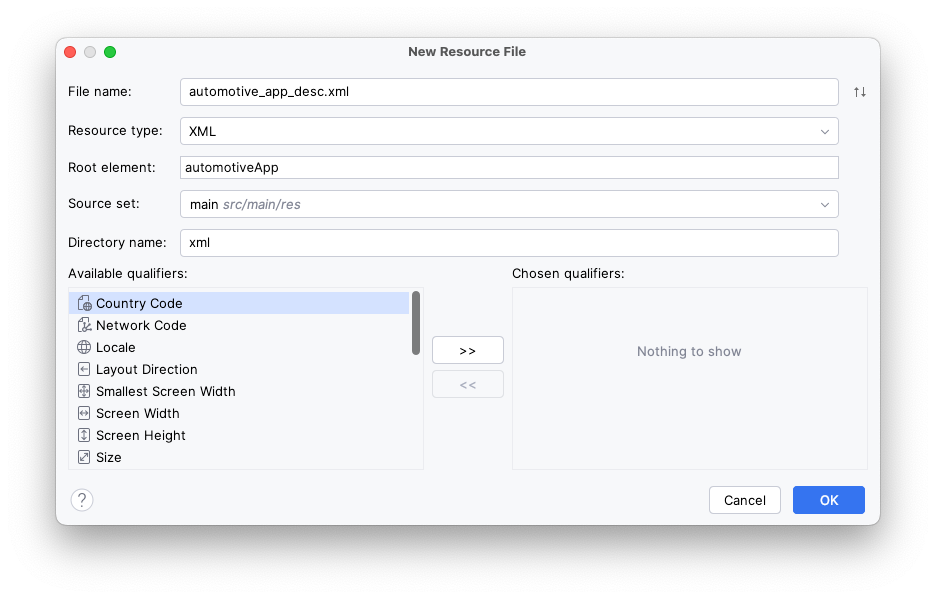
- 右键点击
app模块,选择 New > Android Resource File 选项,然后输入以下值,再点击 OK
- 文件名:
automotive_app_desc.xml - 资源类型:
XML - 根元素:
automotiveApp - 源集:
main - 目录名称:
xml
- 在该文件中,添加以下
<uses>元素,以声明您的应用是视频应用。
automotive_app_desc.xml
<?xml version="1.0" encoding="utf-8"?>
<automotiveApp xmlns:android="http://schemas.android.com/apk/res/android"
    xmlns:tools="http://schemas.android.com/tools">
    <uses
        name="video"
        tools:ignore="InvalidUsesTagAttribute" />
</automotiveApp>
- 在现有
<application>元素中,添加以下<meta-data>元素,该元素引用您刚刚创建的automotive_app_desc.xml文件。
AndroidManifest.xml
<application ...>
    <meta-data
        android:name="com.android.automotive"
        android:resource="@xml/automotive_app_desc" />
</application>
至此,您已完成声明 Android Automotive OS 支持所需的所有更改。
6. 满足 Android Automotive OS 质量要求:可导航性
虽然声明支持 Android Automotive OS 是将应用引入汽车的一部分,但确保应用可用且使用安全仍然是必要的。
添加导航功能
在 Android Automotive OS 模拟器中运行应用时,您可能已经注意到无法从详细信息屏幕返回主屏幕,也无法从播放器屏幕返回详细信息屏幕。与其他可能需要返回按钮或触摸手势才能启用返回导航的外形规格不同,Android Automotive OS 设备没有此类要求。因此,应用必须在其 UI 中提供导航功能,以确保用户能够在应用内导航而不会卡在某个屏幕上。此要求已编码为 AN-1 质量指南。
为了支持从详细信息屏幕返回主屏幕的导航,请为详细信息屏幕的 CenterAlignedTopAppBar 添加一个额外的 navigationIcon 参数,如下所示
RoadReelsApp.kt
import androidx.compose.material.icons.Icons
import androidx.compose.material.icons.automirrored.filled.ArrowBack
import androidx.compose.material3.Icon
import androidx.compose.material3.IconButton

...

} else if (route?.startsWith(Screen.Detail.name) == true) {
    CenterAlignedTopAppBar(
        title = { Text(stringResource(R.string.bbb_title)) },
        navigationIcon = {
            IconButton(onClick = { navController.popBackStack() }) {
                Icon(
                    Icons.AutoMirrored.Filled.ArrowBack,
                    contentDescription = null
                )
            }
        }
    )
}
要支持从播放器屏幕返回主屏幕的导航
- 更新
TopControls可组合函数以接受名为onClose的回调参数,并添加一个IconButton,点击时调用该参数。
PlayerControls.kt
import androidx.compose.material.icons.twotone.Close

...

@Composable
fun TopControls(
    title: String?,
    onClose: () -> Unit,
    modifier: Modifier = Modifier
) {
    Box(modifier) {
        IconButton(
            modifier = Modifier
                .align(Alignment.TopStart),
            onClick = onClose
        ) {
            Icon(
                Icons.TwoTone.Close,
                contentDescription = "Close player",
                tint = Color.White
            )
        }

        if (title != null) { ... }
    }
}
- 更新
PlayerControls可组合项以接受onClose回调参数,并将其传递给TopControls
PlayerControls.kt
fun PlayerControls(
    uiState: PlayerUiState,
    onClose: () -> Unit,
    onPlayPause: () -> Unit,
    onSeek: (seekToMillis: Long) -> Unit,
    modifier: Modifier = Modifier,
) {
    AnimatedVisibility(
        visible = uiState.isShowingControls,
        enter = fadeIn(),
        exit = fadeOut()
    ) {
        Box(modifier = modifier.background(Color.Black.copy(alpha = .5f))) {
            TopControls(
                modifier = Modifier
                    .fillMaxWidth()
                    .padding(dimensionResource(R.dimen.screen_edge_padding))
                    .align(Alignment.TopCenter),
                title = uiState.mediaMetadata.title?.toString(),
                onClose = onClose
            )
            ...
        }
    }
}
- 接下来,更新
PlayerScreen可组合函数以接受相同的参数,并将其传递给其PlayerControls。
PlayerScreen.kt
@Composable
fun PlayerScreen(
    onClose: () -> Unit,
    modifier: Modifier = Modifier,
    viewModel: PlayerViewModel = viewModel()
) {
    ...

    PlayerControls(
        modifier = Modifier
            .fillMaxSize(),
        uiState = playerUiState,
        onClose = onClose,
        onPlayPause = { if (playerUiState.isPlaying) viewModel.pause() else viewModel.play() },
        onSeek = viewModel::seekTo
    )
}
- 最后,在
RoadReelsNavHost中,提供传递给PlayerScreen的实现
RoadReelsNavHost.kt
composable(route = Screen.Player.name, ...) {
    PlayerScreen(onClose = { navController.popBackStack() })
}
现在用户可以在屏幕之间移动而不会遇到任何死胡同。而且,用户体验在其他外形规格上可能也会更好——例如,在高高的手机上,当用户的手已经靠近屏幕顶部时,他们可以更轻松地浏览应用程序,而无需在手中移动设备。

适应屏幕方向支持
与绝大多数移动设备不同,大多数汽车的屏幕方向是固定的。也就是说,它们支持横向或纵向,但不能同时支持两者,因为它们的屏幕无法旋转。因此,应用应避免假设同时支持两种屏幕方向。
在创建 Android Automotive OS 清单中,您为 android.hardware.screen.portrait 和 android.hardware.screen.landscape 功能添加了两个 <uses-feature> 元素,并将 required 属性设置为 false。这样做可确保任何对任一屏幕方向的隐式功能依赖都不会阻止应用分发到汽车。但是,这些清单元素不会改变应用的行为,只会改变其分发方式。
目前,该应用有一个有用的功能,即当视频播放器打开时,它会自动将 Activity 的方向设置为横向,这样手机用户就不必费力调整设备来更改其方向(如果尚未设置为横向)。
不幸的是,同样的行为可能导致固定纵向设备(包括当今许多汽车)上出现闪烁循环或信箱效应。
要解决此问题,您可以根据当前设备支持的屏幕方向添加检查。
- 为了简化实现,首先在
Extensions.kt中添加以下内容
Extensions.kt
import android.content.Context
import android.content.pm.PackageManager

...

enum class SupportedOrientation {
    Landscape,
    Portrait,
}

fun Context.supportedOrientations(): List<SupportedOrientation> {
    return when (Pair(
        packageManager.hasSystemFeature(PackageManager.FEATURE_SCREEN_LANDSCAPE),
        packageManager.hasSystemFeature(PackageManager.FEATURE_SCREEN_PORTRAIT)
    )) {
        Pair(true, false) -> listOf(SupportedOrientation.Landscape)
        Pair(false, true) -> listOf(SupportedOrientation.Portrait)
        // For backwards compat, if neither feature is declared, both can be assumed to be supported
        //
        else -> listOf(SupportedOrientation.Landscape, SupportedOrientation.Portrait)
    }
}
- 然后,保护设置请求方向的调用。由于应用在移动设备上的多窗口模式下也可能遇到类似问题,您也可以在这种情况下不动态设置方向。
PlayerScreen.kt
import com.example.android.cars.roadreels.SupportedOrientation
import com.example.android.cars.roadreels.supportedOrientations

...

DisposableEffect(Unit) {
    ...

    // Only automatically set the orientation to landscape if the device supports landscape.
    // On devices that are portrait only, the activity may enter a compat mode and won't get to
    // use the full window available if so. The same applies if the app's window is portrait
    // in multi-window mode.
    if (activity.supportedOrientations().contains(SupportedOrientation.Landscape)
        && !activity.isInMultiWindowMode
    ) {
        activity.requestedOrientation = ActivityInfo.SCREEN_ORIENTATION_SENSOR_LANDSCAPE
    }

    ...
}
|
|
|
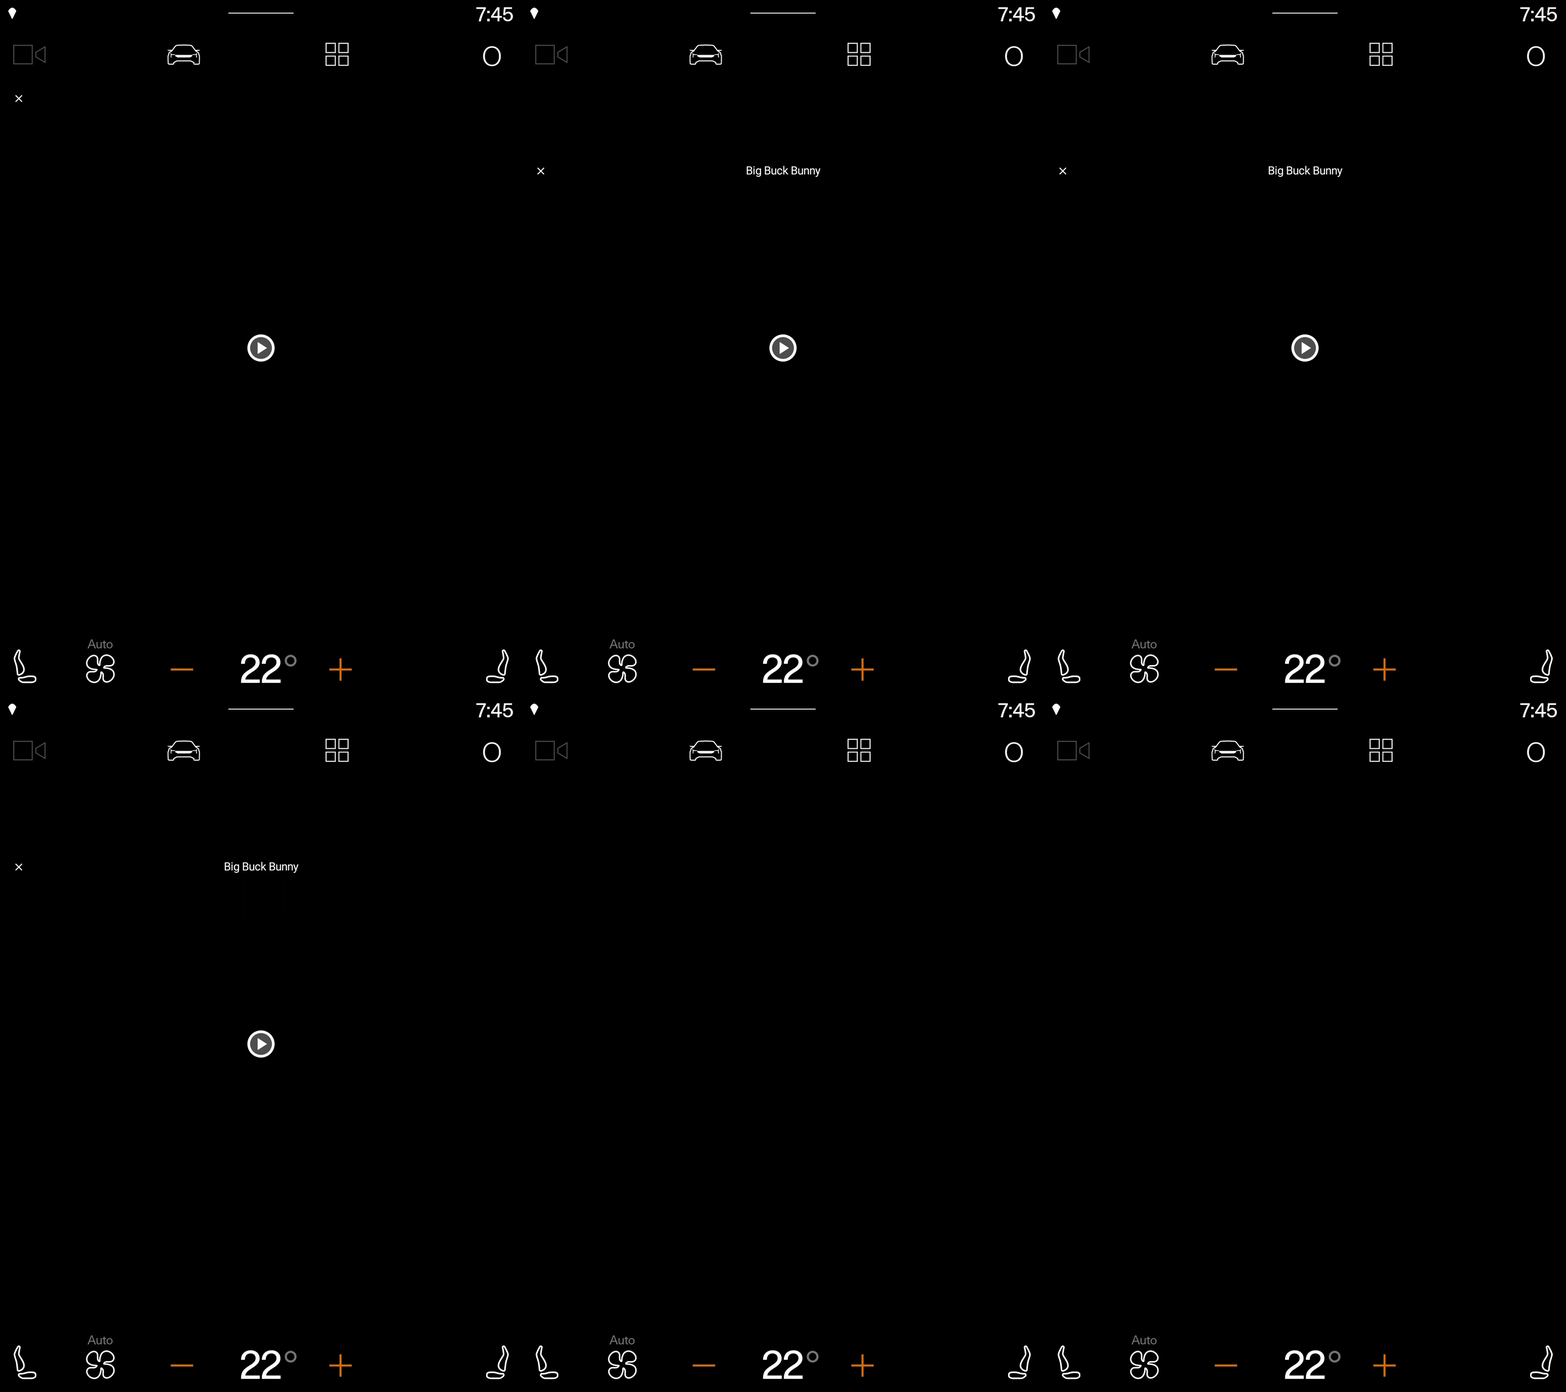
在添加检查之前,播放器屏幕在 Polestar 2 模拟器上进入闪烁循环(当 Activity 不处理 | 在添加检查之前,播放器屏幕在 Polestar 2 模拟器上出现信箱效应(当 Activity 处理 | 添加检查后,播放器屏幕在 Polestar 2 模拟器上没有信箱效应 |
由于这是应用程序中唯一设置屏幕方向的位置,因此应用程序现在避免了信箱效应!在您自己的应用程序中,检查任何仅用于横向或纵向(包括每个的 sensor、reverse 和 user 变体)的 screenOrientation 属性或 setRequestedOrientation 调用,并根据需要删除或保护它们以限制信箱效应。有关更多详细信息,请参阅设备兼容模式。
适应系统栏可控性
不幸的是,尽管之前的更改确保了应用程序不会进入闪烁循环或出现信箱效应,但它也暴露出另一个被打破的假设——即系统栏始终可以隐藏!因为用户在使用汽车时有不同的需求(与使用手机或平板电脑相比),OEM 厂商可以选择阻止应用程序隐藏系统栏,以确保车辆控制(例如气候控制)始终在屏幕上可访问。
因此,当应用以沉浸模式渲染并假定系统栏可以隐藏时,可能会导致应用渲染在系统栏后面。您可以在上一步中看到这一点,因为当应用没有信箱效应时,顶部和底部播放器控件不再可见。在此特定情况下,应用不再可导航,因为关闭播放器的按钮被遮挡,并且由于无法使用进度条,其功能受到阻碍。
最简单的修复方法是将 systemBars 窗口内边距应用到播放器,如下所示
PlayerScreen.kt
import androidx.compose.foundation.layout.WindowInsets
import androidx.compose.foundation.layout.systemBars
import androidx.compose.foundation.layout.windowInsetsPadding

...

Box(
    modifier = Modifier
        .fillMaxSize()
        .windowInsetsPadding(WindowInsets.systemBars)
) {
    PlayerView(...)
    PlayerControls(...)
}
然而,这个解决方案并不理想,因为它会导致 UI 元素随着系统栏的动画消失而跳动。

为了改善用户体验,您可以更新应用,以跟踪哪些内边距可以控制,并仅为不可控制的内边距应用内边距。
- 由于应用程序中的其他屏幕可能对控制窗口内边距感兴趣,因此将可控制的内边距作为
CompositionLocal传递是有意义的。在com.example.android.cars.roadreels包中创建一个新文件LocalControllableInsets.kt,并添加以下内容
LocalControllableInsets.kt
import androidx.compose.runtime.compositionLocalOf

// Assume that no insets can be controlled by default
const val DEFAULT_CONTROLLABLE_INSETS = 0
val LocalControllableInsets = compositionLocalOf { DEFAULT_CONTROLLABLE_INSETS }
- 设置一个
OnControllableInsetsChangedListener以监听更改。
MainActivity.kt
import androidx.compose.runtime.getValue
import androidx.compose.runtime.mutableIntStateOf
import androidx.compose.runtime.remember
import androidx.compose.runtime.setValue
import androidx.core.view.WindowCompat
import androidx.core.view.WindowInsetsControllerCompat.OnControllableInsetsChangedListener

...

class MainActivity : ComponentActivity() {
    private lateinit var onControllableInsetsChangedListener: OnControllableInsetsChangedListener

    @OptIn(ExperimentalMaterial3WindowSizeClassApi::class)
    override fun onCreate(savedInstanceState: Bundle?) {
        super.onCreate(savedInstanceState)

        enableEdgeToEdge()

        setContent {
            var controllableInsetsTypeMask by remember { mutableIntStateOf(DEFAULT_CONTROLLABLE_INSETS) }

            onControllableInsetsChangedListener =
                OnControllableInsetsChangedListener { _, typeMask ->
                    if (controllableInsetsTypeMask != typeMask) {
                        controllableInsetsTypeMask = typeMask
                    }
                }

            WindowCompat.getInsetsController(window, window.decorView)
                .addOnControllableInsetsChangedListener(onControllableInsetsChangedListener)

            RoadReelsTheme {
                RoadReelsApp(calculateWindowSizeClass(this))
            }
        }
    }

    override fun onDestroy() {
        super.onDestroy()

        WindowCompat.getInsetsController(window, window.decorView)
            .removeOnControllableInsetsChangedListener(onControllableInsetsChangedListener)
    }
}
- 添加一个顶级
CompositionLocalProvider,其中包含主题和应用可组合项,并将其值绑定到LocalControllableInsets。
MainActivity.kt
import androidx.compose.runtime.CompositionLocalProvider

...

CompositionLocalProvider(LocalControllableInsets provides controllableInsetsTypeMask) {
    RoadReelsTheme {
        RoadReelsApp(calculateWindowSizeClass(this))
    }
}
- 在播放器中,读取当前值并用它来确定要隐藏和用于填充的内边距。
PlayerScreen.kt
import androidx.compose.foundation.layout.navigationBars
import androidx.compose.foundation.layout.statusBars
import androidx.compose.foundation.layout.union
import androidx.compose.foundation.layout.WindowInsets
import androidx.compose.foundation.layout.navigationBars
import androidx.compose.foundation.layout.statusBars
import androidx.compose.foundation.layout.windowInsetsPadding
import androidx.compose.runtime.rememberUpdatedState
import androidx.compose.ui.unit.dp
import com.example.android.cars.roadreels.LocalControllableInsets

...

val controllableInsetsTypeMask by rememberUpdatedState(LocalControllableInsets.current)

DisposableEffect(Unit) {
    ...
    windowInsetsController.hide(WindowInsetsCompat.Type.systemBars().and(controllableInsetsTypeMask))
    ...
}

...

// When the system bars can be hidden, ignore them when applying padding to the player and
// controls so they don't jump around as the system bars disappear. If they can't be hidden
// include them so nothing renders behind the system bars
var windowInsetsForPadding = WindowInsets(0.dp)
if (controllableInsetsTypeMask.and(WindowInsetsCompat.Type.statusBars()) == 0) {
    windowInsetsForPadding = windowInsetsForPadding.union(WindowInsets.statusBars)
}
if (controllableInsetsTypeMask.and(WindowInsetsCompat.Type.navigationBars()) == 0) {
    windowInsetsForPadding = windowInsetsForPadding.union(WindowInsets.navigationBars)
}

Box(
    modifier = Modifier
        .fillMaxSize()
        .windowInsetsPadding(windowInsetsForPadding)
) {
    PlayerView(...)
    PlayerControls(...)
}
|
|
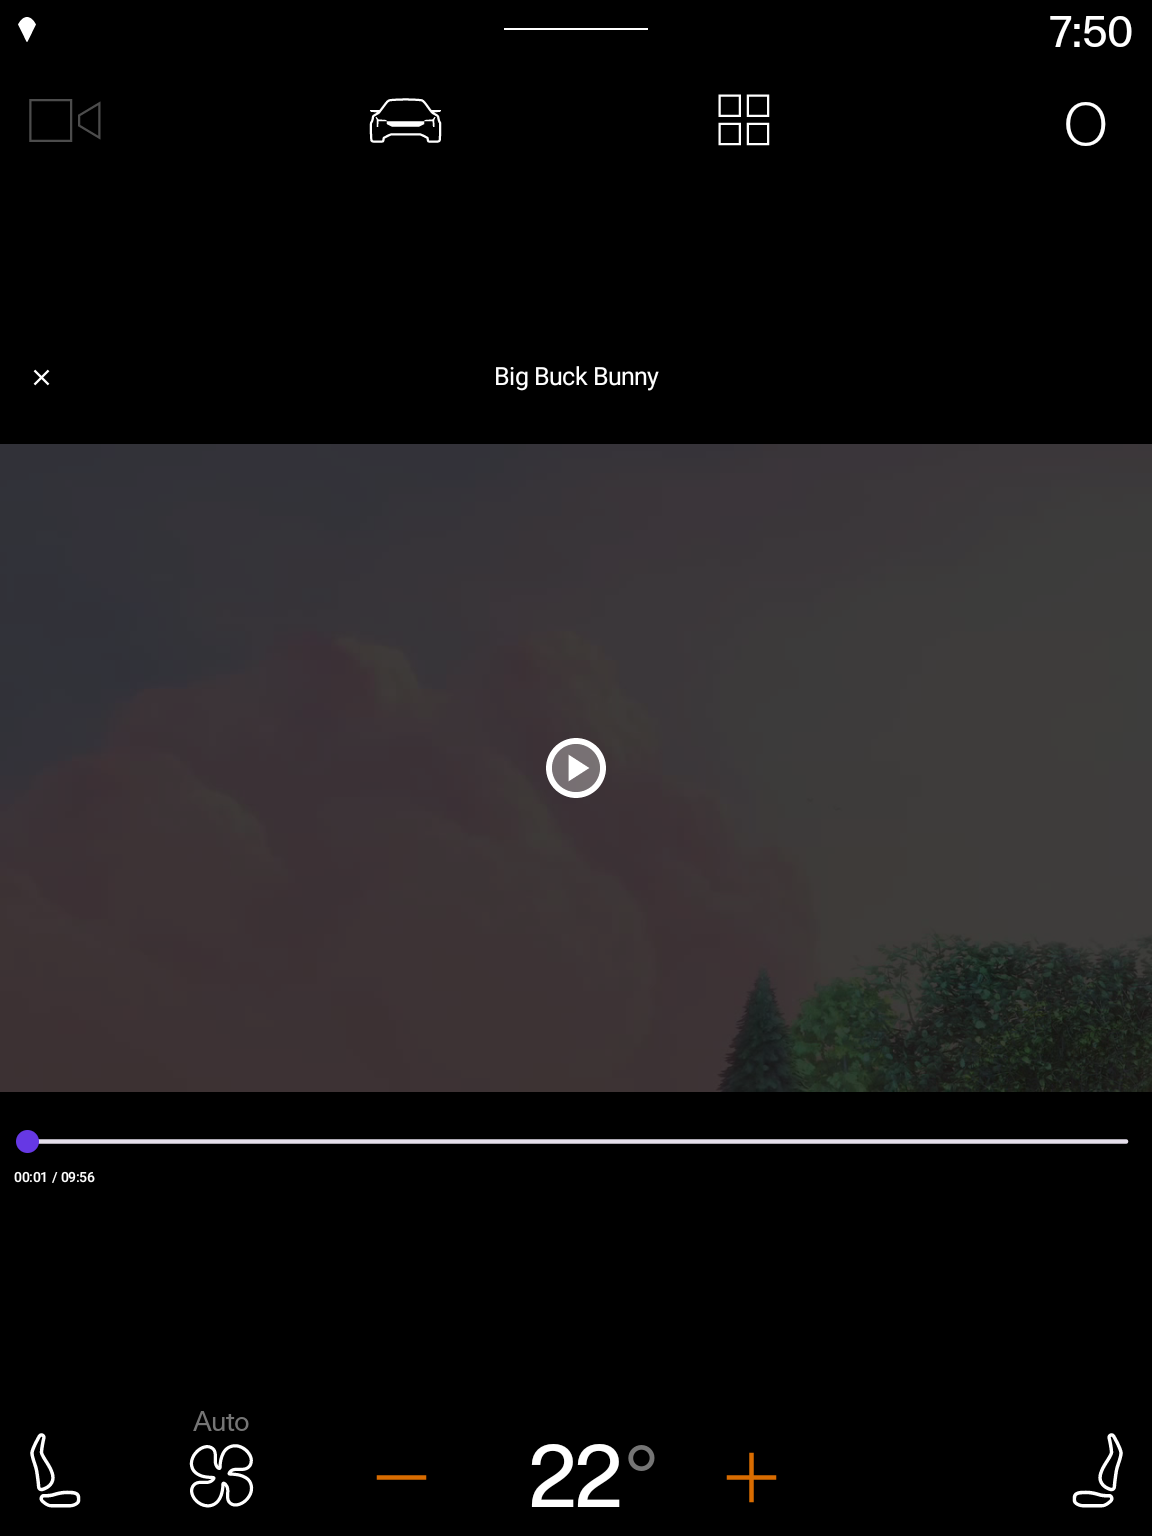
当系统栏可以隐藏时,内容不会跳动 | 当系统栏无法隐藏时,内容仍然可见 |
好多了——内容不会跳动,同时,即使在系统栏无法控制的汽车上,控件也完全可见。
7. 满足 Android Automotive OS 质量要求:驾驶员分心
最后,汽车与其他外形规格之间有一个主要区别——它们用于驾驶!因此,在驾驶时限制分心非常重要。所有 Android Automotive OS 的驻车应用在用户体验限制生效时必须暂停播放,并阻止在用户体验限制生效时恢复播放。当用户体验限制生效时,系统叠加层会出现,从而调用被叠加应用的 onPause 生命周期事件。正是在此调用期间,应用应暂停播放。
模拟驾驶
导航到模拟器中的播放器视图并开始播放内容。然后,按照步骤模拟驾驶,您会注意到,尽管应用的 UI 被系统遮挡,但播放并未暂停。这违反了 DD-2 车载应用质量指南。
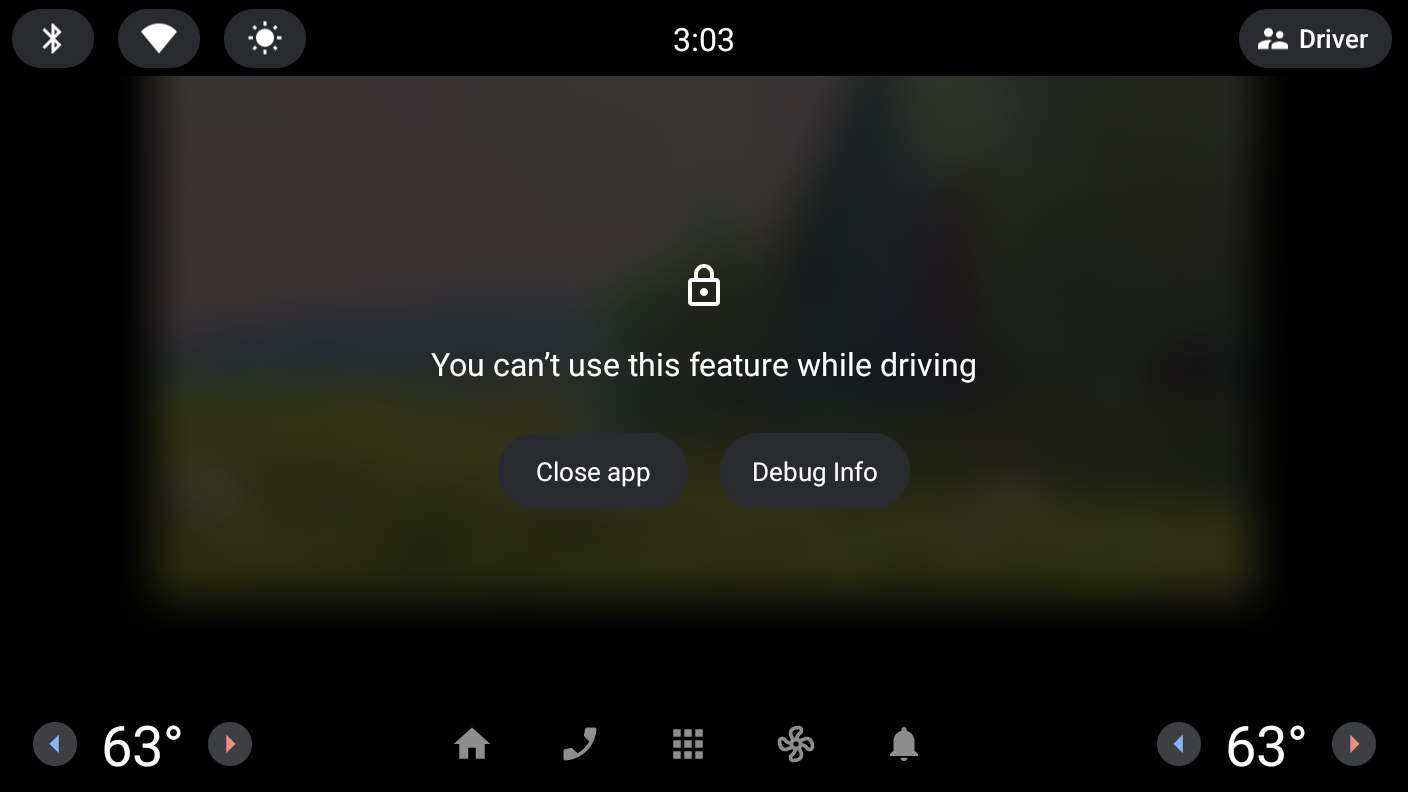
驾驶开始时暂停播放
- 添加对
androidx.lifecycle:lifecycle-runtime-compose工件的依赖,其中包含LifecycleEventEffect,可帮助在生命周期事件上运行代码。
libs.version.toml
androidx-lifecycle-runtime-compose = { group = "androidx.lifecycle", name = "lifecycle-runtime-compose", version.ref = "lifecycle" }
build.gradle.kts (Module :app)
implementation(libs.androidx.lifecycle.runtime.compose)
- 将项目同步以下载依赖项后,添加一个
LifecycleEventEffect,该效果在ON_PAUSE事件上运行以暂停播放(并可选择在ON_RESUME事件上运行以恢复播放)。
PlayerScreen.kt
import androidx.lifecycle.Lifecycle
import androidx.lifecycle.compose.LifecycleEventEffect

...

@Composable
fun PlayerScreen(...) {
    ...
    LifecycleEventEffect(Lifecycle.Event.ON_PAUSE) {
        viewModel.pause()
    }

    LifecycleEventEffect(Lifecycle.Event.ON_RESUME) {
        viewModel.play()
    }
    ...
}
修复实施后,按照您之前模拟主动播放期间驾驶的相同步骤,您会发现播放停止了,满足了 DD-2 要求。
8. 在远距离显示模拟器中测试应用
汽车中开始出现的一种新配置是双屏设置,其中主屏幕位于中控台,副屏幕位于仪表盘高处,靠近挡风玻璃。应用程序可以从中控台移动到副屏幕,然后再移回,从而为驾驶员和乘客提供更多选择。
安装 Automotive Distant Display 镜像
- 首先,在 Android Studio 预览版中打开 SDK 管理器,如果尚未选中,请选择SDK 平台选项卡。在 SDK 管理器窗口的右下角,确保选中显示软件包详细信息框。
- 安装适用于您计算机架构 (x86/ARM) 的 API 33 Automotive Distant Display with Google Play 模拟器映像。
创建 Android Automotive OS Android 虚拟设备
- 打开设备管理器后,在窗口左侧的类别列下选择Automotive。然后,从列表中选择 Automotive Distant Display with Google Play 捆绑硬件配置文件,然后点击下一步。
- 在下一页,选择上一步中的系统映像。点击下一步,然后选择您想要的任何高级选项,最后点击完成创建 AVD。
运行应用
使用现有 app 运行配置,在您刚创建的模拟器上运行应用。按照使用远距离显示模拟器中的说明将应用移动到远距离显示屏并从中移回。测试在主/详细信息屏幕和播放器屏幕上移动应用,并尝试在两个屏幕上与应用交互。
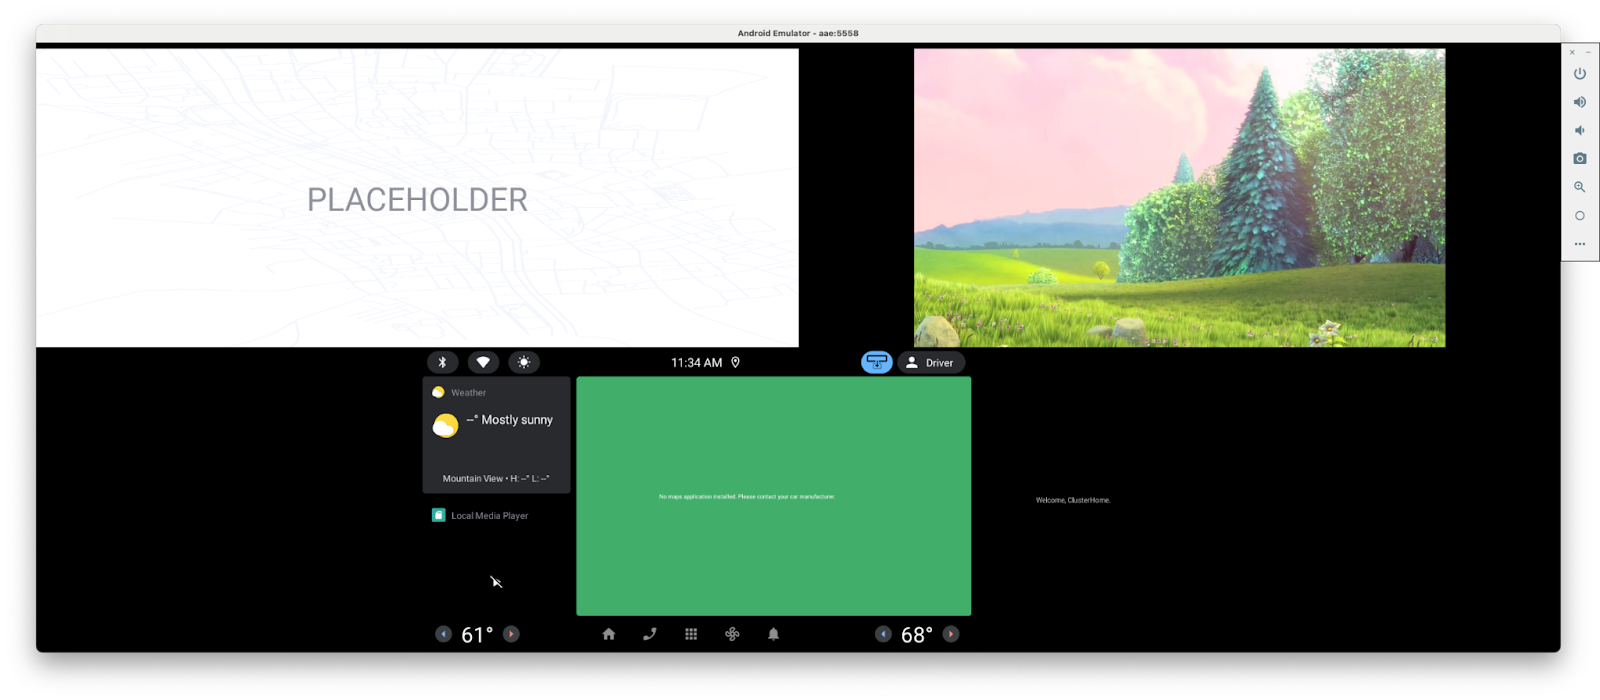
9. 改善远距离显示屏上的应用体验
当您在远距离显示屏上使用该应用程序时,您可能注意到了两件事
- 当应用移动到远距离显示屏或从远距离显示屏移出时,播放会卡顿。
- 当应用在远距离显示屏上时,您无法与应用互动,包括更改播放状态。
改进应用连续性
播放卡顿是由配置更改导致 Activity 被重新创建引起的。由于应用程序是使用 Compose 编写的,并且正在更改的配置与大小相关,因此通过限制基于大小的配置更改的 Activity 重新创建,可以轻松地让 Compose 为您处理配置更改。这使得显示器之间的切换无缝进行,播放不会停止,也不会因 Activity 重新创建而重新加载。
AndroidManifest.xml
<activity
    android:name="com.example.android.cars.roadreels.MainActivity"
    ...
    android:configChanges="screenSize|smallestScreenSize|orientation|screenLayout|density">
        ...
</activity>
实现播放控件
要解决应用在远距离显示屏上无法控制的问题,您可以实现 MediaSession。媒体会话提供了一种与音频或视频播放器交互的通用方式。有关详细信息,请参阅使用 MediaSession 控制和宣传播放。
- 添加对
androidx.media3:media3-session工件的依赖
libs.version.toml
androidx-media3-mediasession = { group = "androidx.media3", name = "media3-session", version.ref = "media3" }
build.gradle.kts (Module :app)
implementation(libs.androidx.media3.mediasession)
- 在
PlayerViewModel中,添加一个变量来保存媒体会话,并使用其构建器创建MediaSession。
PlayverViewModel.kt
import androidx.media3.session.MediaSession
...

class PlayerViewModel(...) {
    ...

    private var mediaSession: MediaSession? = null

    init {
        viewModelScope.launch {
            _player.onEach { player ->
                playerUiStateUpdateJob?.cancel()
                mediaSession?.release()

                if (player != null) {
                    initializePlayer(player)
                    mediaSession = MediaSession.Builder(application, player).build()
                    playerUiStateUpdateJob = viewModelScope.launch {... }
                }
            }.collect()
        }
    }
}
- 然后,在
onCleared方法中添加一行代码,以便在不再需要PlayerViewModel时释放MediaSession。
PlayerViewModel.kt
override fun onCleared() {
    super.onCleared()
    mediaSession?.release()
    _player.value?.release()
}
- 最后,在播放器屏幕上(无论应用是在主显示屏还是远距离显示屏上),您可以使用
adb shell cmd media_session dispatch命令测试媒体控件
# To play content
adb shell cmd media_session dispatch play

# To pause content
adb shell cmd media_session dispatch pause

# To toggle the playing state
adb shell cmd media_session dispatch play-pause
限制播放恢复
尽管支持 MediaSession 使在应用位于远距离显示屏上时控制播放成为可能,但它确实引入了一个新问题。即,它使得在用户体验限制生效时可以恢复播放,这违反了 DD-2 质量指南(再次!)。要亲自测试此功能
- 开始播放
- 模拟驾驶
- 使用
media_session dispatch命令。请注意,即使应用程序被遮挡,播放也会恢复。
为了解决这个问题,您可以监听设备的 UX 限制,并只允许在这些限制生效时恢复播放。这甚至可以以一种方式完成,即相同的逻辑可用于移动设备和 Android Automotive OS。
- 在
app模块的build.gradle文件中,添加以下内容以包含 Android Automotive 库,然后执行 Gradle 同步
build.gradle.kts
android {
    ...
    useLibrary("android.car")
}
- 右键点击
com.example.android.cars.roadreels包,选择 New > Kotlin Class/File。输入RoadReelsPlayer作为名称,然后点击 Class 类型。 - 在您刚刚创建的文件中,添加以下类的起始实现。通过扩展
ForwardingSimpleBasePlayer,可以通过重写getState()方法来轻松修改包装播放器支持的命令和交互。
RoadReelsPlayer.kt
import android.content.Context
import androidx.media3.common.ForwardingSimpleBasePlayer
import androidx.media3.common.util.UnstableApi
import androidx.media3.exoplayer.ExoPlayer

@UnstableApi
class RoadReelsPlayer(context: Context) :
    ForwardingSimpleBasePlayer(ExoPlayer.Builder(context).build()) {
    private var shouldPreventPlay = false

    override fun getState(): State {
        val state = super.getState()

        return state.buildUpon()
            .setAvailableCommands(
                state.availableCommands.buildUpon().removeIf(COMMAND_PLAY_PAUSE, shouldPreventPlay)
                    .build()
            ).build()
    }
}
- 在
PlayerViewModel.kt中,更新播放器变量的声明,使其使用RoadReelsPlayer实例而不是ExoPlayer。此时,行为将与之前完全相同,因为shouldPreventPlay从未从其默认值false更新。
PlayerViewModel.kt
init {
    ...
    _player.update { RoadReelsPlayer(application) }
}
- 要开始跟踪用户体验限制,请添加以下
init块和handleRelease实现
RoadReelsPlayer.kt
import android.car.Car
import android.car.drivingstate.CarUxRestrictions
import android.car.drivingstate.CarUxRestrictionsManager
import android.content.pm.PackageManager
import com.google.common.util.concurrent.ListenableFuture

...

@UnstableApi
class RoadReelsPlayer(context: Context) :
    ForwardingSimpleBasePlayer(ExoPlayer.Builder(context).build()) {
    ...
    private var pausedByUxRestrictions = false
    private lateinit var carUxRestrictionsManager: CarUxRestrictionsManager

   init {
        with(context) {
            // Only listen to UX restrictions if the device is running Android Automotive OS
            if (packageManager.hasSystemFeature(PackageManager.FEATURE_AUTOMOTIVE)) {
                val car = Car.createCar(context)
                carUxRestrictionsManager =
                    car.getCarManager(Car.CAR_UX_RESTRICTION_SERVICE) as CarUxRestrictionsManager

                // Get the initial UX restrictions and update the player state
                shouldPreventPlay =
                    carUxRestrictionsManager.currentCarUxRestrictions.isRequiresDistractionOptimization
                invalidateState()

                // Register a listener to update the player state as the UX restrictions change
                carUxRestrictionsManager.registerListener { carUxRestrictions: CarUxRestrictions ->
                    shouldPreventPlay = carUxRestrictions.isRequiresDistractionOptimization

                    if (!shouldPreventPlay && pausedByUxRestrictions) {
                        handleSetPlayWhenReady(true)
                        invalidateState()
                    } else if (shouldPreventPlay && isPlaying) {
                        pausedByUxRestrictions = true
                        handleSetPlayWhenReady(false)
                        invalidateState()
                    }
                }
            }

            addListener(object : Player.Listener {
                override fun onEvents(player: Player, events: Player.Events) {
                    if (events.contains(EVENT_IS_PLAYING_CHANGED) && isPlaying) {
                        pausedByUxRestrictions = false
                    }
                }
            })
        }
    }

    ...

    override fun handleRelease(): ListenableFuture<*> {
        if (::carUxRestrictionsManager.isInitialized) {
            carUxRestrictionsManager.unregisterListener()
        }
        return super.handleRelease()
    }
}
这里有几点需要注意
CarUxRestrictionsManager作为lateinit变量存储,因为它不在非 Android Automotive OS 设备上实例化或使用,但应在播放器释放时清理其监听器。- 在确定用户体验限制状态时,只引用了
isRequiresDistractionOptimization值。尽管CarUxRestrictions类包含有关哪些限制处于活动状态的更多详细信息,但无需引用它们,因为它们仅供分心优化应用(例如导航应用)使用,因为这些应用在限制处于活动状态时仍可见。 - 在对
shouldPreventPlay变量进行任何更新后,调用invalidateState()以通知播放器状态的消费者更改。 - 在监听器本身中,通过调用带有适当值的
handleSetPlayWhenReady自动暂停或恢复播放。
- 现在,按照本节开头所述模拟驾驶时测试恢复播放,您会发现它不会恢复!
- 最后,由于
RoadReelsPlayer处理了当用户体验限制生效时暂停播放的功能,因此不需要让LifecycleEventEffect在ON_PAUSE期间暂停播放器。相反,这可以更改为ON_STOP,这样当用户离开应用程序去启动器或打开另一个应用程序时,播放就会停止。
PlayerScreen.kt
LifecycleEventEffect(Lifecycle.Event.ON_START) {
    viewModel.play()
}
LifecycleEventEffect(Lifecycle.Event.ON_STOP) {
    viewModel.pause()
}
回顾
至此,该应用在汽车中(无论是否配备远距离显示屏)都能更好地运行!不仅如此,它在其他外形规格上也表现更好!在可以旋转屏幕或允许用户调整应用窗口大小的设备上,该应用在这些情况下也能无缝适应。
此外,得益于媒体会话集成,应用程序的播放不仅可以通过汽车中的硬件和软件控制,还可以通过其他来源进行控制,例如 Google 助手的查询或耳机上的暂停按钮,为用户提供了更多在不同外形规格上控制应用程序的选项。
10. 在不同的系统配置下测试应用
应用程序在主显示屏和远距离显示屏上都能良好运行后,最后要检查的是应用程序如何处理不同的系统栏配置和显示屏开孔。如处理窗口内边距和显示屏开孔中所述,Android Automotive OS 设备可能具有打破在移动外形规格上普遍成立的假设的配置。
在本节中,您将学习如何配置模拟器以具有左侧系统栏,并在此配置下测试应用程序。
配置侧边系统栏
正如使用可配置模拟器进行测试中详述的,有多种选项可以模拟汽车中存在的不同系统配置。
对于此 Codelab,可以使用 com.android.systemui.rro.left 来测试不同的系统栏配置。要启用它,请使用以下命令
adb shell cmd overlay enable --user 0 com.android.systemui.rro.left
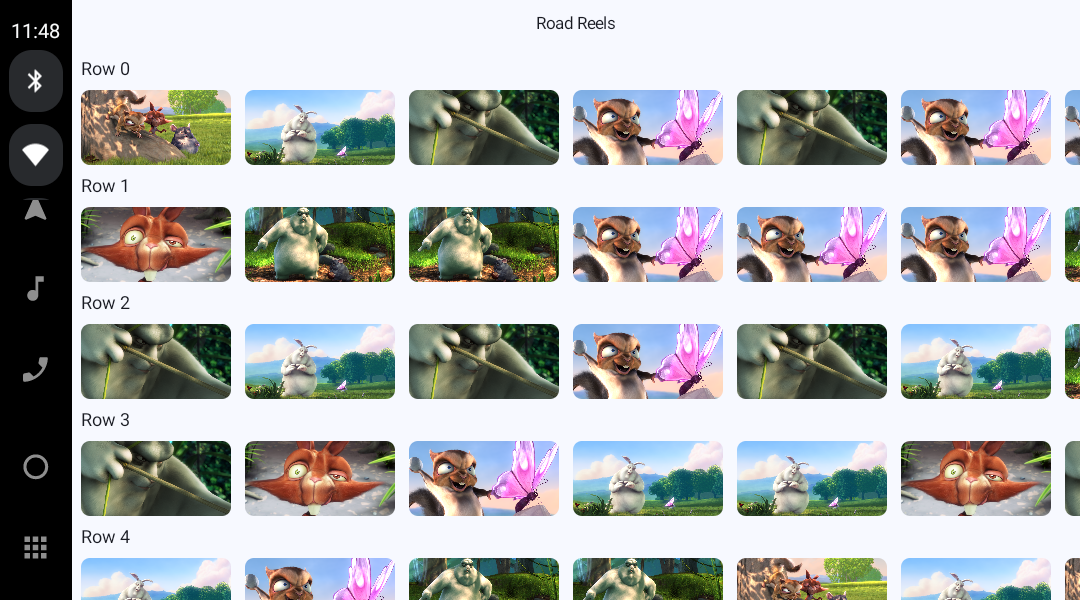
由于应用程序在 Scaffold 中使用 systemBars 修饰符作为 contentWindowInsets,内容已经绘制在系统栏安全区域内。要查看如果应用程序假设系统栏只出现在屏幕的顶部和底部会发生什么,请将该参数更改为以下内容
RoadReelsApp.kt
contentWindowInsets = if (route?.equals(Screen.Player.name) == true) WindowInsets(0.dp) else WindowInsets.systemBars.only(WindowInsetsSides.Vertical)
啊哦!列表和详细信息屏幕渲染在系统栏后面。多亏了之前的工作,播放器屏幕会没问题,即使系统栏不可控。

在进入下一节之前,请务必还原您刚刚对 windowContentPadding 参数所做的更改!
11. 处理显示屏开孔
最后,有些汽车的屏幕带有显示屏开孔,与移动设备上的开孔非常不同。与刘海屏或打孔摄像头开孔不同,一些 Android Automotive OS 车辆具有弯曲屏幕,使得屏幕非矩形。
要查看应用程序在存在此类显示屏开孔时的行为,请首先使用以下命令启用显示屏开孔
adb shell cmd overlay enable --user 0 com.android.internal.display.cutout.emulation.top_and_right
为了真正测试应用程序的良好行为,如果尚未启用,请同时启用上一节中使用的左侧系统栏
adb shell cmd overlay enable --user 0 com.android.systemui.rro.left
目前,应用程序未渲染到显示屏开孔中(开孔的确切形状目前难以分辨,但在下一步中将变得清晰)。这完全没问题,并且比渲染到开孔中但未仔细适应的应用程序提供更好的体验。

渲染到显示屏开孔中
为了给您的用户带来尽可能沉浸的体验,您可以通过渲染到显示屏开孔中来利用更多屏幕空间。
- 要渲染到显示屏开孔中,创建一个
integers.xml文件来保存特定于汽车的覆盖。为此,请使用 UI mode 限定符,其值为 Car Dock(此名称是 Android Auto 独有时的遗留,但它也用于 Android Automotive OS)。此外,因为您将使用的值LAYOUT_IN_DISPLAY_CUTOUT_MODE_ALWAYS是在 Android R 中引入的,所以还要添加 Android Version 限定符,其值为 30。有关更多详细信息,请参阅使用备用资源。
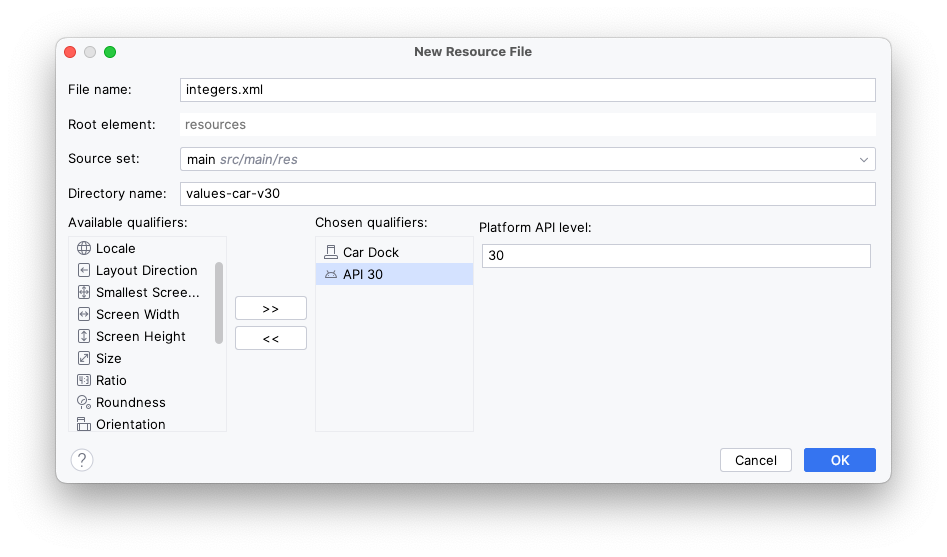
- 在您刚刚创建的文件 (
res/values-car-v30/integers.xml) 中,添加以下内容
integers.xml
<?xml version="1.0" encoding="utf-8"?>
<resources>
    <integer name="windowLayoutInDisplayCutoutMode">3</integer>
</resources>
整数值 3 对应于 LAYOUT_IN_DISPLAY_CUTOUT_MODE_ALWAYS,并覆盖 res/values/integers.xml 中的默认值 0,该值对应于 LAYOUT_IN_DISPLAY_CUTOUT_MODE_DEFAULT。此整数值已在 MainActivity.kt 中引用,以覆盖 enableEdgeToEdge() 设置的模式。有关此属性的更多信息,请参阅参考文档。
现在,当您运行应用时,会注意到内容延伸到开孔区域,看起来非常沉浸!然而,顶部应用栏和部分内容被显示屏开孔部分遮挡,导致了一个类似于应用假定系统栏只出现在顶部和底部时发生的问题。
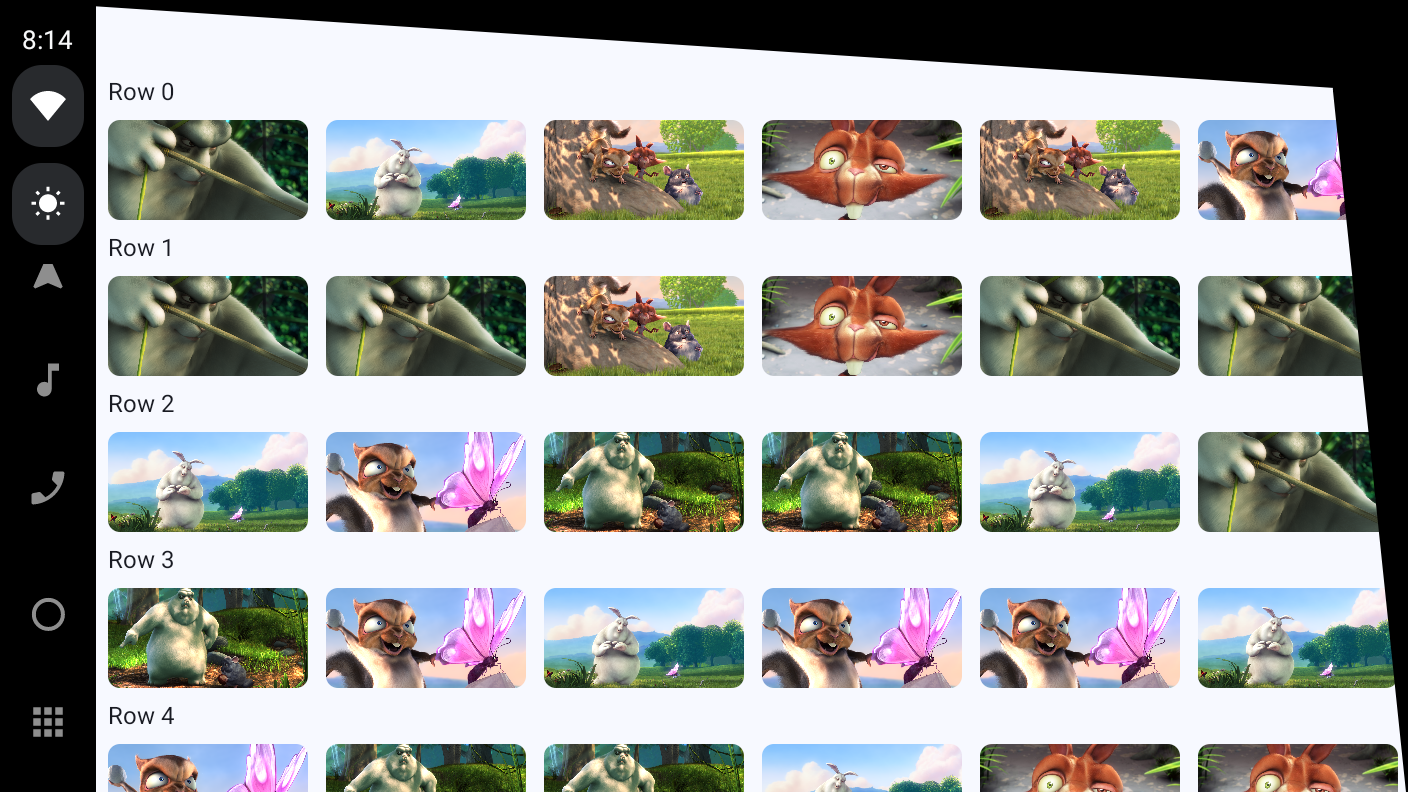
修复顶部应用栏
要修复顶部应用栏,您可以为 CenterAlignedTopAppBar 可组合项添加以下 windowInsets 参数
RoadReelsApp.kt
import androidx.compose.foundation.layout.WindowInsetsSides
import androidx.compose.foundation.layout.only
import androidx.compose.foundation.layout.safeDrawing

...

windowInsets = WindowInsets.safeDrawing.only(WindowInsetsSides.Horizontal + WindowInsetsSides.Top)
由于 safeDrawing 包含 displayCutout 和 systemBars 内边距,因此它改进了默认的 windowInsets 参数,后者在定位顶部应用栏时仅使用 systemBars。
此外,由于顶部应用栏位于窗口顶部,您不应包含 safeDrawing 内边距的底部组件——这样做可能会增加不必要的填充。

修复主屏幕
修复主屏幕和详细信息屏幕内容的一个选项是,将 Scaffold 的 contentWindowInsets 使用 safeDrawing 而不是 systemBars。然而,使用该选项时,应用程序看起来明显不那么沉浸,内容在显示屏开孔开始处突然被截断——这与应用程序完全不渲染到显示屏开孔中没什么区别。

为了获得更沉浸式的用户界面,您可以在屏幕内的每个组件上处理内边距。
- 更新
Scaffold的contentWindowInsets,使其始终为 0dp(而不是仅适用于PlayerScreen)。这允许屏幕和/或屏幕内的每个组件确定其与内边距相关的行为。
RoadReelsApp.kt
Scaffold(
    ...,
    contentWindowInsets = WindowInsets(0.dp)
) { ... }
- 将行标题
Text可组合项的windowInsetsPadding设置为使用safeDrawing内边距的水平组件。这些内边距的顶部组件由顶部应用栏处理,底部组件将在稍后处理。
MainScreen.kt
import androidx.compose.foundation.layout.WindowInsets
import androidx.compose.foundation.layout.WindowInsetsSides
import androidx.compose.foundation.layout.only
import androidx.compose.foundation.layout.safeDrawing
import androidx.compose.foundation.layout.windowInsetsPadding

...

LazyColumn(
    contentPadding = PaddingValues(bottom = dimensionResource(R.dimen.screen_edge_padding))
) {
    items(NUM_ROWS) { rowIndex: Int ->
        Text(
            "Row $rowIndex",
            style = MaterialTheme.typography.headlineSmall,
            modifier = Modifier
                .padding(
                    horizontal = dimensionResource(R.dimen.screen_edge_padding),
                    vertical = dimensionResource(R.dimen.row_header_vertical_padding)
                )
                .windowInsetsPadding(WindowInsets.safeDrawing.only(WindowInsetsSides.Horizontal))
        )
    ...
}
- 移除
LazyRow的contentPadding参数。然后,在每个LazyRow的开始和结束处,添加一个宽度为相应safeDrawing组件宽度的Spacer,以确保所有缩略图都可以完全查看。使用widthIn修饰符确保这些间隔符的宽度至少与内容填充的宽度相同。如果没有这些元素,行开头和结尾的项可能会被系统栏和/或显示屏开孔遮挡,即使完全滑动到行的开头/结尾。
MainScreen.kt
import androidx.compose.foundation.layout.Spacer
import androidx.compose.foundation.layout.widthIn
import androidx.compose.foundation.layout.windowInsetsEndWidth
import androidx.compose.foundation.layout.windowInsetsStartWidth

...

LazyRow(
    horizontalArrangement = Arrangement.spacedBy(dimensionResource(R.dimen.list_item_spacing)),
) {
    item {
        Spacer(
            Modifier
                .windowInsetsStartWidth(WindowInsets.safeDrawing)
                .widthIn(min = dimensionResource(R.dimen.screen_edge_padding))
        )
    }
    items(NUM_ITEMS_PER_ROW) { ... }
    item {
        Spacer(
            Modifier
                .windowInsetsEndWidth(WindowInsets.safeDrawing)
                .widthIn(min = dimensionResource(R.dimen.screen_edge_padding))
        )
    }
}
- 最后,在
LazyColumn的末尾添加一个Spacer,以弥补屏幕底部可能存在的任何系统栏或显示屏开孔内边距。由于顶部应用栏处理了这些,因此LazyColumn的顶部不需要等效的间隔符。如果应用程序使用底部应用栏而不是顶部应用栏,您将在列表开头使用windowInsetsTopHeight修饰符添加一个Spacer。如果应用程序同时使用顶部和底部应用栏,则不需要任何间隔符。
MainScreen.kt
import androidx.compose.foundation.layout.windowInsetsBottomHeight

...

LazyColumn(...){
    items(NUM_ROWS) { ... }
    item {
        Spacer(Modifier.windowInsetsBottomHeight(WindowInsets.safeDrawing))
    }
}
顶部应用栏完全可见,当您滚动到行尾时,现在可以完整地看到所有缩略图。
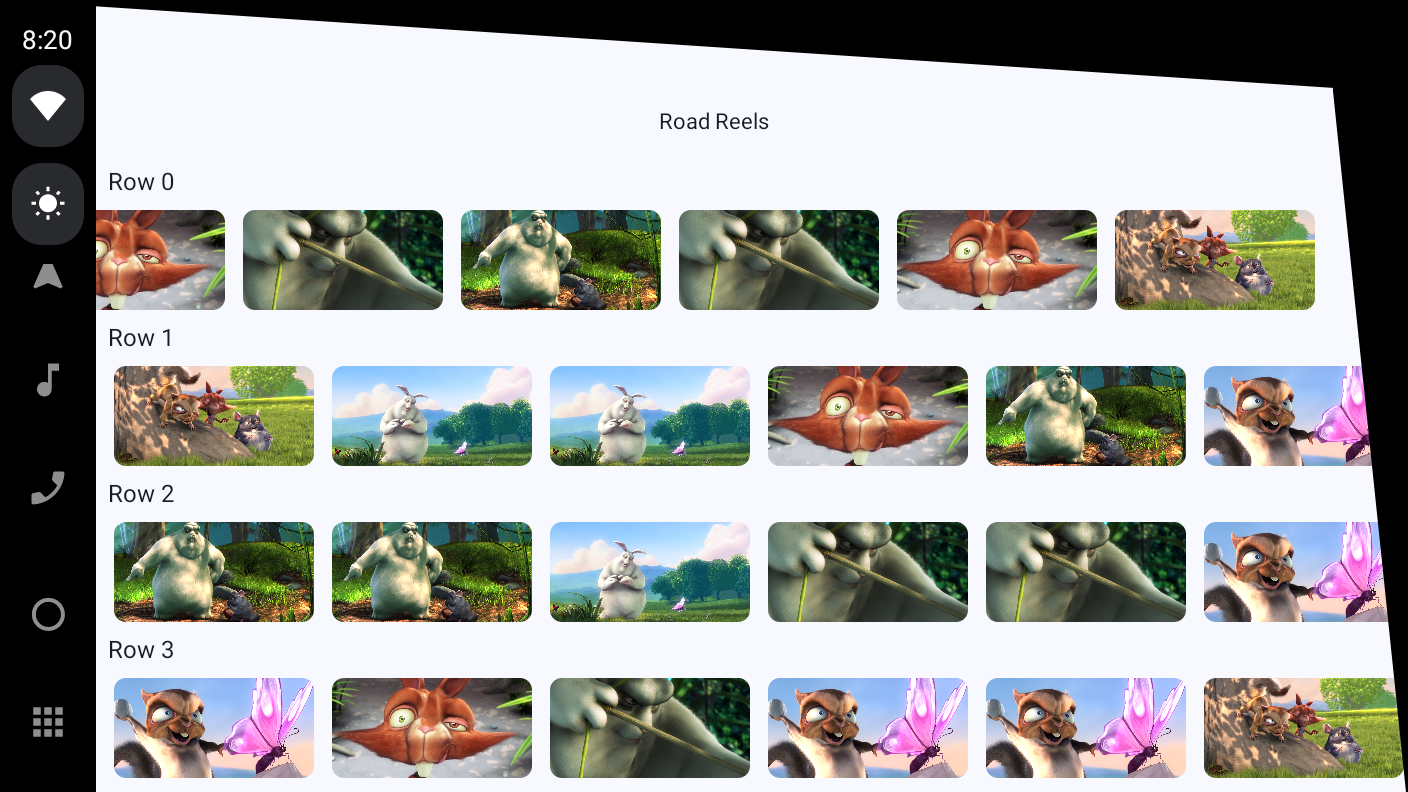
修复详细信息屏幕
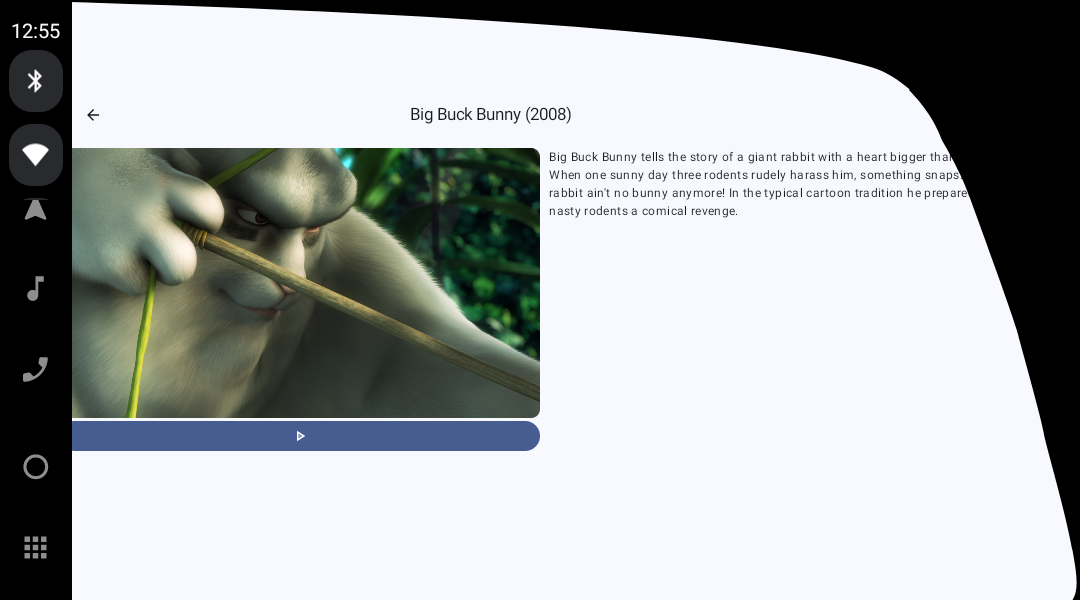
详细信息屏幕虽然没有那么糟糕,但内容仍然被切断。
由于详细信息屏幕没有任何可滚动内容,因此只需在顶级 Box 上添加 windowInsetsPadding 修饰符即可修复。
DetailScreen.kt
import androidx.compose.foundation.layout.WindowInsets
import androidx.compose.foundation.layout.safeDrawing
import androidx.compose.foundation.layout.windowInsetsPadding

...

Box(
    modifier = modifier
        .padding(dimensionResource(R.dimen.screen_edge_padding))
        .windowInsetsPadding(WindowInsets.safeDrawing)
) { ... }
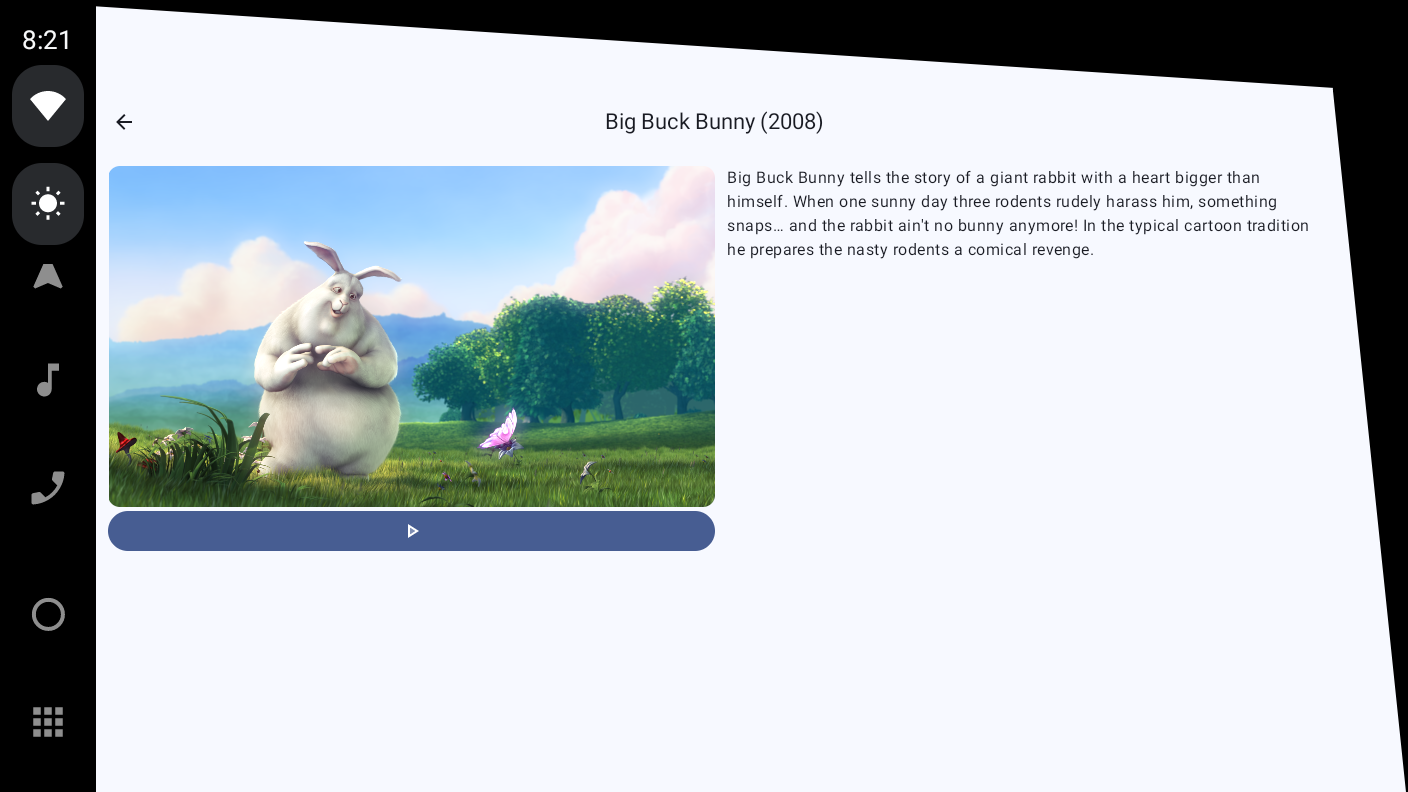
修复播放器屏幕
尽管 PlayerScreen 已经从满足 Android Automotive OS 质量要求:可导航性一节中为部分或所有系统栏窗口内边距应用了填充,但这不足以确保在应用程序渲染到显示屏开孔时它不会被遮挡。在移动设备上,显示屏开孔几乎总是完全包含在系统栏中。然而,在汽车中,显示屏开孔可能远远超出系统栏,打破了假设。

要解决此问题,只需将 windowInsetsForPadding 变量的初始值从零值更改为 displayCutout 即可
PlayerScreen.kt
import androidx.compose.foundation.layout.displayCutout

...

var windowInsetsForPadding = WindowInsets(WindowInsets.displayCutout)

太棒了,应用充分利用了屏幕,同时仍保持可用性!
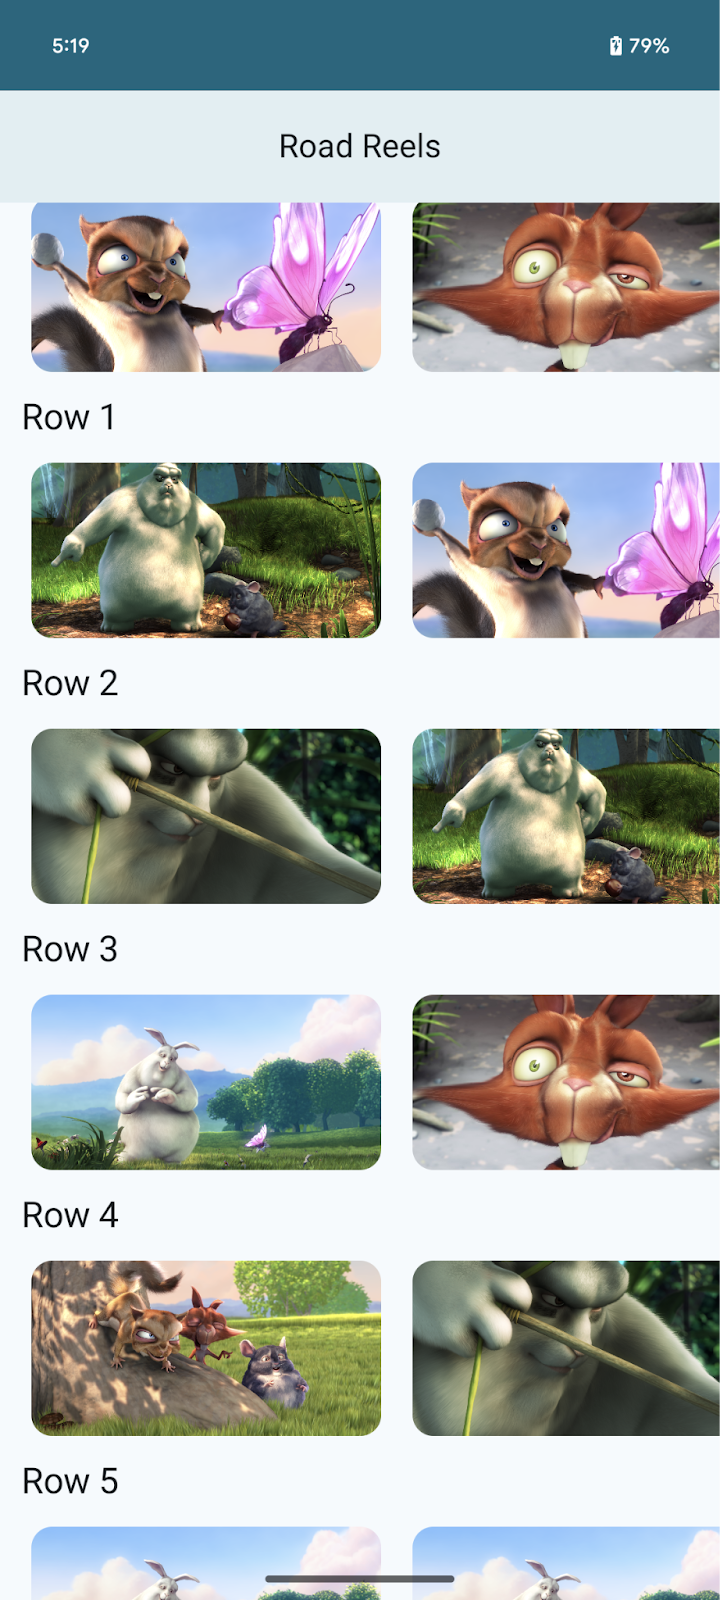
而且,如果您在移动设备上运行该应用,它也会更加沉浸!列表项一直渲染到屏幕边缘,包括导航栏后面。
12. 恭喜
您已成功迁移并优化了您的第一个驻车应用。现在是时候将所学知识应用到您自己的应用中了!
可尝试的事情
进一步阅读
- 构建适用于 Android Automotive OS 的驻车应用
- 为 Android Automotive OS 构建视频应用
- 为 Android Automotive OS 构建游戏
- 为 Android Automotive OS 构建浏览器
- 车载 Android 应用质量页面描述了您的应用必须满足的条件,才能提供出色的用户体验并通过 Play 商店审核。请务必根据您应用的类别进行筛选。

