
1. 开始之前
在本 Codelab 中,您将学习如何使用车载 Android 应用库,为 Android Auto 和 Android Automotive OS 构建针对驾驶优化的应用。您首先要添加对 Android Auto 的支持,然后通过最少额外工作,创建可在 Android Automotive OS 上运行的应用变体。让应用在这两个平台运行后,您将构建一个附加屏幕和一些基本交互功能!
这不是
- 关于如何为 Android Auto 和 Android Automotive OS 创建媒体(音频)应用的指南。如需了解如何构建此类应用,请参阅为车辆构建媒体应用。
- 关于如何为 Android Auto 创建消息应用的指南。如需了解如何构建此类应用,请参阅为 Android Auto 构建消息应用。
您需要
- Android Studio 预览版。Android Automotive OS 模拟器仅通过 Android Studio 预览版提供。如果您尚未安装 Android Studio 预览版,可以在预览版下载的同时,使用稳定版本开始本 Codelab。
- 具备 Kotlin 基础知识。
- 具备 Android Services 的基础知识。
- 具备创建 Android 虚拟设备和在 Android 模拟器中运行它们的经验。
- 具备 Android 应用模块化的基础知识。
- 具备 Builder 设计模式的基础知识。
您将构建
Android Auto | Android Automotive OS |
|
|
您将学习
- 车载应用库的客户端-主机架构如何运作。
- 如何编写您自己的
CarAppService、Session和Screen类。 - 如何在 Android Auto 和 Android Automotive OS 上共享您的实现。
- 如何使用桌面主控单元 (DHU) 在开发机器上运行 Android Auto。
- 如何运行 Android Automotive OS 模拟器。
2. 设置
获取代码
- 本 Codelab 的代码位于
car-codelabsGitHub 代码库中的car-app-library-fundamentals目录中。要克隆它,请运行以下命令
git clone https://github.com/android/car-codelabs.git
- 或者,您也可以将代码库下载为 ZIP 文件
打开项目
- 启动 Android Studio 后,导入项目,仅选择
car-app-library-fundamentals/start目录。car-app-library-fundamentals/end目录包含解决方案代码,您可以在任何时候遇到困难或只想查看完整项目时进行参考。
熟悉代码
- 在 Android Studio 中打开项目后,花些时间查看起始代码。
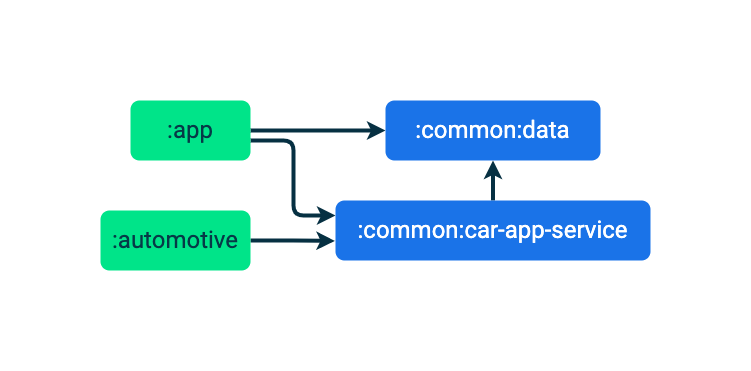
请注意,应用起始代码分为两个模块::app 和 :common:data。
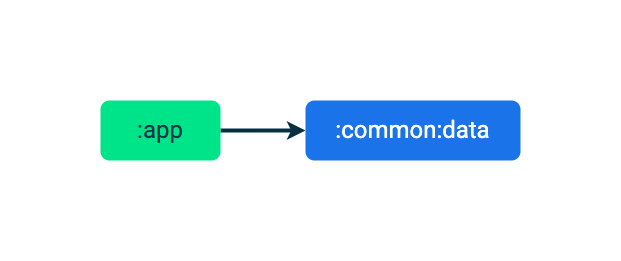
:app 模块包含移动应用的 UI 和逻辑,而 :common:data 模块包含 Place 模型数据类和用于读取 Place 模型的代码库。为简单起见,该代码库从硬编码列表读取数据,但在实际应用中可以轻松地从数据库或后端服务器读取数据。
:app 模块包含对 :common:data 模块的依赖项,以便它可以读取并显示 Place 模型列表。
3. 了解车载 Android 应用库
车载 Android 应用库是一组 Jetpack 库,使开发者能够构建用于车辆的应用。它提供了一个模板化框架,可提供针对驾驶优化的用户界面,同时还能适应车辆中存在的各种硬件配置(例如,输入法、屏幕尺寸和宽高比)。总而言之,这让您作为开发者可以轻松构建应用,并确信它将在运行 Android Auto 和 Android Automotive OS 的各种车辆上良好运行。
了解其工作原理
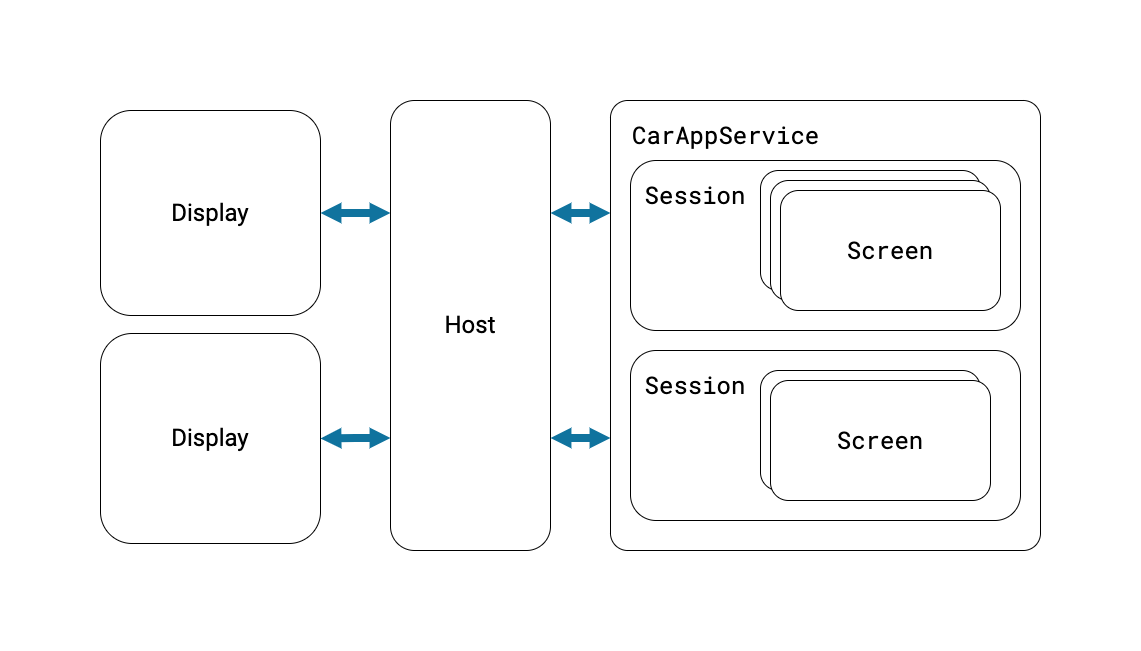
使用车载应用库构建的应用不会直接在 Android Auto 或 Android Automotive OS 上运行。相反,它们依赖于一个主机应用,该主机应用与客户端应用通信并代表它们渲染客户端的用户界面。Android Auto 本身就是一个主机,而 Google Automotive 应用主机是带有 Google 内置服务的 Android Automotive OS 车辆上使用的主机。以下是您在构建应用时必须扩展的关键车载应用库类
CarAppService
CarAppService 是 Android Service 类的子类,是主机应用与客户端应用(例如您在本 Codelab 中构建的应用)通信的入口点。其主要目的是创建主机应用与之交互的 Session 实例。
Session
您可以将 Session 视为在车辆显示屏上运行的客户端应用实例。与其他 Android 组件一样,它具有自身的生命周期,可用于初始化和拆解 Session 实例整个生命周期中使用的资源。CarAppService 和 Session 之间存在一对多关系。例如,一个 CarAppService 可能有两个 Session 实例,一个用于主显示屏,另一个用于仪表盘显示屏,适用于支持仪表盘屏幕的导航应用。
Screen
Screen 实例负责生成由主机应用渲染的用户界面。这些用户界面由 Template 类表示,每个类都建模特定类型的布局,例如网格或列表。每个 Session 都管理一个 Screen 实例堆栈,用于处理用户在应用不同部分之间的流程。与 Session 一样,Screen 具有自身的生命周期,您可以接入其中。
您将在本 Codelab 的编写您的 CarAppService 部分编写 CarAppService、Session 和 Screen,因此如果尚未完全理解,请不必担心。
4. 设置初始配置
首先,设置包含 CarAppService 的模块并声明其依赖项。
创建车载应用服务模块
- 在“项目”窗口中选择
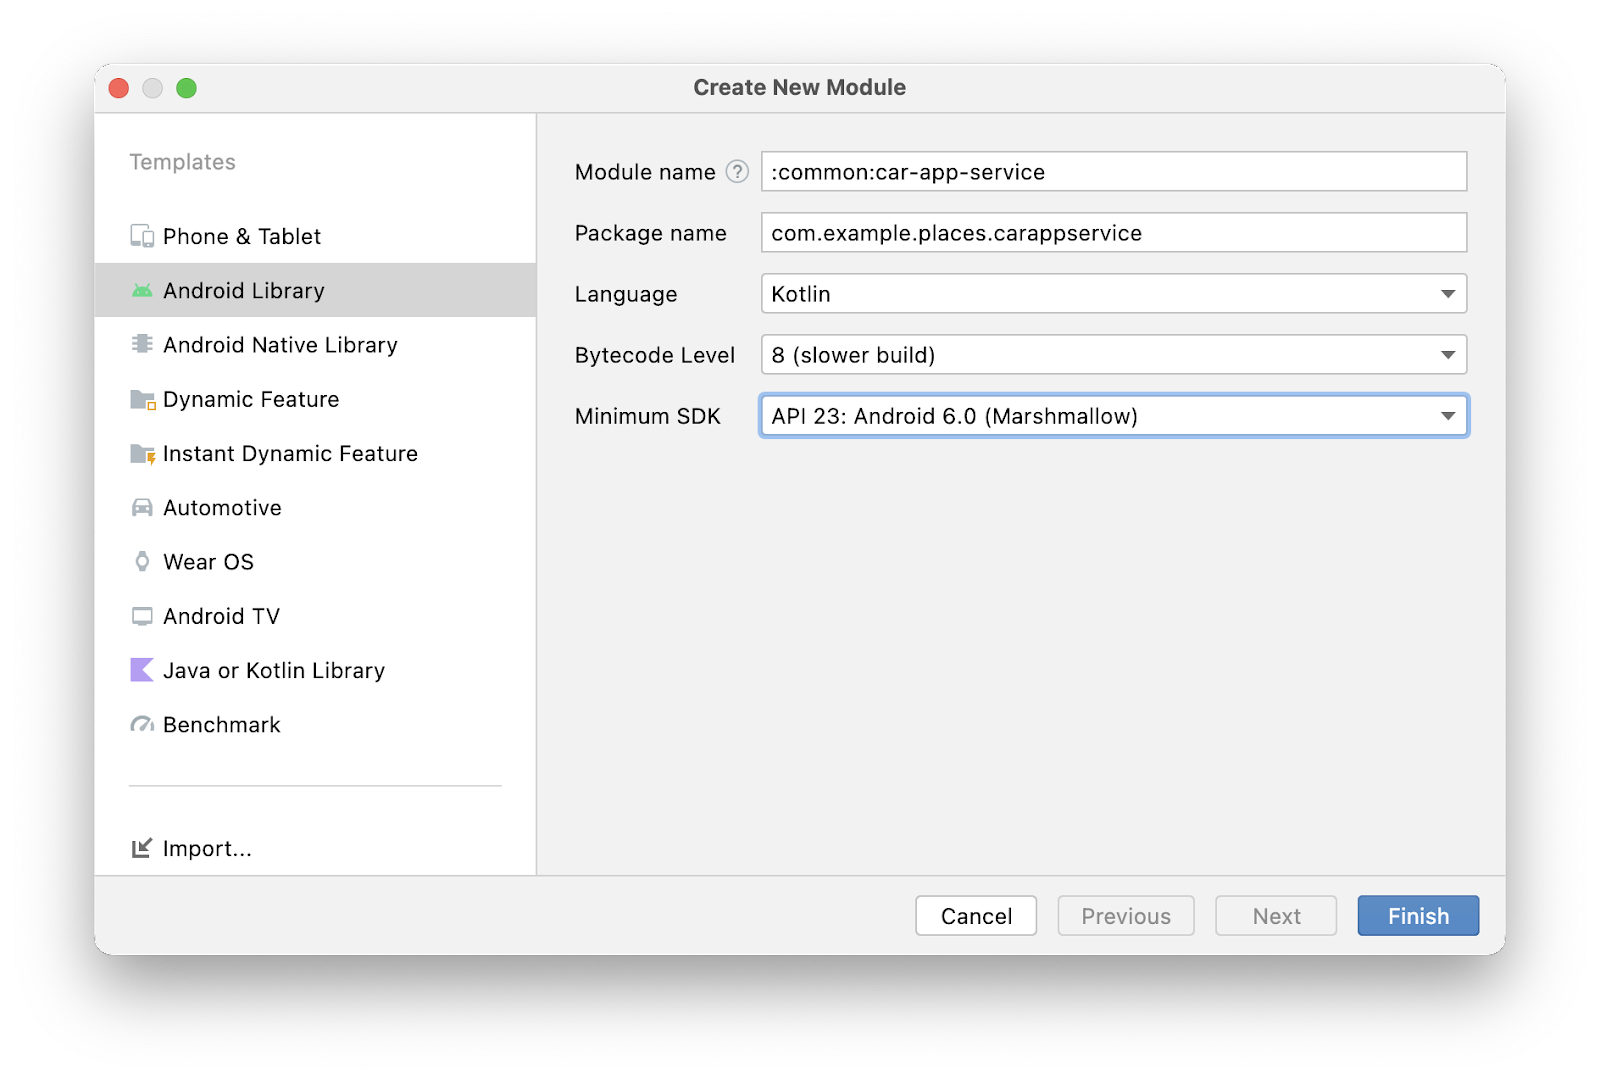
:common模块,右键点击并选择“新建”>“模块”选项。 - 在打开的模块向导中,从左侧列表中选择 Android 库模板(以便此模块可被其他模块用作依赖项),然后使用以下值
- 模块名称:
:common:car-app-service - 软件包名称:
com.example.places.carappservice - 最低 SDK:
API 23: Android 6.0 (Marshmallow)
设置依赖项
- 在项目级
build.gradle文件中,添加车载应用库版本的变量声明,如下所示。这使您可以在应用中每个模块上轻松使用相同版本。
build.gradle(项目:Places)
buildscript {
    ext {
        // All versions can be found at https://developer.android.com/jetpack/androidx/releases/car-app
        car_app_library_version = '1.3.0-rc01'
        ...
    }
}
- 接下来,向
:common:car-app-service模块的build.gradle文件添加两个依赖项。
androidx.car.app:app。这是车载应用库的主要工件,包含构建应用时使用的所有核心类。组成该库的另外三个工件是:androidx.car.app:app-projected用于 Android Auto 专用功能,androidx.car.app:app-automotive用于 Android Automotive OS 功能代码,以及androidx.car.app:app-testing用于一些对单元测试有用的辅助程序。您将在本 Codelab 的稍后部分使用app-projected和app-automotive。:common:data。这是现有移动应用使用的相同数据模块,允许每个版本的应用体验使用相同的数据源。
build.gradle(模块::common:car-app-service)
dependencies {
    ...
    implementation "androidx.car.app:app:$car_app_library_version"
    implementation project(":common:data")
    ...
}
进行此更改后,应用自身模块的依赖关系图如下
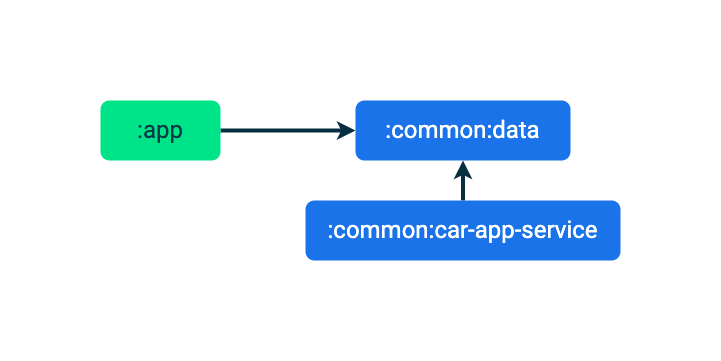
现在依赖项已设置完毕,是时候编写 CarAppService 了!
5. 编写您的 CarAppService
- 首先,在
:common:car-app-service模块内的carappservice软件包中创建一个名为PlacesCarAppService.kt的文件。 - 在该文件中,创建一个名为
PlacesCarAppService的类,它扩展了CarAppService。
PlacesCarAppService.kt
class PlacesCarAppService : CarAppService() {

    override fun createHostValidator(): HostValidator {
        return HostValidator.ALLOW_ALL_HOSTS_VALIDATOR
    }

    override fun onCreateSession(): Session {
        // PlacesSession will be an unresolved reference until the next step
        return PlacesSession()
    }
}
CarAppService 抽象类为您实现了 Service 方法,例如 onBind 和 onUnbind,并阻止进一步重写这些方法,以确保与主机应用实现适当的互操作性。您只需实现 createHostValidator 和 onCreateSession 即可。
从 createHostValidator 返回的 HostValidator 会在您的 CarAppService 绑定时被引用,以确保主机受信任,如果主机与您定义的参数不匹配,则绑定失败。就本 Codelab(以及一般测试)而言,ALLOW_ALL_HOSTS_VALIDATOR 可确保您的应用轻松连接,但不应用于生产环境。如需了解如何为生产应用配置此功能,请参阅 createHostValidator 文档。
对于像这个应用一样简单的应用,onCreateSession 可以简单地返回一个 Session 实例。在更复杂的应用中,这将是初始化长期资源(例如在您的应用在车辆上运行时使用的指标和日志客户端)的好地方。
- 最后,您需要在
:common:car-app-service模块的AndroidManifest.xml文件中添加与PlacesCarAppService对应的<service>元素,以便操作系统(以及通过扩展,其他应用(如主机))知道它的存在。
AndroidManifest.xml(:common:car-app-service)
<?xml version="1.0" encoding="utf-8"?>
<manifest xmlns:android="http://schemas.android.com/apk/res/android">
    <!--
        This AndroidManifest.xml will contain all of the elements that should be shared across the
        Android Auto and Automotive OS versions of the app, such as the CarAppService <service> element
    -->

    <application>
        <service
            android:name="com.example.places.carappservice.PlacesCarAppService"
            android:exported="true">
            <intent-filter>
                <action android:name="androidx.car.app.CarAppService" />
                <category android:name="androidx.car.app.category.POI" />
            </intent-filter>
        </service>
    </application>
</manifest>
此处有两点需要注意
<action>元素允许主机(和启动器)应用找到该应用。<category>元素声明了应用类别,这决定了它必须满足哪些应用质量标准(稍后将提供更多详细信息)。其他可能的值包括androidx.car.app.category.NAVIGATION和androidx.car.app.category.IOT。
创建 PlacesSession 类
- 创建一个
PlacesSession.kt文件并添加以下代码
PlacesCarAppService.kt
class PlacesSession : Session() {
    override fun onCreateScreen(intent: Intent): Screen {
        // MainScreen will be an unresolved reference until the next step
        return MainScreen(carContext)
    }
}
对于这样一个简单的应用,您只需在 onCreateScreen 中返回主屏幕即可。然而,由于此方法将 Intent 作为参数,功能更丰富的应用也可能会从中读取并填充屏幕返回堆栈或使用其他条件逻辑。
创建 MainScreen 类
接下来,创建一个名为 screen. 的新软件包。
- 右键点击
com.example.places.carappservice软件包,然后选择“新建”>“软件包”(其完整软件包名称将是com.example.places.carappservice.screen)。您可以在此处放置应用的所有Screen子类。 - 在
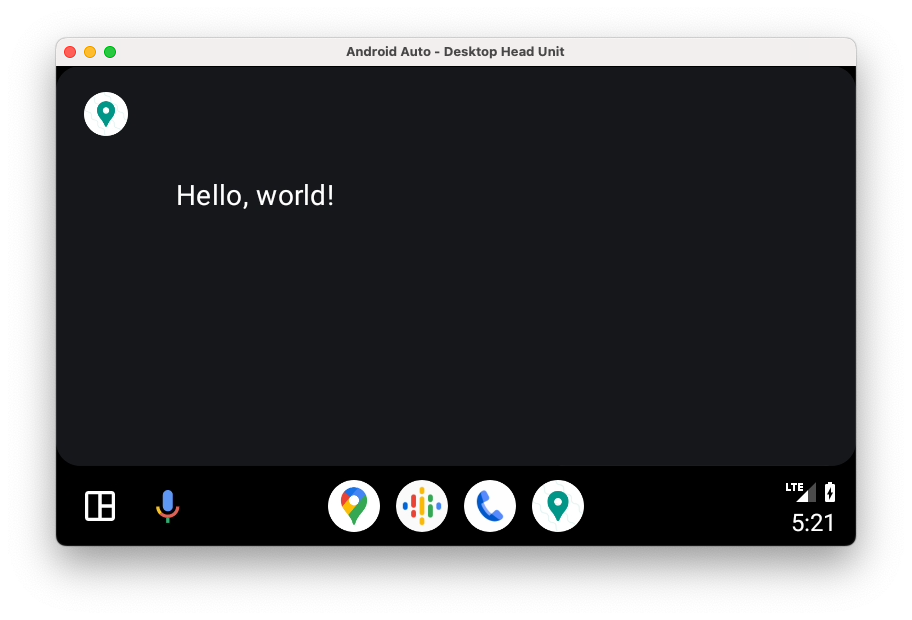
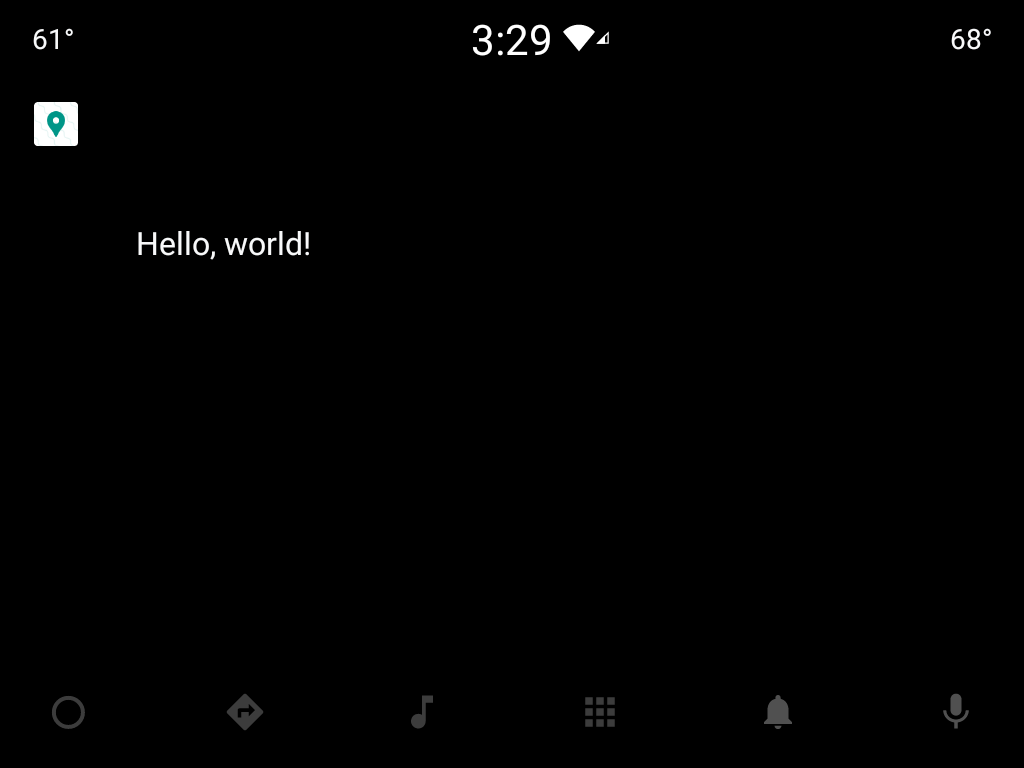
screen软件包中,创建一个名为MainScreen.kt的文件以包含MainScreen类,该类扩展了Screen。目前,它使用PaneTemplate显示简单的“Hello, world!”消息。
MainScreen.kt
class MainScreen(carContext: CarContext) : Screen(carContext) {
    override fun onGetTemplate(): Template {
        val row = Row.Builder()
            .setTitle("Hello, world!")
            .build()

        val pane = Pane.Builder()
            .addRow(row)
            .build()

        return PaneTemplate.Builder(pane)
            .setHeaderAction(Action.APP_ICON)
            .build()
    }
}
6. 添加对 Android Auto 的支持
尽管您现在已经实现了使应用正常运行所需的所有逻辑,但在 Android Auto 上运行它之前,还需要设置另外两项配置。
添加对车载应用服务模块的依赖项
在 :app 模块的 build.gradle 文件中,添加以下内容
build.gradle(模块::app)
dependencies {
    ...
    implementation project(path: ':common:car-app-service')
    ...
}
进行此更改后,应用自身模块的依赖关系图如下
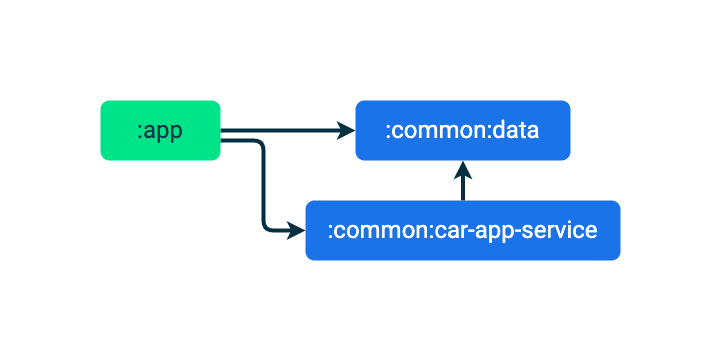
这会将您刚刚在 :common:car-app-service 模块中编写的代码与车载应用库中包含的其他组件(例如提供的权限授予 Activity)捆绑在一起。
声明 com.google.android.gms.car.application 元数据
- 右键点击
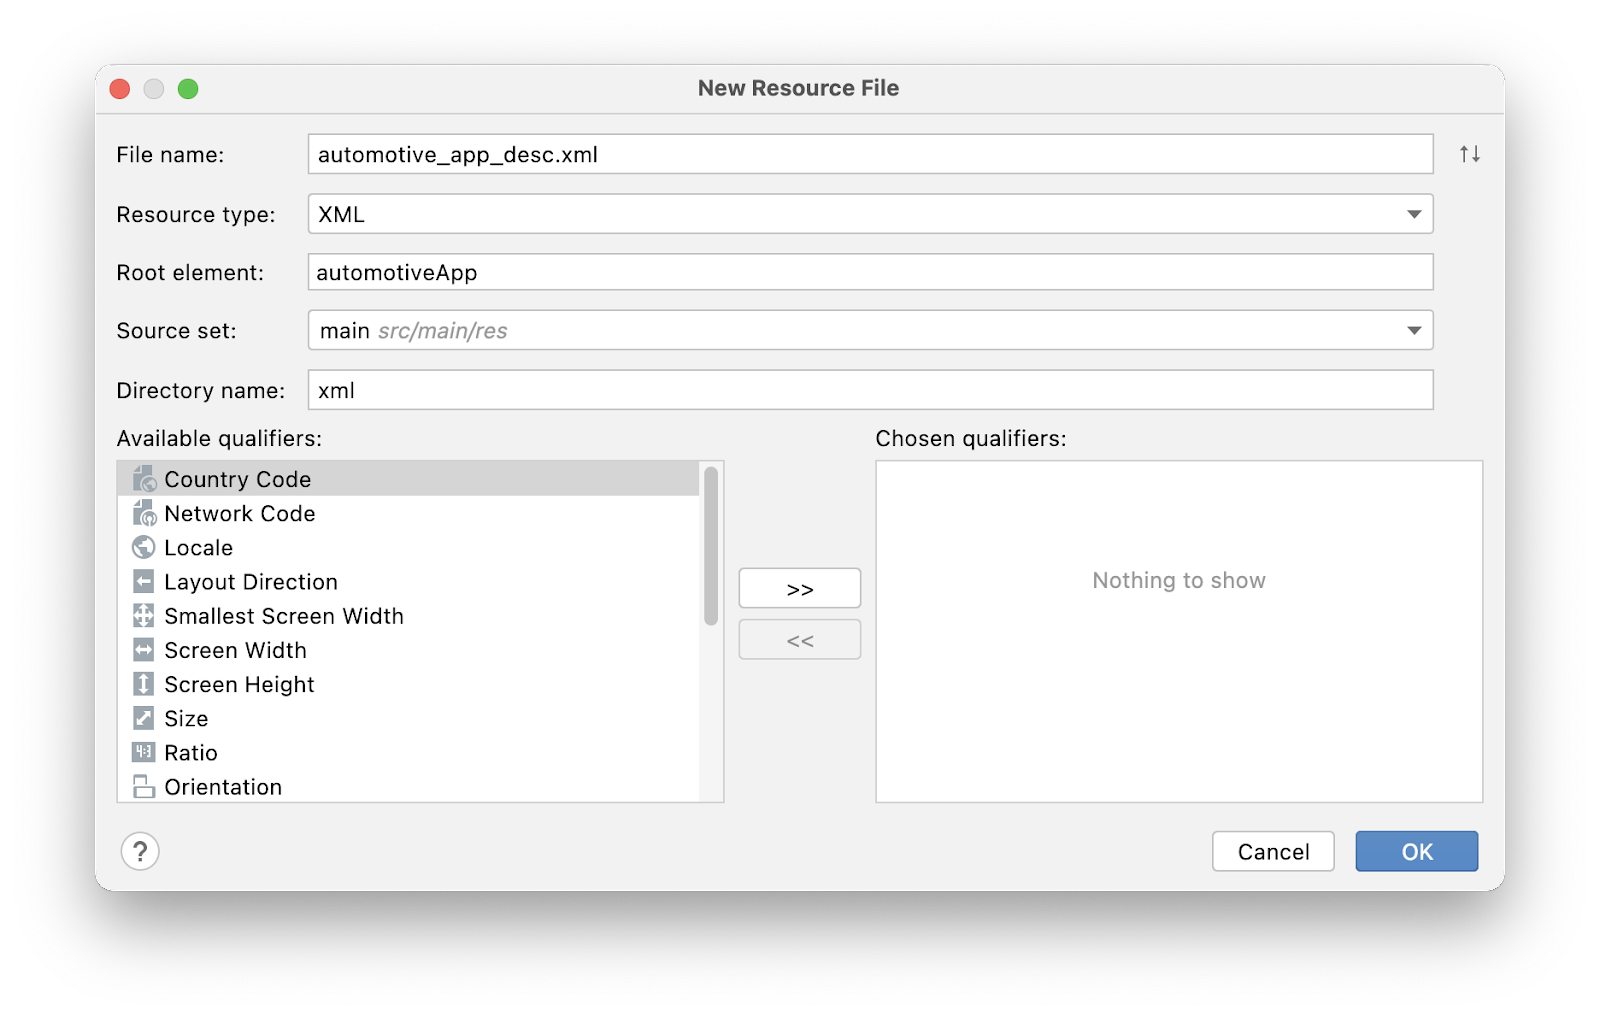
:common:car-app-service模块,然后选择“新建”>“Android 资源文件”选项,然后覆盖以下值
- 文件名:
automotive_app_desc.xml - 资源类型:
XML - 根元素:
automotiveApp
- 在该文件中,添加以下
<uses>元素,以声明您的应用使用车载应用库提供的模板。
automotive_app_desc.xml
<?xml version="1.0" encoding="utf-8"?>
<automotiveApp>
    <uses name="template"/>
</automotiveApp>
- 在
:app模块的AndroidManifest.xml文件中,添加以下<meta-data>元素,它引用您刚刚创建的automotive_app_desc.xml文件。
AndroidManifest.xml(:app)
<application ...>

    <meta-data
        android:name="com.google.android.gms.car.application"
        android:resource="@xml/automotive_app_desc" />

    ...

</application>
Android Auto 会读取此文件,让它知道您的应用支持哪些功能,在此示例中,它使用车载应用库的模板系统。此信息随后用于处理行为,例如将应用添加到 Android Auto 启动器以及通过通知打开它。
可选:监听投影变化
有时,您想知道用户的设备是否已连接到车辆。您可以使用 CarConnection API 来实现此目的,该 API 提供一个 LiveData,可让您观察连接状态。
- 要使用
CarConnectionAPI,首先在:app模块中添加对androidx.car.app:app工件的依赖项。
build.gradle(模块::app)
dependencies {
    ...
    implementation "androidx.car.app:app:$car_app_library_version"
    ...
}
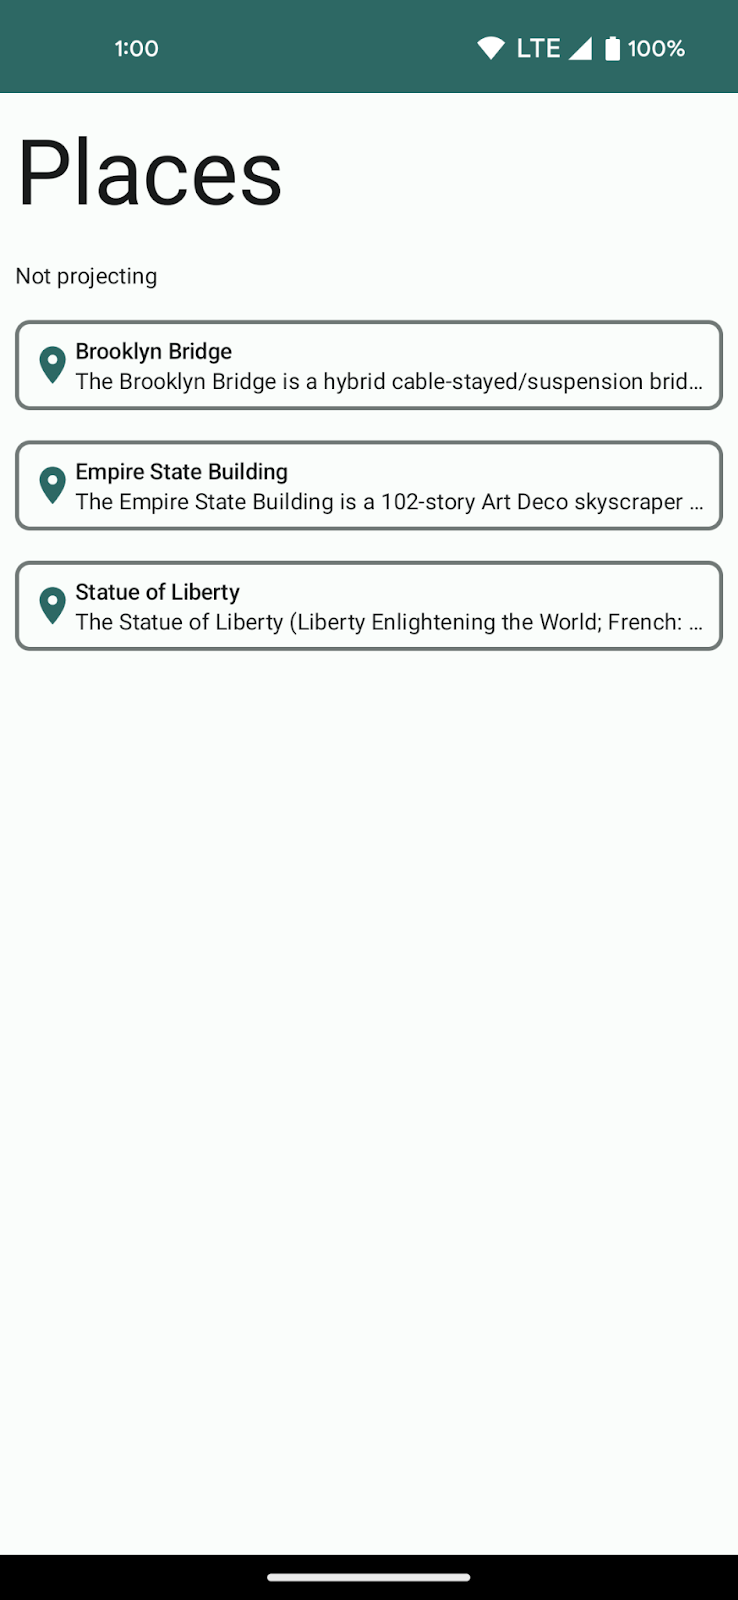
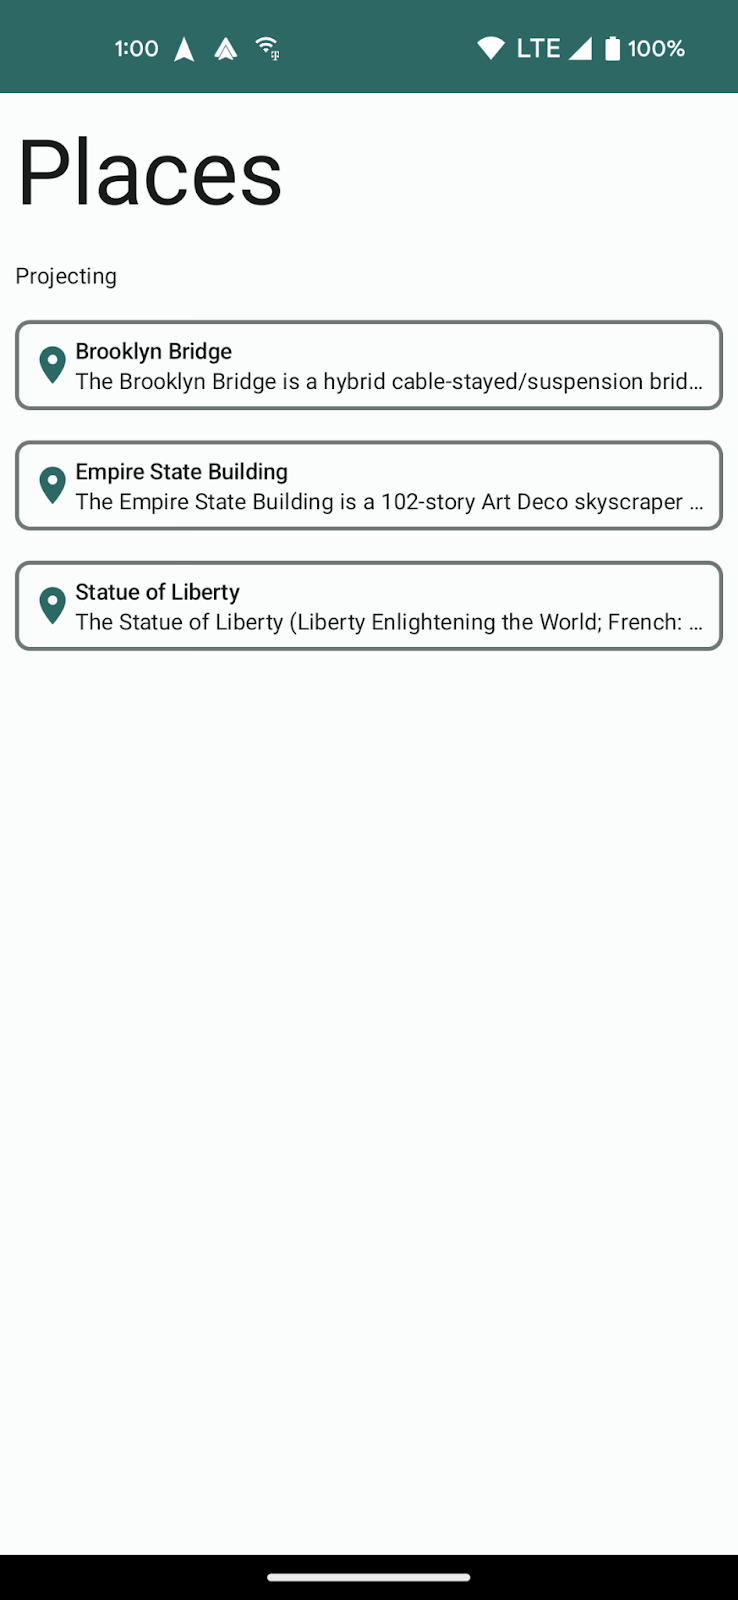
- 出于演示目的,您可以创建一个简单的 Composable(如下所示),用于显示当前连接状态。在实际应用中,此状态可能会记录在日志中,用于在投影时禁用手机屏幕上的某些功能,或者用于其他目的。
MainActivity.kt
@Composable
fun ProjectionState(carConnectionType: Int, modifier: Modifier = Modifier) {
    val text = when (carConnectionType) {
        CarConnection.CONNECTION_TYPE_NOT_CONNECTED -> "Not projecting"
        CarConnection.CONNECTION_TYPE_NATIVE -> "Running on Android Automotive OS"
        CarConnection.CONNECTION_TYPE_PROJECTION -> "Projecting"
        else -> "Unknown connection type"
    }

    Text(
        text = text,
        style = MaterialTheme.typography.bodyMedium,
        modifier = modifier
    )
}
- 现在,有了显示数据的方法,请按照以下代码段的演示,读取数据并将其传递到 Composable 中。
MainActivity.kt
setContent {
    val carConnectionType by CarConnection(this).type.observeAsState(initial = -1)
    PlacesTheme {
        // A surface container using the 'background' color from the theme
        Surface(
            modifier = Modifier.fillMaxSize(),
            color = MaterialTheme.colorScheme.background
        ) {
            Column {
                Text(
                    text = "Places",
                    style = MaterialTheme.typography.displayLarge,
                    modifier = Modifier.padding(8.dp)
                )
                ProjectionState(
                    carConnectionType = carConnectionType,
                    modifier = Modifier.padding(8.dp)
                )
                PlaceList(places = PlacesRepository().getPlaces())
            }
        }
    }
}
- 如果您运行该应用,它应该显示“未投影”。
7. 使用桌面主控单元 (DHU) 进行测试
在 CarAppService 已实现且 Android Auto 配置已到位后,是时候运行应用并查看其外观了。
- 在手机上安装该应用,然后按照有关安装和运行 DHU 的说明进行操作。
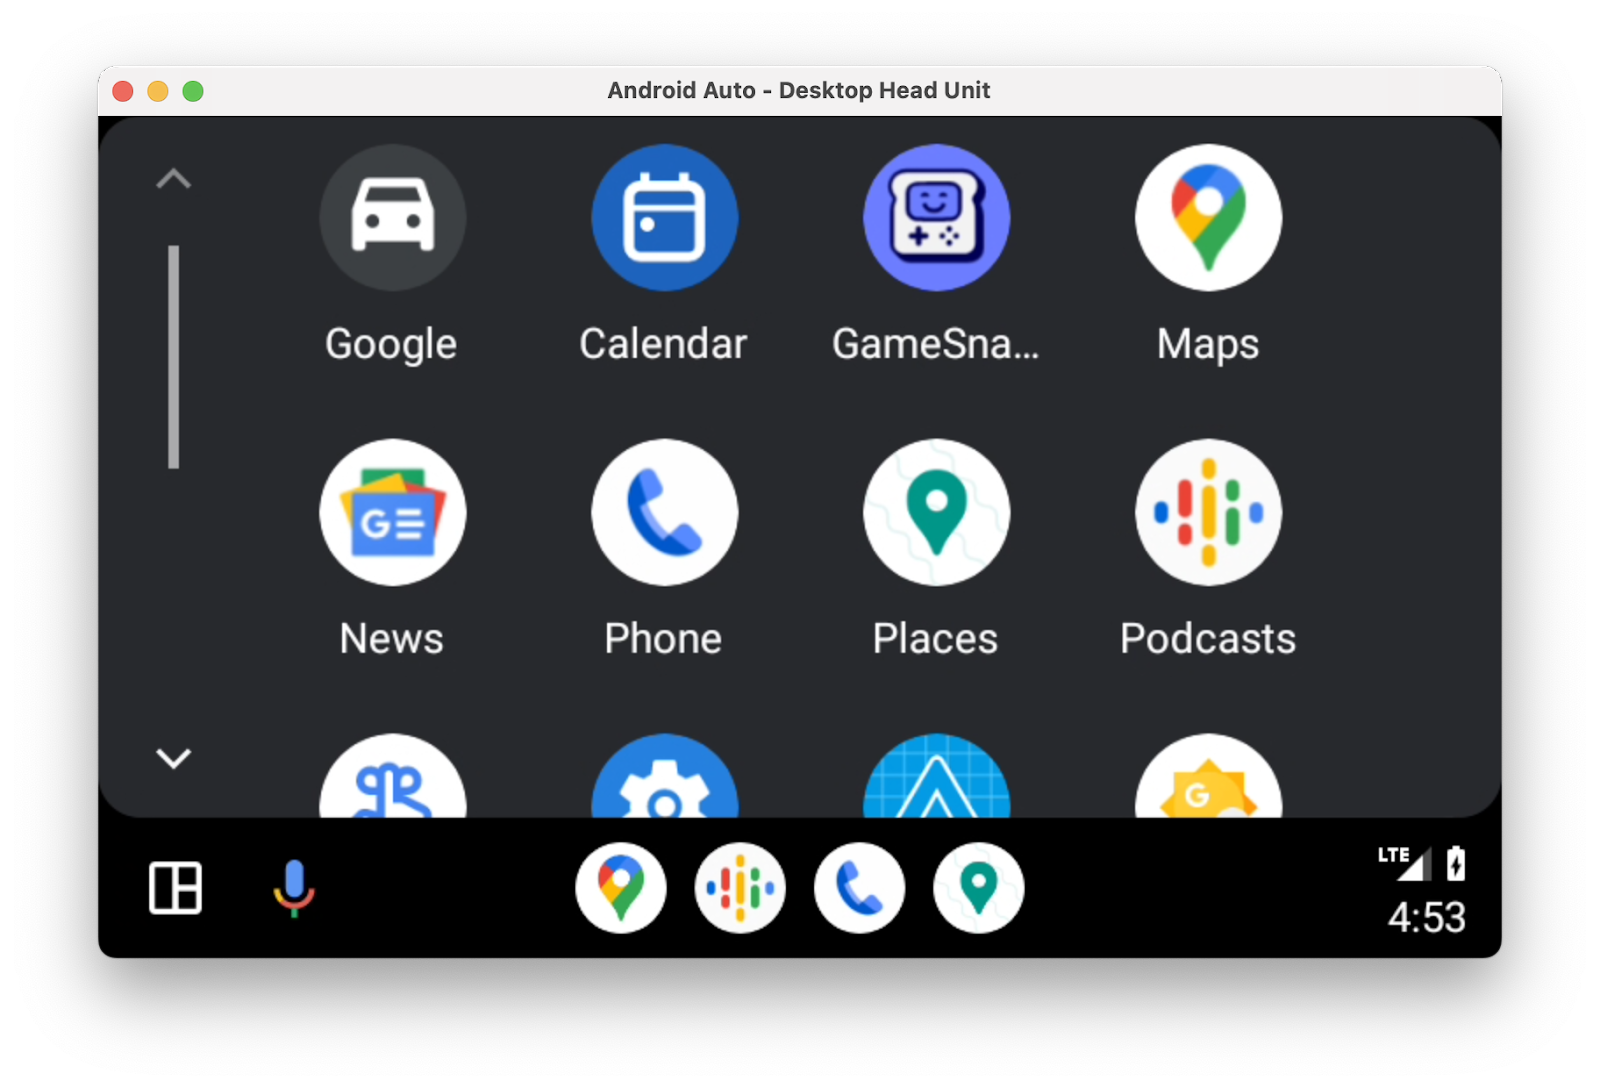
DHU 启动并运行后,您应该会在启动器中看到应用图标(如果没有,请仔细检查您是否已按照上一部分中的所有步骤进行操作,然后从终端退出并重新启动 DHU)。
糟糕,它崩溃了!
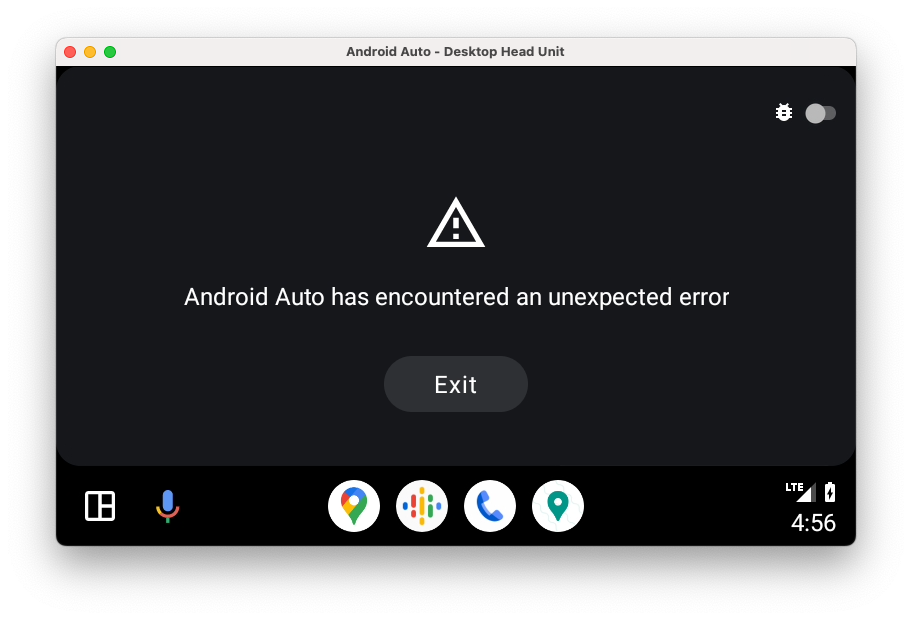
- 要查看应用崩溃的原因,您可以切换右上角的调试图标(仅在使用 DHU 运行时可见)或检查 Android Studio 中的 Logcat。
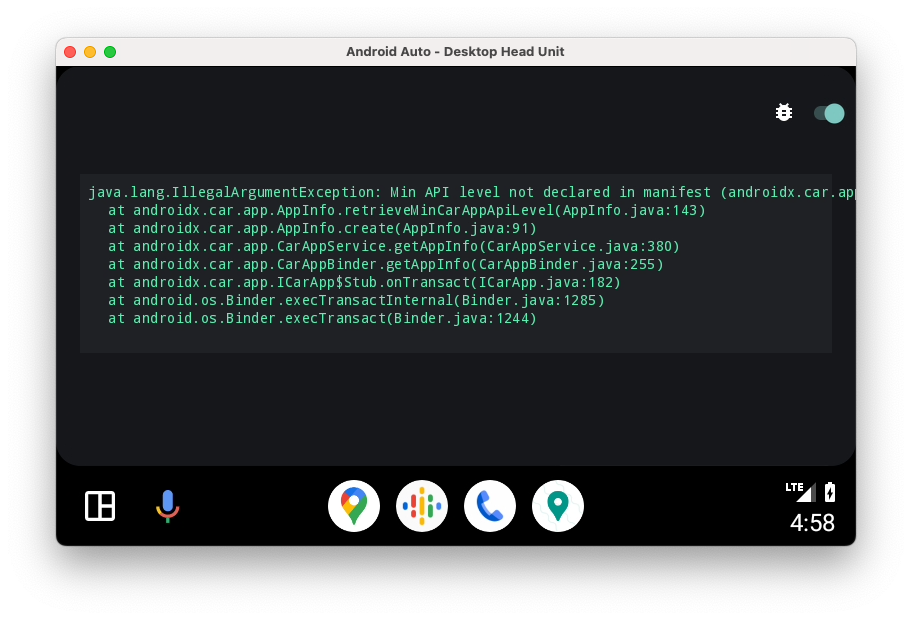
Error: [type: null, cause: null, debug msg: java.lang.IllegalArgumentException: Min API level not declared in manifest (androidx.car.app.minCarApiLevel)
        at androidx.car.app.AppInfo.retrieveMinCarAppApiLevel(AppInfo.java:143)
        at androidx.car.app.AppInfo.create(AppInfo.java:91)
        at androidx.car.app.CarAppService.getAppInfo(CarAppService.java:380)
        at androidx.car.app.CarAppBinder.getAppInfo(CarAppBinder.java:255)
        at androidx.car.app.ICarApp$Stub.onTransact(ICarApp.java:182)
        at android.os.Binder.execTransactInternal(Binder.java:1285)
        at android.os.Binder.execTransact(Binder.java:1244)
]
从日志中,您可以看到清单中缺少对应用支持的最低 API 级别的声明。在添加该条目之前,最好先了解其必要性。
与 Android 本身一样,车载应用库也有 API 级别的概念,因为主机和客户端应用之间需要有一个契约才能进行通信。主机应用支持给定的 API 级别及其相关功能(以及出于向后兼容性考虑,也支持早期级别中的功能)。例如,SignInTemplate 可在运行 API 级别 2 或更高版本的主机上使用。但是,如果您尝试在仅支持 API 级别 1 的主机上使用它,该主机将不知道模板类型,也无法对其进行任何有意义的操作。
在将主机绑定到客户端的过程中,支持的 API 级别必须有一些重叠,以便绑定成功。例如,如果主机仅支持 API 级别 1,但客户端应用没有 API 级别 2 的功能就无法运行(如本清单声明所示),则应用不应该连接,因为客户端无法在主机上成功运行。因此,客户端必须在其清单中声明所需的最低 API 级别,以确保只有支持它的主机才绑定到它。
- 要设置最低支持 API 级别,请在
:common:car-app-service模块的AndroidManfiest.xml文件中添加以下<meta-data>元素
AndroidManifest.xml(:common:car-app-service)
<application>
    <meta-data
        android:name="androidx.car.app.minCarApiLevel"
        android:value="1" />
    <service android:name="com.example.places.carappservice.PlacesCarAppService" ...>
        ...
    </service>
</application>
- 再次安装该应用并在 DHU 上启动它,您应该会看到以下内容
为了完整性起见,您还可以尝试将 minCarApiLevel 设置为一个较大的值(例如 100),以查看当主机和客户端不兼容时尝试启动应用会发生什么(提示:它会崩溃,类似于未设置任何值的情况)。
同样重要的是,与 Android 本身一样,如果您在运行时验证主机是否支持所需的级别,则可以使用高于声明的最低 API 级别的功能。
可选:监听投影变化
- 如果您在上一步中添加了
CarConnection监听器,您应该会在 DHU 运行时在手机上看到状态更新,如下所示
8. 添加对 Android Automotive OS 的支持
Android Auto 已启动并运行,现在是时候付出额外努力,也支持 Android Automotive OS 了。
创建 :automotive 模块
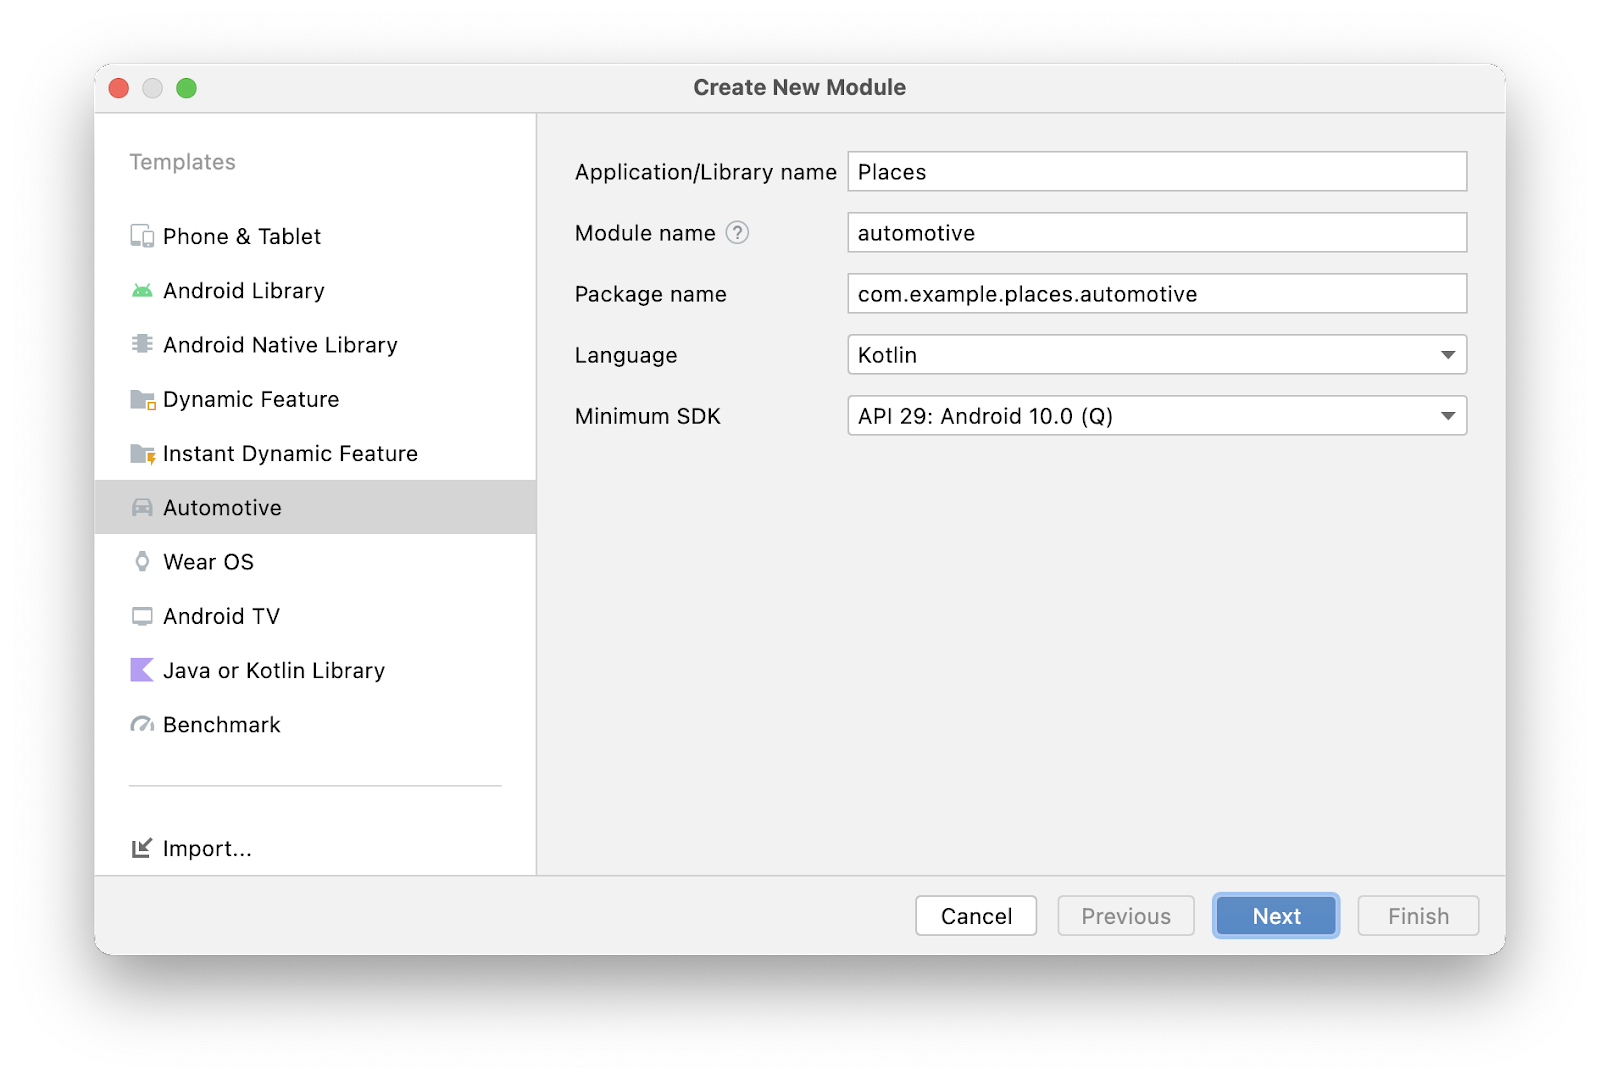
- 要创建包含 Android Automotive OS 版本应用特定代码的模块,请在 Android Studio 中打开“文件”>“新建”>“新建模块...”,从左侧模板类型列表中选择“Automotive”选项,然后使用以下值
- 应用/库名称:
Places(与主应用相同,但如果需要,也可以选择不同的名称) - 模块名称:
automotive - 软件包名称:
com.example.places.automotive - 语言:
Kotlin - 最低 SDK:
API 29: Android 10.0 (Q)——如前所述,在创建:common:car-app-service模块时,所有支持车载应用库应用的 Android Automotive OS 车辆都至少运行 API 29。
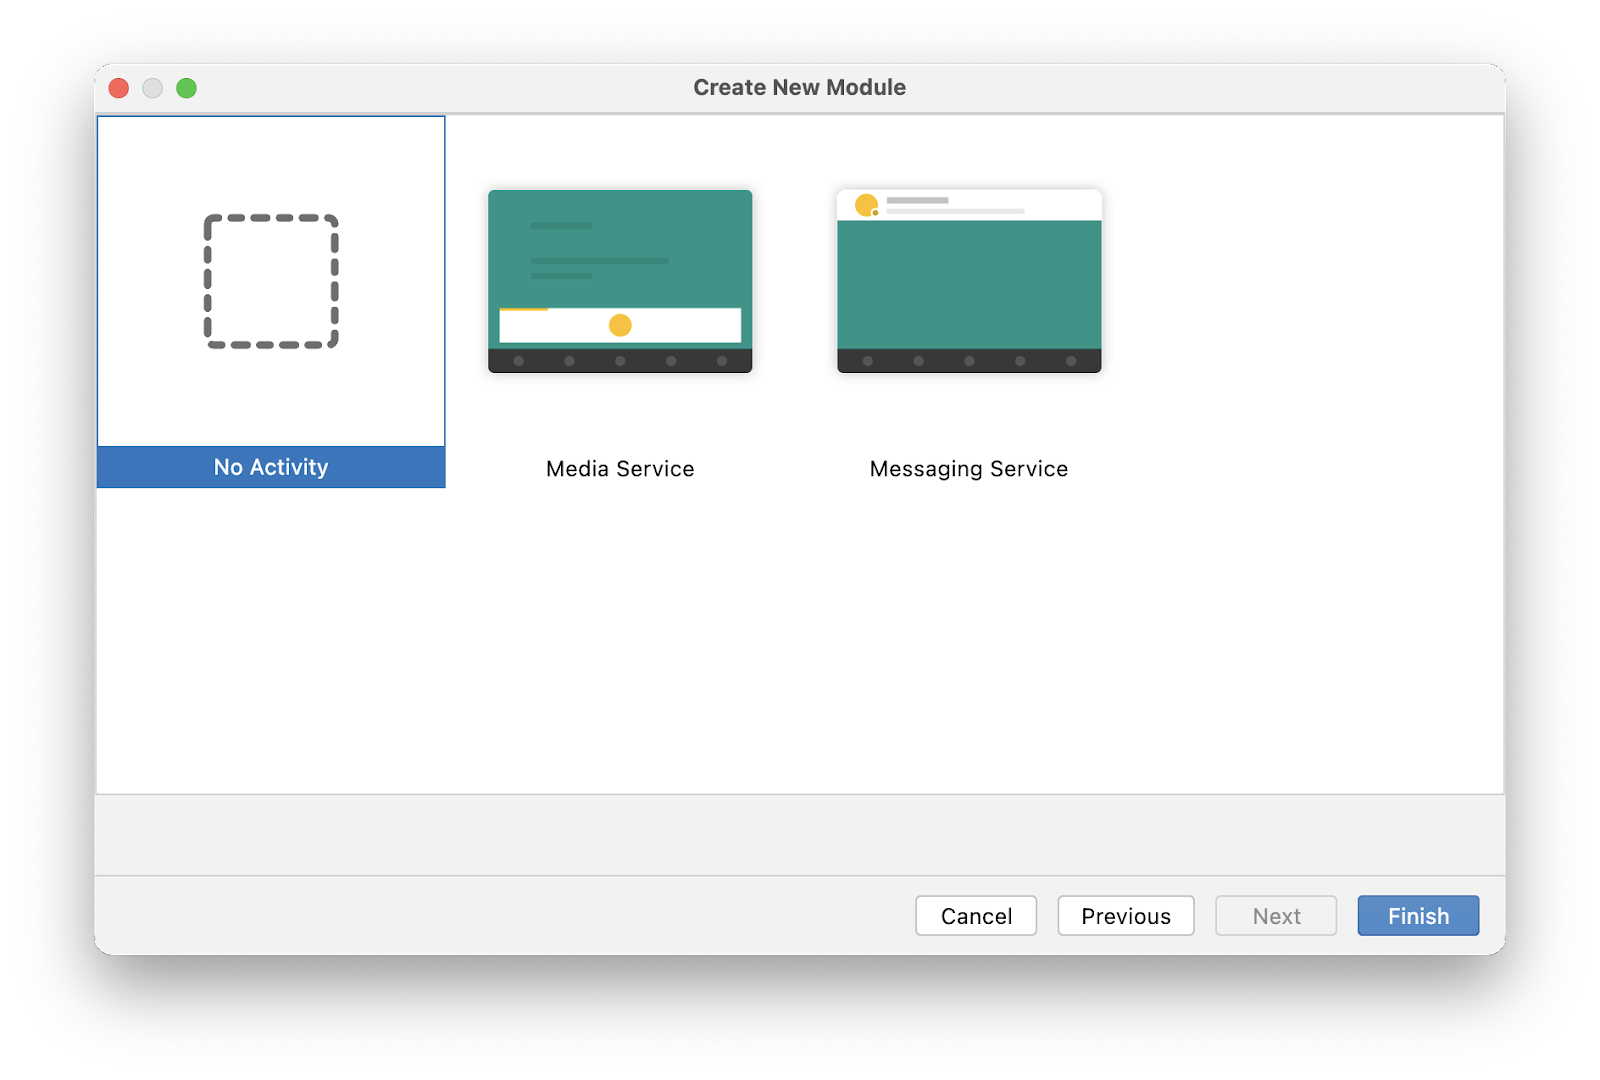
- 点击“下一步”,然后在下一个屏幕上选择“无 Activity”,最后点击“完成”。
添加依赖项
就像 Android Auto 一样,您需要声明对 :common:car-app-service 模块的依赖项。这样,您就可以在两个平台之间共享您的实现!
此外,您还需要添加对 androidx.car.app:app-automotive 工件的依赖项。与 Android Auto 可选的 androidx.car.app:app-projected 工件不同,Android Automotive OS 需要此依赖项,因为它包含用于运行您应用的 CarAppActivity。
- 要添加依赖项,请打开
build.gradle文件,然后插入以下代码
build.gradle(模块::automotive)
dependencies {
    ...
    implementation project(':common:car-app-service')
    implementation "androidx.car.app:app-automotive:$car_app_library_version"
    ...
}
进行此更改后,应用自身模块的依赖关系图如下
设置清单
- 首先,您需要将
android.hardware.type.automotive和android.software.car.templates_host这两个功能声明为必需。
android.hardware.type.automotive 是一个系统功能,它指示设备本身是车辆(有关详细信息,请参阅 FEATURE_AUTOMOTIVE)。只有将此功能标记为必需的应用才能提交到 Play 管理中心的 Automotive OS 轨道(提交到其他轨道的应用不能要求此功能)。android.software.car.templates_host 是一个系统功能,仅存在于具有运行模板应用所需模板主机的车辆中。
AndroidManifest.xml(:automotive)
<manifest xmlns:android="http://schemas.android.com/apk/res/android">
    <uses-feature
        android:name="android.hardware.type.automotive"
        android:required="true" />
    <uses-feature
        android:name="android.software.car.templates_host"
        android:required="true" />
    ...
</manifest>
- 接下来,您需要将某些功能声明为非必需。
这是为了确保您的应用与内置 Google 服务的汽车中可用的硬件范围兼容。例如,如果您的应用需要 android.hardware.screen.portrait 功能,它将与带有横向屏幕的车辆不兼容,因为大多数车辆的屏幕方向是固定的。因此,这些功能的 android:required 属性设置为 false。
AndroidManifest.xml(:automotive)
<manifest xmlns:android="http://schemas.android.com/apk/res/android">
    ...
    <uses-feature
        android:name="android.hardware.wifi"
        android:required="false" />
    <uses-feature
        android:name="android.hardware.screen.portrait"
        android:required="false" />
    <uses-feature
        android:name="android.hardware.screen.landscape"
        android:required="false" />
    <uses-feature
        android:name="android.hardware.camera"
        android:required="false" />
    ...
</manifest>
- 接下来,您需要添加对
automotive_app_desc.xml文件的引用,就像您为 Android Auto 所做的那样。
请注意,这次 android:name 属性与之前不同——它不是 com.google.android.gms.car.application,而是 com.android.automotive。与之前一样,这引用了 :common:car-app-service 模块中的 automotive_app_desc.xml 文件,这意味着 Android Auto 和 Android Automotive OS 都使用相同的资源。请注意,<meta-data> 元素位于 <application> 元素内部(因此您必须将 application 标签从自闭合更改为非自闭合)!
AndroidManifest.xml(:automotive)
<application>
    ...
    <meta-data android:name="com.android.automotive"
        android:resource="@xml/automotive_app_desc"/>
    ...
</application>
- 最后,您需要为库中包含的
CarAppActivity添加一个<activity>元素。
AndroidManifest.xml(:automotive)
<manifest xmlns:android="http://schemas.android.com/apk/res/android">
    ...
    <application ...>
        ...
        <activity
            android:name="androidx.car.app.activity.CarAppActivity"
            android:exported="true"
            android:launchMode="singleTask"
            android:theme="@android:style/Theme.DeviceDefault.NoActionBar">

            <intent-filter>
                <action android:name="android.intent.action.MAIN" />
                <category android:name="android.intent.category.LAUNCHER" />
            </intent-filter>

            <meta-data
                android:name="distractionOptimized"
                android:value="true" />
        </activity>
    </application>
</manifest>
以下是所有这些操作的含义
android:name列出了app-automotive软件包中CarAppActivity类的完全限定类名。android:exported设置为true,因为此Activity必须可由应用本身以外的应用(即启动器)启动。android:launchMode设置为singleTask,以便CarAppActivity只能同时存在一个实例。android:theme设置为@android:style/Theme.DeviceDefault.NoActionBar,以便应用占据其可用的全部屏幕空间。- Intent 过滤器指示这是应用的启动器
Activity。 - 有一个
<meta-data>元素,它向系统指示该应用可以在存在 UX 限制(例如车辆行驶时)的情况下使用。
可选:从 :app 模块复制启动器图标
由于您刚刚创建了 :automotive 模块,它具有默认的绿色 Android 徽标图标。
- 如果需要,您可以将
mipmap资源目录从:app模块复制并粘贴到:automotive模块中,以使用与移动应用相同的启动器图标!
9. 使用 Android Automotive OS 模拟器进行测试
安装带 Play 商店的 Automotive 系统映像
- 首先,在 Android Studio 中打开 SDK 管理器,如果尚未选择,请选择“SDK 平台”标签页。在 SDK 管理器窗口的右下角,确保“显示软件包详情”复选框已选中。
- 安装以下一个或多个模拟器映像。映像只能在与自身具有相同架构(x86/ARM)的机器上运行。
- Android 12L > 带 Play 商店的 Automotive Intel x86 Atom_64 系统映像
- Android 12L > 带 Play 商店的 Automotive ARM 64 v8a 系统映像
- Android 11 > 带 Play 商店的 Automotive Intel x86 Atom_64 系统映像
- Android 10 > 带 Play 商店的 Automotive Intel x86 Atom_64 系统映像
创建 Android Automotive OS Android 虚拟设备
- 打开设备管理器后,在窗口左侧的“类别”列下选择“Automotive”。然后,从列表中选择 Automotive (1024p landscape) 设备定义,然后点击“下一步”。
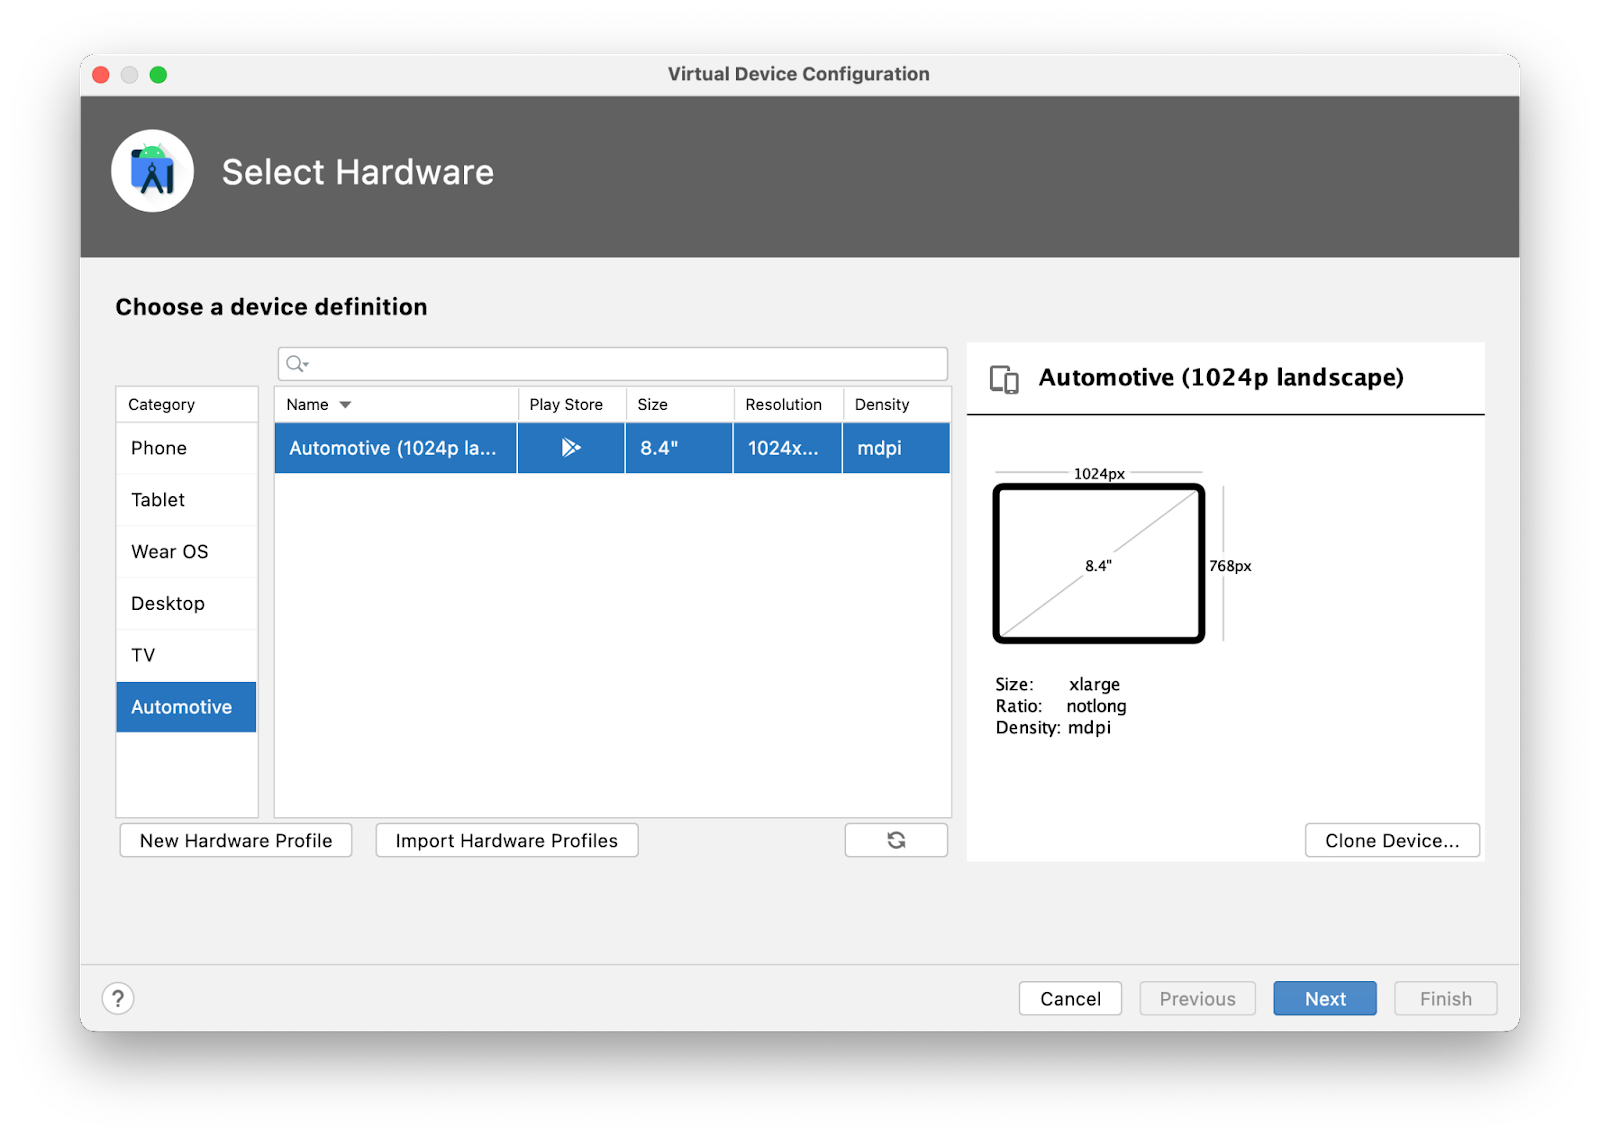
- 在下一页上,从上一步中选择一个系统映像(如果您选择了 Android 11/API 30 映像,它可能位于“x86 映像”标签页下,而不是默认的“推荐”标签页)。点击“下一步”并选择您想要的任何高级选项,最后点击“完成”创建 AVD。
运行应用
- 使用
automotive运行配置,在您刚刚创建的模拟器上运行该应用。

当您首次运行应用时,可能会看到如下屏幕
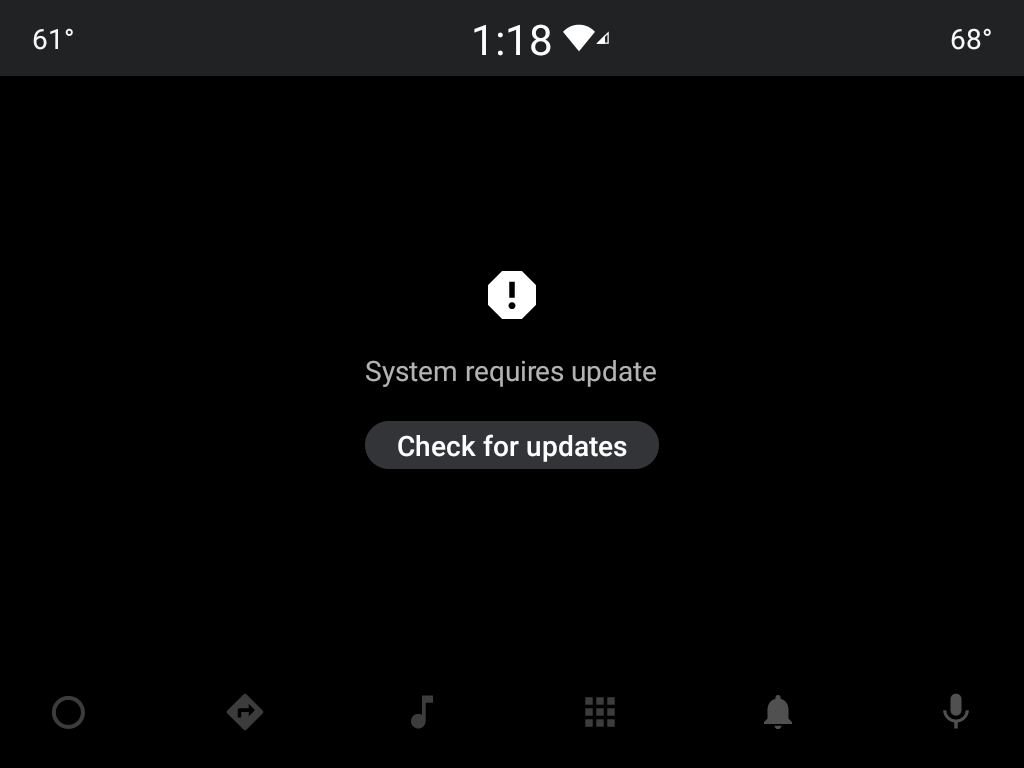
如果是这种情况,请点击“检查更新”按钮,这将带您进入 Google Automotive 应用主机应用的 Play 商店页面,您应该点击“安装”按钮。如果您在点击“检查更新”按钮时未登录,系统会引导您完成登录流程。登录后,您可以再次打开应用,然后点击按钮返回 Play 商店页面。
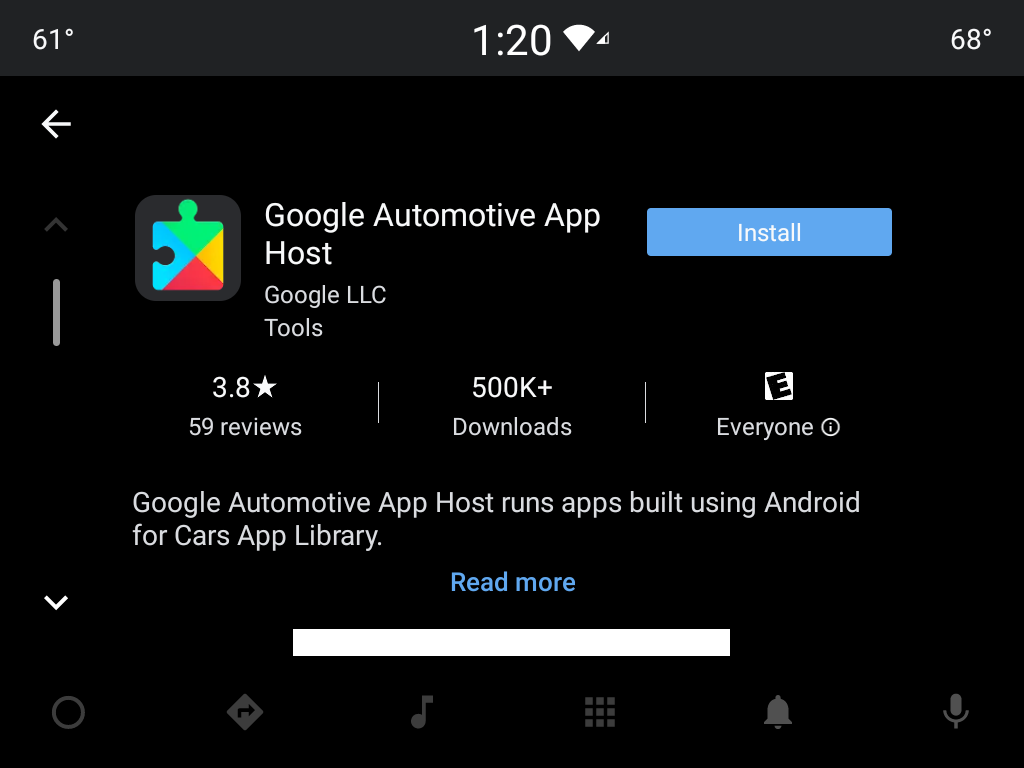
- 最后,在安装主机后,再次从启动器(底部行中的九点网格图标)打开应用,您应该会看到以下内容
在下一步中,您将在 :common:car-app-service 模块中进行更改,以显示地点列表,并允许用户在另一个应用中启动导航到所选位置。
10. 添加地图和详情屏幕
向主屏幕添加地图
- 首先,将
MainScreen类的onGetTemplate方法中的代码替换为以下内容
MainScreen.kt
override fun onGetTemplate(): Template {
    val placesRepository = PlacesRepository()
    val itemListBuilder = ItemList.Builder()
        .setNoItemsMessage("No places to show")

    placesRepository.getPlaces()
        .forEach {
            itemListBuilder.addItem(
                Row.Builder()
                    .setTitle(it.name)
                    // Each item in the list *must* have a DistanceSpan applied to either the title
                    // or one of the its lines of text (to help drivers make decisions)
                    .addText(SpannableString(" ").apply {
                        setSpan(
                            DistanceSpan.create(
                                Distance.create(Math.random() * 100, Distance.UNIT_KILOMETERS)
                            ), 0, 1, Spannable.SPAN_INCLUSIVE_INCLUSIVE
                        )
                    })
                    .setOnClickListener { TODO() }
                    // Setting Metadata is optional, but is required to automatically show the
                    // item's location on the provided map
                    .setMetadata(
                        Metadata.Builder()
                            .setPlace(Place.Builder(CarLocation.create(it.latitude, it.longitude))
                                // Using the default PlaceMarker indicates that the host should
                                // decide how to style the pins it shows on the map/in the list
                                .setMarker(PlaceMarker.Builder().build())
                                .build())
                            .build()
                    ).build()
            )
        }

    return PlaceListMapTemplate.Builder()
        .setTitle("Places")
        .setItemList(itemListBuilder.build())
        .build()
}
此代码从 PlacesRepository 读取 Place 实例列表,然后将它们中的每一个转换为 Row,以添加到 PlaceListMapTemplate 显示的 ItemList 中。
- 再次运行应用(在任一平台或两个平台),查看结果!
Android Auto | Android Automotive OS |
|
|

糟糕,又一个错误——看起来缺少一个权限。
java.lang.SecurityException: The car app does not have a required permission: androidx.car.app.MAP_TEMPLATES
        at android.os.Parcel.createExceptionOrNull(Parcel.java:2373)
        at android.os.Parcel.createException(Parcel.java:2357)
        at android.os.Parcel.readException(Parcel.java:2340)
        at android.os.Parcel.readException(Parcel.java:2282)
        ...
- 要修复此错误,请在
:common:car-app-service模块的清单中添加以下<uses-permission>元素。
任何使用 PlaceListMapTemplate 的应用都必须声明此权限,否则应用会像刚刚演示的那样崩溃。请注意,只有将类别声明为 androidx.car.app.category.POI 的应用才能使用此模板,进而使用此权限。
AndroidManifest.xml(:common:car-app-service)
<manifest xmlns:android="http://schemas.android.com/apk/res/android">
    <uses-permission android:name="androidx.car.app.MAP_TEMPLATES" />
    ...
</manifest>
添加权限后,如果您运行应用,它应该在每个平台上显示如下内容
Android Auto | Android Automotive OS |
|
|
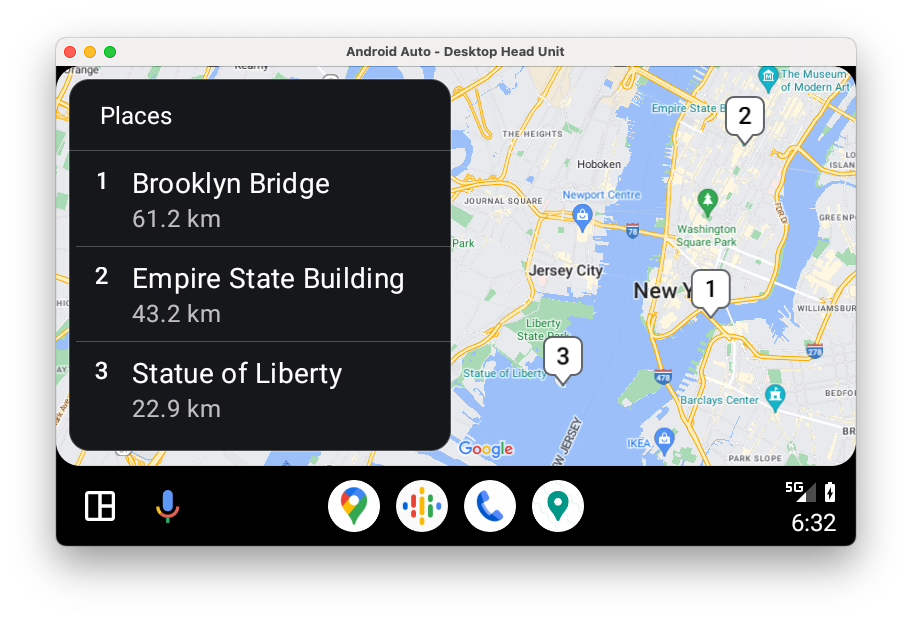
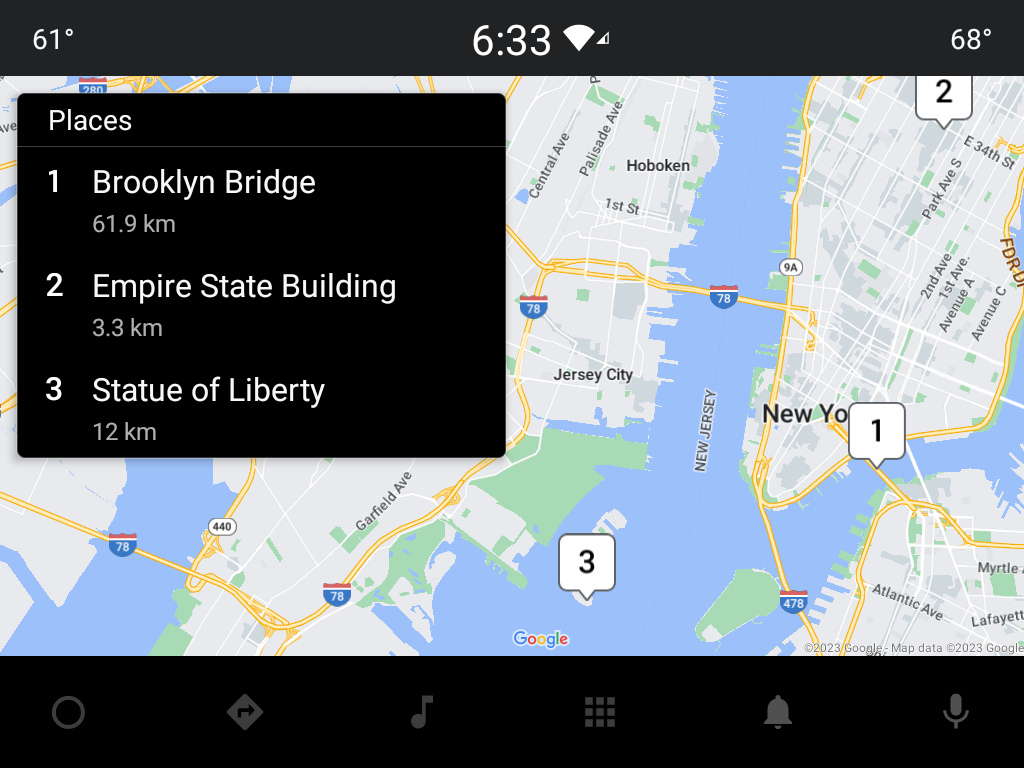
当您提供必要的 Metadata 后,地图渲染将由应用主机为您处理!
添加详情屏幕
接下来,是时候添加一个详情屏幕了,让用户查看有关特定位置的更多信息,并选择使用他们偏好的导航应用导航到该位置,或返回其他地点列表。可以使用 PaneTemplate 来完成此操作,它允许您在可选操作按钮旁边显示最多四行信息。
- 首先,右键点击
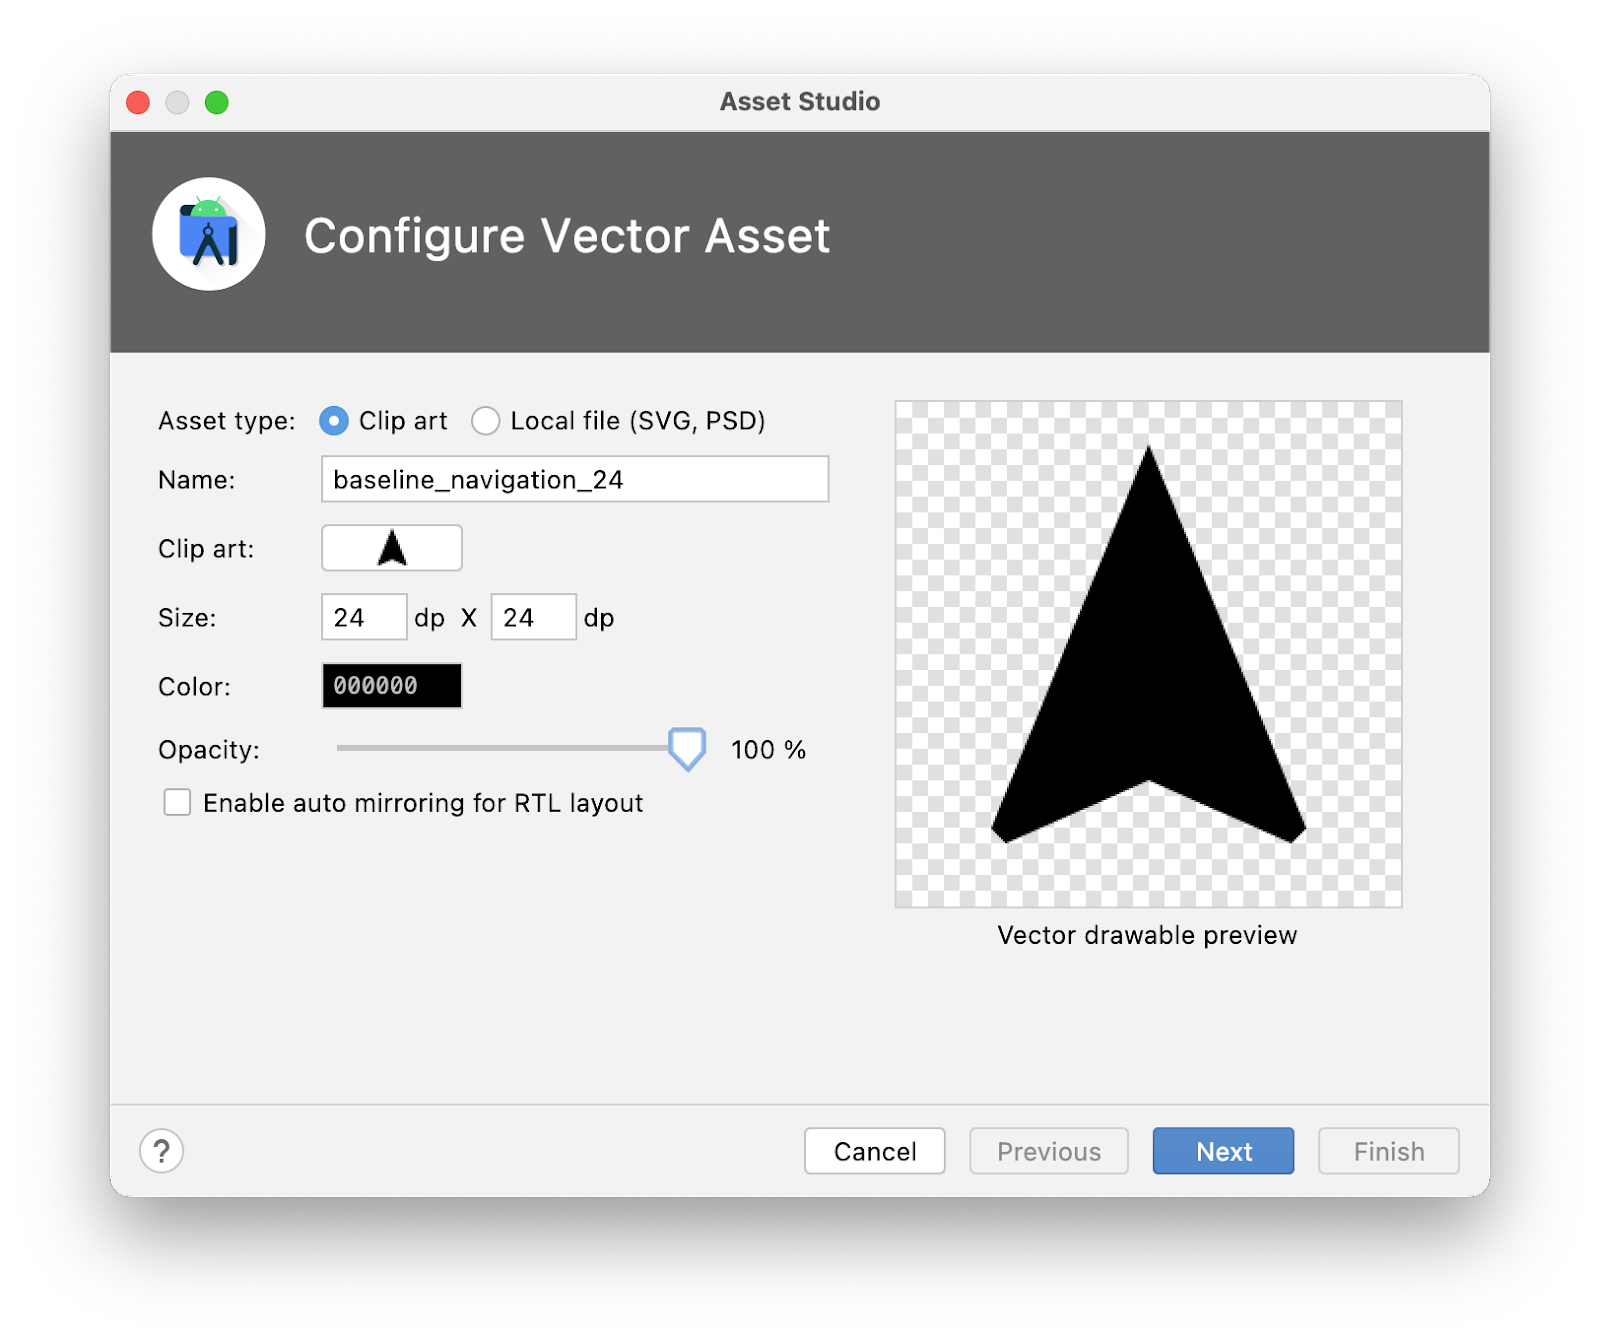
:common:car-app-service模块中的res目录,然后点击“新建”>“矢量资产”,然后使用以下配置创建导航图标
- 资产类型:
Clip art - 剪贴画:
navigation - 名称:
baseline_navigation_24 - 大小:
24dp x24dp - 颜色:
#000000 - 不透明度:
100%
- 然后,在
screen软件包中,创建一个名为DetailScreen.kt的文件(位于现有MainScreen.kt文件旁边)并添加以下代码
DetailScreen.kt
class DetailScreen(carContext: CarContext, private val placeId: Int) : Screen(carContext) {

    override fun onGetTemplate(): Template {
        val place = PlacesRepository().getPlace(placeId)
            ?: return MessageTemplate.Builder("Place not found")
                .setHeaderAction(Action.BACK)
                .build()

        val navigateAction = Action.Builder()
            .setTitle("Navigate")
            .setIcon(
                CarIcon.Builder(
                    IconCompat.createWithResource(
                        carContext,
                        R.drawable.baseline_navigation_24
                    )
                ).build()
            )
            // Only certain intent actions are supported by `startCarApp`. Check its documentation
            // for all of the details. To open another app that can handle navigating to a location
            // you must use the CarContext.ACTION_NAVIGATE action and not Intent.ACTION_VIEW like
            // you might on a phone.
            .setOnClickListener {  carContext.startCarApp(place.toIntent(CarContext.ACTION_NAVIGATE)) }
            .build()

        return PaneTemplate.Builder(
            Pane.Builder()
                .addAction(navigateAction)
                .addRow(
                    Row.Builder()
                        .setTitle("Coordinates")
                        .addText("${place.latitude}, ${place.longitude}")
                        .build()
                ).addRow(
                    Row.Builder()
                        .setTitle("Description")
                        .addText(place.description)
                        .build()
                ).build()
        )
            .setTitle(place.name)
            .setHeaderAction(Action.BACK)
            .build()
    }
}
请特别注意 navigateAction 的构建方式——在其 OnClickListener 中调用 startCarApp 是与 Android Auto 和 Android Automotive OS 上其他应用交互的关键。
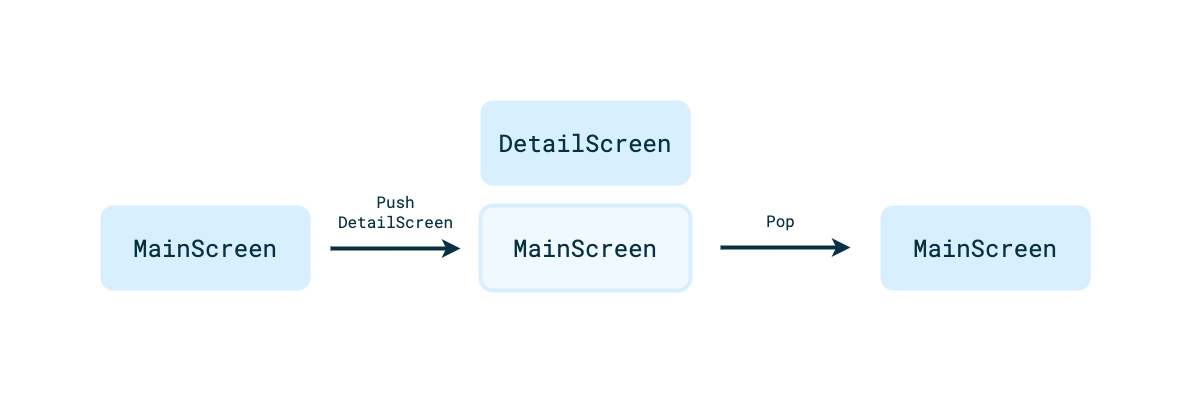
在屏幕之间导航
现在有两种类型的屏幕,是时候在它们之间添加导航了!车载应用库中的导航使用推拉式堆栈模型,非常适合在驾驶时完成的简单任务流程。
- 要从
MainScreen上的一个列表项导航到该项的DetailScreen,请添加以下代码
MainScreen.kt
Row.Builder()
    ...
    .setOnClickListener { screenManager.push(DetailScreen(carContext, it.id)) }
    ...
从 DetailScreen 返回 MainScreen 的导航已处理,因为在构建 DetailScreen 上显示的 PaneTemplate 时调用了 setHeaderAction(Action.BACK)。当用户点击标头操作时,主机将为您处理从堆栈中弹出当前屏幕,但如果需要,此行为可以由您的应用覆盖。
- 现在运行应用,查看
DetailScreen和应用内导航的效果!
11. 更新屏幕上的内容
通常,您希望让用户与屏幕交互并更改该屏幕上元素的状态。为了演示如何执行此操作,您将构建功能,让用户可以在 DetailScreen 上切换收藏和取消收藏某个地点。
- 首先,添加一个局部变量
isFavorite来保存状态。在实际应用中,这应该作为数据层的一部分存储,但对于演示目的而言,局部变量就足够了。
DetailScreen.kt
class DetailScreen(carContext: CarContext, private val placeId: Int) : Screen(carContext) {
    private var isFavorite = false
    ...
}
- 接下来,右键点击
:common:car-app-service模块中的res目录,然后点击“新建”>“矢量资产”,然后使用以下配置创建收藏图标
- 资产类型:
Clip art - 名称:
baseline_favorite_24 - 剪贴画:
favorite - 大小:
24dp x24dp - 颜色:
#000000 - 不透明度:
100%

- 然后,在
DetailsScreen.kt中,为PaneTemplate创建一个ActionStrip。
ActionStrip UI 组件位于标题对面的标题行中,非常适合次要和三级操作。由于导航是 DetailScreen 上要执行的主要操作,因此将收藏或取消收藏的操作放置在 ActionStrip 中是构建屏幕的好方法。
DetailScreen.kt
val navigateAction = ...

val actionStrip = ActionStrip.Builder()
    .addAction(
        Action.Builder()
            .setIcon(
                CarIcon.Builder(
                    IconCompat.createWithResource(
                        carContext,
                        R.drawable.baseline_favorite_24
                    )
                ).setTint(
                    if (isFavorite) CarColor.RED else CarColor.createCustom(
                        Color.LTGRAY,
                        Color.DKGRAY
                    )
                ).build()
            )
            .setOnClickListener {
                isFavorite = !isFavorite
            }.build()
    )
    .build()

...
此处有两点值得关注
- 的
CarIcon颜色会根据项的状态而变化。 setOnClickListener用于响应用户输入并切换收藏状态。
- 别忘了在
PaneTemplate.Builder上调用setActionStrip才能使用它!
DetailScreen.kt
return PaneTemplate.Builder(...)
    ...
    .setActionStrip(actionStrip)
    .build()
- 现在,运行应用,看看会发生什么
有意思……看起来点击事件正在发生,但 UI 没有更新。
这是因为车载应用库有一个“刷新”的概念。为了限制驾驶员分心,刷新屏幕内容有某些限制(因显示模板而异),每次刷新都必须由您自己的代码通过调用 Screen 类的 invalidate 方法显式请求。仅仅更新 onGetTemplate 中引用的某些状态不足以更新 UI。
- 要解决此问题,请按如下方式更新
OnClickListener
DetailScreen.kt
.setOnClickListener {
    isFavorite = !isFavorite
    // Request that `onGetTemplate` be called again so that updates to the
    // screen's state can be picked up
    invalidate()
}
- 再次运行应用,您会看到心形图标的颜色在每次点击时都会更新!
就这样,您有了一个与 Android Auto 和 Android Automotive OS 都良好集成的基本应用!
12. 恭喜
您已成功构建了第一个车载应用库应用。现在是时候将所学知识应用到您自己的应用中了!
如前所述,目前只有使用车载应用库构建的特定类别应用可以提交到 Play 商店。如果您的应用是导航应用、兴趣点 (POI) 应用(如您在本 Codelab 中操作的应用)或物联网 (IOT) 应用,今天就可以开始构建您的应用,并在两个平台上发布到生产环境。
每年都会增加新的应用类别,因此即使您无法立即应用所学知识,也请稍后回来查看,届时可能正是将您的应用扩展到车载设备的合适时机!
尝试以下操作
- 安装 OEM 模拟器(例如Polestar 2 模拟器),了解 OEM 定制如何改变 Android Automotive OS 上车载应用库应用的外观和风格。请注意,并非所有 OEM 模拟器都支持车载应用库应用。
- 查看Showcase 示例应用,它演示了车载应用库的完整功能。
延伸阅读
- 使用车载 Android 应用库涵盖了本 Codelab 中的内容以及更多!
- 车载 Android 应用库设计指南详细描述了所有不同的模板以及构建应用时要遵循的最佳实践。
- 车载 Android 应用质量页面描述了您的应用必须满足的条件,才能创建出色的用户体验并通过 Play 商店审核。