
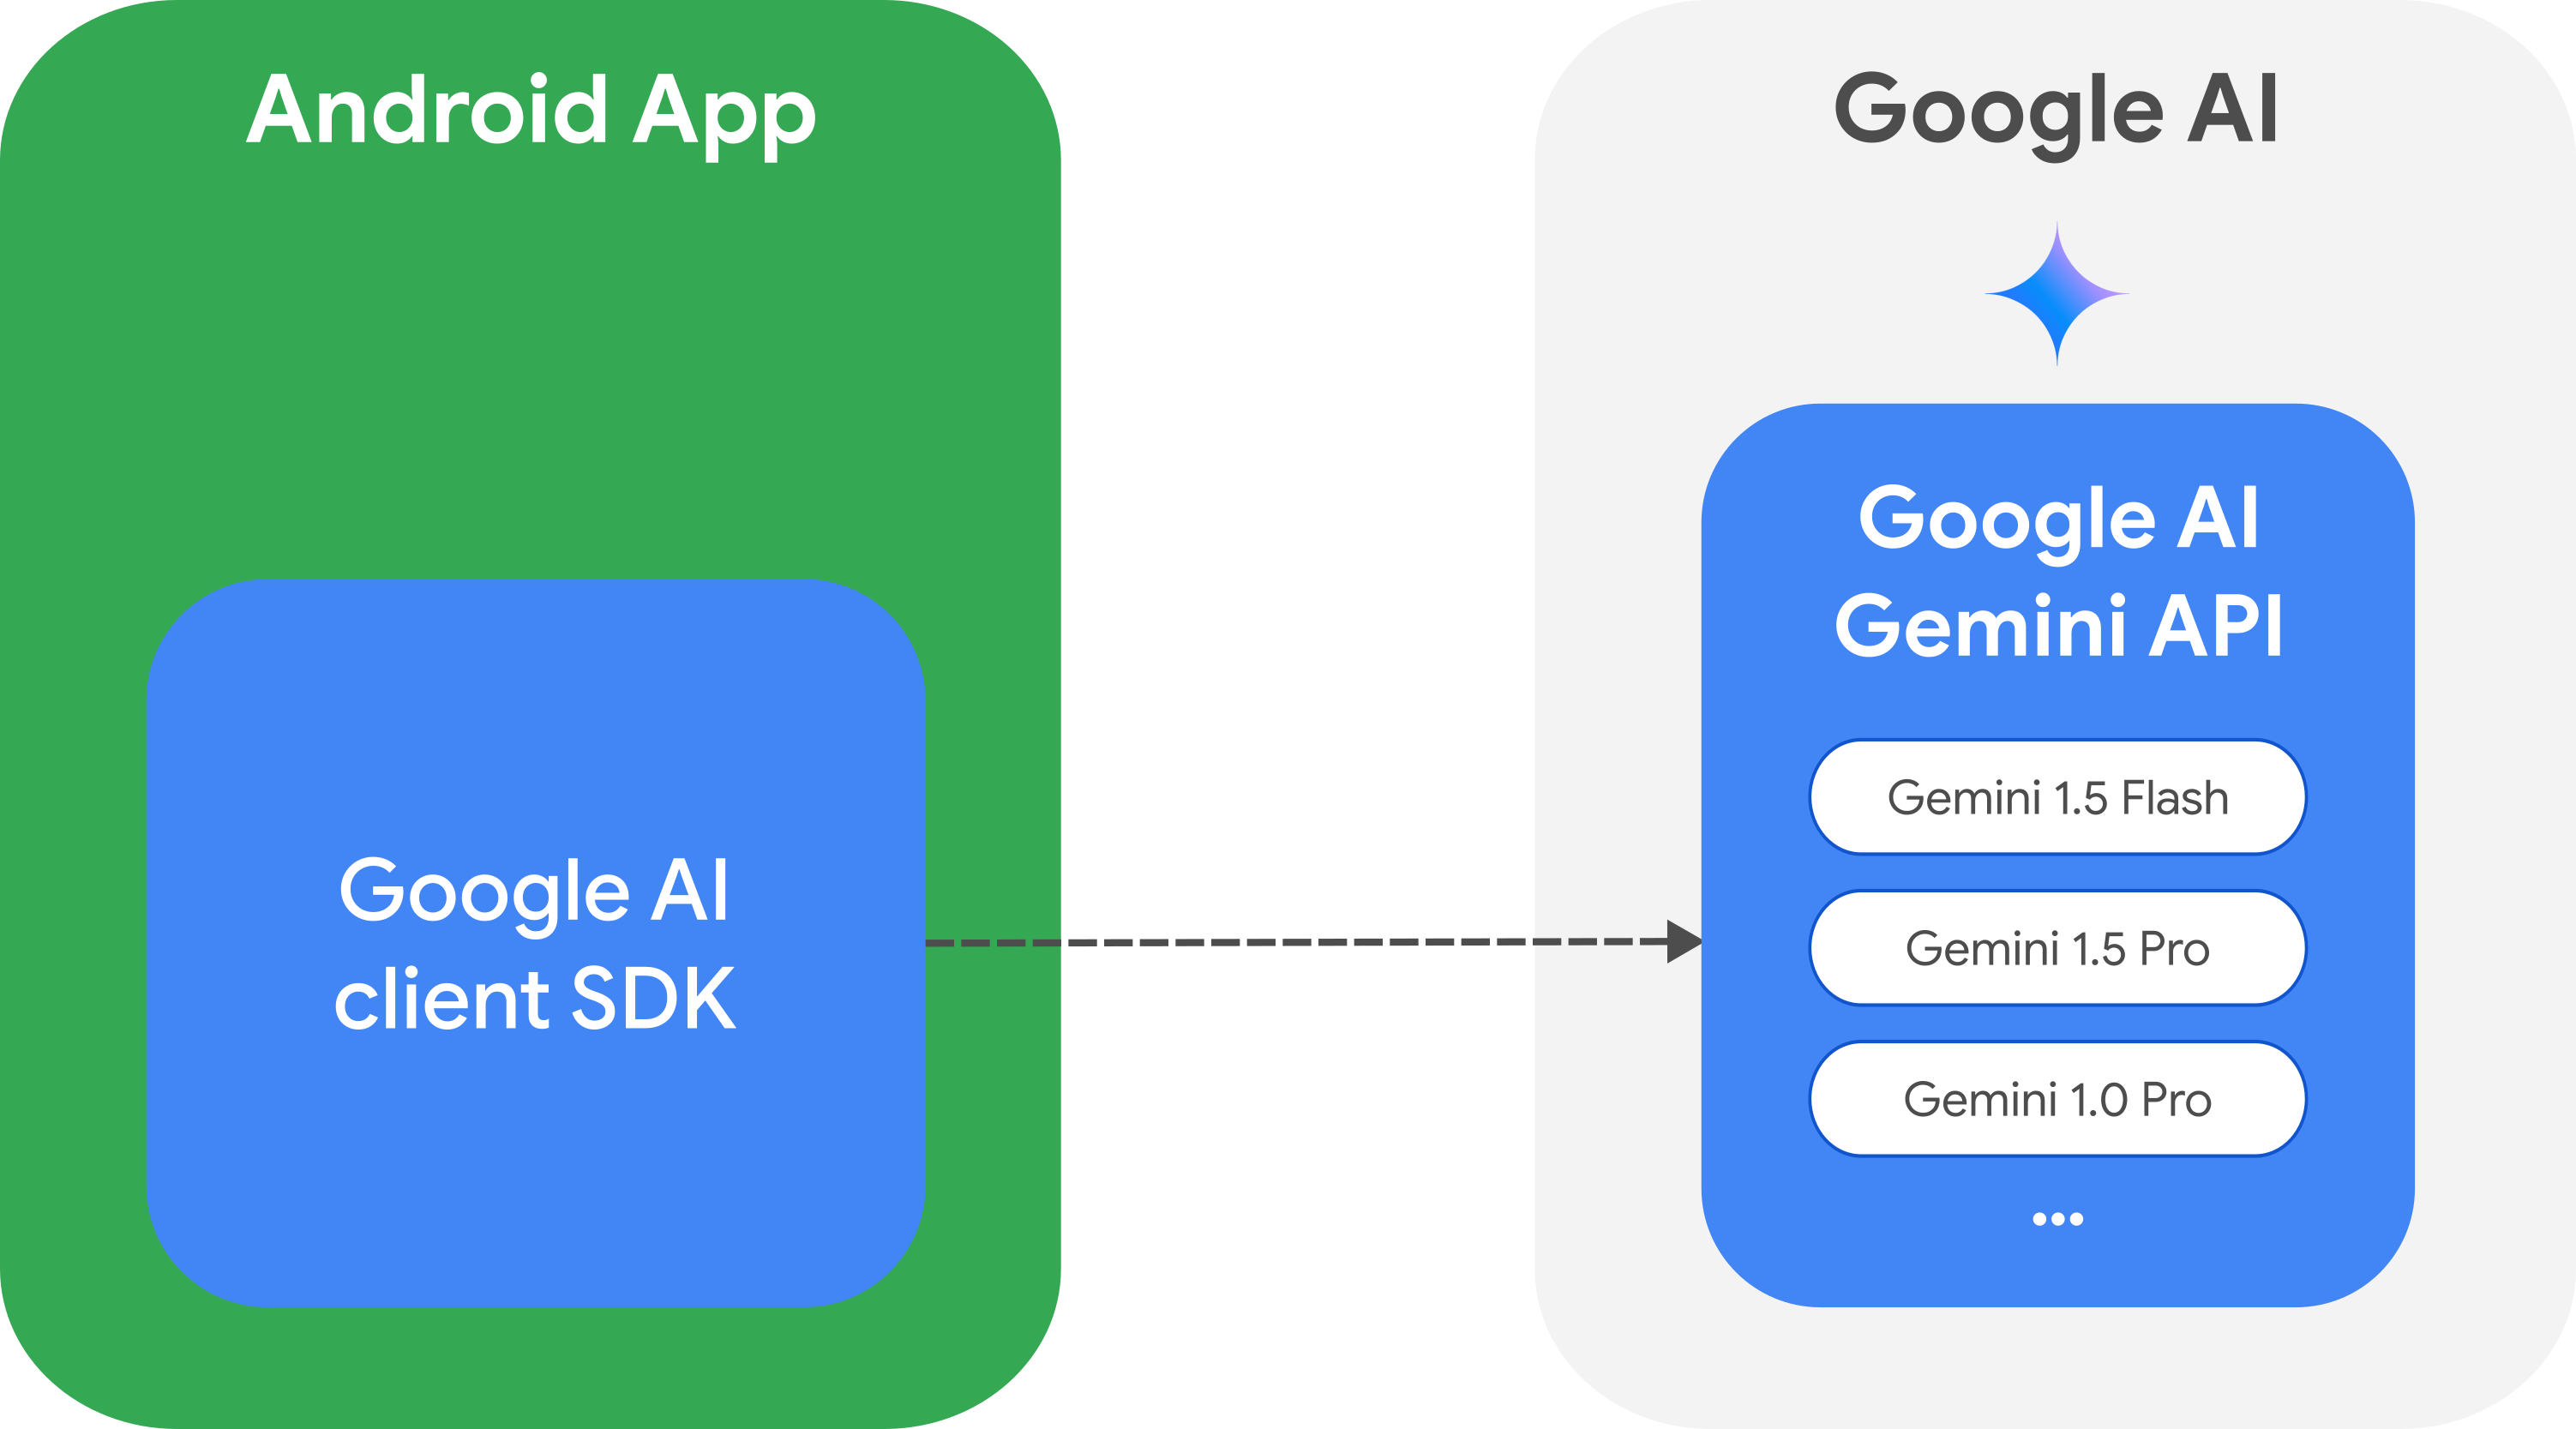
Google AI 客户端 SDK 允许您调用 Gemini API 并直接从您的 Android 应用中使用 Gemini 系列模型。
免费套餐让您能够免费进行实验。有关其他定价详细信息,请参阅定价指南。
开始使用
在您直接从应用中与 Gemini API 交互之前,您需要先执行一些操作,包括熟悉提示以及生成 API 密钥并设置您的应用以使用 SDK。
试用提示
首先在Google AI Studio中对提示进行原型设计。
Google AI Studio 是一个用于提示设计和原型设计的 IDE。它允许您上传文件以使用文本和图像测试提示,并将提示保存以供以后重新访问。
为您的用例创建正确的提示更像是艺术而非科学,这使得实验至关重要。您可以在官方 Google AI 文档中详细了解提示。

要了解有关 Google AI Studio 高级功能的更多信息,请参阅Google AI Studio 快速入门指南。
生成您的 API 密钥
对提示满意后,点击获取 API 密钥以生成您的 Gemini API 密钥。密钥将与您的应用捆绑在一起,这对于实验和原型设计是可以的,但不建议用于生产用例。
此外,为防止您的 API 密钥提交到您的源代码存储库,请使用Secrets Gradle 插件。
添加 Gradle 依赖项
将 Google AI 客户端 SDK 的依赖项添加到您的应用中
Kotlin
dependencies {
  [...]
 implementation("com.google.ai.client.generativeai:generativeai:0.7.0")
}
Java
dependencies {
  [...]
  implementation("com.google.ai.client.generativeai:generativeai:0.7.0")

  // Required to use `ListenableFuture` from Guava Android for one-shot generation
  implementation("com.google.guava:guava:31.0.1-android")

  // Required to use `Publisher` from Reactive Streams for streaming operations
  implementation("org.reactivestreams:reactive-streams:1.0.4")
}
创建GenerativeModel
首先通过提供以下内容实例化GenerativeModel
- 模型名称:
gemini-1.5-flash、gemini-1.5-pro或gemini-1.0-pro - 使用 Google AI Studio 生成的API 密钥。
您可以选择定义模型参数并为温度、topK、topP 和最大输出标记提供值。
您还可以为以下主题定义安全功能
骚扰仇恨言论性露骨内容危险内容
Kotlin
val model = GenerativeModel(
  model = "gemini-1.5-flash-001",
  apiKey = BuildConfig.apikey,
  generationConfig = generationConfig {
    temperature = 0.15f
    topK = 32
    topP = 1f
    maxOutputTokens = 4096
  },
  safetySettings = listOf(
    SafetySetting(HarmCategory.HARASSMENT, BlockThreshold.MEDIUM_AND_ABOVE),
    SafetySetting(HarmCategory.HATE_SPEECH, BlockThreshold.MEDIUM_AND_ABOVE),
    SafetySetting(HarmCategory.SEXUALLY_EXPLICIT, BlockThreshold.MEDIUM_AND_ABOVE),
    SafetySetting(HarmCategory.DANGEROUS_CONTENT, BlockThreshold.MEDIUM_AND_ABOVE),
  )
)
Java
GenerationConfig.Builder configBuilder = new GenerationConfig.Builder();
configBuilder.temperature = 0.15f;
configBuilder.topK = 32;
configBuilder.topP = 1f;
configBuilder.maxOutputTokens = 4096;

ArrayList<SafetySetting> safetySettings = new ArrayList();
safetySettings.add(new SafetySetting(HarmCategory.HARASSMENT, BlockThreshold.MEDIUM_AND_ABOVE));
safetySettings.add(new SafetySetting(HarmCategory.HATE_SPEECH, BlockThreshold.MEDIUM_AND_ABOVE));
safetySettings.add(new SafetySetting(HarmCategory.SEXUALLY_EXPLICIT, BlockThreshold.MEDIUM_AND_ABOVE));
safetySettings.add(new SafetySetting(HarmCategory.DANGEROUS_CONTENT, BlockThreshold.MEDIUM_AND_ABOVE));

GenerativeModel gm = new GenerativeModel(
    "gemini-1.5-flash-001",
    BuildConfig.apiKey,
    configBuilder.build(),
    safetySettings
);
在您的应用中使用 Google AI 客户端 SDK
现在您已获得 API 密钥并设置了您的应用以使用 SDK,您就可以与 Gemini API 交互了。
生成文本
要生成文本响应,请使用您的提示调用generateContent()。
Kotlin
scope.launch {
  val response = model.generateContent("Write a story about a green robot.")
}
Java
// In Java, create a GenerativeModelFutures from the GenerativeModel.
// generateContent() returns a ListenableFuture.
// Learn more:
// https://developer.android.com/develop/background-work/background-tasks/asynchronous/listenablefuture

GenerativeModelFutures model = GenerativeModelFutures.from(gm);

Content content = new Content.Builder()
      .addText("Write a story about a green robot.")
      .build();
Executor executor = // ...

ListenableFuture<GenerateContentResponse> response = model.generateContent(content);

Futures.addCallback(response, new FutureCallback<GenerateContentResponse>() {
      @Override
      public void onSuccess(GenerateContentResponse result) {
        String resultText = result.getText();
      }

      @Override
      public void onFailure(Throwable t) {
        t.printStackTrace();
      }
}, executor);
请注意,generateContent() 是一个suspend 函数,它可以很好地与现有的 Kotlin 代码集成。
从图像和其他媒体生成文本
您还可以从包含文本加图像或其他媒体的提示生成文本。当您调用generateContent() 时,您可以将媒体作为内联数据传递(如下面的示例所示)。
Kotlin
scope.launch {
  val response = model.generateContent(
    content {
      image(bitmap)
      text("What is the object in this picture?")
    }
  )
}
Java
Content content = new Content.Builder()
     .addImage(bitmap)
     .addText("What is the object in this picture?")
     .build();

Executor executor = // ...

ListenableFuture<GenerateContentResponse> response = model.generateContent(content);

Futures.addCallback(response, new FutureCallback<GenerateContentResponse>() {
      @Override
      public void onSuccess(GenerateContentResponse result) {
        String resultText = result.getText();
      }

      @Override
      public void onFailure(Throwable t) {
        t.printStackTrace();
      }
}, executor);
多轮对话
您还可以支持多轮对话。使用startChat() 函数初始化对话。您可以选择提供消息历史记录。然后调用sendMessage() 函数发送聊天消息。
Kotlin
val chat = model.startChat(
    history = listOf(
        content(role = "user") { text("Hello, I have 2 dogs in my house.") },
        content(role = "model") { text("Great to meet you. What would you like to know?") }
    )
)

scope.launch {
   val response = chat.sendMessage("How many paws are in my house?")
}
Java
Content.Builder userContentBuilder = new Content.Builder();
userContentBuilder.setRole("user");
userContentBuilder.addText("Hello, I have 2 dogs in my house.");
Content userContent = userContentBuilder.build();

// (Optional) create message history
Content.Builder modelContentBuilder = new Content.Builder();
modelContentBuilder.setRole("model");
modelContentBuilder.addText("Great to meet you. What would you like to know?");
Content modelContent = userContentBuilder.build();

List<Content> history = Arrays.asList(userContent, modelContent);

// Initialize the chat
ChatFutures chat = model.startChat(history);

Content.Builder userMessageBuilder = new Content.Builder();
userMessageBuilder.setRole("user");
userMessageBuilder.addText("How many paws are in my house?");
Content userMessage = userMessageBuilder.build();

Executor executor = // ...

ListenableFuture<GenerateContentResponse> response = chat.sendMessage(userMessage);

Futures.addCallback(response, new FutureCallback<GenerateContentResponse>() {
    @Override
    public void onSuccess(GenerateContentResponse result) {
        String resultText = result.getText();
    }

    @Override
    public void onFailure(Throwable t) {
        t.printStackTrace();
    }
}, executor);
流式传输响应
通过使用流处理部分结果,而不是等待模型生成完整结果,您可以实现更快的交互。使用 generateContentStream() 来流式传输响应。
Kotlin
someScope.launch {
  var outputContent = ""

  generativeModel.generateContentStream(inputContent)
    .collect { response ->
      outputContent += response.text
    }
}
Java
// In Java, the method generateContentStream() returns a Publisher
// from the Reactive Streams library.
// https://www.reactive-streams.org/

Publisher<GenerateContentResponse> streamingResponse =
    model.generateContentStream(content);

StringBuilder outputContent = new StringBuilder();

streamingResponse.subscribe(new Subscriber<GenerateContentResponse>() {
  @Override
  public void onNext(GenerateContentResponse generateContentResponse) {
    String chunk = generateContentResponse.getText();
    outputContent.append(chunk);
  }

    @Override
    public void onComplete() {
        // ...
    }

    @Override
    public void onError(Throwable t) {
        t.printStackTrace();
    }

    @Override
    public void onSubscribe(Subscription s) {
       s.request(Long.MAX_VALUE);  // Request all messages
 }
});
Android Studio
Android Studio 提供了其他工具来帮助您入门。
- Gemini API 入门模板:此入门模板可帮助您直接从 Android Studio 创建 API 密钥,并生成一个包含使用 Gemini API 所需 Android 依赖项的项目。
- 生成式 AI 示例:此示例允许您在 Android Studio 中导入 Google AI 客户端 SDK for Android 示例应用。
后续步骤
- 在 GitHub 上查看 Google AI 客户端 SDK for Android 的 示例应用。
- 在 官方 Google AI 文档 中详细了解 Google AI 客户端 SDK。