
1. 准备工作
本实践 Codelab 将教您面向双屏和可折叠设备开发应用的基础知识。完成此 Codelab 后,您的应用可以支持 Pixel Fold、Microsoft Surface Duo、Samsung Galaxy Z Fold 5 等可折叠设备。
前提条件
要完成本 Codelab,您需要具备以下条件:
- 具有构建 Android 应用的经验
- 具有使用 Activities、Fragments、视图绑定和 XML 布局的经验
您将做什么
创建一个简单的应用,用于
- 显示设备特性
- 检测应用何时在可折叠或双屏设备上运行
- 确定设备状态
- 使用 Jetpack WindowManager 以处理新的外形规格设备。
您需要准备什么
- Android Studio Arctic Fox 或更高版本
- 可折叠设备或模拟器
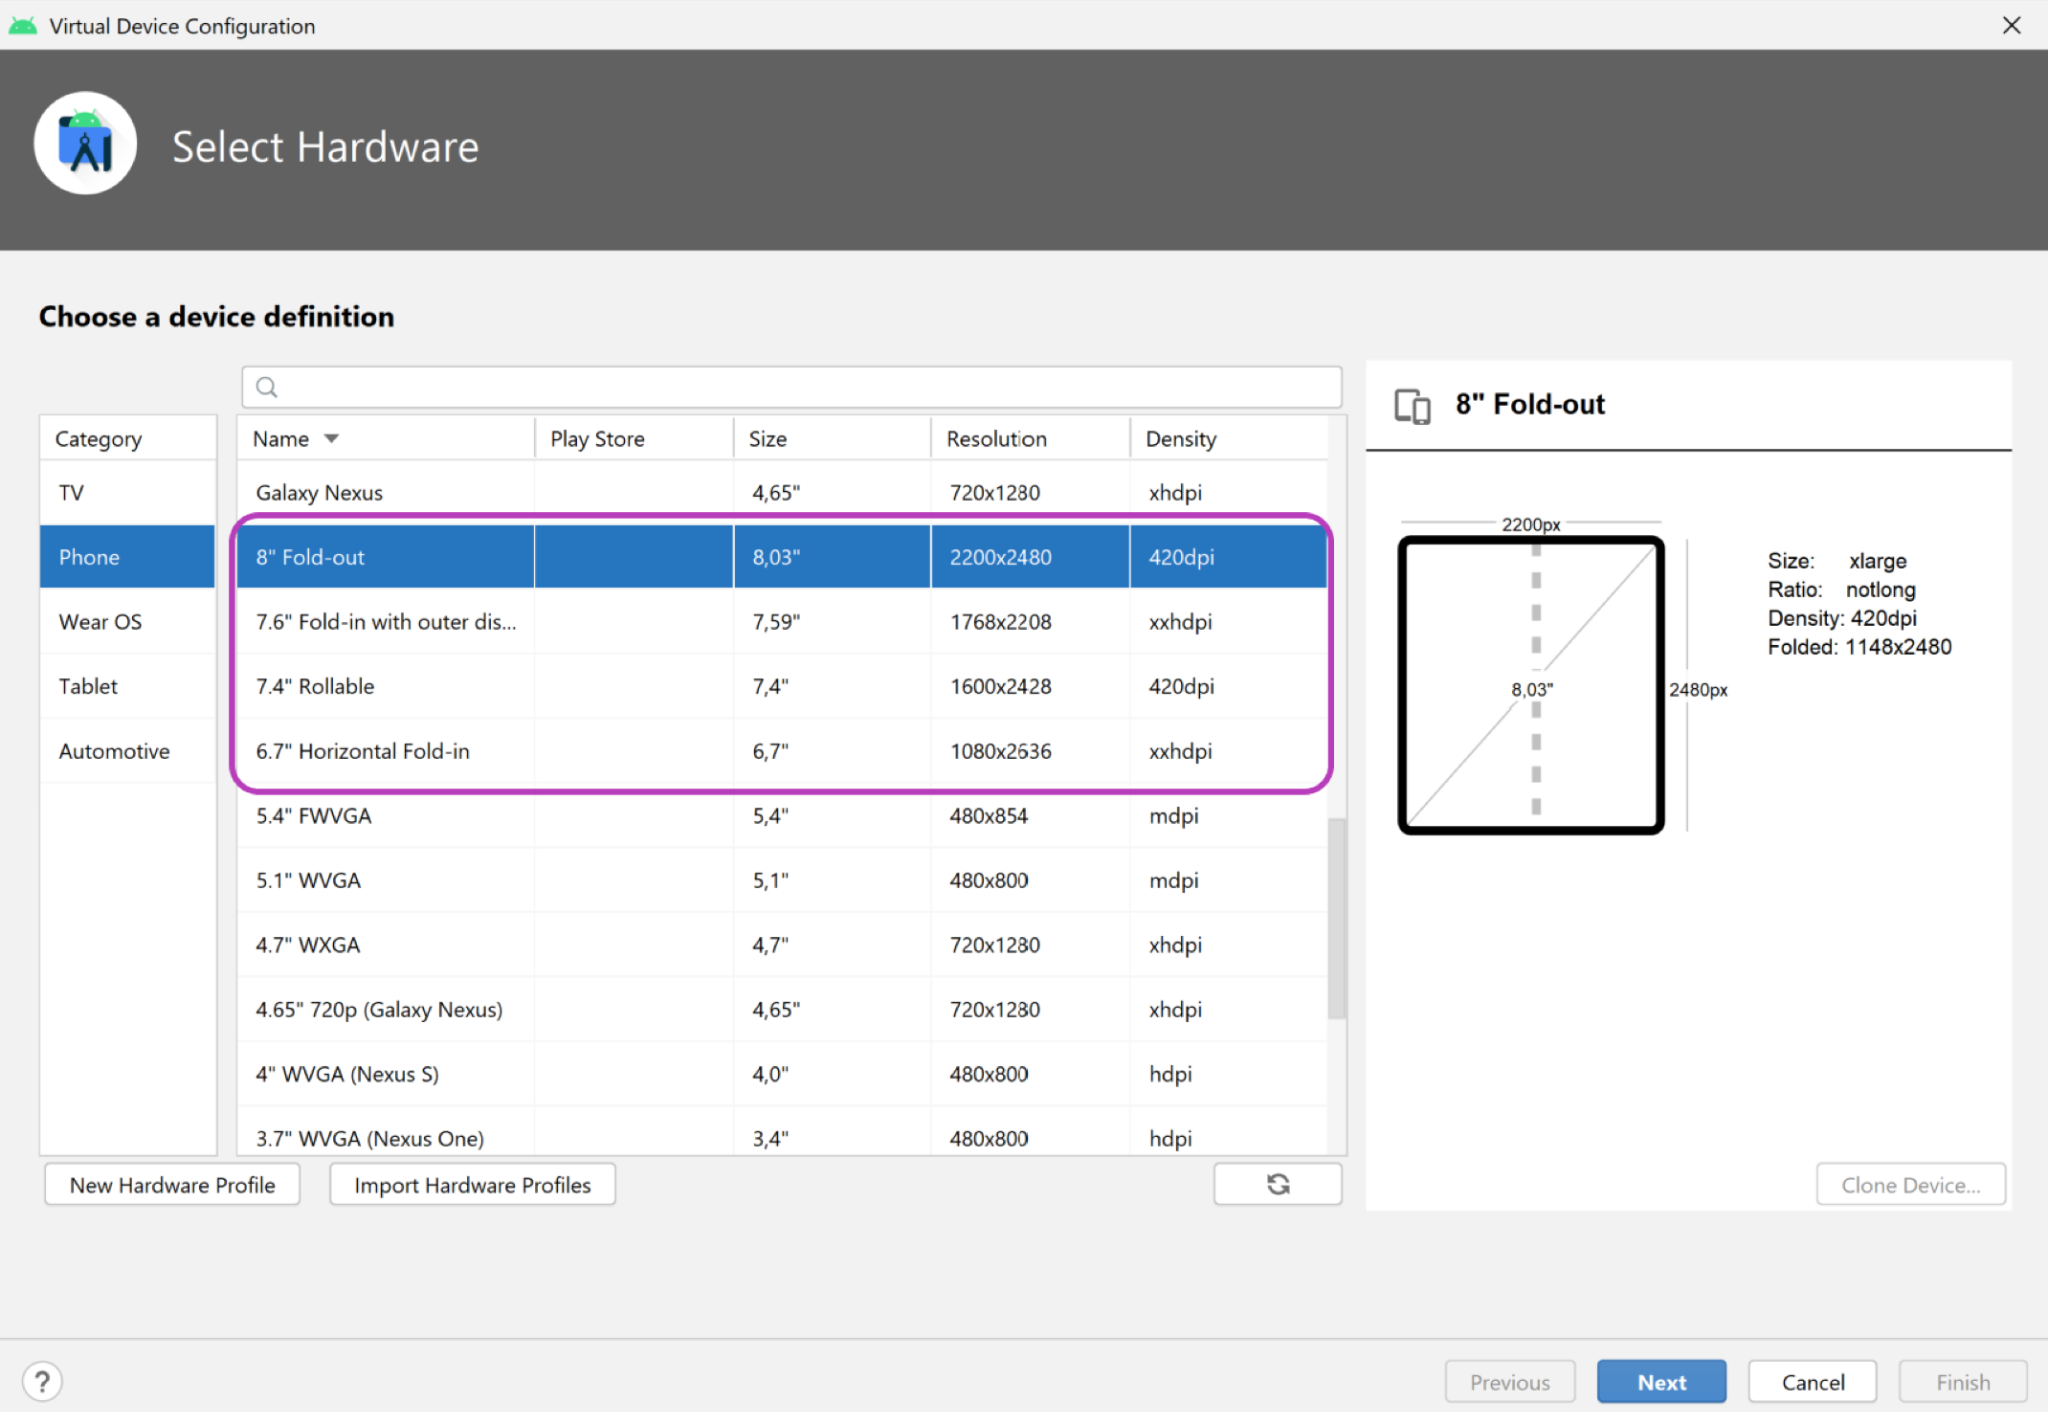
Android Emulator v30.0.6+ 支持可折叠设备,包括虚拟铰链传感器和 3D 视图。您可以像下图所示,使用一些可折叠设备模拟器
- 如果您想使用双屏设备模拟器,您可以下载适用于您平台的 Microsoft Surface Duo 模拟器(Windows、MacOS 或 GNU/Linux)。
2. 单屏设备与可折叠设备
与现有的移动设备相比,可折叠设备为用户提供了更大的屏幕和更通用的用户界面。折叠时,这些设备通常比普通尺寸的平板电脑更小,使其更便携、更实用。
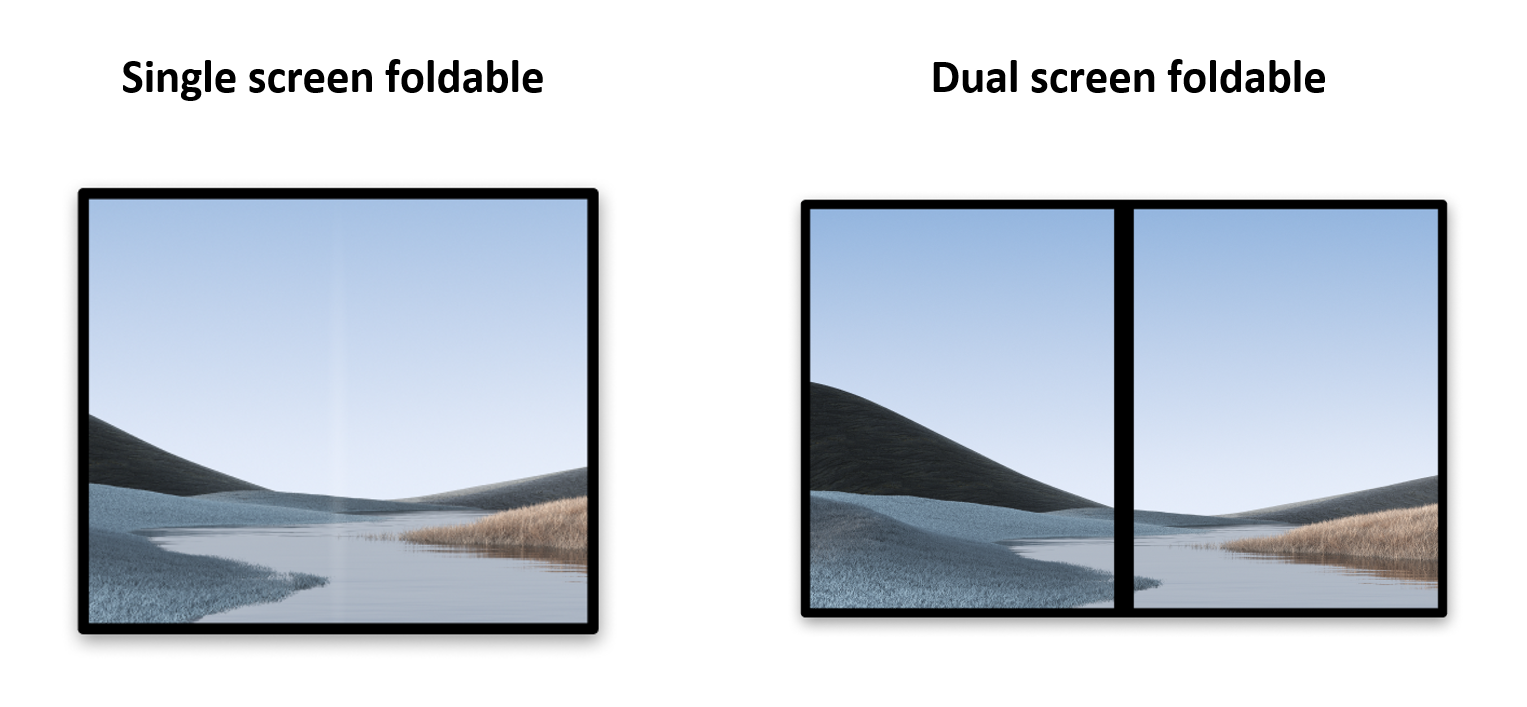
截至本文撰写之时,可折叠设备有两种类型:
- 单屏可折叠设备,拥有一块可折叠的屏幕。用户可以使用
多窗口模式在同一屏幕上同时运行多个应用。 - 双屏可折叠设备,由铰链连接两块屏幕。这些设备也可以折叠,但它们有两个不同的逻辑显示区域。
与平板电脑和其他单屏移动设备一样,可折叠设备可以
- 在一个显示区域中运行一个应用。
- 并排运行两个应用,每个应用位于不同的显示区域(使用
多窗口模式)。
与单屏设备不同,可折叠设备还支持不同的姿势。可以使用姿势以不同方式显示内容。
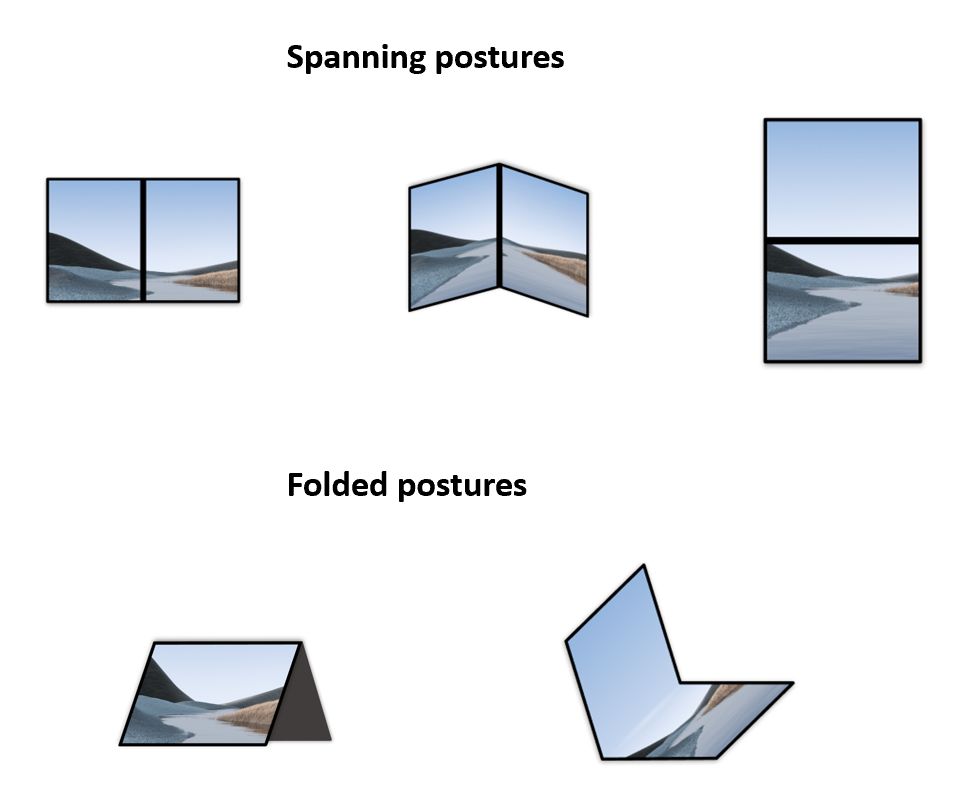
当应用跨越整个显示区域(在双屏可折叠设备上使用所有显示区域)展开(显示)时,可折叠设备可以提供不同的展开姿势。
可折叠设备还可以提供折叠姿势,例如桌面模式,这样您可以在平放屏幕的部分和向您倾斜的部分之间进行逻辑分割;以及帐篷模式,这样您就可以像设备使用了支架一样查看内容。
3. Jetpack WindowManager
Jetpack WindowManager 库帮助应用开发者支持新的设备外形规格,并为新旧平台版本上的各种 WindowManager 功能提供通用的 API 接口。
主要特性
Jetpack WindowManager 1.1.0 版本包含 FoldingFeature 类,用于描述柔性显示屏中的折叠或两个物理显示面板之间的铰链。其 API 提供对设备相关重要信息的访问权限:
state():从定义的姿势列表(FLAT和HALF_OPENED)中提供设备的当前姿势isSeparating():计算FoldingFeature是否应被视为将窗口分割成用户可以视作逻辑上独立的多个物理区域occlusionType():计算遮挡模式以确定FoldingFeature是否遮挡了窗口的一部分。orientation():如果FoldingFeature的宽度大于高度,则返回FoldingFeature.Orientation.HORIZONTAL;否则,返回FoldingFeature.Orientation.VERTICAL。bounds():提供一个Rect实例,其中包含设备特性的边界,例如物理铰链的边界。
使用 WindowInfoTracker 接口,您可以访问 windowLayoutInfo() 以收集包含所有可用 DisplayFeature 的 Flow 类型的 WindowLayoutInfo。
4. 设置
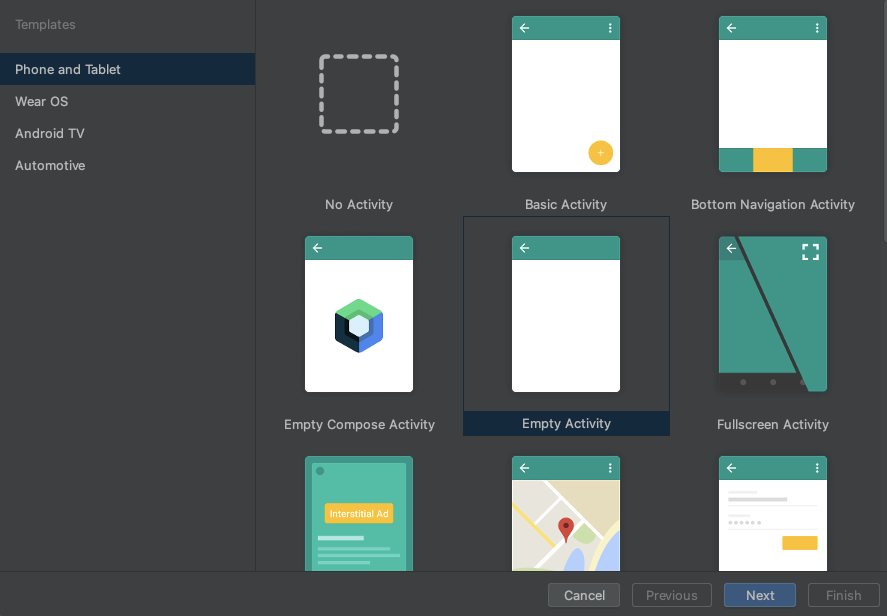
创建一个新项目并选择“空 Activity”模板
所有参数保持默认值。
声明依赖项
为了使用 Jetpack WindowManager,请在应用或模块的 build.gradle 文件中添加依赖项
app/build.gradle
dependencies {
    ext.windowmanager_version = "1.1.0"

    implementation "androidx.window:window:$windowmanager_version"
    androidTestImplementation "androidx.window:window-testing:$windowmanager_version"

    // Needed to use lifecycleScope to collect the WindowLayoutInfo flow
    implementation "androidx.lifecycle:lifecycle-runtime-ktx:2.6.2"
}
使用 WindowManager
窗口特性可以通过 WindowManager 的 WindowInfoTracker 接口访问。
打开 MainActivity.kt 源文件并调用 WindowInfoTracker.getOrCreate(this@MainActivity) 来初始化与当前 Activity 关联的 WindowInfoTracker 实例
MainActivity.kt
import androidx.window.layout.WindowInfoTracker

private lateinit var windowInfoTracker: WindowInfoTracker

override fun onCreate(savedInstanceState: Bundle?) {
        super.onCreate(savedInstanceState)

        windowInfoTracker = WindowInfoTracker.getOrCreate(this@MainActivity)
}
使用 WindowInfoTracker 实例,获取设备的当前窗口状态信息。
5. 设置应用界面
从 Jetpack WindowManager 获取有关窗口指标、布局和显示配置的信息。在主 activity 布局中显示这些信息,为每个信息使用一个 TextView。
创建一个 ConstraintLayout,包含三个 TextView,并在屏幕上居中显示。
打开 activity_main.xml 文件并粘贴以下内容
activity_main.xml
<?xml version="1.0" encoding="utf-8"?>
<androidx.constraintlayout.widget.ConstraintLayout xmlns:android="http://schemas.android.com/apk/res/android"
   xmlns:app="http://schemas.android.com/apk/res-auto"
   xmlns:tools="http://schemas.android.com/tools"
   android:id="@+id/constraint_layout"
   android:layout_width="match_parent"
   android:layout_height="match_parent"
   tools:context=".MainActivity">

    <TextView
        android:id="@+id/window_metrics"
        android:layout_width="wrap_content"
        android:layout_height="wrap_content"
        android:padding="20dp"
        tools:text="Window metrics"
        android:textSize="20sp"
        app:layout_constraintBottom_toTopOf="@+id/layout_change"
        app:layout_constraintStart_toStartOf="parent"
        app:layout_constraintTop_toTopOf="parent"
        app:layout_constraintVertical_chainStyle="packed" />

    <TextView
        android:id="@+id/layout_change"
        android:layout_width="wrap_content"
        android:layout_height="wrap_content"
        android:padding="20dp"
        tools:text="Layout change"
        android:textSize="20sp"
        app:layout_constrainedWidth="true"
        app:layout_constraintBottom_toTopOf="@+id/configuration_changed"
        app:layout_constraintStart_toStartOf="parent"
        app:layout_constraintTop_toBottomOf="@+id/window_metrics" />

    <TextView
        android:id="@+id/configuration_changed"
        android:layout_width="wrap_content"
        android:layout_height="wrap_content"
        android:padding="20dp"
        tools:text="Using one logic/physical display - unspanned"
        android:textSize="20sp"
        app:layout_constraintBottom_toBottomOf="parent"
        app:layout_constraintStart_toStartOf="parent"
        app:layout_constraintTop_toBottomOf="@+id/layout_change" />

</androidx.constraintlayout.widget.ConstraintLayout>
现在我们将使用视图绑定在代码中连接这些 UI 元素。为此,我们首先在应用的 build.gradle 文件中启用它
app/build.gradle
android {
   // Other configurations

   buildFeatures {
      viewBinding true
   }
}
按照 Android Studio 的建议同步 gradle 项目,并在 MainActivity.kt 中使用以下代码使用视图绑定
MainActivity.kt
class MainActivity : AppCompatActivity() {
    private lateinit var windowInfoTracker: WindowInfoTracker
    private lateinit var binding: ActivityMainBinding

    override fun onCreate(savedInstanceState: Bundle?) {
        super.onCreate(savedInstanceState)
        binding = ActivityMainBinding.inflate(layoutInflater)
        setContentView(binding.root)

        windowInfoTracker = WindowInfoTracker.getOrCreate(this@MainActivity)
    }
}
6. 可视化 WindowMetrics 信息
在 MainActivity 的 onCreate 方法中,调用一个函数来获取和显示 WindowMetrics 信息。在 onCreate 方法中添加一个 obtainWindowMetrics() 调用
MainActivity.kt
override fun onCreate(savedInstanceState: Bundle?) {
   super.onCreate(savedInstanceState)
   binding = ActivityMainBinding.inflate(layoutInflater)
   setContentView(binding.root)

   windowInfoTracker = WindowInfoTracker.getOrCreate(this@MainActivity)

   obtainWindowMetrics()
}
实现 obtainWindowMetrics 方法
MainActivity.kt
import androidx.window.layout.WindowMetricsCalculator

private fun obtainWindowMetrics() {
   val wmc = WindowMetricsCalculator.getOrCreate()
   val currentWM = wmc.computeCurrentWindowMetrics(this).bounds.flattenToString()
   val maximumWM = wmc.computeMaximumWindowMetrics(this).bounds.flattenToString()
   binding.windowMetrics.text =
       "CurrentWindowMetrics: ${currentWM}\nMaximumWindowMetrics: ${maximumWM}"
}
通过其伴生函数 getOrCreate() 获取 WindowMetricsCalculator 的实例。
使用该 WindowMetricsCalculator 实例,将信息设置到 windowMetrics TextView 中。使用函数 computeCurrentWindowMetrics.bounds 和 computeMaximumWindowMetrics.bounds 返回的值。
这些值提供了有关窗口所占区域指标的有用信息。
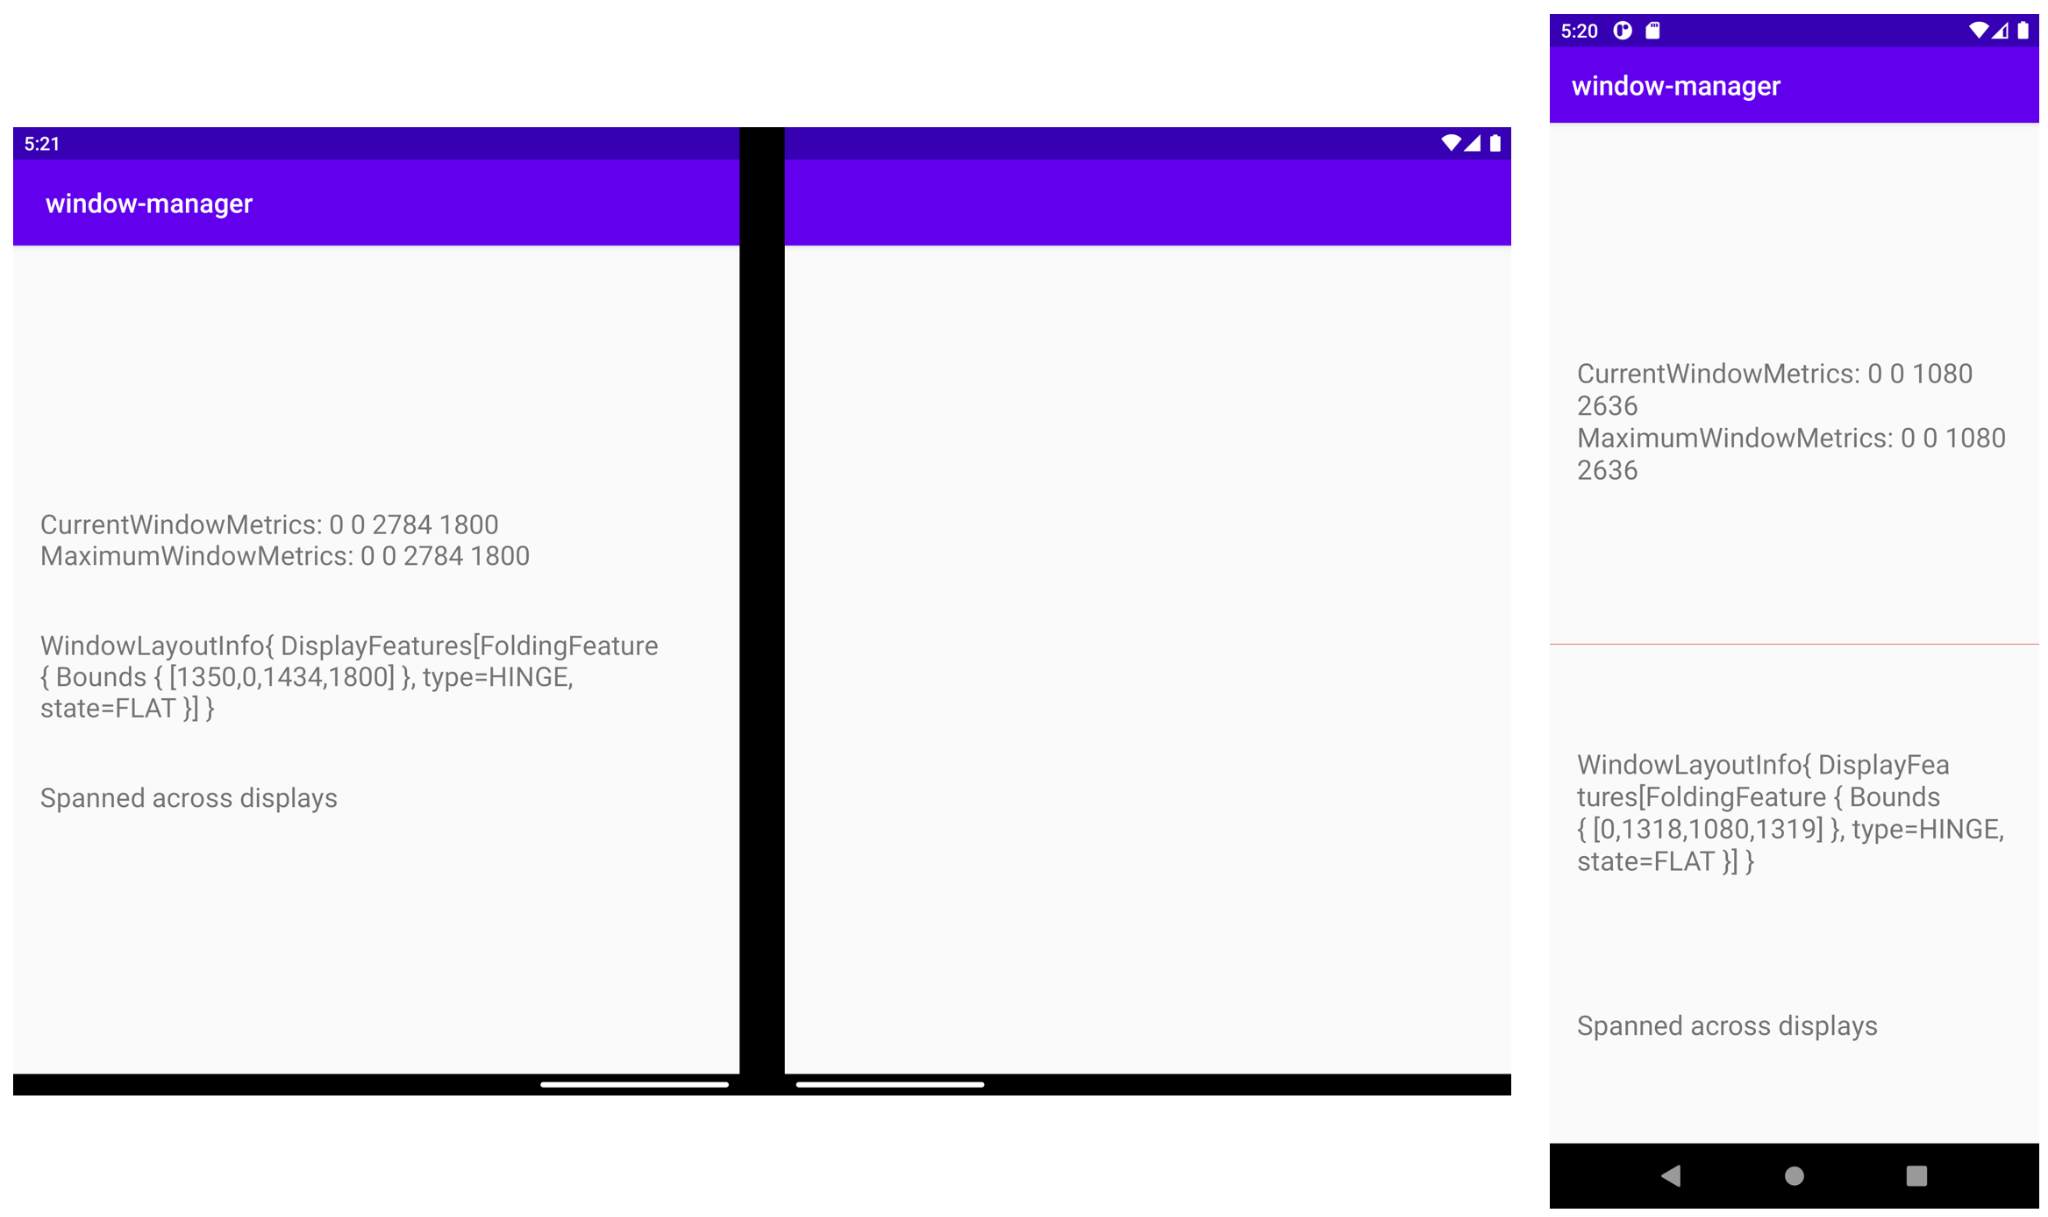
运行应用。在双屏模拟器中(如下图所示),您会获得与该模拟器所模拟的设备的尺寸相符的 CurrentWindowMetrics。您还可以在应用在单屏模式下运行时看到指标

当应用跨显示屏展开时,窗口指标会像下图一样发生变化,从而反映应用使用的更大窗口区域
当前窗口指标和最大窗口指标都具有相同的值,因为应用始终在运行并占据整个可用显示区域,无论是在单屏还是双屏上。
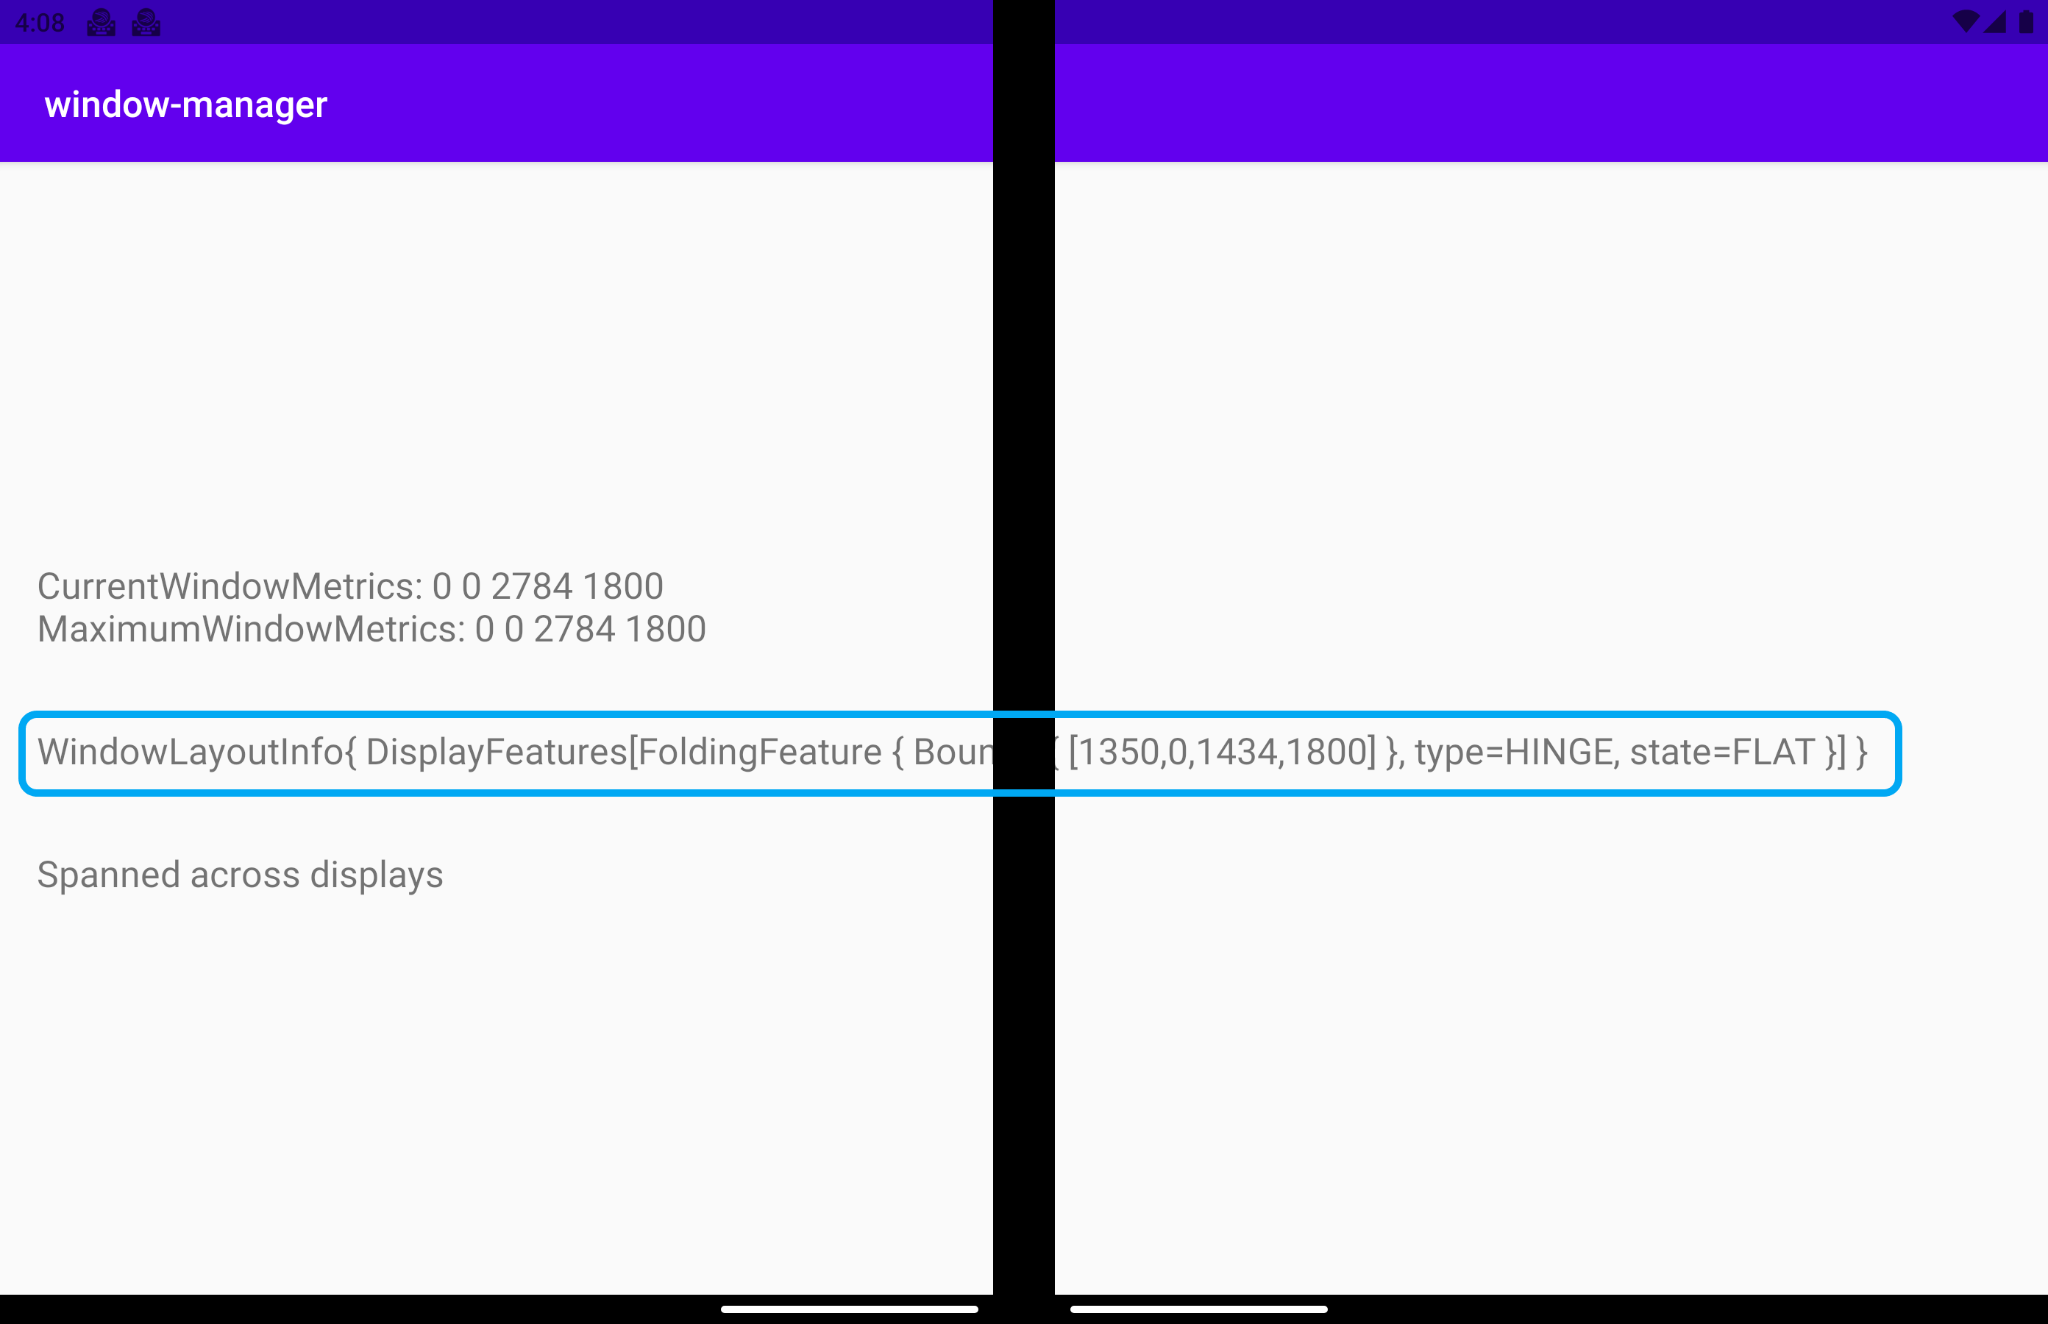
在具有水平折叠的可折叠设备模拟器中,当应用跨越整个物理显示屏运行时以及当应用在多窗口模式下运行时,这些值会有所不同
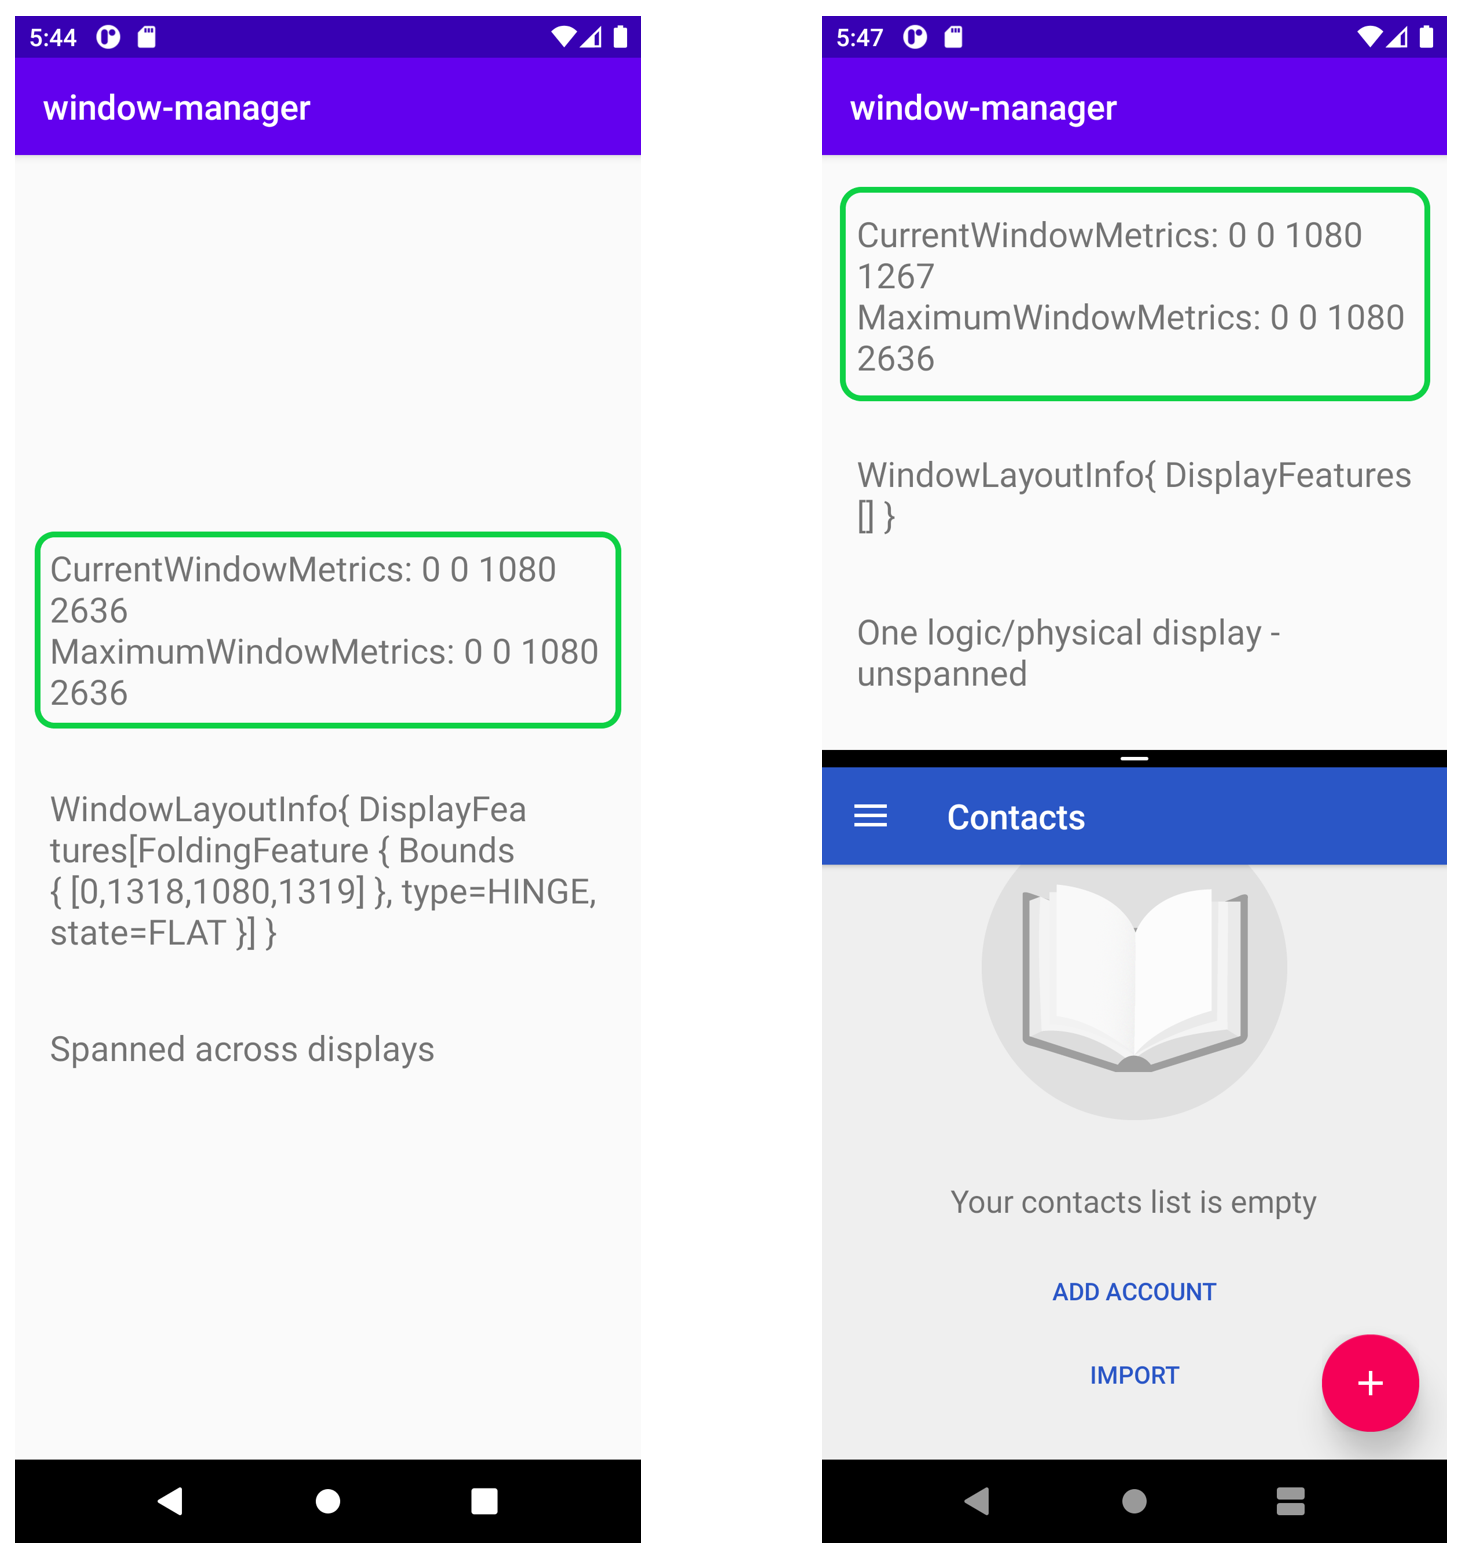
如左侧图像所示,这两个指标具有相同的值,因为正在运行的应用正在使用整个显示区域,即当前和最大的可用区域。
但在右侧图像中,应用在多窗口模式下运行,您可以看到当前指标如何显示应用在该分屏模式的特定区域(顶部)中运行的区域尺寸,并且您可以看到最大指标如何显示设备具有的最大显示区域。
WindowMetricsCalculator 提供的指标对于确定应用正在使用或可以使用的窗口区域非常有用。
7. 可视化 FoldingFeature 信息
现在注册接收窗口布局更改以及模拟器或设备的 DisplayFeatures 的特性和边界信息。
为了从 WindowInfoTracker#windowLayoutInfo() 收集信息,使用为每个 Lifecycle 对象定义的 lifecycleScope。在此范围内启动的任何协程在 Lifecycle 销毁时都会取消。您可以通过 lifecycle.coroutineScope 或 lifecycleOwner.lifecycleScope 属性访问生命周期的协程范围。
在 MainActivity 的 onCreate 方法中,调用一个函数来获取和显示 WindowInfoTracker 信息。首先在 onCreate 方法中添加一个 onWindowLayoutInfoChange() 调用
MainActivity.kt
override fun onCreate(savedInstanceState: Bundle?) {
   super.onCreate(savedInstanceState)
   binding = ActivityMainBinding.inflate(layoutInflater)
   setContentView(binding.root)

   windowInfoTracker = WindowInfoTracker.getOrCreate(this@MainActivity)

   obtainWindowMetrics()
   onWindowLayoutInfoChange()
}
使用该函数的实现来在新的布局配置更改时获取信息。
定义函数签名和框架。
MainActivity.kt
private fun onWindowLayoutInfoChange() {
}
使用函数接收的参数 WindowInfoTracker,获取其 WindowLayoutInfo 数据。WindowLayoutInfo 包含位于窗口内的 DisplayFeature 列表。例如,铰链或显示屏折叠可以穿过窗口,在这种情况下,将可视内容和交互元素分成两组(例如,列表详细信息或视图控件)可能会有意义。
仅报告当前窗口边界内存在的特性。如果窗口在屏幕上移动或调整大小,它们的位置和大小可能会改变。
通过 lifecycle-runtime-ktx 依赖项中定义的 lifecycleScope,获取包含所有显示特性列表的 WindowLayoutInfo 的 flow。添加 onWindowLayoutInfoChange 的主体
MainActivity.kt
import androidx.lifecycle.Lifecycle
import androidx.lifecycle.lifecycleScope
import androidx.lifecycle.repeatOnLifecycle
import kotlinx.coroutines.Dispatchers
import kotlinx.coroutines.flow.collect
import kotlinx.coroutines.launch

private fun onWindowLayoutInfoChange() {
    lifecycleScope.launch(Dispatchers.Main) {
        lifecycle.repeatOnLifecycle(Lifecycle.State.STARTED) {
            windowInfoTracker.windowLayoutInfo(this@MainActivity)
                .collect { value ->
                    updateUI(value)
                }
        }
    }
}
正在从 collect 调用 updateUI 函数。实现此函数以显示和打印从 WindowLayoutInfo 的 flow 接收到的信息。检查 WindowLayoutInfo 数据是否包含显示特性。如果包含,则表示显示特性以某种方式与应用的 UI 交互。如果 WindowLayoutInfo 数据不包含任何显示特性,则表示应用在单屏设备或模式下运行,或者在多窗口模式下运行。
MainActivity.kt
import androidx.window.layout.WindowLayoutInfo

private fun updateUI(newLayoutInfo: WindowLayoutInfo) {
    binding.layoutChange.text = newLayoutInfo.toString()
    if (newLayoutInfo.displayFeatures.isNotEmpty()) {
        binding.configurationChanged.text = "Spanned across displays"
    } else {
        binding.configurationChanged.text = "One logic/physical display - unspanned"
    }
}
运行应用。在双屏模拟器中,您会看到
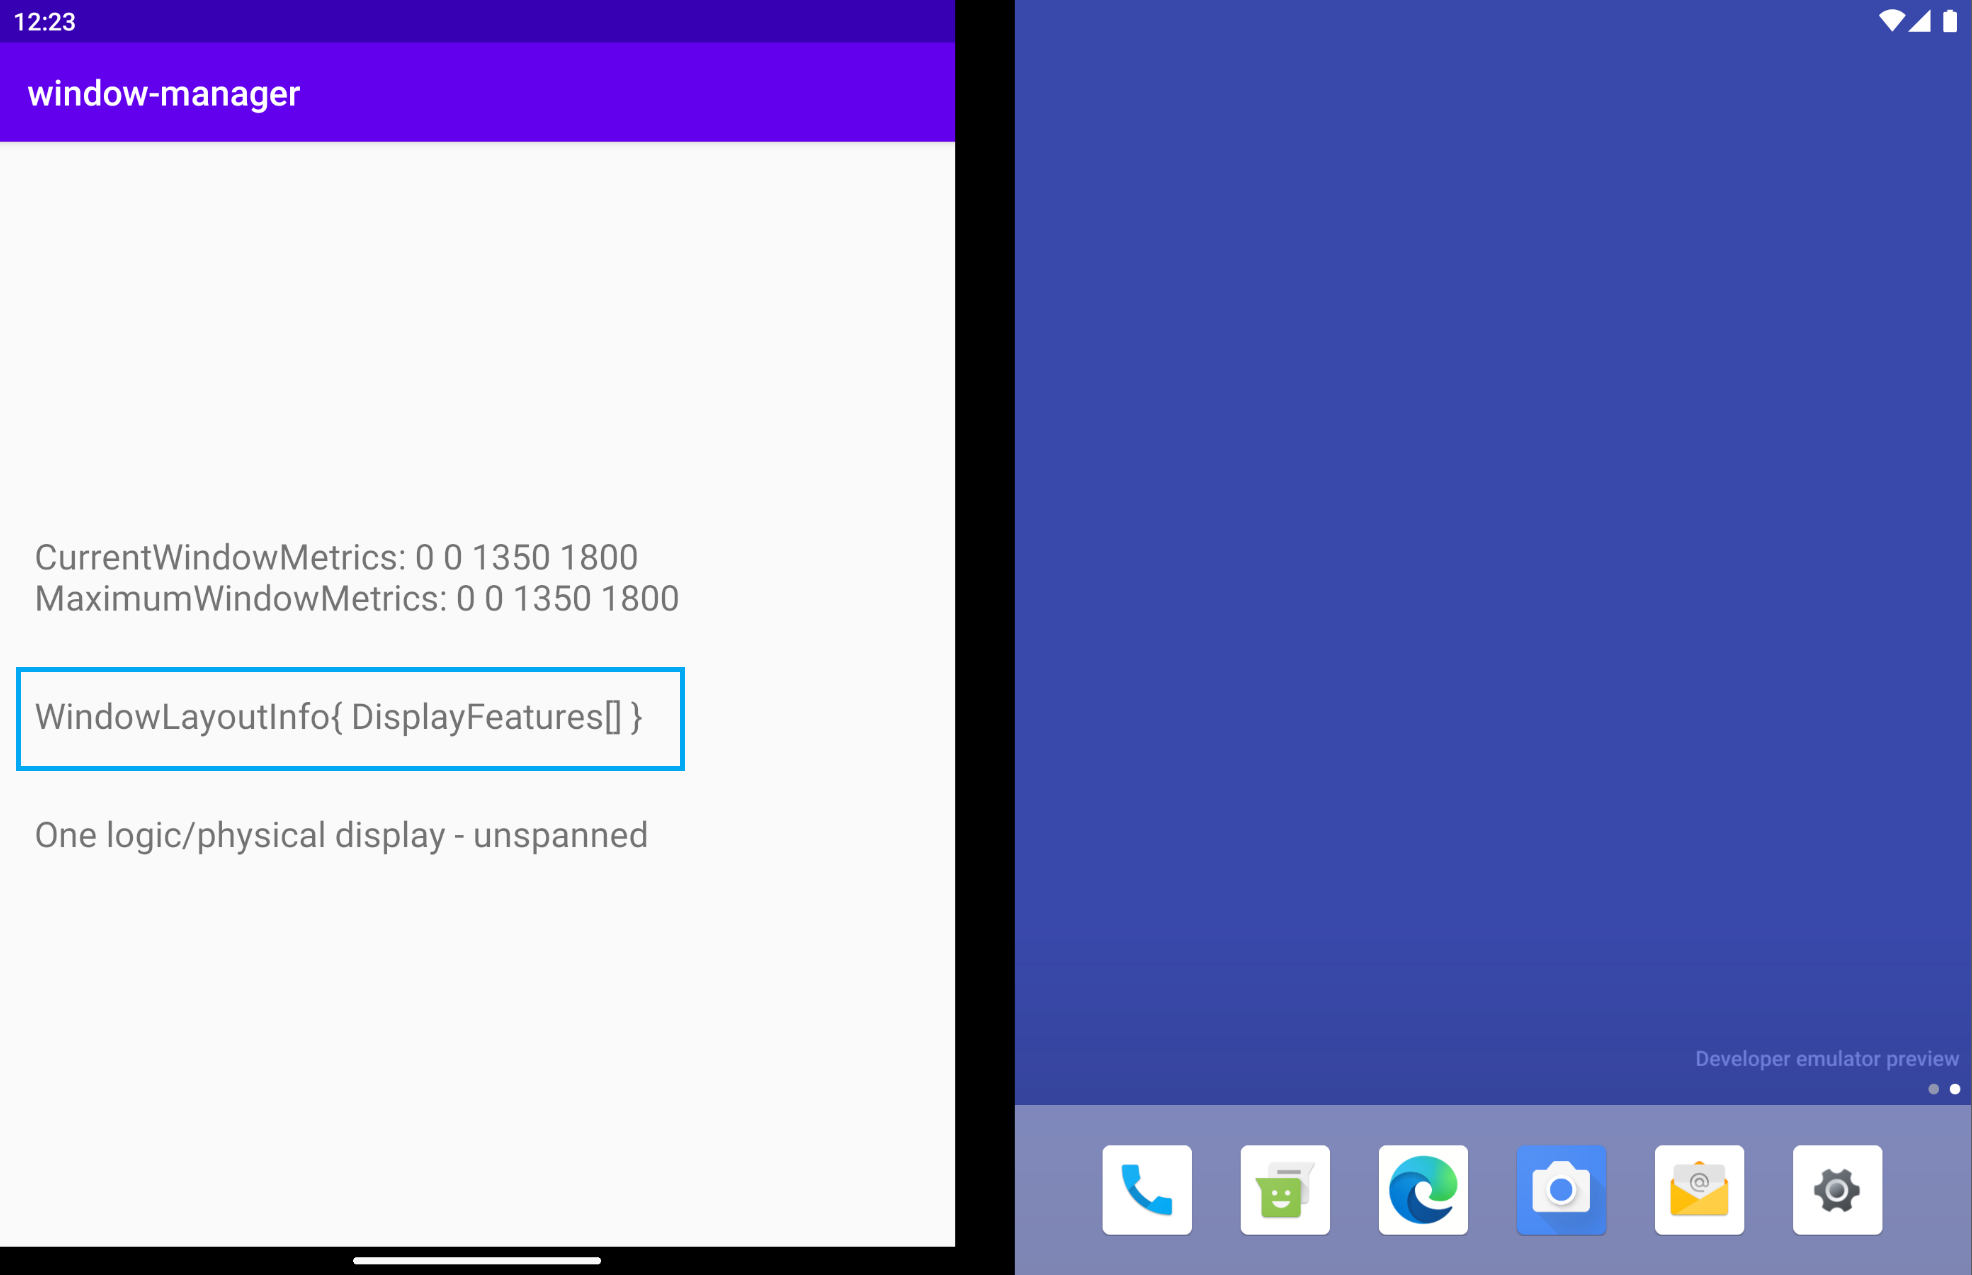
WindowLayoutInfo 为空。它包含一个空的 List<DisplayFeature>。但是,如果模拟器中间有一个铰链,为什么您没有从 WindowManager 获取信息?
WindowManager(通过 WindowInfoTracker)仅在应用跨显示屏(物理或非物理)展开时才提供 WindowLayoutInfo 数据(设备特性类型、设备特性边界和设备姿势)。因此,在之前的图中,应用在单屏模式下运行时,WindowLayoutInfo 为空。
有了这些信息,您就知道应用运行在何种模式下(单屏模式或跨显示屏展开),这样您就可以更改 UI/UX,提供更适合这些特定配置的更佳用户体验。
在没有两个物理显示屏的设备上(它们通常没有物理铰链),应用可以使用多窗口模式并排运行。在这些设备上,当应用在多窗口模式下运行时,它的行为与上一个示例中的单屏应用相同。当应用占据所有逻辑显示屏运行时,它的行为与应用展开时相同。请参见下图
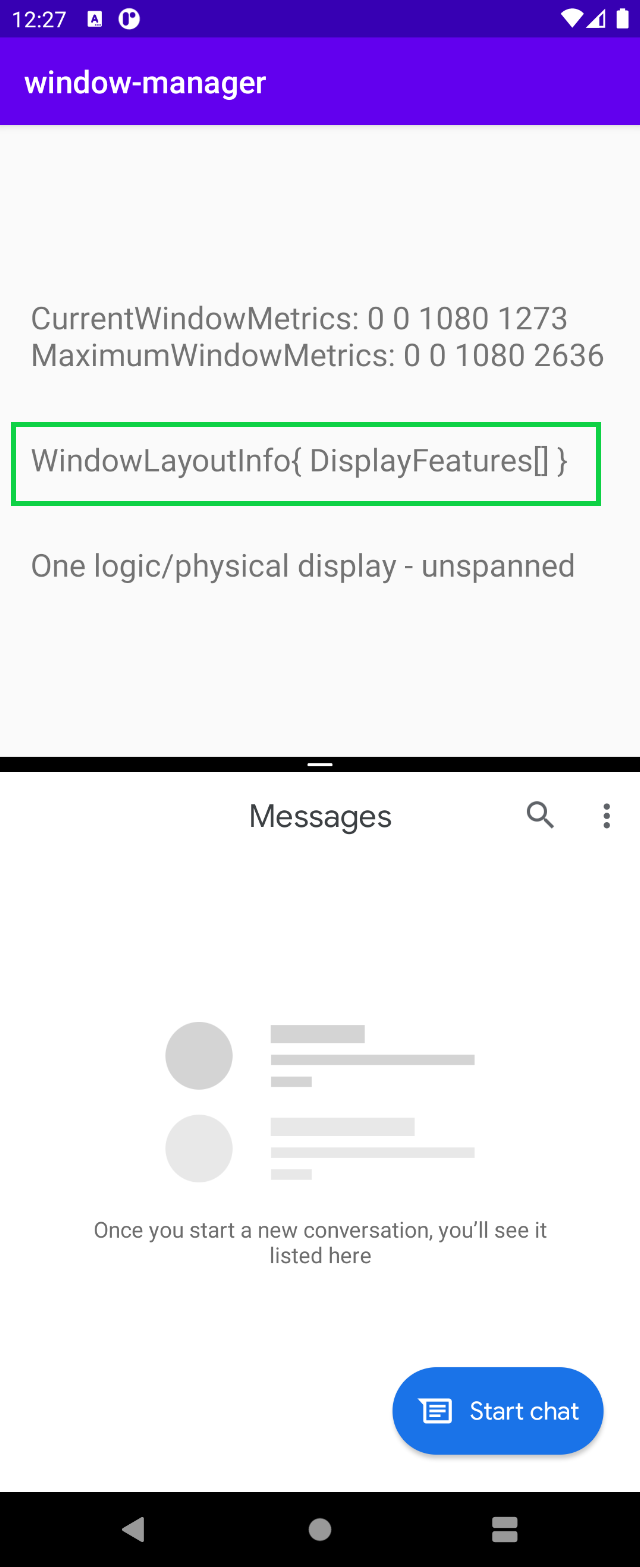
当应用在多窗口模式下运行时,WindowManager 提供一个空的 List<LayoutInfo>。
总而言之,仅当应用运行时占据所有逻辑显示屏并与设备特性(折叠或铰链)相交时,您才会获取 WindowLayoutInfo 数据。在所有其他情况下,您不会获得任何信息。 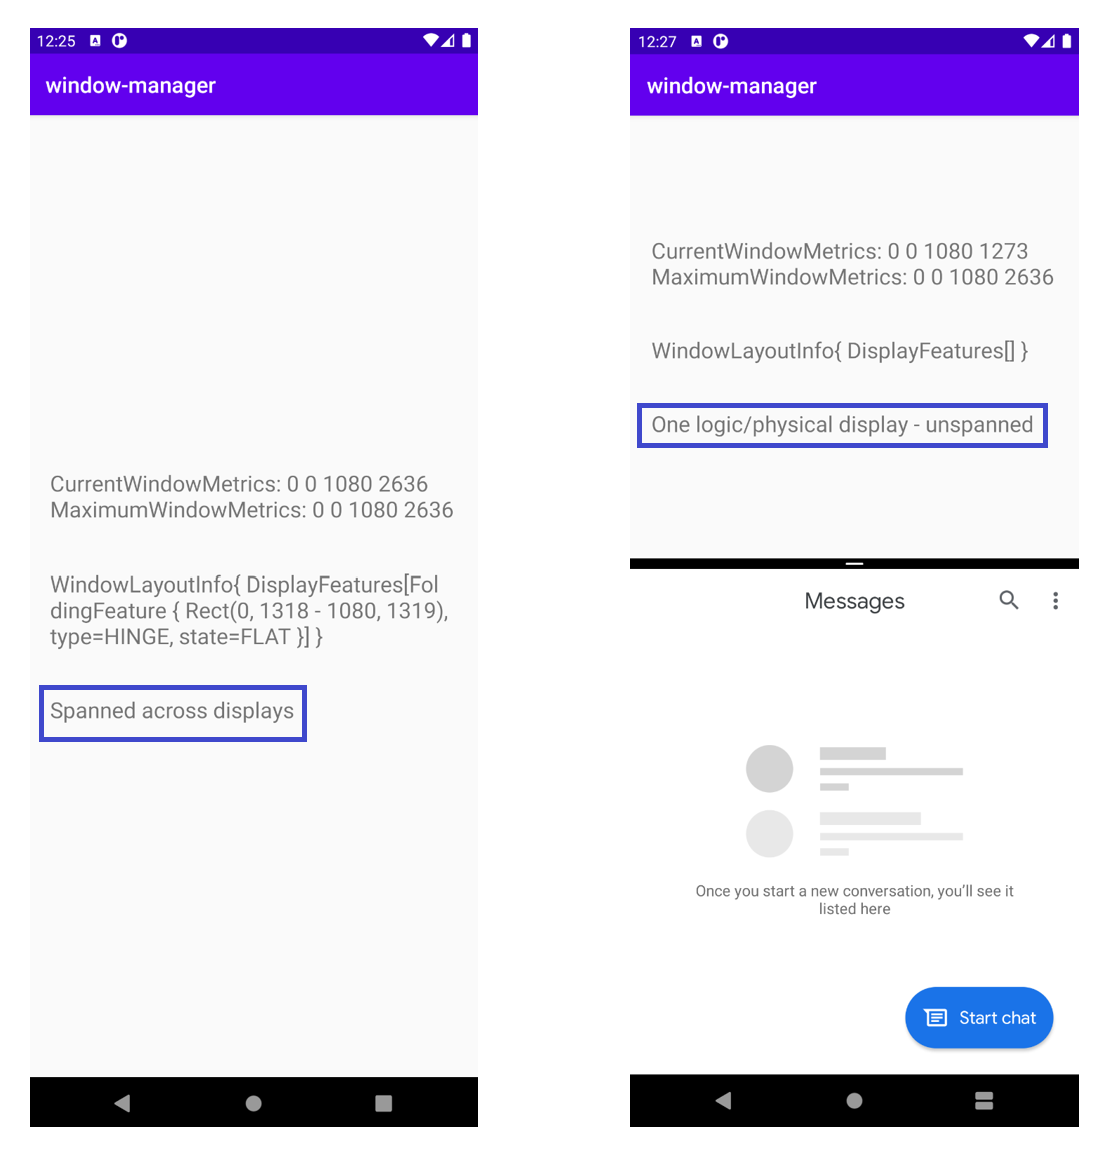
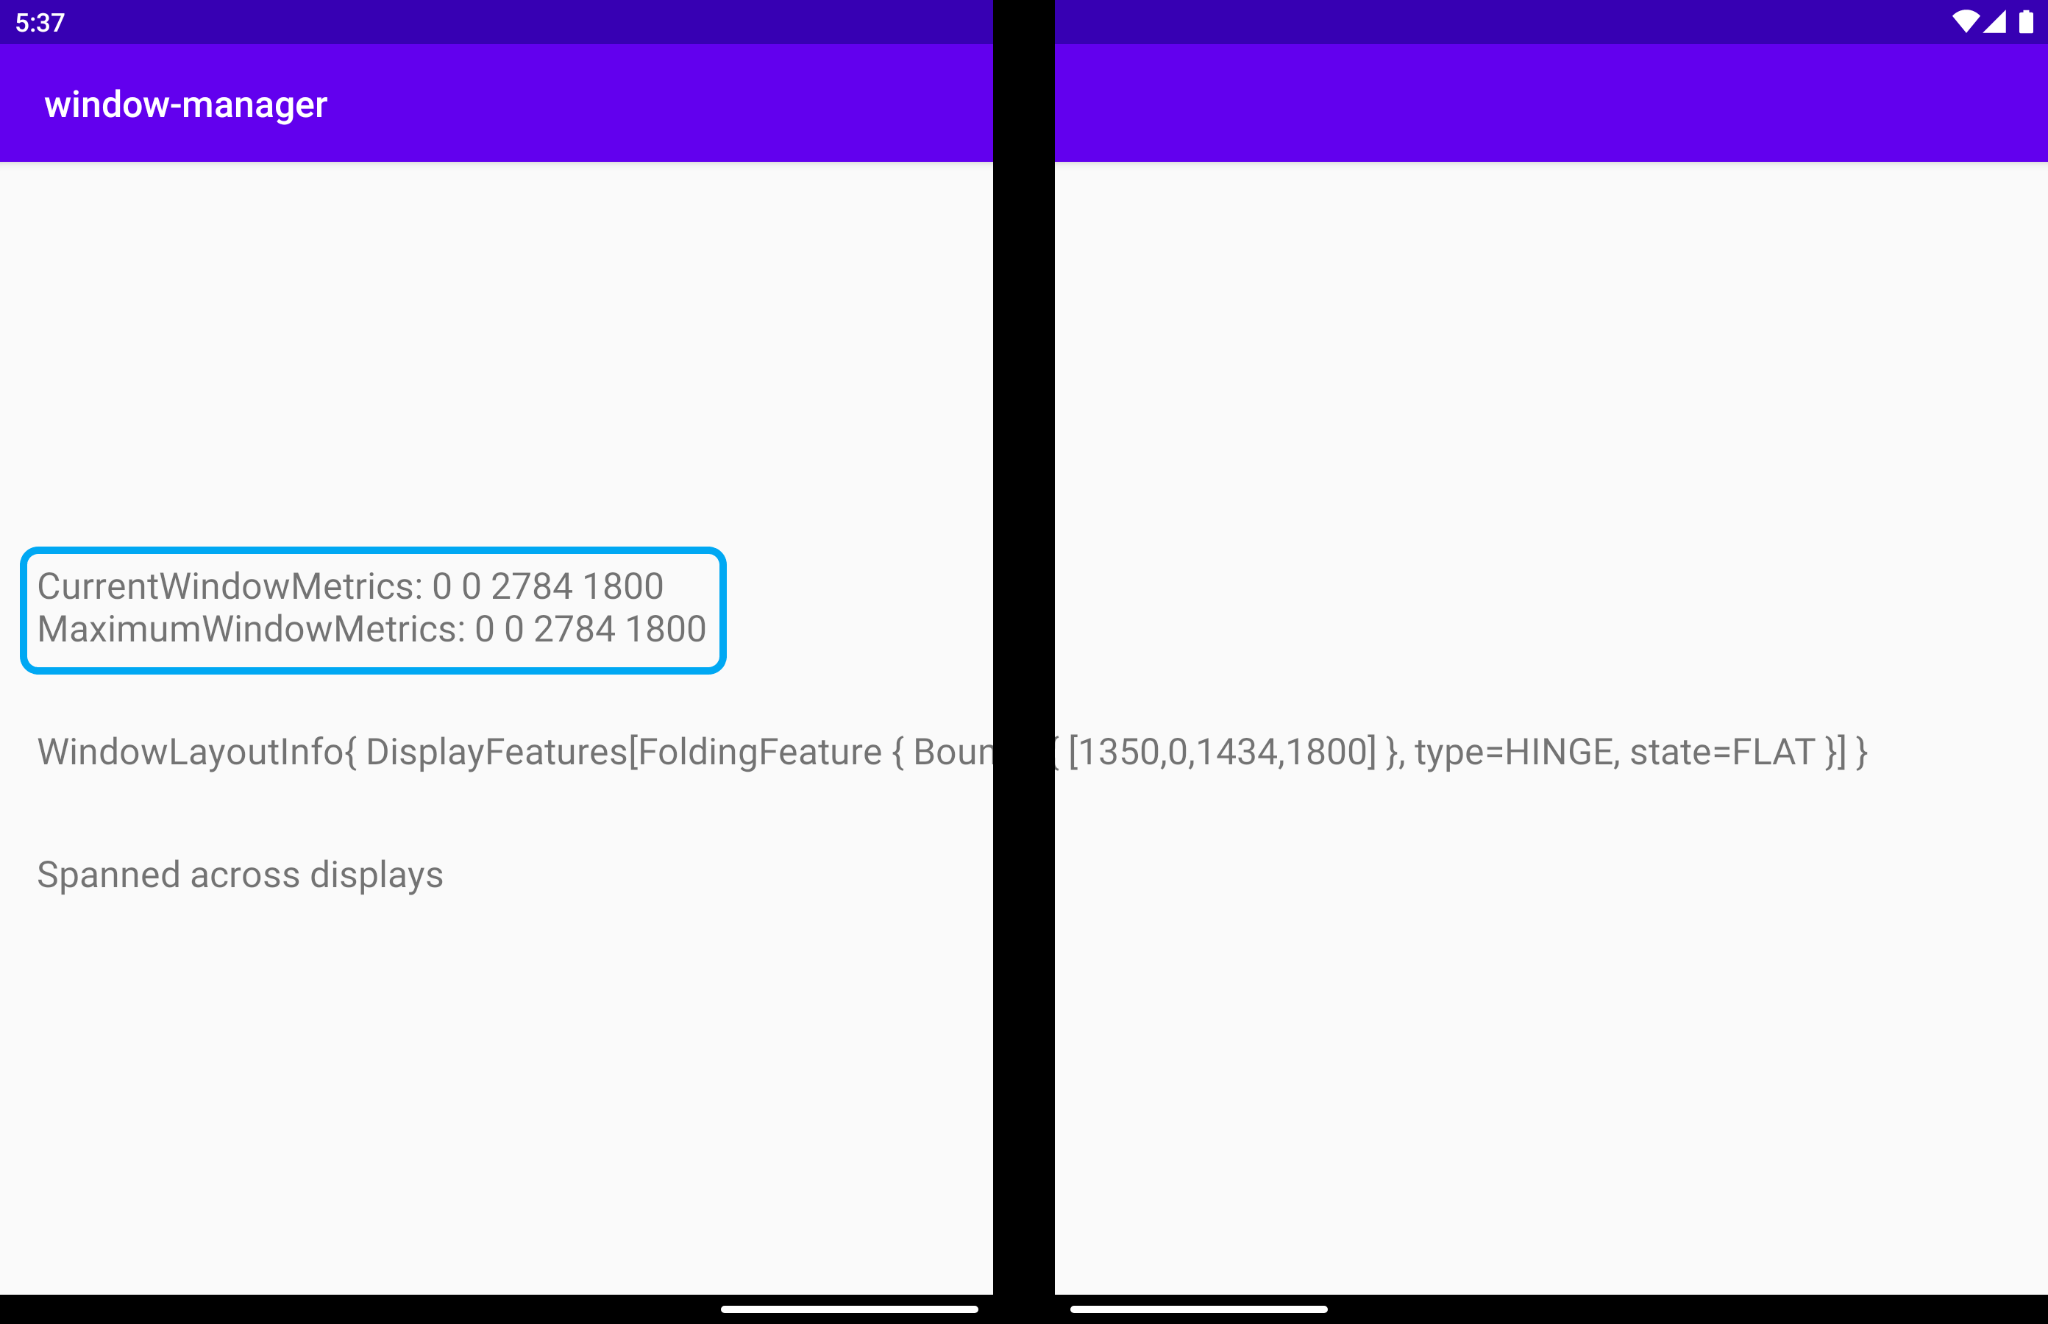
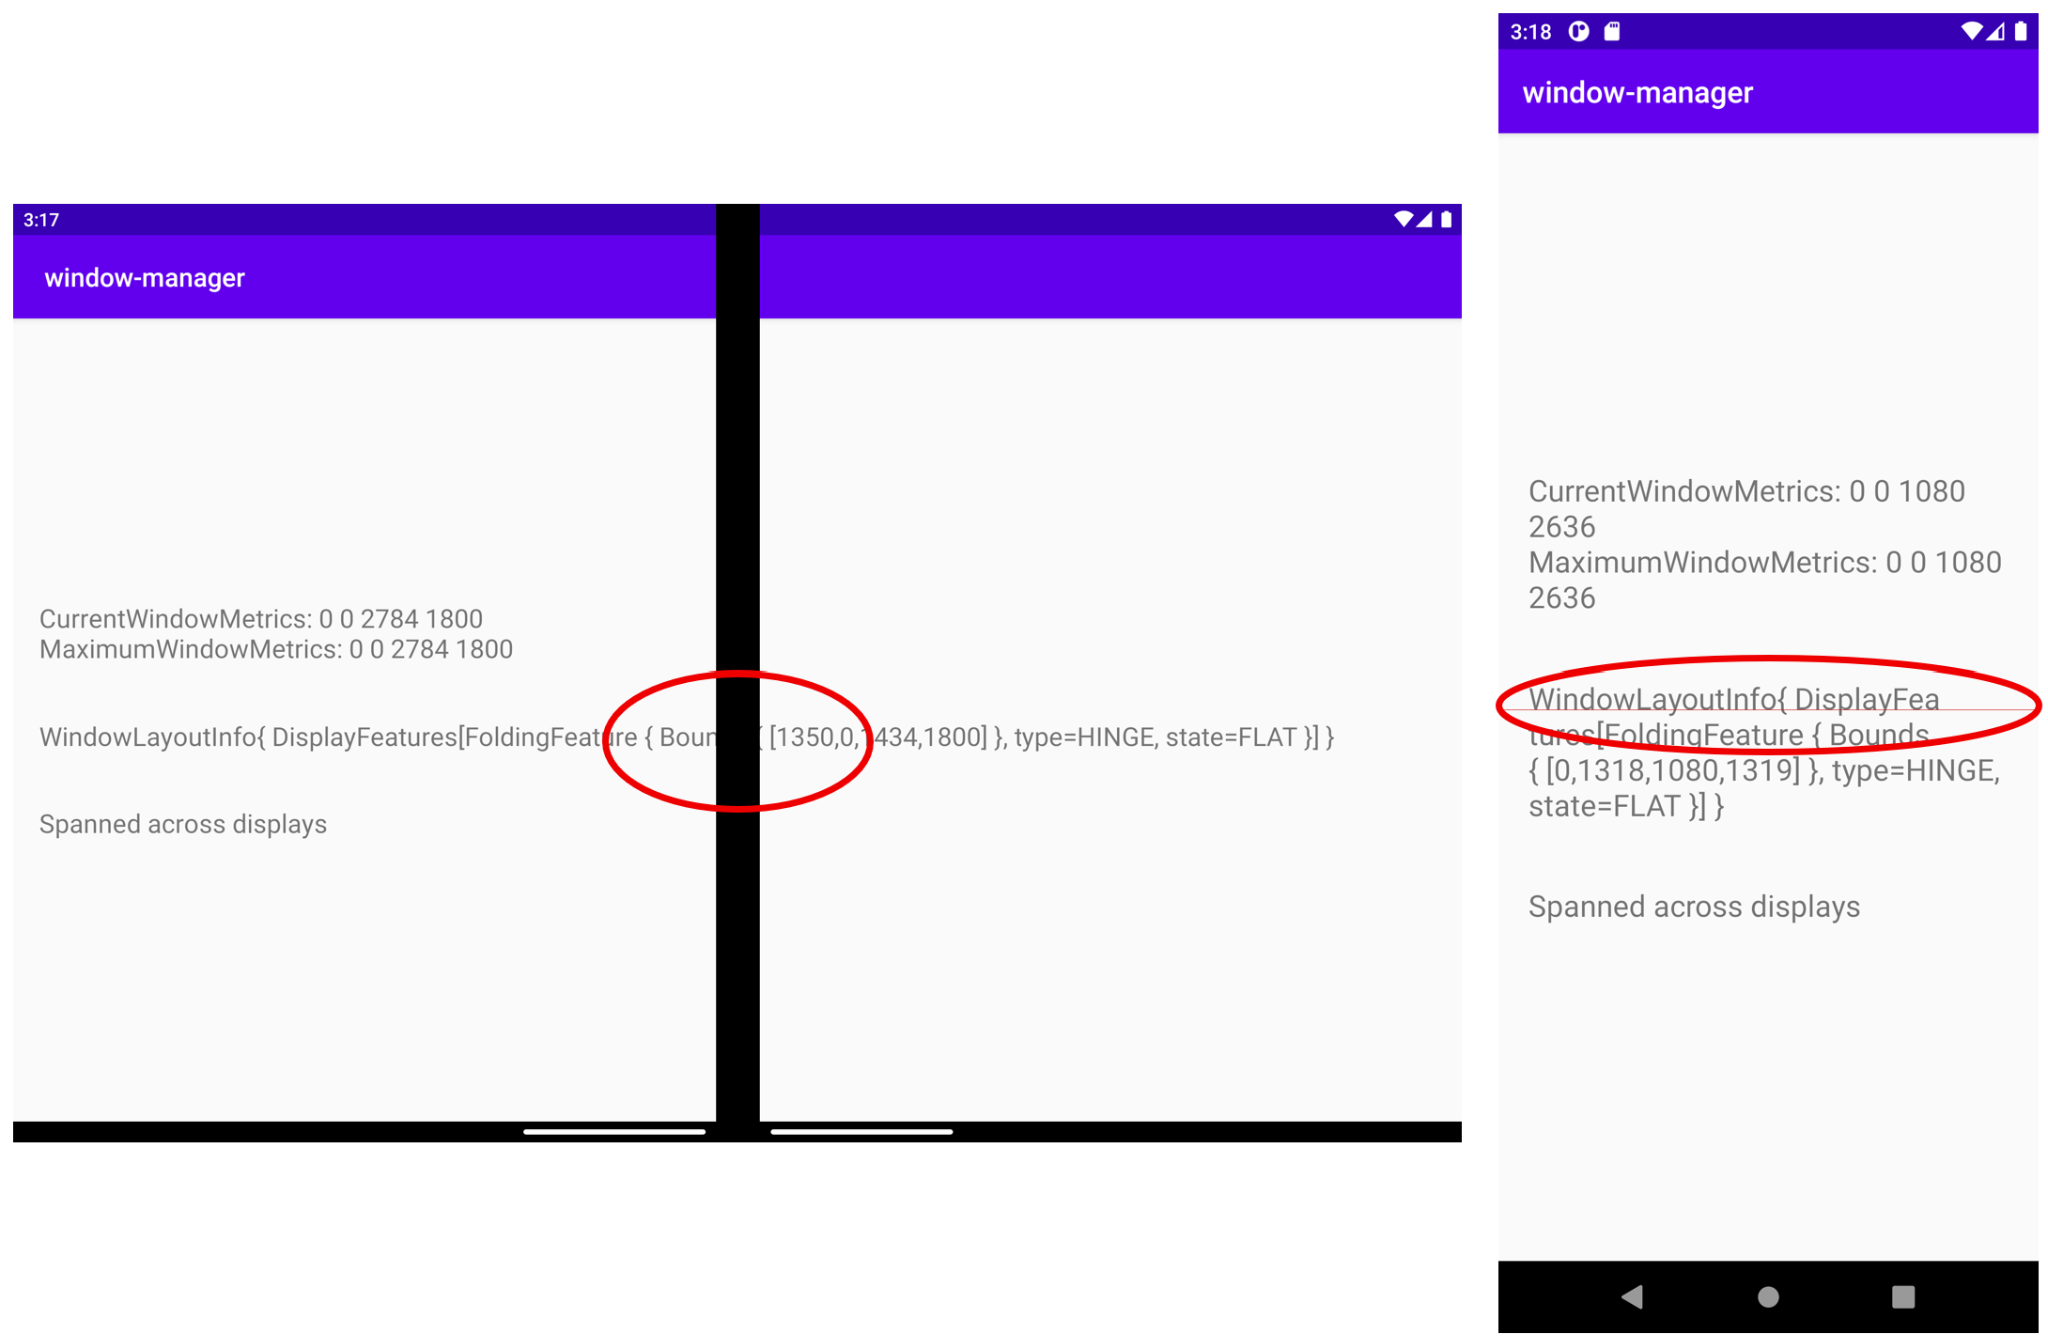
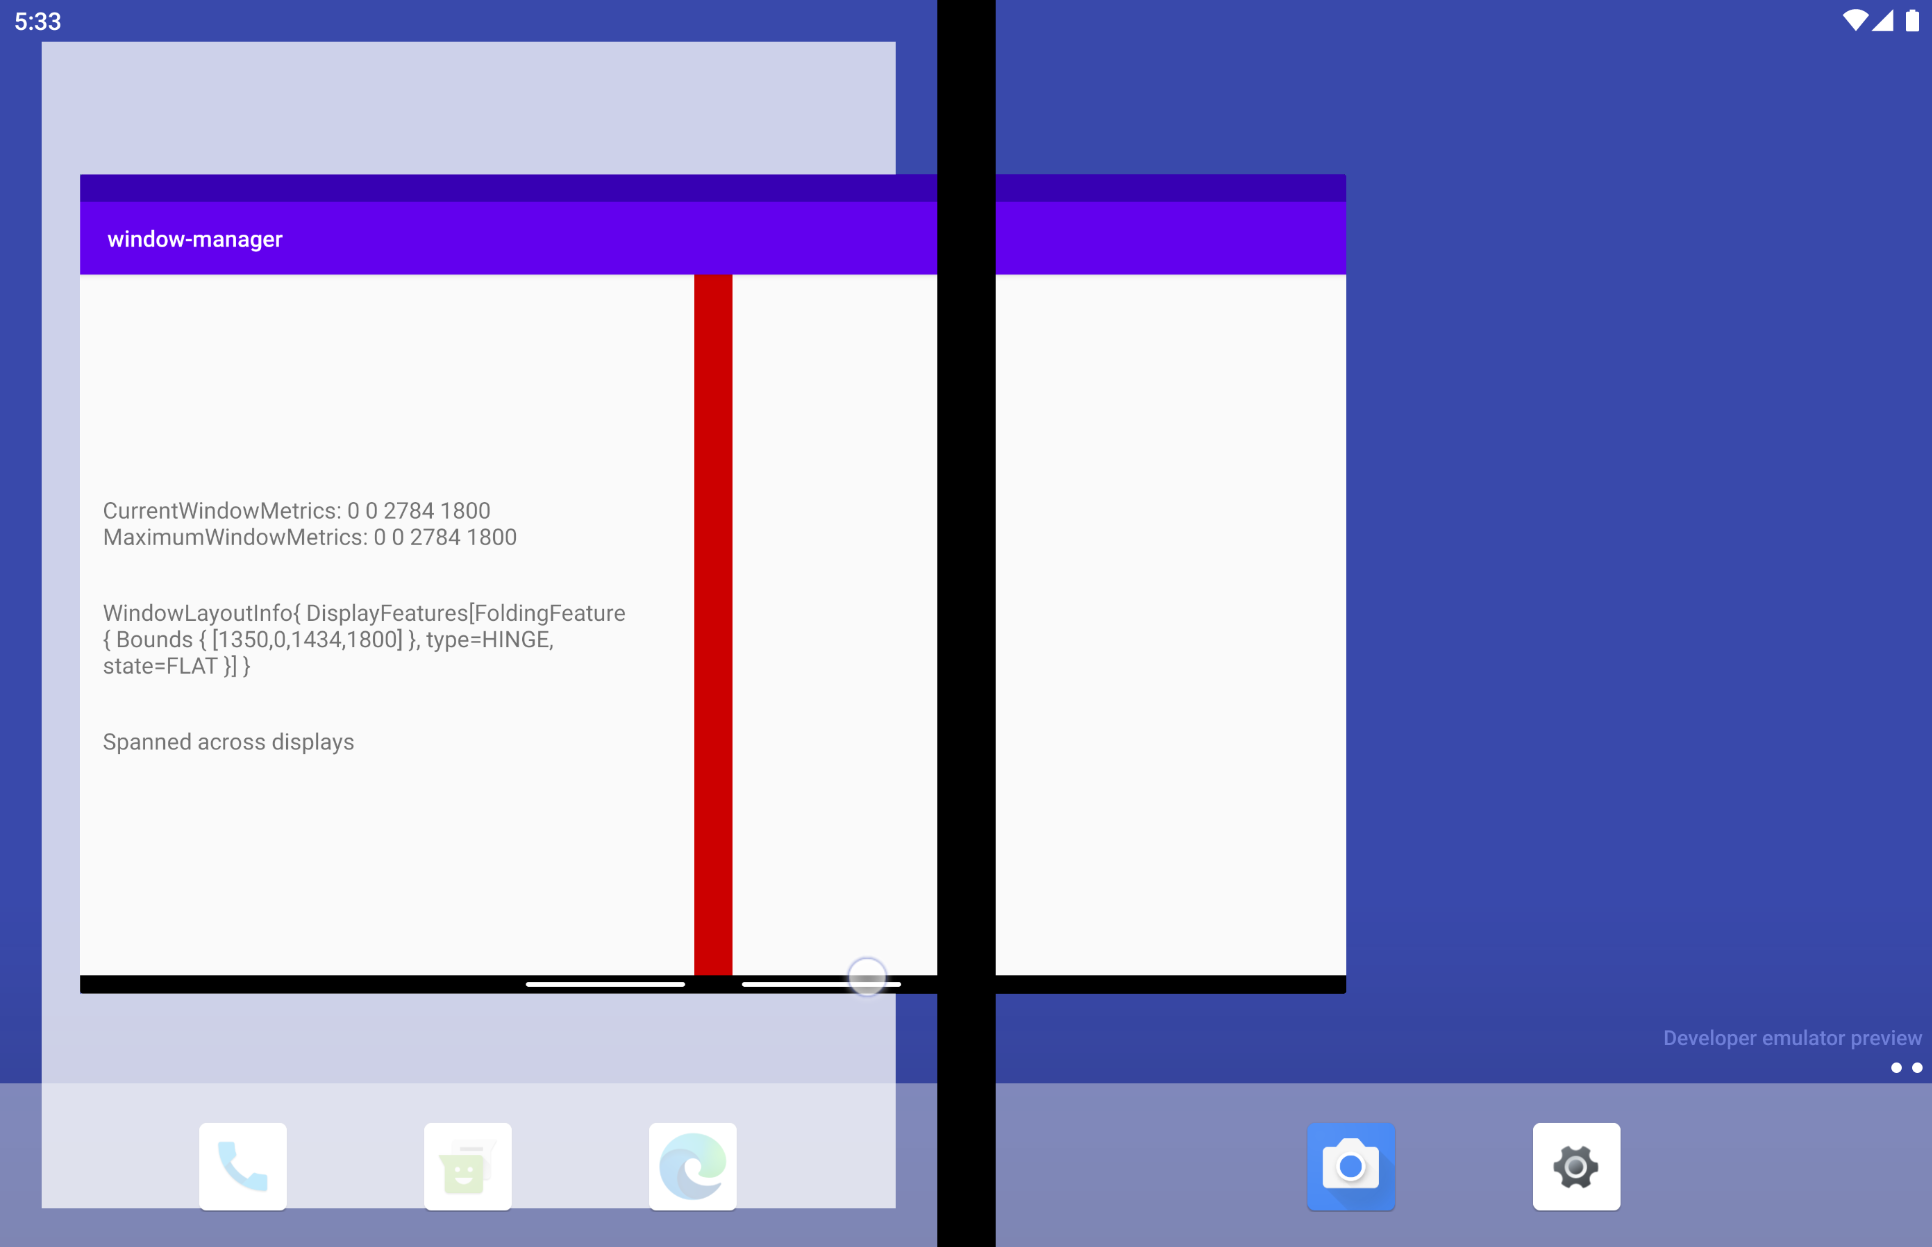
将应用跨显示屏展开时会发生什么?在双屏模拟器中,WindowLayoutInfo 将具有一个 FoldingFeature 对象,该对象提供有关设备特性的数据:一个 HINGE、该特性的边界( Rect (0, 0 - 1434, 1800))以及设备的姿势(状态)(FLAT)。
我们来看看每个字段的含义:
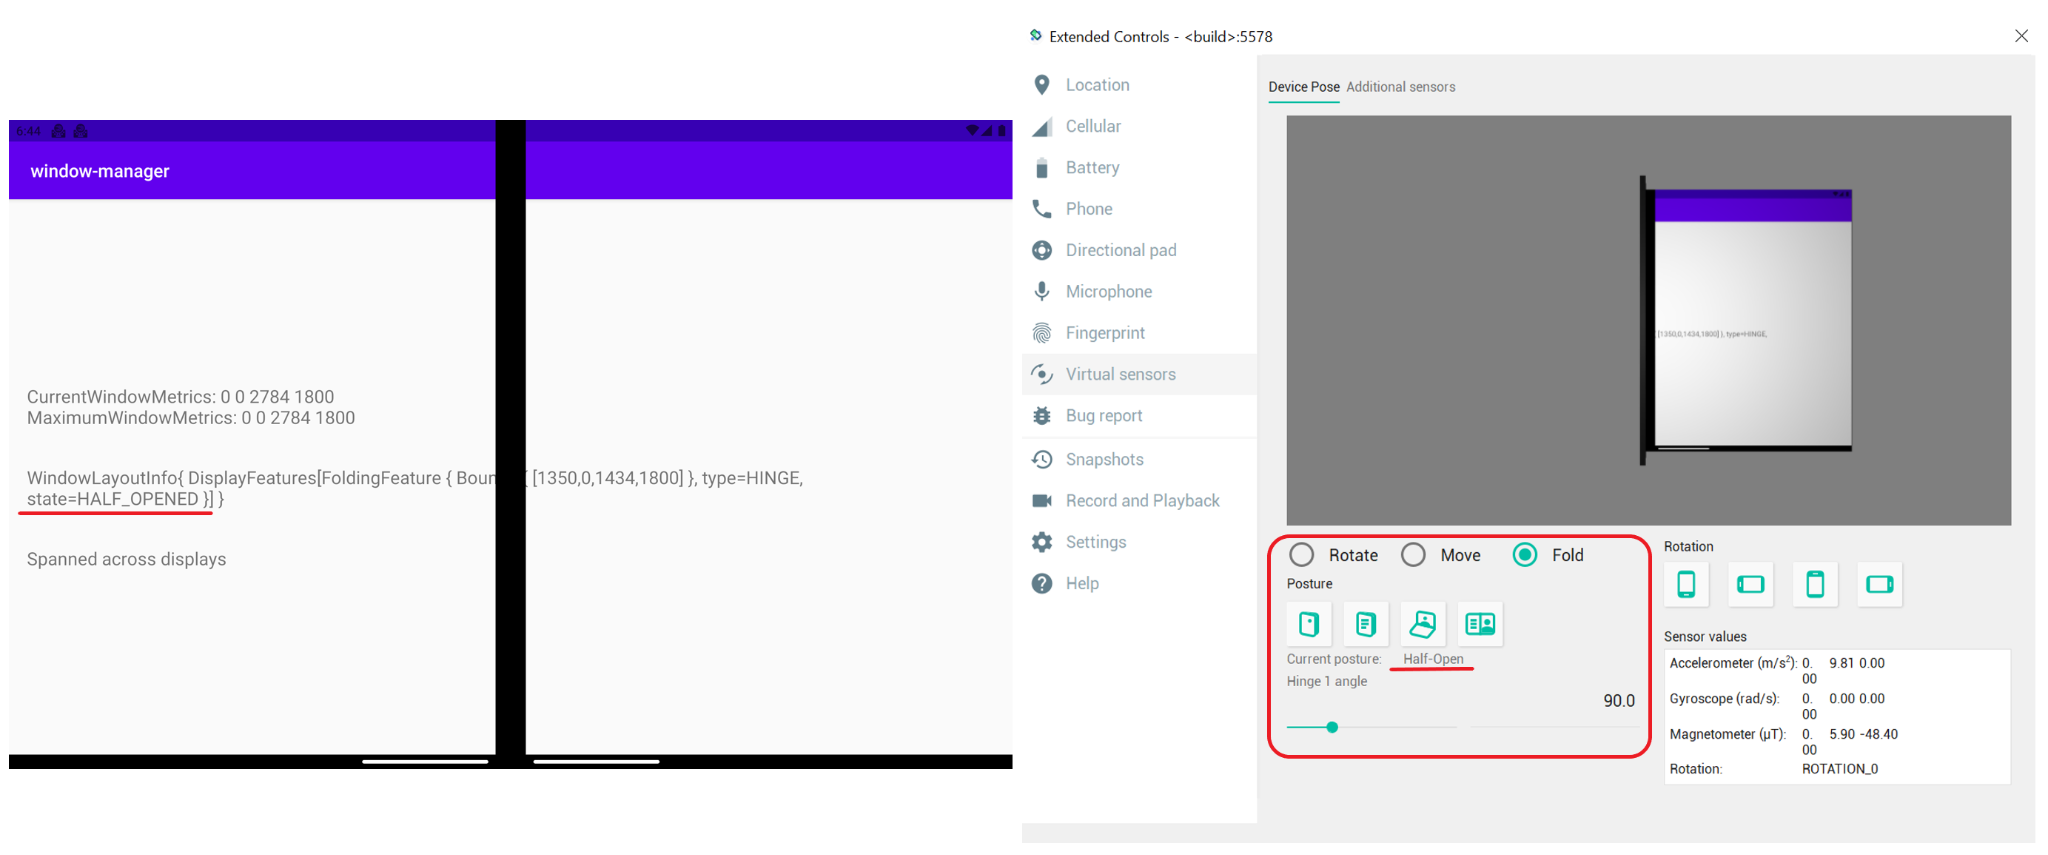
type = TYPE_HINGE:这个双屏模拟器模拟了具有物理铰链的真实 Surface Duo 设备,这就是 WindowManager 报告的内容。边界 (Bounds)[0, 0 - 1434, 1800]:表示特性在窗口坐标空间中应用窗口内的边界矩形。如果您阅读 Surface Duo 的尺寸规格,您会看到铰链位于这些边界报告的准确位置(左、上、右、下)。状态 (State):有两个不同的值代表设备的姿势(状态)。半开 (HALF_OPENED):可折叠设备的铰链处于打开和关闭状态之间的中间位置,并且柔性屏幕或物理屏幕面板之间存在非平角。平展 (FLAT):可折叠设备完全打开,呈现给用户的屏幕空间是平坦的。
模拟器默认打开 180 度,因此 WindowManager 返回的姿势是 FLAT。
如果您使用虚拟传感器选项将模拟器的姿势更改为半开姿势,WindowManager 将通知您新的位置:HALF_OPENED。
使用 WindowManager 调整 UI/UX
如显示窗口布局信息的图中所示,显示的信息被显示特性截断,这里也发生了同样的情况
这并非最佳用户体验。您可以使用 WindowManager 提供的信息来调整您的 UI/UX。
如前所述,当您的应用跨越所有不同的显示区域展开时,也是您的应用与设备特性相交的时候,因此 WindowManager 会提供窗口布局信息,例如显示状态和显示边界。因此,在这里,当应用展开时,您需要使用这些信息并调整您的 UI/UX。
接下来您要做的是,在应用展开时调整运行时您当前的 UI/UX,这样就不会有重要信息被显示特性截断或隐藏。您将创建一个视图,该视图模仿设备的显示特性,并用作约束被截断或隐藏的 TextView 的参考,这样您就不会再丢失信息了。
出于学习目的,为这个新视图着色,以便可以轻松看到它专门位于真实设备显示特性所在的位置,并且具有相同的尺寸。
在 activity_main.xml 中添加您将用作设备特性参考的新视图
activity_main.xml
<!-- It's not important where this view is placed by default, it will be positioned dynamically at runtime -->
<View
    android:id="@+id/folding_feature"
    android:layout_width="0dp"
    android:layout_height="0dp"
    android:background="@android:color/holo_red_dark"
    android:visibility="gone"
    tools:ignore="MissingConstraints" />
在 MainActivity.kt 中,转到您用于显示给定 WindowLayoutInfo 信息的 updateUI() 函数,并在存在显示特性的 if-else 情况中添加一个新函数调用
MainActivity.kt
private fun updateUI(newLayoutInfo: WindowLayoutInfo) {
   binding.layoutChange.text = newLayoutInfo.toString()
   if (newLayoutInfo.displayFeatures.isNotEmpty()) {
       binding.configurationChanged.text = "Spanned across displays"
       alignViewToFoldingFeatureBounds(newLayoutInfo)
   } else {
       binding.configurationChanged.text = "One logic/physical display - unspanned"
   }
}
您已添加函数 alignViewToFoldingFeatureBounds,该函数将 WindowLayoutInfo 作为参数接收。
创建该函数。在函数内部,创建您的 ConstraintSet,以便为您的视图应用新的约束。然后,使用 WindowLayoutInfo 获取显示特性边界。由于 WindowLayoutInfo 返回一个 DisplayFeature 列表,而 DisplayFeature 只是一个接口,请将其强制转换为 FoldingFeature 以获取所有信息
MainActivity.kt
import androidx.constraintlayout.widget.ConstraintSet
import androidx.window.layout.FoldingFeature

private fun alignViewToFoldingFeatureBounds(newLayoutInfo: WindowLayoutInfo) {
   val constraintLayout = binding.constraintLayout
   val set = ConstraintSet()
   set.clone(constraintLayout)

   // Get and translate the feature bounds to the View's coordinate space and current
   // position in the window.
   val foldingFeature = newLayoutInfo.displayFeatures[0] as FoldingFeature
   val bounds = getFeatureBoundsInWindow(foldingFeature, binding.root)


   // Rest of the code to be added in the following steps
}
定义一个 getFeatureBoundsInWindow() 函数,用于将特性边界转换为视图的坐标空间和在窗口中的当前位置。
MainActivity.kt
import android.graphics.Rect
import android.view.View
import androidx.window.layout.DisplayFeature

/**
 * Get the bounds of the display feature translated to the View's coordinate space and current
 * position in the window. This will also include view padding in the calculations.
 */
private fun getFeatureBoundsInWindow(
    displayFeature: DisplayFeature,
    view: View,
    includePadding: Boolean = true
): Rect? {
    // Adjust the location of the view in the window to be in the same coordinate space as the feature.
    val viewLocationInWindow = IntArray(2)
    view.getLocationInWindow(viewLocationInWindow)

    // Intersect the feature rectangle in window with view rectangle to clip the bounds.
    val viewRect = Rect(
        viewLocationInWindow[0], viewLocationInWindow[1],
        viewLocationInWindow[0] + view.width, viewLocationInWindow[1] + view.height
    )

    // Include padding if needed
    if (includePadding) {
        viewRect.left += view.paddingLeft
        viewRect.top += view.paddingTop
        viewRect.right -= view.paddingRight
        viewRect.bottom -= view.paddingBottom
    }

    val featureRectInView = Rect(displayFeature.bounds)
    val intersects = featureRectInView.intersect(viewRect)

    // Checks to see if the display feature overlaps with our view at all
    if ((featureRectInView.width() == 0 && featureRectInView.height() == 0) ||
        !intersects
    ) {
        return null
    }

    // Offset the feature coordinates to view coordinate space start point
    featureRectInView.offset(-viewLocationInWindow[0], -viewLocationInWindow[1])

    return featureRectInView
}
有了显示特性的边界信息,您就可以用它来为您的参考视图设置正确的尺寸,并相应地移动它。
alignViewToFoldingFeatureBounds 的完整代码如下:
MainActivity.kt - alignViewToFoldingFeatureBounds
private fun alignViewToFoldingFeatureBounds(newLayoutInfo: WindowLayoutInfo) {
    val constraintLayout = binding.constraintLayout
    val set = ConstraintSet()
    set.clone(constraintLayout)

    // Get and Translate the feature bounds to the View's coordinate space and current
    // position in the window.
    val foldingFeature = newLayoutInfo.displayFeatures[0] as FoldingFeature
    val bounds = getFeatureBoundsInWindow(foldingFeature, binding.root)

    bounds?.let { rect ->
        // Some devices have a 0px width folding feature. We set a minimum of 1px so we
        // can show the view that mirrors the folding feature in the UI and use it as reference.
        val horizontalFoldingFeatureHeight = (rect.bottom - rect.top).coerceAtLeast(1)
        val verticalFoldingFeatureWidth = (rect.right - rect.left).coerceAtLeast(1)

        // Sets the view to match the height and width of the folding feature
        set.constrainHeight(
            R.id.folding_feature,
            horizontalFoldingFeatureHeight
        )
        set.constrainWidth(
            R.id.folding_feature,
            verticalFoldingFeatureWidth
        )

        set.connect(
            R.id.folding_feature, ConstraintSet.START,
            ConstraintSet.PARENT_ID, ConstraintSet.START, 0
        )
        set.connect(
            R.id.folding_feature, ConstraintSet.TOP,
            ConstraintSet.PARENT_ID, ConstraintSet.TOP, 0
        )

        if (foldingFeature.orientation == FoldingFeature.Orientation.VERTICAL) {
            set.setMargin(R.id.folding_feature, ConstraintSet.START, rect.left)
            set.connect(
                R.id.layout_change, ConstraintSet.END,
                R.id.folding_feature, ConstraintSet.START, 0
            )
        } else {
            // FoldingFeature is Horizontal
            set.setMargin(
                R.id.folding_feature, ConstraintSet.TOP,
                rect.top
            )
            set.connect(
                R.id.layout_change, ConstraintSet.TOP,
                R.id.folding_feature, ConstraintSet.BOTTOM, 0
            )
        }

        // Set the view to visible and apply constraints
        set.setVisibility(R.id.folding_feature, View.VISIBLE)
        set.applyTo(constraintLayout)
    }
}
现在,与设备显示特性冲突的 TextView 考虑了该特性的位置,因此其内容永远不会被截断或隐藏
在双屏模拟器中(上图左侧),您可以看到跨显示屏显示内容且被铰链截断的 TextView 不再被截断,因此没有信息丢失。
在可折叠模拟器中(上图右侧),您会看到一条淡红色线条,表示折叠显示特性的位置,并且 TextView 现在已放置在该特性下方。因此,当设备折叠时(例如,以笔记本电脑姿势折叠 90 度),没有信息会受到该特性的影响。
如果您想知道显示特性在双屏模拟器上的位置(因为这是一种铰链式设备),则表示该特性的视图被铰链隐藏。但是,如果应用从展开状态变为非展开状态,您将在与该特性相同的位置看到它,并具有正确的宽度和高度。
8. 其他 Jetpack WindowManager 工件
WindowManager 还提供其他有用的工件,除了主要工件外,这些工件可以帮助您以不同方式与组件交互,同时考虑构建应用时使用的当前环境。
Java 工件
如果您使用 Java 编程语言而不是 Kotlin,或者如果通过回调监听事件对于您的架构来说是更好的方法,那么 WindowManager 的 Java 工件会很有用,因为它提供了一个 Java 友好型 API 来通过回调注册和注销事件监听器。
RxJava 工件
如果您已经在使用 RxJava(版本 2 或 版本 3),您可以使用特定的工件来帮助您保持代码的一致性,无论您使用 Observables 还是 Flowables。
9. 使用 Jetpack WindowManager 进行测试
在任何模拟器或设备上测试可折叠设备的姿势非常有用,可以用来测试 UI 元素如何围绕 FoldingFeature 放置。
为了实现这一点,WindowManager 提供了一个对插桩测试非常有用的工件。
我们来看看如何使用它。
与主要的 WindowManager 依赖项一起,我们在应用的 build.gradle 文件中添加了测试工件:androidx.window:window-testing
window-testing 工件包含一个有用的新 TestRule,名为 WindowLayoutInfoPublisherRule,它将帮助测试使用 WindowLayoutInfo 值流。WindowLayoutInfoPublisherRule 允许您按需推送不同的 WindowLayoutInfo 值。
为了使用它,并据此创建一个可以帮助您使用此新工件测试 UI 的示例,请更新 Android Studio 模板创建的测试类。将 ExampleInstrumentedTest 类中的所有代码替换为以下内容:
ExampleInstrumentedTest.kt
import androidx.test.ext.junit.rules.ActivityScenarioRule
import androidx.test.ext.junit.runners.AndroidJUnit4
import androidx.window.testing.layout.WindowLayoutInfoPublisherRule
import org.junit.Rule
import org.junit.rules.RuleChain
import org.junit.rules.TestRule
import org.junit.runner.RunWith

@RunWith(AndroidJUnit4::class)
class MainActivityTest {
    private val activityRule = ActivityScenarioRule(MainActivity::class.java)
    private val publisherRule = WindowLayoutInfoPublisherRule()

    @get:Rule
    val testRule: TestRule

    init {
        testRule = RuleChain.outerRule(publisherRule).around(activityRule)
    }
}
上述规则已与 ActivityScenarioRule 链式连接。
为了模拟 FoldingFeature,新工件提供了一些非常有用的函数来实现。这是提供一些默认值的最简单的函数。
在 MainActivity 中,TextView 与折叠特性的左侧对齐。创建一个测试,检查此功能是否正确实现。
创建一个名为 testText_is_left_of_Vertical_FoldingFeature 的测试
ExampleInstrumentedTest.kt
import androidx.window.layout.FoldingFeature.Orientation.Companion.VERTICAL
import androidx.window.layout.FoldingFeature.State.Companion.FLAT
import androidx.window.testing.layout.FoldingFeature
import androidx.window.testing.layout.TestWindowLayoutInfo
import org.junit.Test

@Test
fun testText_is_left_of_Vertical_FoldingFeature() {
   activityRule.scenario.onActivity { activity ->
       val hinge = FoldingFeature(
           activity = activity,
           state = FLAT,
           orientation = VERTICAL,
           size = 2
       )

       val expected = TestWindowLayoutInfo(listOf(hinge))
       publisherRule.overrideWindowLayoutInfo(expected)
   }

   // Add Assertion with EspressoMatcher here

}
测试 FoldingFeature 处于 FLAT 状态,其方向为 VERTICAL。我们定义了一个特定的大小,因为我们希望在测试中,UI 中能显示伪造的 FoldingFeature,以便我们能看到它在设备上的位置。
我们使用之前实例化的 WindowLayoutInfoPublishRule 来发布伪造的 FoldingFeature,然后就可以像获取真实的 WindowLayoutInfo 数据一样获取它
最后一步是测试我们的 UI 元素是否位于应该与 FoldingFeature 对齐的位置。为此,我们只需使用 EspressoMatchers,在我们刚刚创建的测试末尾添加断言即可
ExampleInstrumentedTest.kt
import androidx.test.espresso.assertion.PositionAssertions
import androidx.test.espresso.matcher.ViewMatchers.withId

onView(withId(R.id.layout_change)).check(
    PositionAssertions.isCompletelyLeftOf(withId(R.id.folding_feature))
)
完整的测试如下:
ExampleInstrumentedTest.kt
@Test
fun testText_is_left_of_Vertical_FoldingFeature() {
    activityRule.scenario.onActivity { activity ->
        val hinge = FoldingFeature(
            activity = activity,
            state = FoldingFeature.State.FLAT,
            orientation = FoldingFeature.Orientation.VERTICAL,
            size = 2
        )
        val expected = TestWindowLayoutInfo(listOf(hinge))
        publisherRule.overrideWindowLayoutInfo(expected)
    }
    onView(withId(R.id.layout_change)).check(
        PositionAssertions.isCompletelyLeftOf(withId(R.id.folding_feature))
    )
}
val horizontal_hinge = FoldingFeature(
   activity = activity,
   state = FLAT,
   orientation = HORIZONTAL,
   size = 2
)
您现在可以在设备或模拟器上运行测试,检查应用的行为是否符合预期。请注意,您不需要可折叠设备或模拟器即可运行此测试。
10. 恭喜!
Jetpack WindowManager 帮助开发者处理可折叠设备等新型外形规格设备。
WindowManager 提供的信息对于调整 Android 应用以适应可折叠设备、从而提供更佳用户体验非常有用。
总而言之,在本 Codelab 中,您已了解:
- 什么是可折叠设备
- 不同可折叠设备之间的差异
- 可折叠设备、单屏设备和平板电脑之间的差异
- Jetpack WindowManager API
- 使用 Jetpack WindowManager 并将我们的应用适应新型设备外形规格
- 使用 Jetpack WindowManager 进行测试