
1. 开始之前
Android 架构组件 集合提供了有关应用架构的指导,并包含用于常见任务(如生命周期管理和数据持久性)的库。使用架构组件可以帮助您以健壮、可测试且可维护的方式构建应用,并减少样板代码。
架构组件库是 Android Jetpack 的一部分。
这是此 Codelab 的 Kotlin 版本。Java 编程语言版本可在此处找到。
如果您在此 Codelab 中遇到任何问题,例如代码错误、语法错误或内容令人困惑,请通过 Codelab 左下角的“报告错误”链接报告问题。
前提条件
您需要熟悉 Kotlin、面向对象设计概念和 Android 开发基础知识,尤其是
RecyclerView和适配器- SQLite 数据库和 SQLite 查询语言
- 基础协程(如果您不熟悉协程,可以从在 Android 应用中使用 Kotlin 协程开始。)
熟悉将数据与用户界面分离的软件架构模式(如 Model-View-Presenter (MVP) 或 Model-View-Controller (MVC))也有帮助。此 Codelab 实现了 应用架构指南 Android 开发者文档中定义的架构。
此 Codelab 重点关注 Android 架构组件。与主题无关的概念和代码提供给您,以便您直接复制和粘贴。
您将执行的操作
您将学习如何使用 Room、ViewModel 和 LiveData 架构组件设计和构建应用。您的应用将
- 使用 Android 架构组件实现推荐的架构。
- 使用数据库获取和保存数据,并用示例词语预填充数据库。
- 在
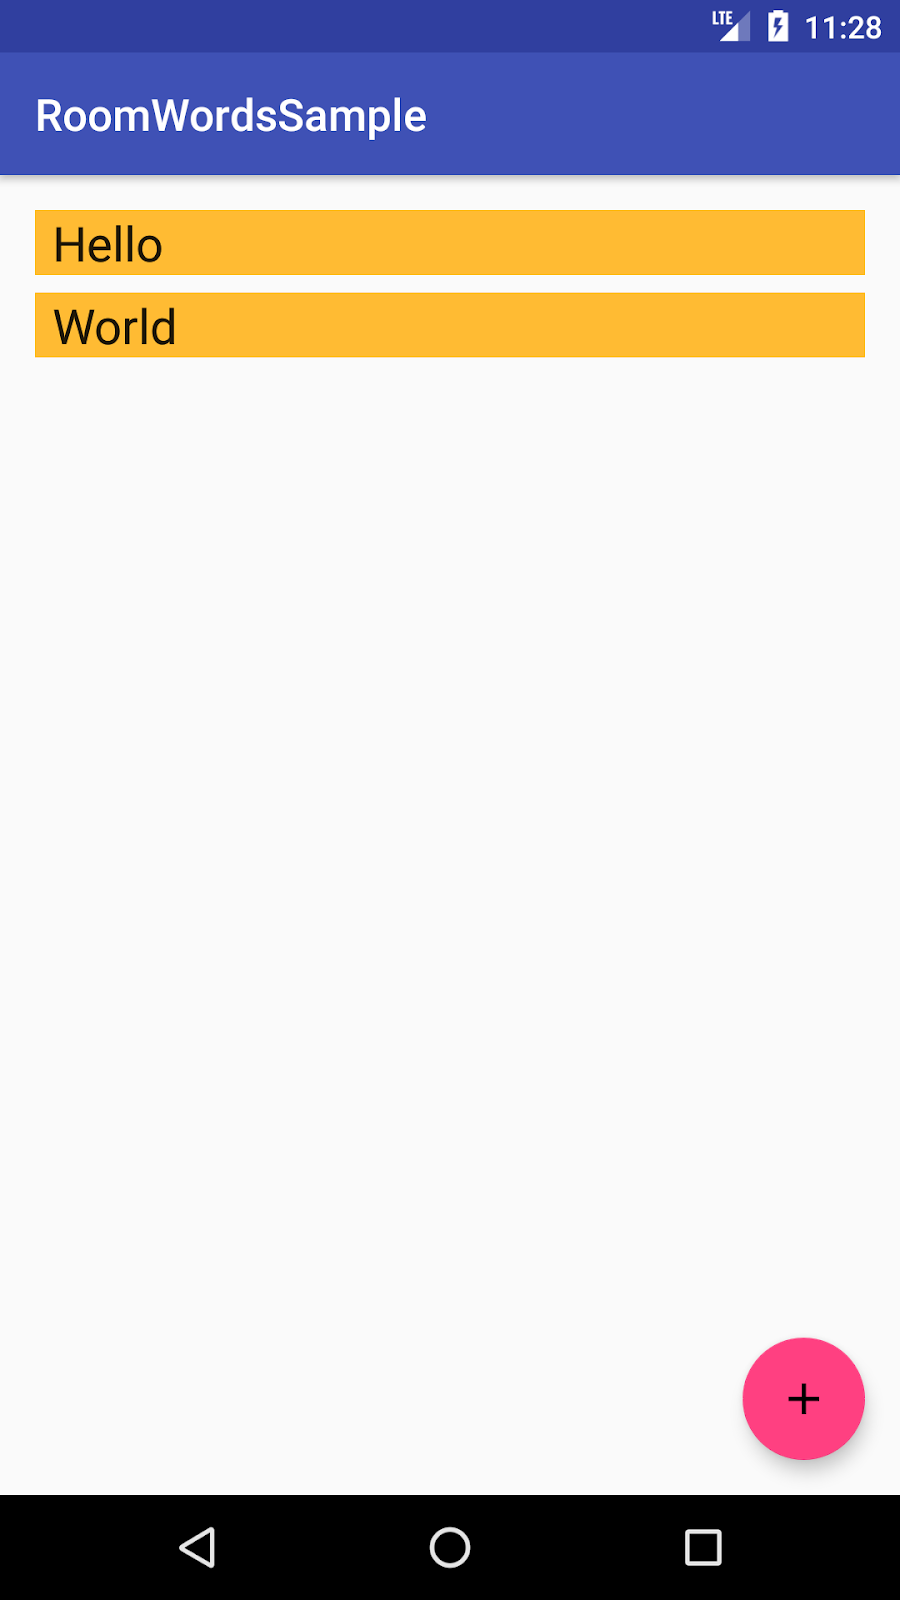
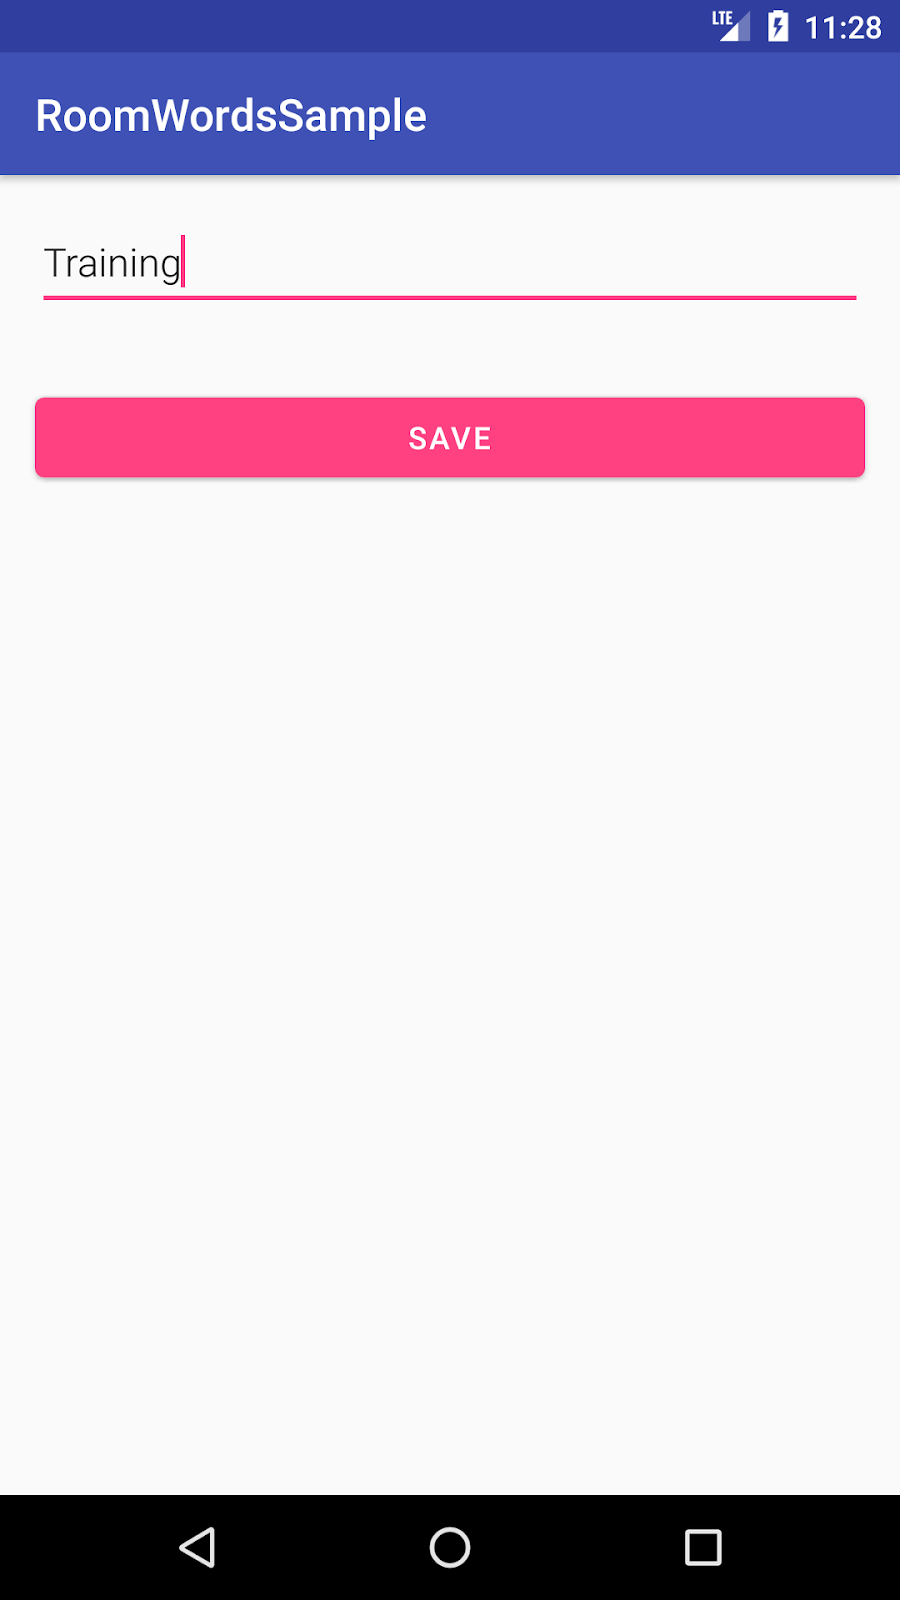
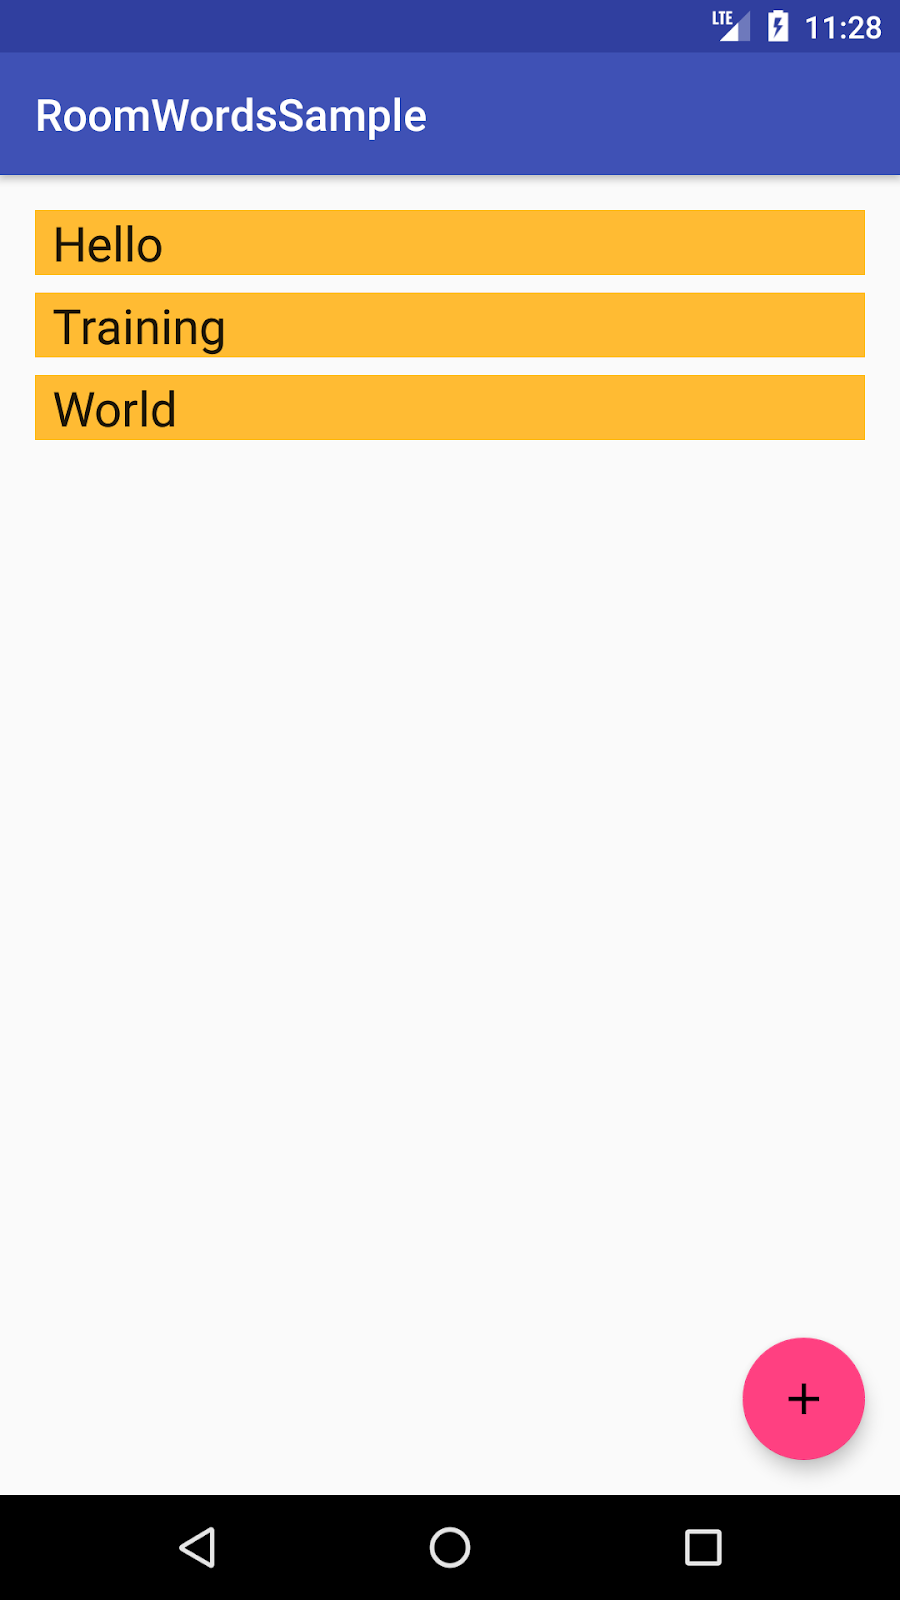
MainActivity类中的RecyclerView中显示所有词语。 - 用户点按 + 按钮时打开第二个 Activity。用户输入一个词语后,该词语会添加到数据库中并显示在
RecyclerView列表中。
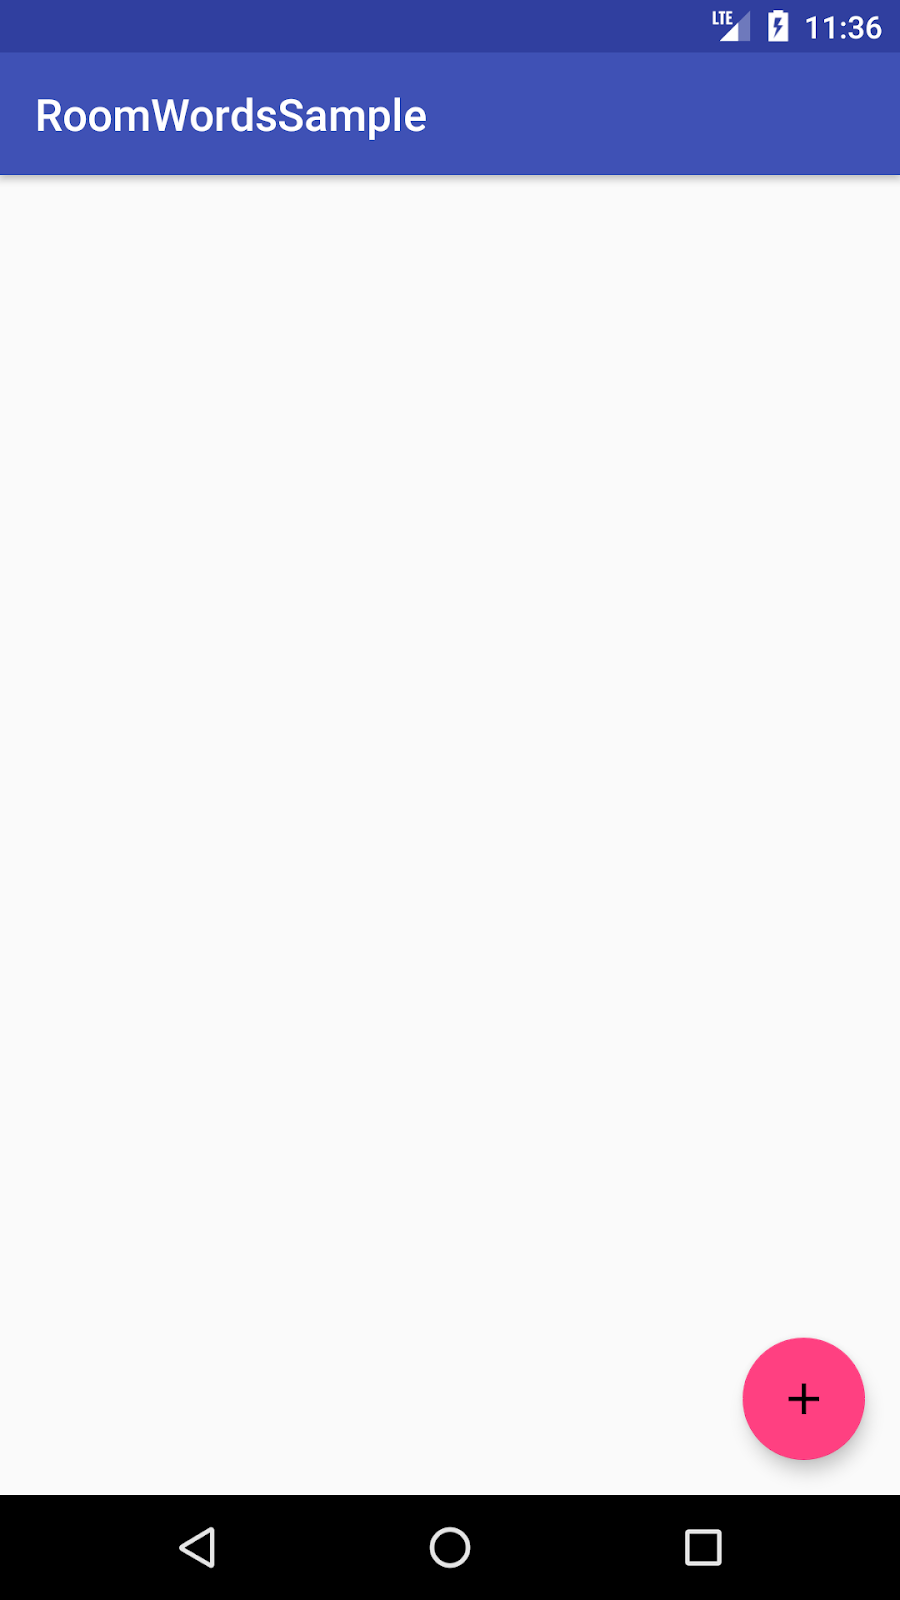
该应用功能不多,但足够复杂,您可以将其用作构建基础的模板。以下是预览
|
|
|
您将需要什么
- Android Studio Arctic Fox,以及了解如何使用它。确保 Android Studio 已更新,以及您的 SDK 和 Gradle 也已更新。
- Android 设备或模拟器。
此 Codelab 提供了构建完整应用所需的所有代码。
2. 使用架构组件
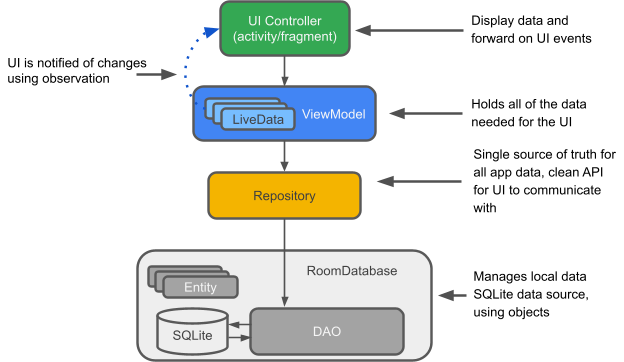
以下是一个简短图表,向您介绍架构组件及其协同工作方式。请注意,此 Codelab 重点关注组件的一个子集,即 LiveData、ViewModel 和 Room。每个组件在使用时都会详细解释。
LiveData:一个可观察的数据持有者类。始终持有/缓存最新版本的数据,并在数据更改时通知其观察者。LiveData 具有生命周期感知能力。UI 组件只需观察相关数据,无需停止或恢复观察。LiveData 会自动管理这一切,因为它在观察时了解相关的生命周期状态变化。
ViewModel:充当 Repository(数据)和 UI 之间的通信中心。UI 不再需要关心数据的来源。ViewModel 实例在 Activity/Fragment 重建后仍然存在。
Repository(仓库):您创建的一个类,主要用于管理多个数据源。
Entity(实体):与 Room 一起使用时,描述数据库表的带注解类。
Room 数据库:简化数据库工作,并作为底层 SQLite 数据库的访问点(隐藏 SQLiteOpenHelper)。Room 数据库使用 DAO 向 SQLite 数据库发出查询。
SQLite 数据库:设备上的存储。Room 持久性库为您创建并维护此数据库。
DAO:数据访问对象 (Data access object)。SQL 查询到函数的映射。使用 DAO 时,您只需调用方法,其余部分由 Room 处理。
RoomWordSample 架构概览
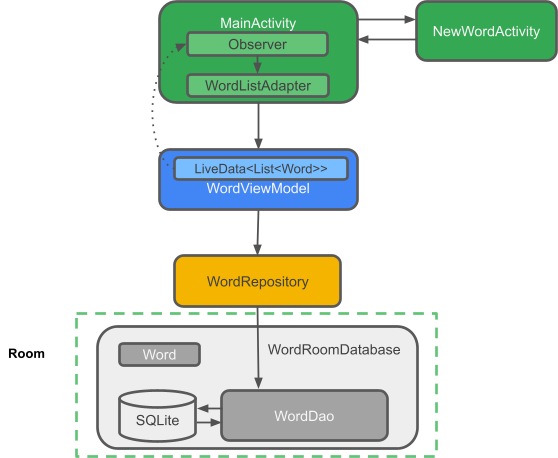
下图显示了应用的所有部分应如何交互。每个矩形框(SQLite 数据库除外)表示您将创建的一个类。
3. 创建您的应用
- 打开 Android Studio 并点击 Start a new Android Studio project(启动新的 Android Studio 项目)。
- 在 Create New Project(创建新项目)窗口中,选择 Empty Activity(空 Activity),然后点击 Next(下一步)。
- 在下一个屏幕上,将应用命名为 RoomWordSample,然后点击 Finish(完成)。

4. 更新 Gradle 文件
接下来,您需要将组件库添加到 Gradle 文件中。
- 在 Android Studio 中,点击 Projects(项目)选项卡,然后展开 Gradle Scripts(Gradle 脚本)文件夹。
打开 build.gradle (Module: app)。
- 通过将其添加到
build.gradle(Module: app) 文件顶部的plugins 部分中,应用kaptannotation processor Kotlin 插件。
plugins {
    id 'com.android.application'
    id 'kotlin-android'
    id 'kotlin-kapt'
}
- 您将使用的一些 API 需要 1.8
jvmTarget,因此也将其添加到android块中。
android {
    // other configuration (buildTypes, defaultConfig, etc.)

    packagingOptions {
        exclude 'META-INF/atomicfu.kotlin_module'
    }

    kotlinOptions {
        jvmTarget = "1.8"
    }

}
- 将
dependencies块替换为
dependencies {
    implementation "androidx.appcompat:appcompat:$rootProject.appCompatVersion"
    implementation "androidx.activity:activity-ktx:$rootProject.activityVersion"

    // Dependencies for working with Architecture components
    // You'll probably have to update the version numbers in build.gradle (Project)

    // Room components
    implementation "androidx.room:room-ktx:$rootProject.roomVersion"
    kapt "androidx.room:room-compiler:$rootProject.roomVersion"
    androidTestImplementation "androidx.room:room-testing:$rootProject.roomVersion"

    // Lifecycle components
    implementation "androidx.lifecycle:lifecycle-viewmodel-ktx:$rootProject.lifecycleVersion"
    implementation "androidx.lifecycle:lifecycle-livedata-ktx:$rootProject.lifecycleVersion"
    implementation "androidx.lifecycle:lifecycle-common-java8:$rootProject.lifecycleVersion"

    // Kotlin components
    implementation "org.jetbrains.kotlin:kotlin-stdlib-jdk7:$kotlin_version"
    api "org.jetbrains.kotlinx:kotlinx-coroutines-core:$rootProject.coroutines"
    api "org.jetbrains.kotlinx:kotlinx-coroutines-android:$rootProject.coroutines"

    // UI
    implementation "androidx.constraintlayout:constraintlayout:$rootProject.constraintLayoutVersion"
    implementation "com.google.android.material:material:$rootProject.materialVersion"

    // Testing
    testImplementation "junit:junit:$rootProject.junitVersion"
    androidTestImplementation "androidx.arch.core:core-testing:$rootProject.coreTestingVersion"
    androidTestImplementation ("androidx.test.espresso:espresso-core:$rootProject.espressoVersion", {
        exclude group: 'com.android.support', module: 'support-annotations'
    })
    androidTestImplementation "androidx.test.ext:junit:$rootProject.androidxJunitVersion"
}
此时 Gradle 可能会抱怨缺少或未定义的版本。下一步应解决这些问题。
- 在您的
build.gradle(Project: RoomWordsSample) 文件中,进行以下更改:在 buildscript 块的顶部添加 kotlin_version,然后在文件末尾添加版本号,如下面的代码所示。
buildscript {
    ext.kotlin_version = '1.5.31'

    ...
}
ext {
    activityVersion = '1.4.0'
    appCompatVersion = '1.4.0'
    constraintLayoutVersion = '2.1.2'
    coreTestingVersion = '2.1.0'
    coroutines = '1.5.2'
    lifecycleVersion = '2.4.0'
    materialVersion = '1.4.0'
    roomVersion = '2.3.0'
    // testing
    junitVersion = '4.13.2'
    espressoVersion = '3.4.0'
    androidxJunitVersion = '1.1.3'
}
5. 创建实体
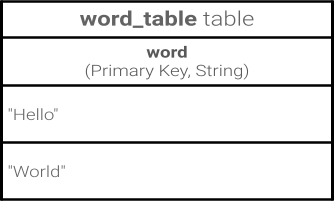
此应用的数据是词语,您需要一个简单的表来存储这些值
Room 允许您通过Entity创建表。现在就开始吧。
- 创建一个新的 Kotlin 类文件
Word,其中包含Word数据类。此类将描述词语的 Entity(代表 SQLite 表)。类中的每个属性代表表中的一列。Room 最终将使用这些属性来创建表并从数据库中的行实例化对象。
以下是代码
data class Word(val word: String)
为了使 Word 类对 Room 数据库有意义,您需要使用 Kotlin 注解在类和数据库之间创建关联。您将使用特定注解来标识此类的每个部分与数据库中的条目有何关联。Room 使用这些额外信息生成代码。
如果您自己键入注解(而不是粘贴),Android Studio 将自动导入注解类。
- 使用此代码中所示的注解更新您的
Word类
@Entity(tableName = "word_table")
class Word(@PrimaryKey @ColumnInfo(name = "word") val word: String)
让我们看看这些注解有什么作用
@Entity(tableName ="word_table")每个@Entity类代表一个 SQLite 表。注解您的类声明以表明它是一个实体。如果您希望表名与类名不同,可以指定表名。这将表命名为 "word_table"。@PrimaryKey每个实体都需要一个主键。为简单起见,每个词语都作为其自身的主键。@ColumnInfo(name ="word")如果您希望列名与成员变量名不同,则指定列名。这会将列命名为 "word"。- 数据库中存储的每个属性都需要具有公共可见性,这是 Kotlin 的默认设置。
您可以在Room 包摘要参考中找到完整的注解列表。
提示:您可以通过如下注解主键来自动生成唯一键
@Entity(tableName = "word_table")
class Word(

    @PrimaryKey(autoGenerate = true) val id: Int,
    @ColumnInfo(name = "word") val word: String

)
6. 创建 DAO
什么是 DAO?
在 DAO (数据访问对象) 中,您指定 SQL 查询并将其与方法调用关联。编译器会检查 SQL 并从方便的注解(如 @Insert)生成常见查询。Room 使用 DAO 为您的代码创建一个干净的 API。
DAO 必须是接口或抽象类。
默认情况下,所有查询都必须在单独的线程上执行。
Room 支持 Kotlin 协程。这允许您的查询使用 suspend 修饰符进行注解,然后从协程或另一个挂起函数调用。
实现 DAO
让我们编写一个提供以下查询的 DAO
- 获取按字母顺序排序的所有词语
- 插入一个词语
- 删除所有词语
- 创建一个新的 Kotlin 类文件
WordDao。 - 将以下代码复制并粘贴到
WordDao中,并根据需要修复导入以使其编译。
@Dao
interface WordDao {

    @Query("SELECT * FROM word_table ORDER BY word ASC")
    fun getAlphabetizedWords(): List<Word>

    @Insert(onConflict = OnConflictStrategy.IGNORE)
    suspend fun insert(word: Word)

    @Query("DELETE FROM word_table")
    suspend fun deleteAll()
}
让我们逐步讲解
WordDao是一个接口;DAO 必须是接口或抽象类。@Dao注解将其标识为 Room 的 DAO 类。suspend fun insert(word: Word):声明一个挂起函数用于插入一个词语。@Insert注解是一个特殊的 DAO 方法注解,您无需提供任何 SQL!(还有用于删除和更新行的@Delete和@Update注解,但您在此应用中未使用它们。)onConflict = OnConflictStrategy.IGNORE:选定的 onConflict 策略在列表中已有完全相同的新词时忽略新词。要了解更多可用的冲突策略,请查看文档。suspend fun deleteAll():声明一个挂起函数用于删除所有词语。- 没有用于删除多个实体的方便注解,因此使用通用
@Query进行注解。 @Query("DELETE FROM word_table"):@Query要求您将 SQL 查询作为字符串参数提供给注解,允许进行复杂的读取查询和其他操作。fun getAlphabetizedWords(): List<Word>:一个获取所有词语并让其返回Word的List的方法。@Query("SELECT * FROM word_table ORDER BY word ASC"):返回按升序排序的词语列表的查询。
7. 观察数据库更改
当数据发生变化时,您通常会想采取一些操作,例如在 UI 中显示更新后的数据。这意味着您必须观察数据,以便在数据更改时做出反应。
要观察数据更改,您将使用 kotlinx-coroutines 中的 Flow。在您的方法描述中使用 Flow 类型的返回值,Room 会生成所有必要的代码,以便在数据库更新时更新 Flow。
在 WordDao 中,更改 getAlphabetizedWords() 方法签名,以便返回的 List<Word> 用 Flow 包装。
   @Query("SELECT * FROM word_table ORDER BY word ASC")
   fun getAlphabetizedWords(): Flow<List<Word>>
在本 Codelab 的后面部分,我们将在 ViewModel 中将 Flow 转换为 LiveData。但在我们实现这些组件之前,先了解更多信息。
8. 添加 Room 数据库
什么是 Room 数据库**?**
- Room 是构建在 SQLite 数据库之上的数据库层。
- Room 负责处理您以前使用
SQLiteOpenHelper处理的日常任务。 - Room 使用 DAO 向其数据库发出查询。
- 默认情况下,为了避免 UI 性能不佳,Room 不允许您在主线程上发出查询。当 Room 查询返回
Flow时,查询会自动在后台线程上异步运行。 - Room 提供对 SQLite 语句的编译时检查。
实现 Room 数据库
您的 Room 数据库类必须是抽象类并扩展 RoomDatabase。通常,整个应用只需一个 Room 数据库实例。
现在创建一个。
- 创建一个名为
WordRoomDatabase的 Kotlin 类文件,并将此代码添加到其中
// Annotates class to be a Room Database with a table (entity) of the Word class
@Database(entities = arrayOf(Word::class), version = 1, exportSchema = false)
public abstract class WordRoomDatabase : RoomDatabase() {

   abstract fun wordDao(): WordDao

   companion object {
        // Singleton prevents multiple instances of database opening at the
        // same time.
        @Volatile
        private var INSTANCE: WordRoomDatabase? = null

        fun getDatabase(context: Context): WordRoomDatabase {
            // if the INSTANCE is not null, then return it,
            // if it is, then create the database
            return INSTANCE ?: synchronized(this) {
                val instance = Room.databaseBuilder(
                        context.applicationContext,
                        WordRoomDatabase::class.java,
                        "word_database"
                    ).build()
                INSTANCE = instance
                // return instance
                instance
            }
        }
   }
}
让我们逐步讲解代码
- Room 的数据库类必须是
abstract并扩展RoomDatabase. - 您使用
@Database注解类以使其成为 Room 数据库,并使用注解参数声明属于该数据库的实体并设置版本号。每个实体对应于将在数据库中创建的一个表。数据库迁移超出了此 Codelab 的范围,因此此处将exportSchema设置为 false,以避免构建警告。在实际应用中,考虑为 Room 设置一个目录以导出 schema,以便您可以将当前 schema 提交到版本控制系统。 - 数据库通过每个 @Dao 的抽象“getter”方法公开 DAO。
- 您定义了一个单例
WordRoomDatabase,,以防止同时打开多个数据库实例。 getDatabase返回单例。它在首次访问时创建数据库,使用 Room 的数据库构建器从WordRoomDatabase类在应用上下文中创建RoomDatabase对象,并将其命名为"word_database"。
9. 创建 Repository
什么是 Repository?
Repository 类抽象了对多个数据源的访问。Repository 不是架构组件库的一部分,但它是代码分离和架构的建议最佳实践。Repository 类为应用的其余部分提供了清晰的数据访问 API。
为什么要使用 Repository?
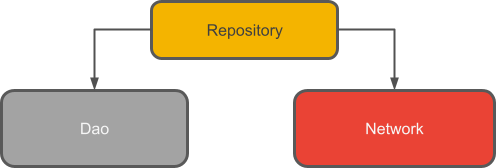
Repository 管理查询并允许您使用多个后端。在最常见的示例中,Repository 实现逻辑来决定是从网络获取数据还是使用本地数据库中缓存的结果。
实现 Repository
创建一个名为 WordRepository 的 Kotlin 类文件,并将以下代码粘贴到其中
// Declares the DAO as a private property in the constructor. Pass in the DAO
// instead of the whole database, because you only need access to the DAO
class WordRepository(private val wordDao: WordDao) {

    // Room executes all queries on a separate thread.
    // Observed Flow will notify the observer when the data has changed.
    val allWords: Flow<List<Word>> = wordDao.getAlphabetizedWords()

    // By default Room runs suspend queries off the main thread, therefore, we don't need to
    // implement anything else to ensure we're not doing long running database work
    // off the main thread.
    @Suppress("RedundantSuspendModifier")
    @WorkerThread
    suspend fun insert(word: Word) {
        wordDao.insert(word)
    }
}
主要收获
- DAO 作为参数传递给 Repository 构造函数,而不是整个数据库。这是因为它只需要访问 DAO,因为 DAO 包含数据库的所有读/写方法。无需将整个数据库公开给 Repository。
- 词语列表是一个公共属性。它通过从 Room 获取
Flow词语列表进行初始化;您之所以能这样做,是因为您在“观察数据库更改”步骤中定义getAlphabetizedWords方法以返回Flow的方式。Room 在单独的线程上执行所有查询。 suspend修饰符告诉编译器此函数需要从协程或另一个挂起函数调用。- Room 在主线程之外执行挂起查询。
10. 创建 ViewModel
什么是 ViewModel?
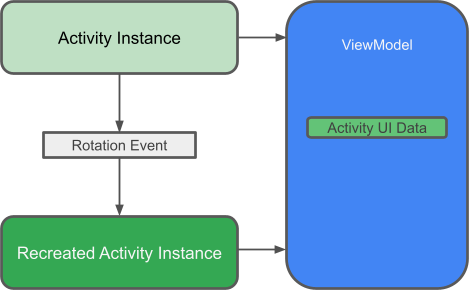
ViewModel 的作用是向 UI 提供数据并在配置更改后保留。 ViewModel 充当 Repository 和 UI 之间的通信中心。您还可以使用 ViewModel 在 Fragment 之间共享数据。ViewModel 是 生命周期库 的一部分。
有关此主题的入门指南,请参阅ViewModel Overview 或博文ViewModel:一个简单示例。
为什么要使用 ViewModel?
ViewModel 以生命周期感知的方式保存应用的 UI 数据,并在配置更改后保留。将应用的 UI 数据与 Activity 和 Fragment 类分开,可以更好地遵循单一职责原则:您的 Activity 和 Fragment 负责将数据绘制到屏幕上,而您的 ViewModel 可以负责持有和处理 UI 所需的所有数据。
LiveData 和 ViewModel
LiveData 是一个可观察的数据持有者——数据每次更改时您都会收到通知。与 Flow 不同,LiveData 具有生命周期感知能力,这意味着它将尊重 Activity 或 Fragment 等其他组件的生命周期。LiveData 会根据监听更改的组件的生命周期自动停止或恢复观察。这使得 LiveData 成为用于 UI 将使用或显示的可变数据的完美组件。
ViewModel 将从 Repository 转换数据,从 Flow 转换为 LiveData,并将词语列表作为 LiveData 公开给 UI。这确保了数据库中的数据每次更改时,您的 UI 都会自动更新。
viewModelScope
在 Kotlin 中,所有协程都在 CoroutineScope 内运行。作用域通过其任务控制协程的生命周期。当您取消作用域的任务时,它会取消在该作用域内启动的所有协程。
AndroidX lifecycle-viewmodel-ktx 库将 viewModelScope 作为 ViewModel 类的一个扩展函数添加,使您能够使用作用域。
要了解更多关于在 ViewModel 中使用协程的信息,请查看 在 Android 应用中使用 Kotlin 协程 Codelab 的第 5 步或博文Android 中的简易协程:viewModelScope。
实现 ViewModel
创建一个用于 WordViewModel 的 Kotlin 类文件,并将此代码添加到其中
class WordViewModel(private val repository: WordRepository) : ViewModel() {

    // Using LiveData and caching what allWords returns has several benefits:
    // - We can put an observer on the data (instead of polling for changes) and only update the
    //   the UI when the data actually changes.
    // - Repository is completely separated from the UI through the ViewModel.
    val allWords: LiveData<List<Word>> = repository.allWords.asLiveData()

    /**
     * Launching a new coroutine to insert the data in a non-blocking way
     */
    fun insert(word: Word) = viewModelScope.launch {
        repository.insert(word)
    }
}

class WordViewModelFactory(private val repository: WordRepository) : ViewModelProvider.Factory {
    override fun <T : ViewModel> create(modelClass: Class<T>): T {
        if (modelClass.isAssignableFrom(WordViewModel::class.java)) {
            @Suppress("UNCHECKED_CAST")
            return WordViewModel(repository) as T
        }
        throw IllegalArgumentException("Unknown ViewModel class")
    }
}
让我们分解这段代码。在这里,您已经
- 创建了一个名为
WordViewModel的类,该类将WordRepository作为参数并扩展ViewModel。Repository 是 ViewModel 所需的唯一依赖项。如果需要其他类,它们也会在构造函数中传递。 - 添加了一个公共
LiveData成员变量来缓存词语列表。 - 使用 Repository 的
allWordsFlow 初始化了LiveData。然后通过调用asLiveData()将 Flow 转换为 LiveData。 - 创建了一个包装方法
insert(),该方法调用 Repository 的insert()方法。这样,insert()的实现就与 UI 封装起来了。我们正在启动一个新的协程并调用 Repository 的 insert,这是一个挂起函数。如前所述,ViewModel 有一个基于其生命周期的协程作用域,称为viewModelScope,您将在此处使用它。 - 创建了 ViewModel 并实现了一个
ViewModelProvider.Factory,它将创建WordViewModel所需的依赖项作为参数获取:即WordRepository。
通过使用 viewModels 和 ViewModelProvider.Factory,框架将负责 ViewModel 的生命周期。即使 Activity 重建,它也能在配置更改后保留,您也将始终获得 WordViewModel 类的正确实例。
11. 添加 XML 布局
接下来,您需要添加列表和项的 XML 布局。
此 Codelab 假定您熟悉如何在 XML 中创建布局,因此我们只为您提供代码。
通过将 AppTheme 的父主题设置为 Theme.MaterialComponents.Light.DarkActionBar 来使您的应用主题符合 Material Design。在 values/styles.xml 中添加列表项的样式
<resources>

    <!-- Base application theme. -->
    <style name="AppTheme" parent="Theme.MaterialComponents.Light.DarkActionBar">
        <!-- Customize your theme here. -->
        <item name="colorPrimary">@color/colorPrimary</item>
        <item name="colorPrimaryDark">@color/colorPrimaryDark</item>
        <item name="colorAccent">@color/colorAccent</item>
    </style>

    <!-- The default font for RecyclerView items is too small.
    The margin is a simple delimiter between the words. -->
    <style name="word_title">
        <item name="android:layout_marginBottom">8dp</item>
        <item name="android:paddingLeft">8dp</item>
        <item name="android:background">@android:color/holo_orange_light</item>
        <item name="android:textAppearance">@android:style/TextAppearance.Large</item>
    </style>
</resources>
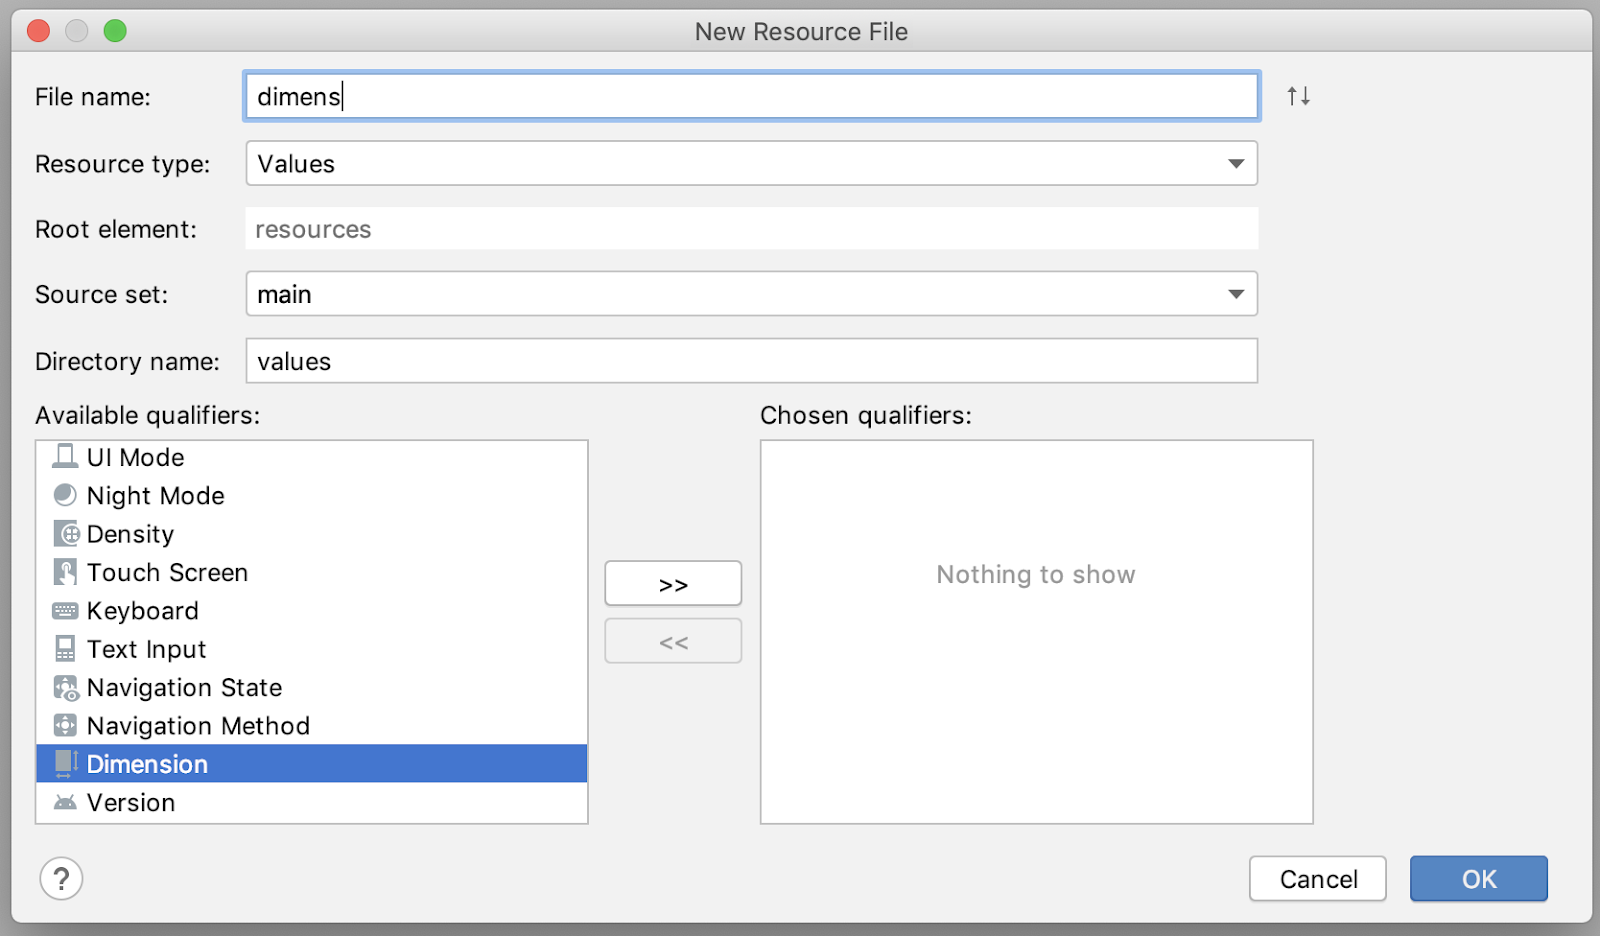
创建新的维度资源文件
- 在 Project(项目)窗口中点击应用模块。
- 选择 File > New > Android Resource File(文件 > 新建 > Android 资源文件)。
- 从 Available Qualifiers(可用限定符)中选择 Dimension(维度)。
- 文件名:dimens
在 values/dimens.xml 中添加这些维度资源
<dimen name="big_padding">16dp</dimen>
添加一个 layout/recyclerview_item.xml 布局
<?xml version="1.0" encoding="utf-8"?>
<LinearLayout xmlns:android="http://schemas.android.com/apk/res/android"
    android:orientation="vertical"
    android:layout_width="match_parent"
    android:layout_height="wrap_content">

    <TextView
        android:id="@+id/textView"
        style="@style/word_title"
        android:layout_width="match_parent"
        android:layout_height="wrap_content"
        android:background="@android:color/holo_orange_light" />
</LinearLayout>
在 layout/activity_main.xml 中,将 TextView 替换为 RecyclerView 并添加一个浮动操作按钮 (FAB)。现在您的布局应该如下所示
<androidx.constraintlayout.widget.ConstraintLayout
    xmlns:android="http://schemas.android.com/apk/res/android"
    xmlns:app="http://schemas.android.com/apk/res-auto"
    xmlns:tools="http://schemas.android.com/tools"
    android:layout_width="match_parent"
    android:layout_height="match_parent"
    tools:context=".MainActivity">

    <androidx.recyclerview.widget.RecyclerView
        android:id="@+id/recyclerview"
        android:layout_width="0dp"
        android:layout_height="0dp"
        tools:listitem="@layout/recyclerview_item"
        android:padding="@dimen/big_padding"
        app:layout_constraintBottom_toBottomOf="parent"
        app:layout_constraintLeft_toLeftOf="parent"
        app:layout_constraintRight_toRightOf="parent"
        app:layout_constraintTop_toTopOf="parent" />

    <com.google.android.material.floatingactionbutton.FloatingActionButton
        android:id="@+id/fab"
        app:layout_constraintBottom_toBottomOf="parent"
        app:layout_constraintEnd_toEndOf="parent"
        android:layout_width="wrap_content"
        android:layout_height="wrap_content"
        android:layout_margin="16dp"
        android:contentDescription="@string/add_word"/>

</androidx.constraintlayout.widget.ConstraintLayout>
您的 FAB 的外观应该与可用的操作相对应,因此您需要将图标替换为“+”符号。
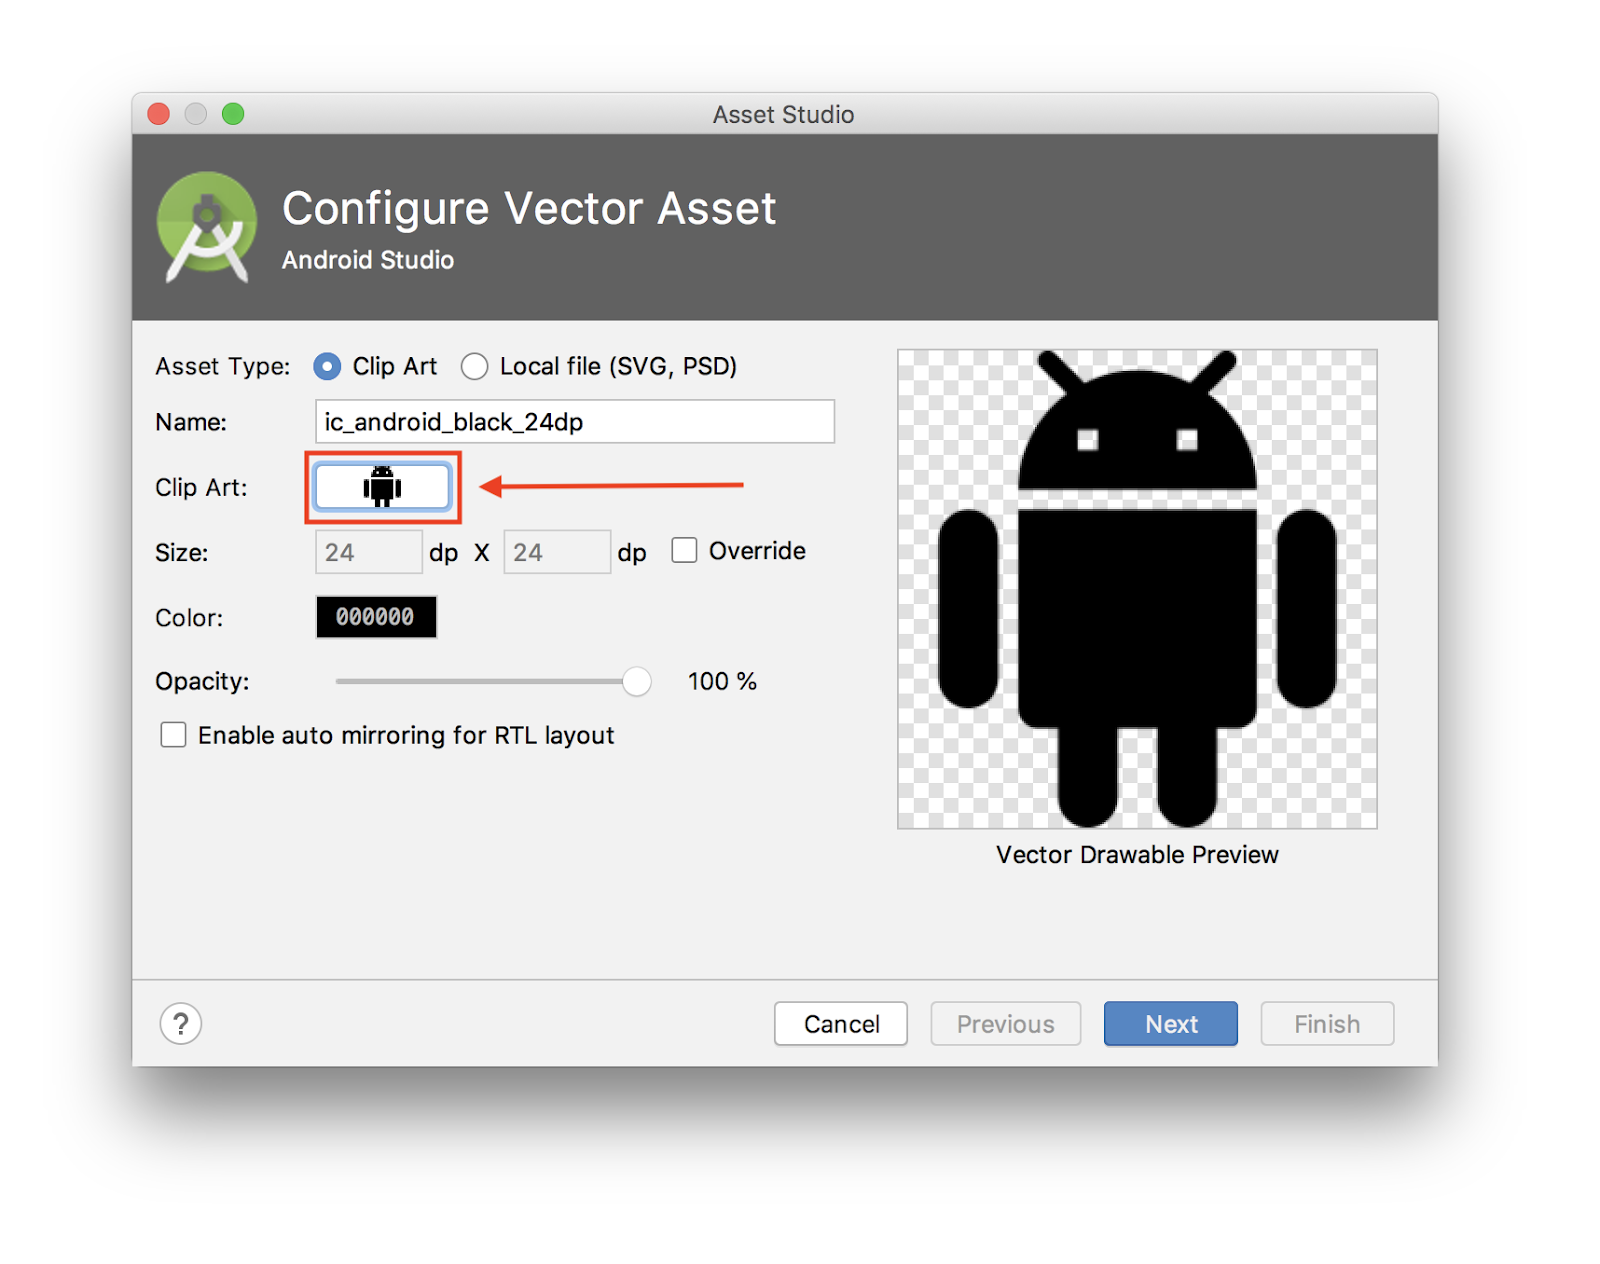
首先,您需要添加一个新的 Vector Asset
- 选择 File > New > Vector Asset(文件 > 新建 > Vector Asset)。
- 点击 Clip Art(剪贴画):字段中的 Android 机器人图标。
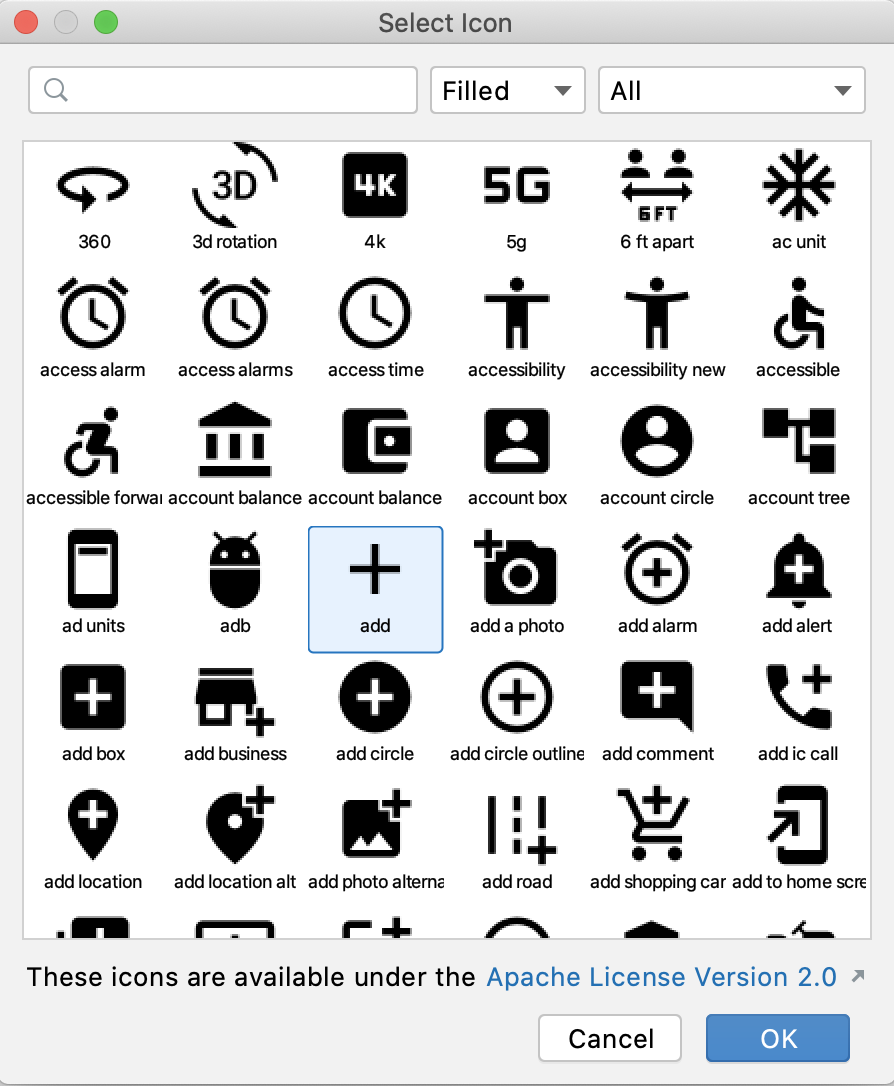
- 搜索“add”并选择“+”资源。点击 OK(确定)。
- 在 Asset Studio(资产工作室)窗口中,点击 Next(下一步)。
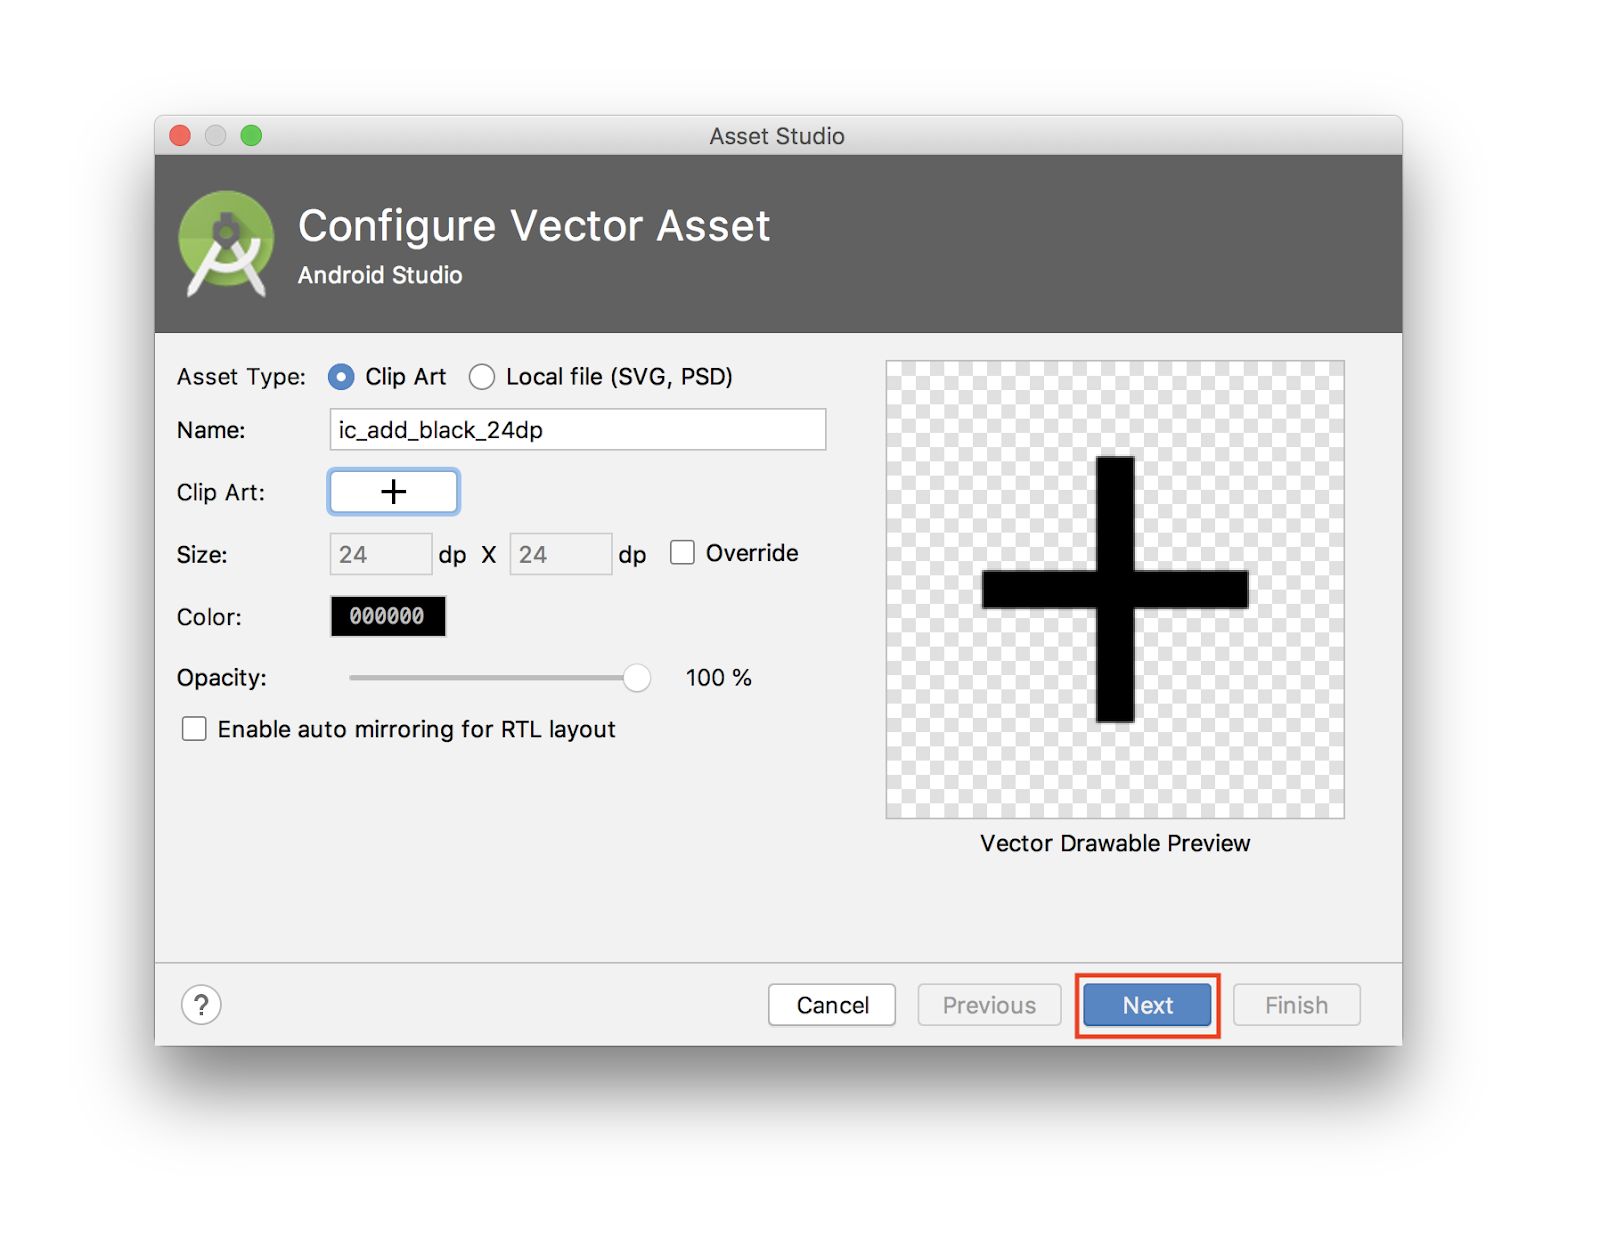
- 确认图标路径为
main > drawable,然后点击 Finish(完成)添加资源。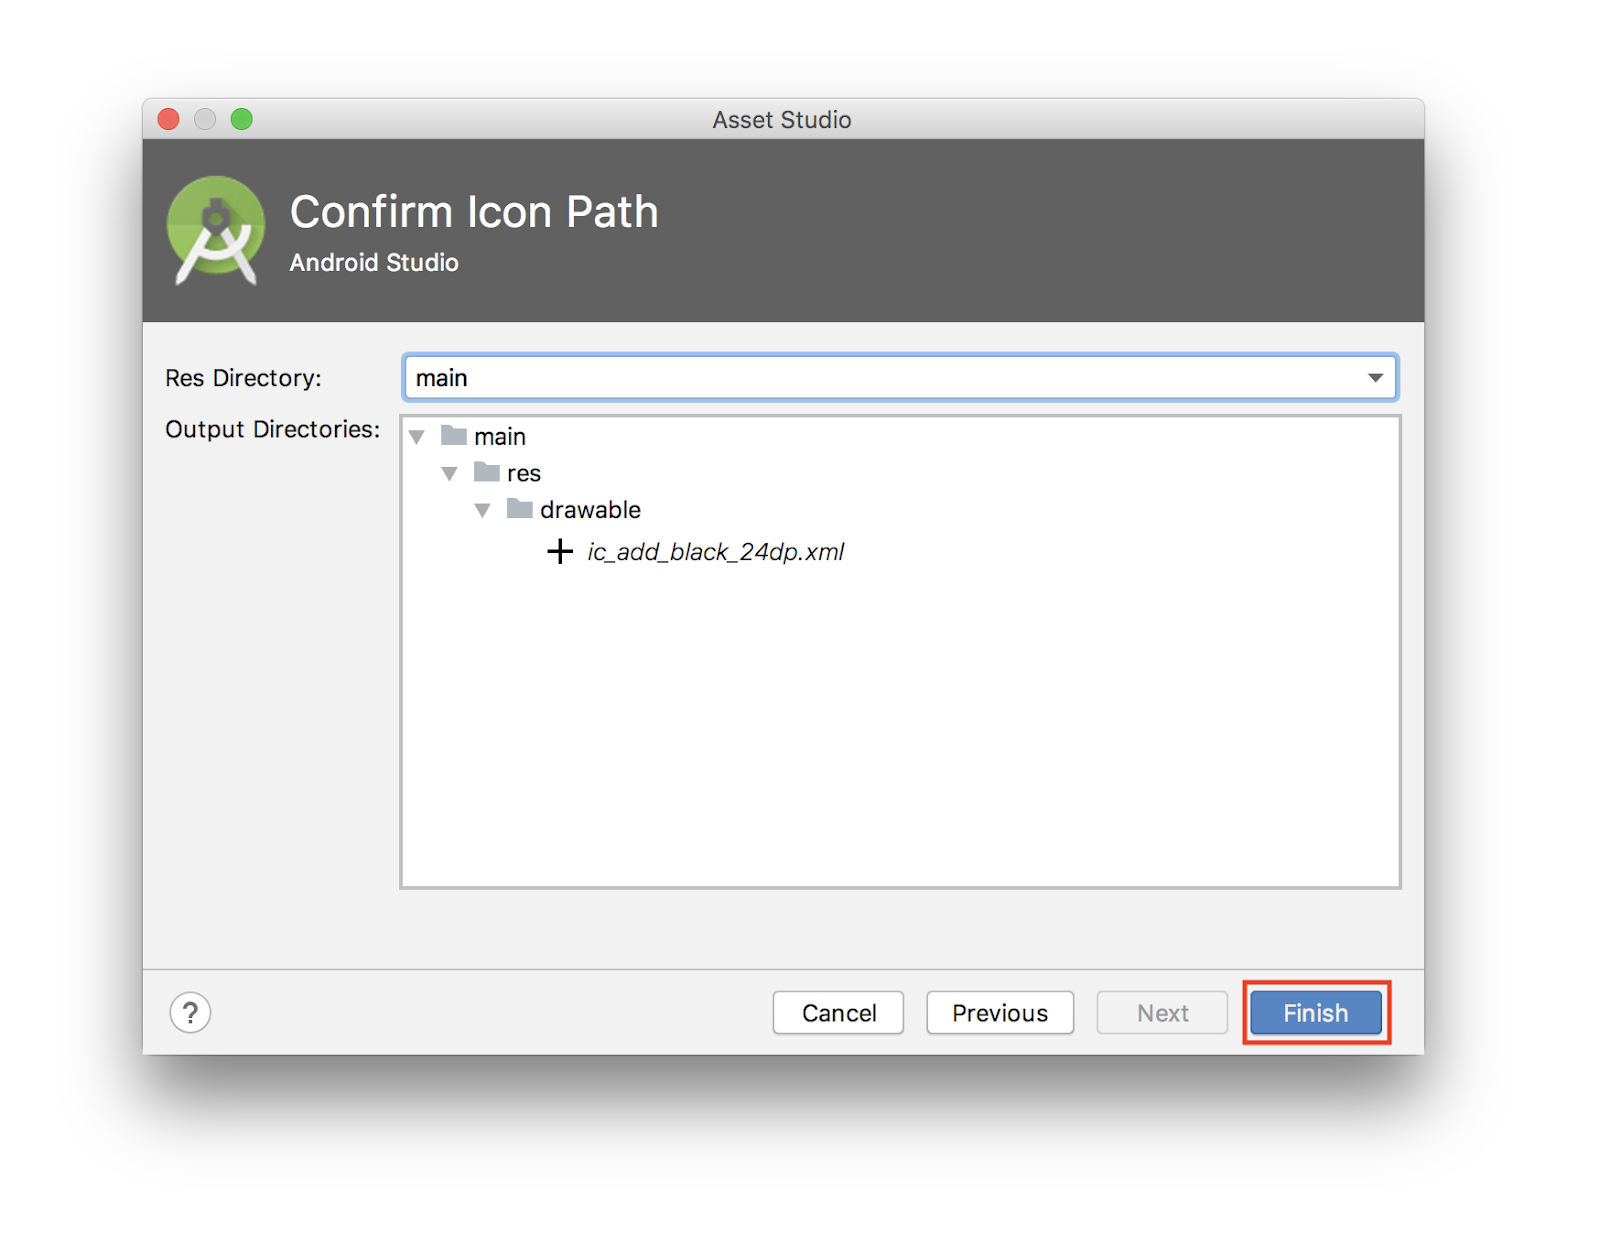
- 仍在
layout/activity_main.xml中,更新 FAB 以包含新的可绘制资源
<com.google.android.material.floatingactionbutton.FloatingActionButton
        android:id="@+id/fab"
        app:layout_constraintBottom_toBottomOf="parent"
        app:layout_constraintEnd_toEndOf="parent"
        android:layout_width="wrap_content"
        android:layout_height="wrap_content"
        android:layout_margin="16dp"
        android:contentDescription="@string/add_word"
        android:src="@drawable/ic_add_black_24dp"/>
12. 添加 RecyclerView
您将使用 RecyclerView 显示数据,这比仅将数据放入 TextView 中要好一些。此 Codelab 假定您了解 RecyclerView、RecyclerView.ViewHolder 和 ListAdapter 的工作原理。
您需要创建
- 扩展
ListAdapter的WordListAdapter类。 WordListAdapter中的嵌套DiffUtil.ItemCallback类。- 用于在我们的列表中显示每个词语的
ViewHolder。
以下是代码
class WordListAdapter : ListAdapter<Word, WordViewHolder>(WordsComparator()) {

    override fun onCreateViewHolder(parent: ViewGroup, viewType: Int): WordViewHolder {
        return WordViewHolder.create(parent)
    }

    override fun onBindViewHolder(holder: WordViewHolder, position: Int) {
        val current = getItem(position)
        holder.bind(current.word)
    }

    class WordViewHolder(itemView: View) : RecyclerView.ViewHolder(itemView) {
        private val wordItemView: TextView = itemView.findViewById(R.id.textView)

        fun bind(text: String?) {
            wordItemView.text = text
        }

        companion object {
            fun create(parent: ViewGroup): WordViewHolder {
                val view: View = LayoutInflater.from(parent.context)
                    .inflate(R.layout.recyclerview_item, parent, false)
                return WordViewHolder(view)
            }
        }
    }

    class WordsComparator : DiffUtil.ItemCallback<Word>() {
        override fun areItemsTheSame(oldItem: Word, newItem: Word): Boolean {
            return oldItem === newItem
        }

        override fun areContentsTheSame(oldItem: Word, newItem: Word): Boolean {
            return oldItem.word == newItem.word
        }
    }
}
在这里,您已经
WordViewHolder类,它允许我们将文本绑定到TextView。该类公开了一个处理布局膨胀的静态create()函数。WordsComparator定义了如何计算两个词语是否相同或内容是否相同。WordListAdapter在onCreateViewHolder中创建WordViewHolder,并在onBindViewHolder中绑定它。
在 MainActivity 的 onCreate() 方法中添加 RecyclerView。
在 setContentView 之后的 onCreate() 方法中
   val recyclerView = findViewById<RecyclerView>(R.id.recyclerview)
   val adapter = WordListAdapter()
   recyclerView.adapter = adapter
   recyclerView.layoutManager = LinearLayoutManager(this)
运行您的应用以确保一切正常。目前没有项目,因为您还没有连接数据。
13. 实例化 Repository 和数据库
您希望在应用中只有一个数据库和 Repository 实例。一种简单的方法是将其作为 Application 类成员创建。这样,无论何时需要它们,都只需从 Application 中检索,而不是每次都构造新的实例。
创建一个名为 WordsApplication 的新类,该类扩展 Application。以下是代码
class WordsApplication : Application() {
    // Using by lazy so the database and the repository are only created when they're needed
    // rather than when the application starts
    val database by lazy { WordRoomDatabase.getDatabase(this) }
    val repository by lazy { WordRepository(database.wordDao()) }
}
这是您所做的
- 创建了一个数据库实例。
- 基于数据库 DAO 创建了一个 Repository 实例。
- 由于这些对象应该仅在首次需要时创建,而不是在应用启动时创建,因此您使用了 Kotlin 的属性委托:
by lazy.
现在您已创建 Application 类,更新 AndroidManifest 文件并将 WordsApplication 设置为 application 的 android:name。
application 标签应如下所示
<application
        android:name=".WordsApplication"
        android:allowBackup="true"
        android:icon="@mipmap/ic_launcher"
        android:label="@string/app_name"
        android:roundIcon="@mipmap/ic_launcher_round"
        android:supportsRtl="true"
        android:theme="@style/AppTheme">
...
14. 填充数据库
目前,数据库中没有数据。您将以两种方式添加数据:在创建数据库时添加一些数据,以及添加一个用于添加词语的 Activity。
要在应用创建时删除所有内容并重新填充数据库,您将创建一个 RoomDatabase.Callback 并重写 onCreate()。由于您不能在 UI 线程上执行 Room 数据库操作,因此 onCreate() 在 IO Dispatcher 上启动一个协程。
要启动协程,您需要一个 CoroutineScope。更新 WordRoomDatabase 类的 getDatabase 方法,使其也获取协程作用域作为参数
fun getDatabase(
       context: Context,
       scope: CoroutineScope
  ): WordRoomDatabase {
...
}
填充数据库与 UI 生命周期无关,因此您不应使用 viewModelScope 这样的 CoroutineScope。它与应用的生命周期相关。您将更新 WordsApplication 以包含一个 applicationScope,然后将其传递给 WordRoomDatabase.getDatabase。
class WordsApplication : Application() {
    // No need to cancel this scope as it'll be torn down with the process
    val applicationScope = CoroutineScope(SupervisorJob())

    // Using by lazy so the database and the repository are only created when they're needed
    // rather than when the application starts
    val database by lazy { WordRoomDatabase.getDatabase(this, applicationScope) }
    val repository by lazy { WordRepository(database.wordDao()) }
}
在 WordRoomDatabase 中,您将创建一个 RoomDatabase.Callback() 的自定义实现,它也获取一个 CoroutineScope 作为构造函数参数。然后,您重写 onCreate 方法来填充数据库。
以下是在 WordRoomDatabase 类内部创建回调的代码
private class WordDatabaseCallback(
    private val scope: CoroutineScope
) : RoomDatabase.Callback() {

    override fun onCreate(db: SupportSQLiteDatabase) {
        super.onCreate(db)
        INSTANCE?.let { database ->
            scope.launch {
                populateDatabase(database.wordDao())
            }
        }
    }

    suspend fun populateDatabase(wordDao: WordDao) {
        // Delete all content here.
        wordDao.deleteAll()

        // Add sample words.
        var word = Word("Hello")
        wordDao.insert(word)
        word = Word("World!")
        wordDao.insert(word)

        // TODO: Add your own words!
    }
}
最后,在调用 Room.databaseBuilder() 的 .build() 方法之前,将回调添加到数据库构建序列中
.addCallback(WordDatabaseCallback(scope))
最终代码应如下所示
@Database(entities = arrayOf(Word::class), version = 1, exportSchema = false)
abstract class WordRoomDatabase : RoomDatabase() {

   abstract fun wordDao(): WordDao

   private class WordDatabaseCallback(
       private val scope: CoroutineScope
   ) : RoomDatabase.Callback() {

       override fun onCreate(db: SupportSQLiteDatabase) {
           super.onCreate(db)
           INSTANCE?.let { database ->
               scope.launch {
                   var wordDao = database.wordDao()

                   // Delete all content here.
                   wordDao.deleteAll()

                   // Add sample words.
                   var word = Word("Hello")
                   wordDao.insert(word)
                   word = Word("World!")
                   wordDao.insert(word)

                   // TODO: Add your own words!
                   word = Word("TODO!")
                   wordDao.insert(word)
               }
           }
       }
   }

   companion object {
       @Volatile
       private var INSTANCE: WordRoomDatabase? = null

       fun getDatabase(
           context: Context,
           scope: CoroutineScope
       ): WordRoomDatabase {
            // if the INSTANCE is not null, then return it,
            // if it is, then create the database
            return INSTANCE ?: synchronized(this) {
                val instance = Room.databaseBuilder(
                        context.applicationContext,
                        WordRoomDatabase::class.java,
                        "word_database"
                )
                 .addCallback(WordDatabaseCallback(scope))
                 .build()
                INSTANCE = instance
                // return instance
                instance
        }
     }
   }
}
15. 添加 NewWordActivity
在 values/strings.xml 中添加这些字符串资源
<string name="hint_word">Word...</string>
<string name="button_save">Save</string>
<string name="empty_not_saved">Word not saved because it is empty.</string>
<string name="add_word">Add word</string>
在 value/colors.xml 中添加此颜色资源
<color name="buttonLabel">#FFFFFF</color>
在 values/dimens.xml 中添加 min_height 维度资源
<dimen name="min_height">48dp</dimen>
使用 Empty Activity 模板创建一个新的空 Android Activity
- 选择 File > New > Activity > Empty Activity(文件 > 新建 > Activity > 空 Activity)
- 为 Activity 名称输入
NewWordActivity。 - 验证新 Activity 是否已添加到 Android Manifest。
<activity android:name=".NewWordActivity"></activity>
使用以下代码更新 layout 文件夹中的 activity_new_word.xml 文件
<LinearLayout xmlns:android="http://schemas.android.com/apk/res/android"
    android:orientation="vertical"
    android:layout_width="match_parent"
    android:layout_height="match_parent">

    <EditText
        android:id="@+id/edit_word"
        android:layout_width="match_parent"
        android:layout_height="wrap_content"
        android:minHeight="@dimen/min_height"
        android:fontFamily="sans-serif-light"
        android:hint="@string/hint_word"
        android:inputType="textAutoComplete"
        android:layout_margin="@dimen/big_padding"
        android:textSize="18sp" />

    <Button
        android:id="@+id/button_save"
        android:layout_width="match_parent"
        android:layout_height="wrap_content"
        android:background="@color/colorPrimary"
        android:text="@string/button_save"
        android:layout_margin="@dimen/big_padding"
        android:textColor="@color/buttonLabel" />

</LinearLayout>
更新 Activity 的代码
class NewWordActivity : AppCompatActivity() {

    private lateinit var editWordView: EditText

    public override fun onCreate(savedInstanceState: Bundle?) {
        super.onCreate(savedInstanceState)
        setContentView(R.layout.activity_new_word)
        editWordView = findViewById(R.id.edit_word)

        val button = findViewById<Button>(R.id.button_save)
        button.setOnClickListener {
            val replyIntent = Intent()
            if (TextUtils.isEmpty(editWordView.text)) {
                setResult(Activity.RESULT_CANCELED, replyIntent)
            } else {
                val word = editWordView.text.toString()
                replyIntent.putExtra(EXTRA_REPLY, word)
                setResult(Activity.RESULT_OK, replyIntent)
            }
            finish()
        }
    }

    companion object {
        const val EXTRA_REPLY = "com.example.android.wordlistsql.REPLY"
    }
}
16. 连接数据
最后一步是通过保存用户输入的新词并在 RecyclerView 中显示词语数据库的当前内容,将 UI 连接到数据库。
要显示数据库的当前内容,请添加一个观察者来观察 ViewModel 中的 LiveData。
每当数据更改时,就会调用 onChanged() 回调,它会调用适配器的 setWords() 方法来更新适配器的缓存数据并刷新显示的列表。
在 MainActivity 中,创建 ViewModel
private val wordViewModel: WordViewModel by viewModels {
    WordViewModelFactory((application as WordsApplication).repository)
}
要创建 ViewModel,您使用了 viewModels 委托,传入了我们的 WordViewModelFactory 实例。这是基于从 WordsApplication 中检索到的 repository 构建的。
同样在 onCreate() 中,为 WordViewModel 的 allWords LiveData 属性添加一个观察者。
当观察到的数据更改且 Activity 处于前台时,会触发 onChanged() 方法(我们的 Lambda 的默认方法)
wordViewModel.allWords.observe(this, Observer { words ->
            // Update the cached copy of the words in the adapter.
            words?.let { adapter.submitList(it) }
})
您希望在点按 FAB 时打开 NewWordActivity,并在返回 MainActivity 后,将新词插入数据库或显示一个 Toast。
为此,首先定义一个请求码
private val newWordActivityRequestCode = 1
在 MainActivity 中,为 NewWordActivity 添加 onActivityResult() 代码。
如果 Activity 返回结果为 RESULT_OK,则通过调用 WordViewModel 的 insert() 方法将返回的词语插入数据库。
override fun onActivityResult(requestCode: Int, resultCode: Int, data: Intent?) {
    super.onActivityResult(requestCode, resultCode, data)

    if (requestCode == newWordActivityRequestCode && resultCode == Activity.RESULT_OK) {
        data?.getStringExtra(NewWordActivity.EXTRA_REPLY)?.let {
            val word = Word(it)
            wordViewModel.insert(word)
        }
    } else {
        Toast.makeText(
            applicationContext,
            R.string.empty_not_saved,
            Toast.LENGTH_LONG).show()
    }
}
在 MainActivity 中,当用户点按 FAB 时启动 NewWordActivity。在 MainActivity 的 onCreate 中,找到 FAB 并使用此代码添加一个 onClickListener。
val fab = findViewById<FloatingActionButton>(R.id.fab)
fab.setOnClickListener {
  val intent = Intent(this@MainActivity, NewWordActivity::class.java)
  startActivityForResult(intent, newWordActivityRequestCode)
}
您的最终代码应如下所示
class MainActivity : AppCompatActivity() {

    private val newWordActivityRequestCode = 1
    private val wordViewModel: WordViewModel by viewModels {
        WordViewModelFactory((application as WordsApplication).repository)
    }

    override fun onCreate(savedInstanceState: Bundle?) {
        super.onCreate(savedInstanceState)
        setContentView(R.layout.activity_main)

        val recyclerView = findViewById<RecyclerView>(R.id.recyclerview)
        val adapter = WordListAdapter()
        recyclerView.adapter = adapter
        recyclerView.layoutManager = LinearLayoutManager(this)

        // Add an observer on the LiveData returned by getAlphabetizedWords.
        // The onChanged() method fires when the observed data changes and the activity is
        // in the foreground.
        wordViewModel.allWords.observe(owner = this) { words ->
            // Update the cached copy of the words in the adapter.
            words.let { adapter.submitList(it) }
        }

        val fab = findViewById<FloatingActionButton>(R.id.fab)
        fab.setOnClickListener {
            val intent = Intent(this@MainActivity, NewWordActivity::class.java)
            startActivityForResult(intent, newWordActivityRequestCode)
        }
    }

    override fun onActivityResult(requestCode: Int, resultCode: Int, intentData: Intent?) {
        super.onActivityResult(requestCode, resultCode, intentData)

        if (requestCode == newWordActivityRequestCode && resultCode == Activity.RESULT_OK) {
            intentData?.getStringExtra(NewWordActivity.EXTRA_REPLY)?.let { reply ->
                val word = Word(reply)
                wordViewModel.insert(word)
            }
        } else {
            Toast.makeText(
                applicationContext,
                R.string.empty_not_saved,
                Toast.LENGTH_LONG
            ).show()
        }
    }
}
现在运行您的应用!当您在 NewWordActivity 中向数据库添加词语时,UI 将自动更新。
17. 总结
现在您拥有一个可以工作的应用了,让我们回顾一下您构建了什么。以下是应用结构概览
应用的组件包括
MainActivity:使用RecyclerView和WordListAdapter在列表中显示词语。在MainActivity中,有一个Observer观察数据库中的词语,并在词语更改时收到通知。NewWordActivity:将新词添加到列表中。WordViewModel:提供访问数据层的方法,并返回 LiveData,以便 MainActivity 可以建立观察者关系。*LiveData<List<Word>>:使 UI 组件中的自动更新成为可能。您可以通过调用flow.toLiveData()将Flow转换为LiveData。Repository:管理一个或多个数据源。Repository向 ViewModel 公开方法,以便与底层数据提供者交互。在此应用中,该后端是 Room 数据库。Room:是 SQLite 数据库的包装和实现。Room 为您完成了许多以前需要自己完成的工作。- DAO:将方法调用映射到数据库查询,以便当 Repository 调用
getAlphabetizedWords()等方法时,Room 可以执行SELECT * FROM word_table ORDER BY word ASC。 - DAO 可以公开用于一次性请求的
suspend查询,以及在您希望收到数据库更改通知时使用的Flow查询。 Word:是包含单个词语的实体类。Views和Activities(以及Fragments)仅通过ViewModel与数据交互。因此,数据来自何处并不重要。
自动 UI 更新的数据流(响应式 UI)
自动更新之所以可能,是因为您使用了 LiveData。在 MainActivity 中,有一个 Observer 观察数据库中的词语 LiveData,并在它们更改时收到通知。发生更改时,执行观察者的 onChange() 方法,并在 WordListAdapter 中更新 mWords。
数据之所以可以被观察,是因为它是 LiveData。被观察的是 WordViewModel 的 allWords 属性返回的 LiveData<List<Word>>。
WordViewModel 对 UI 层隐藏了后端的所有信息。它提供访问数据层的方法,并返回 LiveData,以便 MainActivity 可以建立观察者关系。Views 和 Activities(以及 Fragments)仅通过 ViewModel 与数据交互。因此,数据来自何处并不重要。
在本例中,数据来自 Repository。ViewModel 不需要知道该 Repository 与什么交互。它只需要知道如何与 Repository 交互,这通过 Repository 公开的方法来实现。
Repository 管理一个或多个数据源。在 WordListSample 应用中,该后端是一个 Room 数据库。Room 是 SQLite 数据库的包装和实现。Room 为您完成了许多以前需要自己完成的工作。例如,Room 完成了您以前使用 SQLiteOpenHelper 类完成的所有工作。
DAO 将方法调用映射到数据库查询,以便当 Repository 调用 getAllWords() 等方法时,Room 可以执行 SELECT * FROM word_table ORDER BY word ASC
.
由于查询返回的结果是可观察的 LiveData,因此 Room 中的数据每次更改时,都会执行 Observer 接口的 onChanged() 方法,并更新 UI。
18. 恭喜!
[可选] 下载解决方案代码
如果您还没有,可以查看此 Codelab 的解决方案代码。您可以查看 github 仓库或在此处下载代码
解压下载的 zip 文件。这将解压一个根文件夹 android-room-with-a-view-kotlin,其中包含完整的应用。