1. 开始之前
Architecture Components 的目的是提供应用架构指南,包含用于生命周期管理和数据持久性等常见任务的库。架构组件可帮助您以稳健、可测试且易于维护的方式构建应用,并减少样板代码。架构组件库是 Android Jetpack 的一部分。
这是此 Codelab 的 Java 编程语言版本。Kotlin 语言版本可在此处找到。
如果您在完成此 Codelab 时遇到任何问题(代码错误、语法错误、措辞不清楚等),请通过 Codelab 左下角的“报告错误”链接报告问题。
前提条件
您需要熟悉 Java、面向对象设计概念和 Android 开发基础知识。特别是
RecyclerView和适配器- SQLite 数据库和 SQLite 查询语言
- 多线程和
ExecutorService - 熟悉将数据与用户界面分离的软件架构模式(例如 MVP 或 MVC)会有所帮助。此 Codelab 实现了应用架构指南中定义的架构。
此 Codelab 侧重于 Android Architecture Components。提供了非主题相关的概念和代码供您直接复制粘贴。
此 Codelab 提供了构建完整应用所需的所有代码。
您将执行的操作
在此 Codelab 中,您将学习如何使用 Architecture Components 中的 Room、ViewModel 和 LiveData 设计和构建应用,并构建一个具有以下功能的应用
- 使用 Android Architecture Components 实现我们推荐的架构。
- 使用数据库获取和保存数据,并使用一些单词预填充数据库。
- 在
MainActivity的RecyclerView中显示所有单词。 - 当用户点击 + 按钮时打开第二个 Activity。当用户输入一个单词时,将该单词添加到数据库和列表中。
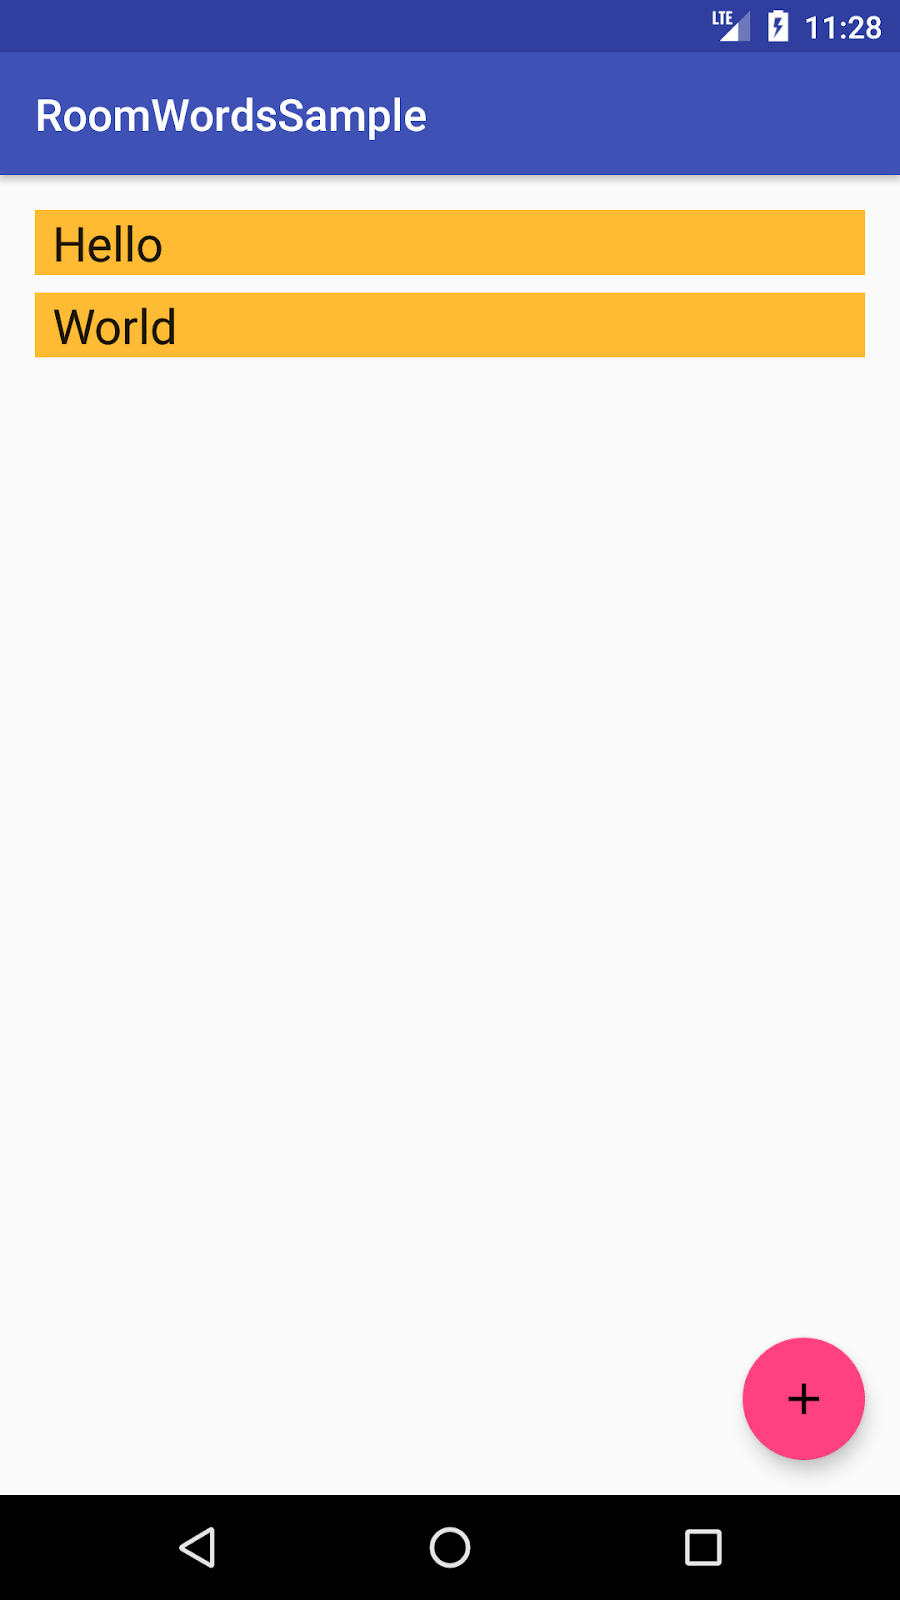
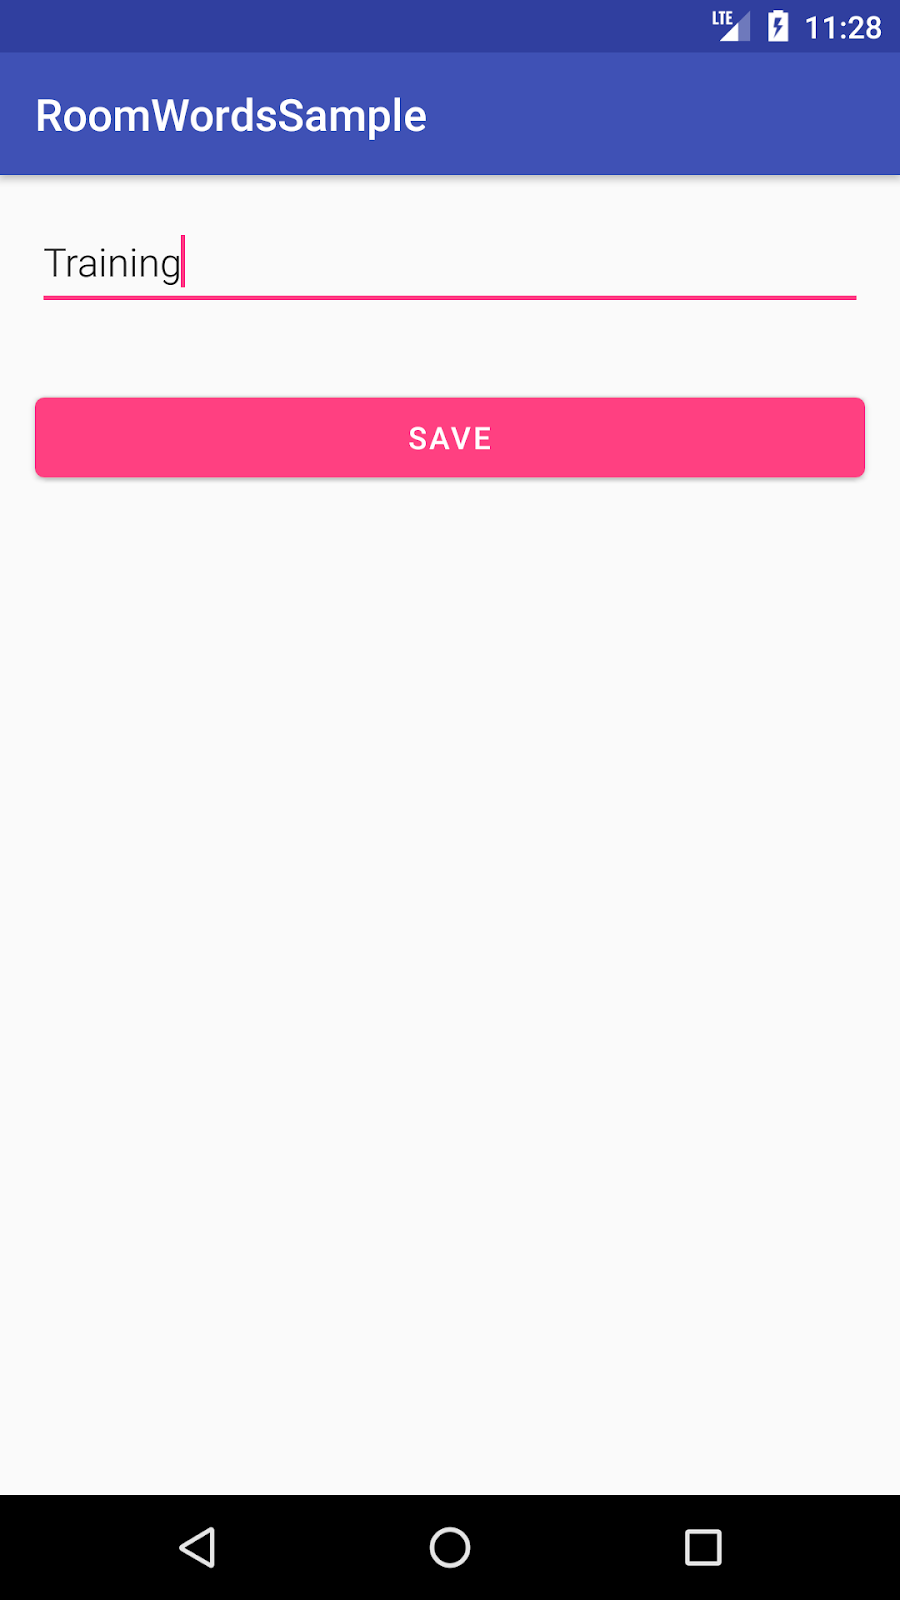
该应用功能简单,但足够复杂,您可以将其用作构建的基础模板。以下是预览
|
|
|
您需要准备的事项
- 最新稳定版本的 Android Studio 以及如何使用它的知识。请确保 Android Studio、SDK 和 Gradle 都已更新。否则,您可能需要等待所有更新完成。
- 一台 Android 设备或模拟器。
2. 使用 Architecture Components
使用 Architecture Components 并实现推荐架构需要很多步骤。最重要的是建立一个正在发生的事情的心智模型,理解各个部分如何配合以及数据如何流动。在完成此 Codelab 时,不要只复制粘贴代码,而是尝试开始建立这种内在的理解。
推荐的 Architecture Components 是什么?
以下是 Architecture Components 及其如何协同工作的简要介绍。请注意,此 Codelab 侧重于这些组件的一个子集,即 LiveData、ViewModel 和 Room。在使用每个组件时都会对其进行更多解释。
此图显示了此架构的基本形式
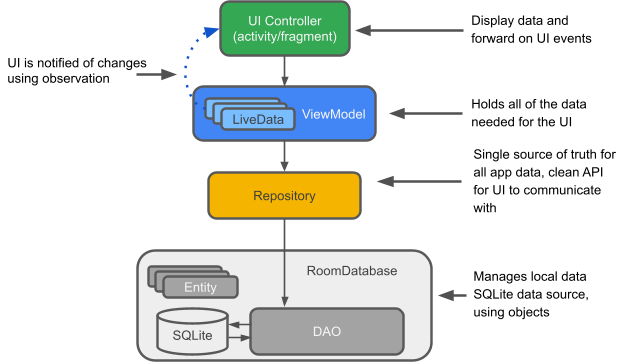
Entity(实体):在使用 Room 时描述数据库表的带注解类。
SQLite 数据库: 设备存储上的数据库。Room 持久性库会为您创建并维护此数据库。
DAO(数据访问对象): 数据访问对象。SQL 查询到函数的映射。当您使用 DAO 时,您调用方法,其余工作由 Room 处理。
Room 数据库: 简化数据库操作,并充当底层 SQLite 数据库的访问点(隐藏 SQLiteOpenHelper)。Room 数据库使用 DAO 向 SQLite 数据库发出查询。
Repository(仓库): 用于管理多个数据源。
ViewModel: 充当 Repository(数据)和 UI 之间的通信中心。UI 无需再担心数据的来源。ViewModel 实例可在 Activity/Fragment 重建后幸存。
LiveData: 一个可被观察的数据持有者类。始终持有/缓存最新版本的数据,并在数据发生变化时通知其观察者。LiveData 具有生命周期感知能力。UI 组件只需观察相关数据,而无需停止或恢复观察。由于 LiveData 在观察时感知相关的生命周期状态变化,因此它会自动管理所有这些。
RoomWordSample 架构概览
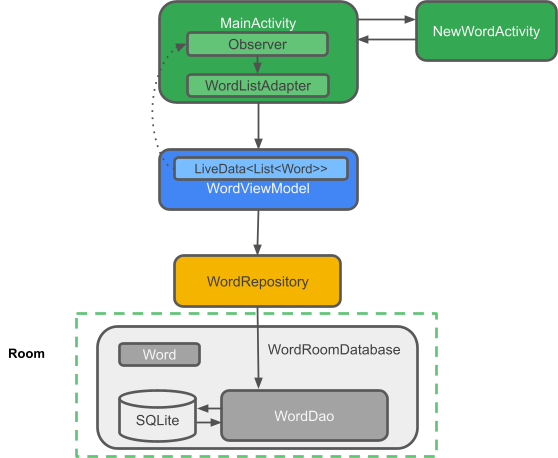
下图显示了应用的所有组件。每个封闭框(SQLite 数据库除外)都代表您将创建的一个类。
3. 创建您的应用
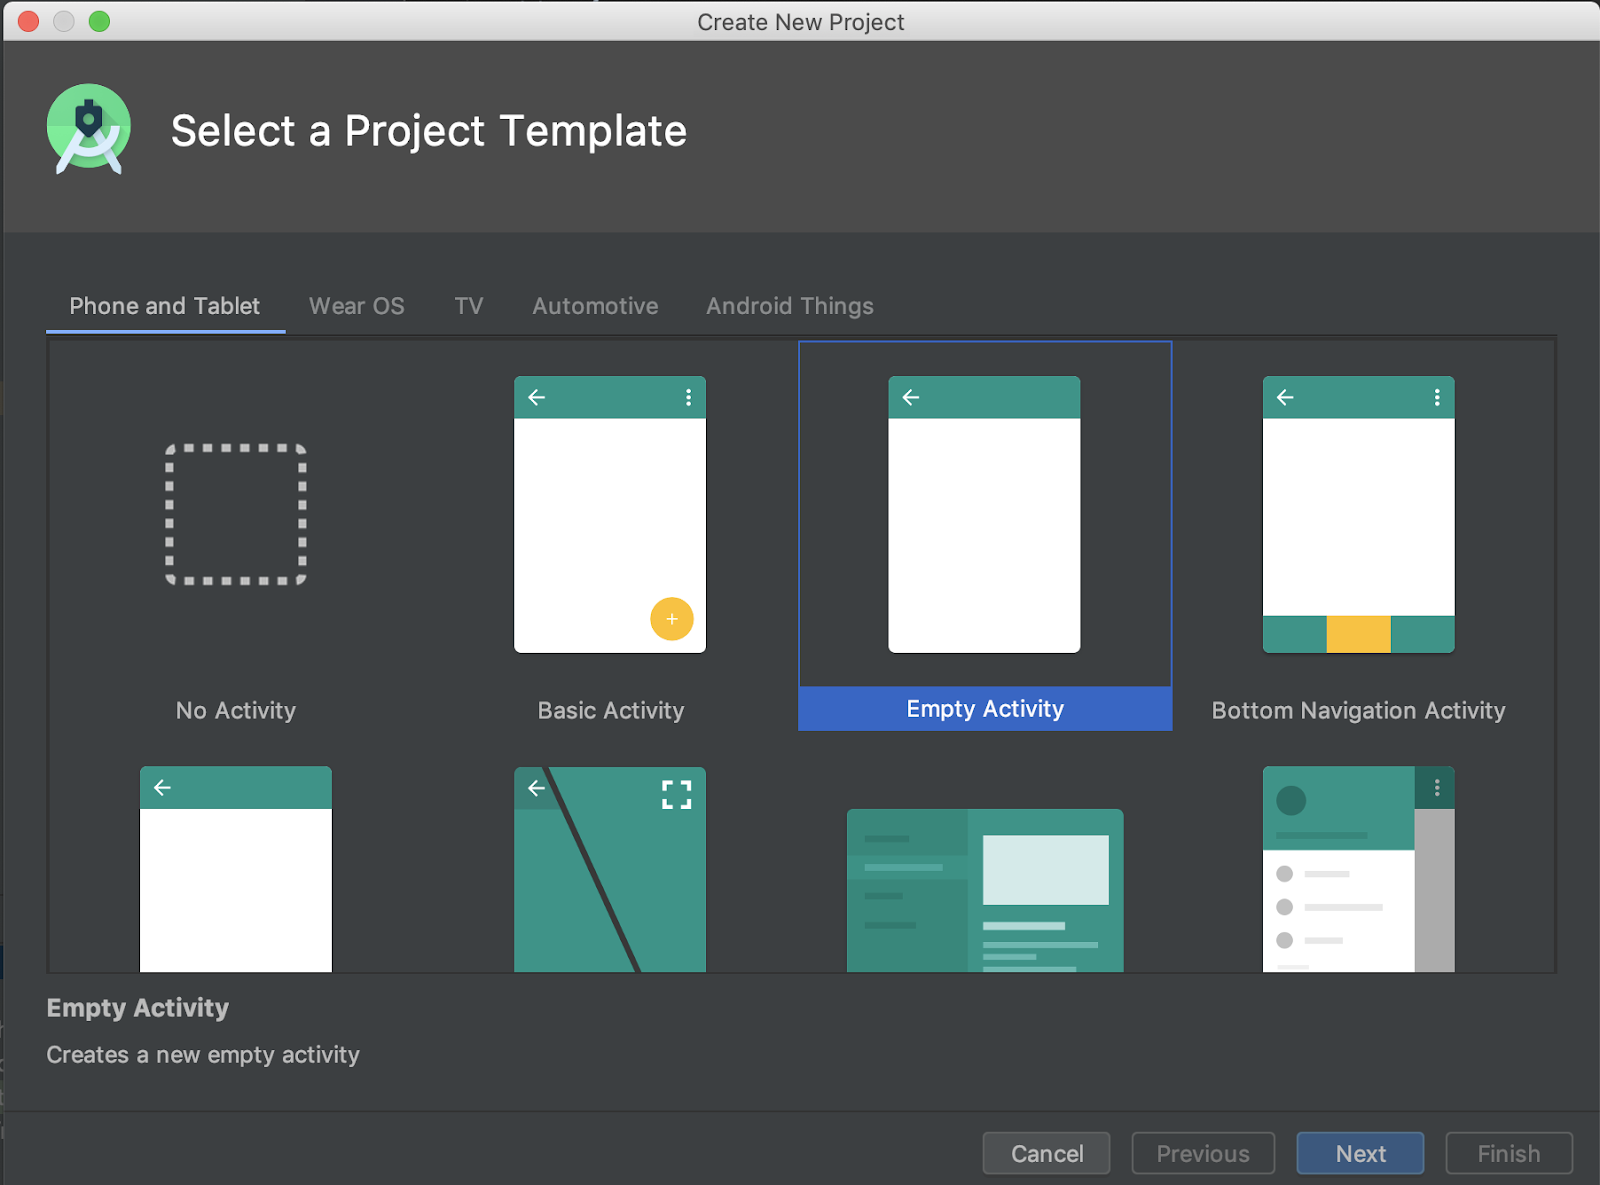
- 打开 Android Studio,然后点击 Start a new Android Studio project.
- 在 Create New Project 窗口中,选择 Empty Activity 并点击 Next。
- 在下一个屏幕上,将应用命名为 RoomWordSample,然后点击 Finish。
4. 更新 Gradle 文件
接下来,您需要将组件库添加到您的 Gradle 文件中。
- 在 Android Studio 中,点击 Projects 选项卡并展开 Gradle Scripts 文件夹。
- 打开
build.gradle(Module: app)。 - 在
android代码块中添加以下compileOptions代码块,以将目标和源兼容性设置为 1.8,这将允许我们在以后使用 JDK 8 lambda 表达式
compileOptions {
    sourceCompatibility = 1.8
    targetCompatibility = 1.8
}
- 将
dependencies代码块替换为
dependencies {
    implementation "androidx.appcompat:appcompat:$rootProject.appCompatVersion"

    // Dependencies for working with Architecture components
    // You'll probably have to update the version numbers in build.gradle (Project)

    // Room components
    implementation "androidx.room:room-runtime:$rootProject.roomVersion"
    annotationProcessor "androidx.room:room-compiler:$rootProject.roomVersion"
    androidTestImplementation "androidx.room:room-testing:$rootProject.roomVersion"

    // Lifecycle components
    implementation "androidx.lifecycle:lifecycle-viewmodel:$rootProject.lifecycleVersion"
    implementation "androidx.lifecycle:lifecycle-livedata:$rootProject.lifecycleVersion"
    implementation "androidx.lifecycle:lifecycle-common-java8:$rootProject.lifecycleVersion"

    // UI
    implementation "androidx.constraintlayout:constraintlayout:$rootProject.constraintLayoutVersion"
    implementation "com.google.android.material:material:$rootProject.materialVersion"

    // Testing
    testImplementation "junit:junit:$rootProject.junitVersion"
    androidTestImplementation "androidx.arch.core:core-testing:$rootProject.coreTestingVersion"
    androidTestImplementation ("androidx.test.espresso:espresso-core:$rootProject.espressoVersion", {
        exclude group: 'com.android.support', module: 'support-annotations'
    })
    androidTestImplementation "androidx.test.ext:junit:$rootProject.androidxJunitVersion"
}
- 在您的
build.gradle(Project: RoomWordsSample) 文件中,将版本号添加到文件末尾,如下面代码所示
ext {
    appCompatVersion = '1.5.1'
    constraintLayoutVersion = '2.1.4'
    coreTestingVersion = '2.1.0'
    lifecycleVersion = '2.3.1'
    materialVersion = '1.3.0'
    roomVersion = '2.3.0'
    // testing
    junitVersion = '4.13.2'
    espressoVersion = '3.4.0'
    androidxJunitVersion = '1.1.2'
}
- 同步您的项目。
5. 创建实体
此应用的数据是单词,您将需要一个简单的表来存储这些值
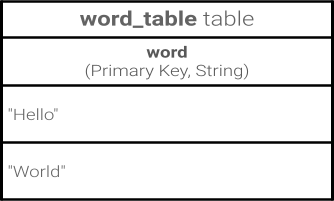
Architecture components 允许您通过 Entity 创建一个实体。现在就来创建吧。
- 创建一个名为
Word的新类文件。此类将描述单词的 Entity(表示 SQLite 表)。类中的每个属性都代表表中的一列。Room 最终将使用这些属性来创建表并从数据库中的行实例化对象。以下是代码
public class Word {

   private String mWord;

   public Word(@NonNull String word) {this.mWord = word;}

   public String getWord(){return this.mWord;}
}
为了使 Word 类对 Room 数据库有意义,您需要对其进行注解。注解标识此类中的每个部分如何与数据库中的条目相关联。Room 使用此信息来生成代码。
- 使用注解更新您的
Word类,如下面代码所示
@Entity(tableName = "word_table")
public class Word {

   @PrimaryKey
   @NonNull
   @ColumnInfo(name = "word")
   private String mWord;

   public Word(@NonNull String word) {this.mWord = word;}

   public String getWord(){return this.mWord;}
}
让我们看看这些注解的作用
@Entity(tableName ="word_table")每个@Entity类代表一个 SQLite 表。注解您的类声明以指示它是一个实体。如果您想让表名与类名不同,可以指定表名。这会将表命名为“word_table”。@PrimaryKey每个实体都需要一个主键。为了简单起见,每个单词都充当其自身的主键。@NonNull表示参数、字段或方法返回值永远不能为 null。@ColumnInfo(name ="word")如果您希望表中的列名与成员变量名不同,可以指定列名。- 数据库中存储的每个字段都需要是 public 或具有一个“getter”方法。此示例提供了
getWord()方法。
您可以在Room 包摘要参考中找到完整的注解列表。
提示: 您可以通过如下方式注解主键来自动生成唯一的键
@Entity(tableName = "word_table")
public class Word {

    @PrimaryKey(autoGenerate = true)
    private int id;

    @NonNull
    private String word;
    //..other fields, getters, setters
}
6. 创建 DAO
什么是 DAO?
一个 DAO (数据访问对象) 在编译时验证您的 SQL,并将其与方法关联。在您的 Room DAO 中,您可以使用方便的注解,例如 @Insert,来表示最常见的数据库操作!Room 使用 DAO 为您的代码创建一个清晰的 API。
DAO 必须是接口或抽象类。默认情况下,所有查询都必须在单独的线程上执行。
实现 DAO
让我们编写一个 DAO,它提供以下查询功能
- 按字母顺序获取所有单词
- 插入一个单词
- 删除所有单词
- 创建一个名为
WordDao的新类文件。 - 将以下代码复制粘贴到
WordDao中,并根据需要修改导入以使其能够编译
@Dao
public interface WordDao {

   // allowing the insert of the same word multiple times by passing a
   // conflict resolution strategy
   @Insert(onConflict = OnConflictStrategy.IGNORE)
   void insert(Word word);

   @Query("DELETE FROM word_table")
   void deleteAll();

   @Query("SELECT * FROM word_table ORDER BY word ASC")
   List<Word> getAlphabetizedWords();
}
让我们逐步分析
WordDao是一个接口;DAO 必须是接口或抽象类。- The
@Daoannotation identifies it as a DAO class for Room. void insert(Word word);声明一个插入一个单词的方法@Insert注解是一个特殊的 DAO 方法注解,您无需提供任何 SQL!(还有用于删除和更新行的@Delete和@Update注解,但在此应用中未使用它们。)onConflict = OnConflictStrategy.IGNORE:选定的冲突策略会忽略一个新单词,如果它与列表中已有的单词完全相同。要了解更多关于可用冲突策略的信息,请查阅文档。deleteAll():声明一个删除所有单词的方法。- 没有用于删除多个实体的便捷注解,因此它使用泛型
@Query进行注解。 @Query("DELETE FROM word_table"):@Query要求您提供一个 SQL 查询作为注解的字符串参数。List<Word> getAlphabetizedWords():一个用于获取所有单词并使其返回ListofWords的方法。@Query("SELECT * FROM word_table ORDER BY word ASC"):返回按升序排序的单词列表。
7. LiveData 类
当数据发生变化时,您通常希望采取一些操作,例如在 UI 中显示更新的数据。这意味着您必须观察数据,以便在数据发生变化时能够做出反应。
根据数据的存储方式,这可能会很棘手。观察应用多个组件之间的数据变化会创建组件之间显式、僵化的依赖路径。这使得测试和调试变得困难,等等。
用于数据观察的LiveData 是一个生命周期感知库类,解决了这个问题。在您的方法描述中使用类型为 LiveData 的返回值,Room 会生成所有必要的代码,以便在数据库更新时更新 LiveData。
在 WordDao 中,更改 getAlphabetizedWords() 方法签名,以便返回的 List<Word> 被 LiveData 包装
   @Query("SELECT * FROM word_table ORDER BY word ASC")
   LiveData<List<Word>> getAlphabetizedWords();
在本 Codelab 的后续部分,您将在 MainActivity 中通过一个 Observer 来跟踪数据变化。
8. 添加 Room 数据库
什么是 Room 数据库?
- Room 是构建在 SQLite 数据库之上的数据库层。
- Room 负责处理您以前使用
SQLiteOpenHelper处理的繁琐任务。 - Room 使用 DAO 向其数据库发出查询。
- 默认情况下,为了避免糟糕的 UI 性能,Room 不允许您在主线程上发出查询。当 Room 查询返回
LiveData时,查询会自动在后台线程上异步运行。 - Room 提供 SQLite 语句的编译时检查。
实现 Room 数据库
您的 Room 数据库类必须是抽象类并扩展 RoomDatabase。通常,您只需要应用的一个 Room 数据库实例。
现在创建一个。创建一个名为 WordRoomDatabase 的类文件,并将此代码添加到其中
@Database(entities = {Word.class}, version = 1, exportSchema = false)
public abstract class WordRoomDatabase extends RoomDatabase {

   public abstract WordDao wordDao();

   private static volatile WordRoomDatabase INSTANCE;
   private static final int NUMBER_OF_THREADS = 4;
   static final ExecutorService databaseWriteExecutor =
        Executors.newFixedThreadPool(NUMBER_OF_THREADS);

   static WordRoomDatabase getDatabase(final Context context) {
        if (INSTANCE == null) {
            synchronized (WordRoomDatabase.class) {
                if (INSTANCE == null) {
                    INSTANCE = Room.databaseBuilder(context.getApplicationContext(),
                            WordRoomDatabase.class, "word_database")
                            .build();
                }
            }
        }
        return INSTANCE;
    }
}
让我们逐步分析代码
- Room 的数据库类必须是
abstract并扩展RoomDatabase - 使用
@Database注解将类标记为 Room 数据库,并使用注解参数声明数据库中包含的实体并设置版本号。每个实体对应于将在数据库中创建的表。数据库迁移超出了此 codelab 的范围,因此我们在此处将exportSchema设置为 false 以避免构建警告。在实际应用中,您应该考虑设置一个目录供 Room 用于导出 schema,以便您可以将当前 schema 检入到您的版本控制系统中。 - 数据库通过每个 @Dao 的抽象“getter”方法公开 DAO。
- 我们定义了一个单例
WordRoomDatabase,以防止同时打开多个数据库实例。 getDatabase返回单例。它会在第一次访问时创建数据库,使用 Room 的数据库构建器从WordRoomDatabase类在应用上下文中创建一个RoomDatabase对象并将其命名为"word_database"。- 我们创建了一个具有固定线程池的
ExecutorService,您将使用它在后台线程上异步运行数据库操作。
9. 创建 Repository
什么是 Repository?
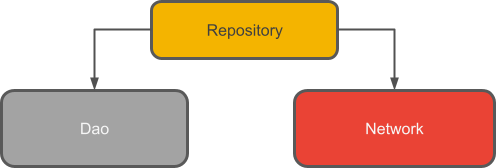
一个 Repository 类抽象了对多个数据源的访问。Repository 不是 Architecture Components 库的一部分,而是代码分离和架构的建议最佳实践。Repository 类为应用程序的其余部分提供了干净的数据访问 API。
为什么要使用 Repository?
Repository 管理查询并允许您使用多个后端。在最常见的示例中,Repository 实现决定是从网络获取数据还是使用本地数据库中缓存结果的逻辑。
实现 Repository
创建一个名为 WordRepository 的类文件,并将以下代码粘贴到其中
class WordRepository {

    private WordDao mWordDao;
    private LiveData<List<Word>> mAllWords;

    // Note that in order to unit test the WordRepository, you have to remove the Application
    // dependency. This adds complexity and much more code, and this sample is not about testing.
    // See the BasicSample in the android-architecture-components repository at
    // https://github.com/googlesamples
    WordRepository(Application application) {
        WordRoomDatabase db = WordRoomDatabase.getDatabase(application);
        mWordDao = db.wordDao();
        mAllWords = mWordDao.getAlphabetizedWords();
    }

    // Room executes all queries on a separate thread.
    // Observed LiveData will notify the observer when the data has changed.
    LiveData<List<Word>> getAllWords() {
        return mAllWords;
    }

    // You must call this on a non-UI thread or your app will throw an exception. Room ensures
    // that you're not doing any long running operations on the main thread, blocking the UI.
    void insert(Word word) {
        WordRoomDatabase.databaseWriteExecutor.execute(() -> {
            mWordDao.insert(word);
        });
    }
}
主要要点
- DAO 被传入 repository 构造函数,而不是整个数据库。这是因为您只需要访问 DAO,因为它包含数据库的所有读/写方法。没有必要将整个数据库暴露给 repository。
getAllWords方法返回 Room 中的LiveData单词列表;我们之所以可以这样做,是因为我们在“LiveData 类”步骤中定义了getAlphabetizedWords方法返回LiveData。Room 在单独的线程上执行所有查询。然后,被观察的LiveData会在数据发生变化时通知主线程上的观察者。- 我们需要不在主线程上运行插入操作,因此我们使用在
WordRoomDatabase中创建的ExecutorService在后台线程上执行插入。
10. 创建 ViewModel
什么是 ViewModel?
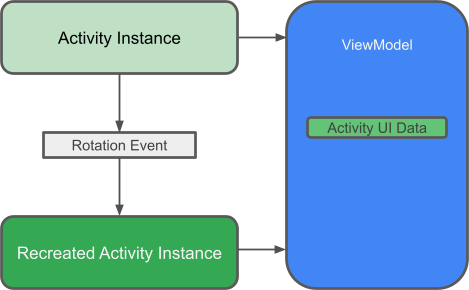
ViewModel 的作用是向 UI 提供数据并在配置更改后幸存。ViewModel 充当 Repository 和 UI 之间的通信中心。您还可以使用 ViewModel 在片段之间共享数据。ViewModel 是生命周期感知库的一部分。
有关本主题的入门指南,请参阅ViewModel 概览或博客文章ViewModels:一个简单示例。
为什么要使用 ViewModel?
一个 ViewModel 以一种生命周期感知的方式持有您的应用 UI 数据,并且能够在配置更改后幸存。将应用的 UI 数据与 Activity 和 Fragment 类分离,可以让您更好地遵循单一职责原则:您的 activity 和 fragment 负责在屏幕上绘制数据,而您的 ViewModel 则负责持有和处理 UI 所需的所有数据。
在 ViewModel 中,对 UI 将使用或显示的易变数据使用 LiveData。使用 LiveData 有几个好处
- 您可以对数据设置观察者(而不是轮询变化),并且只在数据实际发生变化时更新 UI。
- Repository 和 UI 通过
ViewModel完全分离。 - ViewModel 中没有数据库调用(这都在 Repository 中处理),使得代码更易于测试。
实现 ViewModel
创建一个 WordViewModel 的类文件,并将此代码添加到其中
public class WordViewModel extends AndroidViewModel {

   private WordRepository mRepository;

   private final LiveData<List<Word>> mAllWords;

   public WordViewModel (Application application) {
       super(application);
       mRepository = new WordRepository(application);
       mAllWords = mRepository.getAllWords();
   }

   LiveData<List<Word>> getAllWords() { return mAllWords; }

   public void insert(Word word) { mRepository.insert(word); }
}
在这里,我们已经
- 创建了一个名为
WordViewModel的类,它将Application作为参数并扩展AndroidViewModel。 - 添加了一个私有成员变量来持有 repository 的引用。
- 添加了一个
getAllWords()方法来返回缓存的单词列表。 - 实现了一个创建
WordRepository的构造函数。 - 在构造函数中,使用 repository 初始化了
allWordsLiveData。 - 创建了一个包装
insert()方法,它调用 Repository 的insert()方法。通过这种方式,insert()的实现与 UI 封装隔离开来。
11. 添加 XML 布局
接下来,您需要为列表和项目添加 XML 布局。
此 codelab 假定您熟悉如何在 XML 中创建布局,因此我们只向您提供代码。
通过将 AppTheme 父级设置为 Theme.MaterialComponents.Light.DarkActionBar 来使您的应用程序主题为 Material Design。在 values/styles.xml 中为列表项添加样式
<resources>

    <!-- Base application theme. -->
    <style name="AppTheme" parent="Theme.MaterialComponents.Light.DarkActionBar">
        <!-- Customize your theme here. -->
        <item name="colorPrimary">@color/colorPrimary</item>
        <item name="colorPrimaryDark">@color/colorPrimaryDark</item>
        <item name="colorAccent">@color/colorAccent</item>
    </style>

    <!-- The default font for RecyclerView items is too small.
    The margin is a simple delimiter between the words. -->
    <style name="word_title">
        <item name="android:layout_width">match_parent</item>
        <item name="android:layout_marginBottom">8dp</item>
        <item name="android:paddingLeft">8dp</item>
        <item name="android:background">@android:color/holo_orange_light</item>
        <item name="android:textAppearance">@android:style/TextAppearance.Large</item>
    </style>
</resources>
添加一个 layout/recyclerview_item.xml 布局
<?xml version="1.0" encoding="utf-8"?>
<LinearLayout xmlns:android="http://schemas.android.com/apk/res/android"
    android:orientation="vertical"
    android:layout_width="match_parent"
    android:layout_height="wrap_content">

    <TextView
        android:id="@+id/textView"
        style="@style/word_title"
        android:layout_width="match_parent"
        android:layout_height="wrap_content"
        android:background="@android:color/holo_orange_light" />
</LinearLayout>
在 layout/activity_main.xml 中,将 TextView 替换为 RecyclerView 并添加一个浮动操作按钮 (FAB)。现在您的布局应该如下所示
<androidx.constraintlayout.widget.ConstraintLayout
    xmlns:android="http://schemas.android.com/apk/res/android"
    xmlns:app="http://schemas.android.com/apk/res-auto"
    xmlns:tools="http://schemas.android.com/tools"
    android:layout_width="match_parent"
    android:layout_height="match_parent"
    tools:context=".MainActivity">

    <androidx.recyclerview.widget.RecyclerView
        android:id="@+id/recyclerview"
        android:layout_width="0dp"
        android:layout_height="0dp"
        tools:listitem="@layout/recyclerview_item"
        android:padding="@dimen/big_padding"
        app:layout_constraintBottom_toBottomOf="parent"
        app:layout_constraintLeft_toLeftOf="parent"
        app:layout_constraintRight_toRightOf="parent"
        app:layout_constraintTop_toTopOf="parent" />

    <com.google.android.material.floatingactionbutton.FloatingActionButton
        android:id="@+id/fab"
        app:layout_constraintBottom_toBottomOf="parent"
        app:layout_constraintEnd_toEndOf="parent"
        android:layout_width="wrap_content"
        android:layout_height="wrap_content"
        android:layout_margin="16dp"
        android:contentDescription="@string/add_word"/>

</androidx.constraintlayout.widget.ConstraintLayout>
您的浮动操作按钮 (FAB) 的外观应该与可用操作相对应,因此我们希望将图标替换为 + 符号。
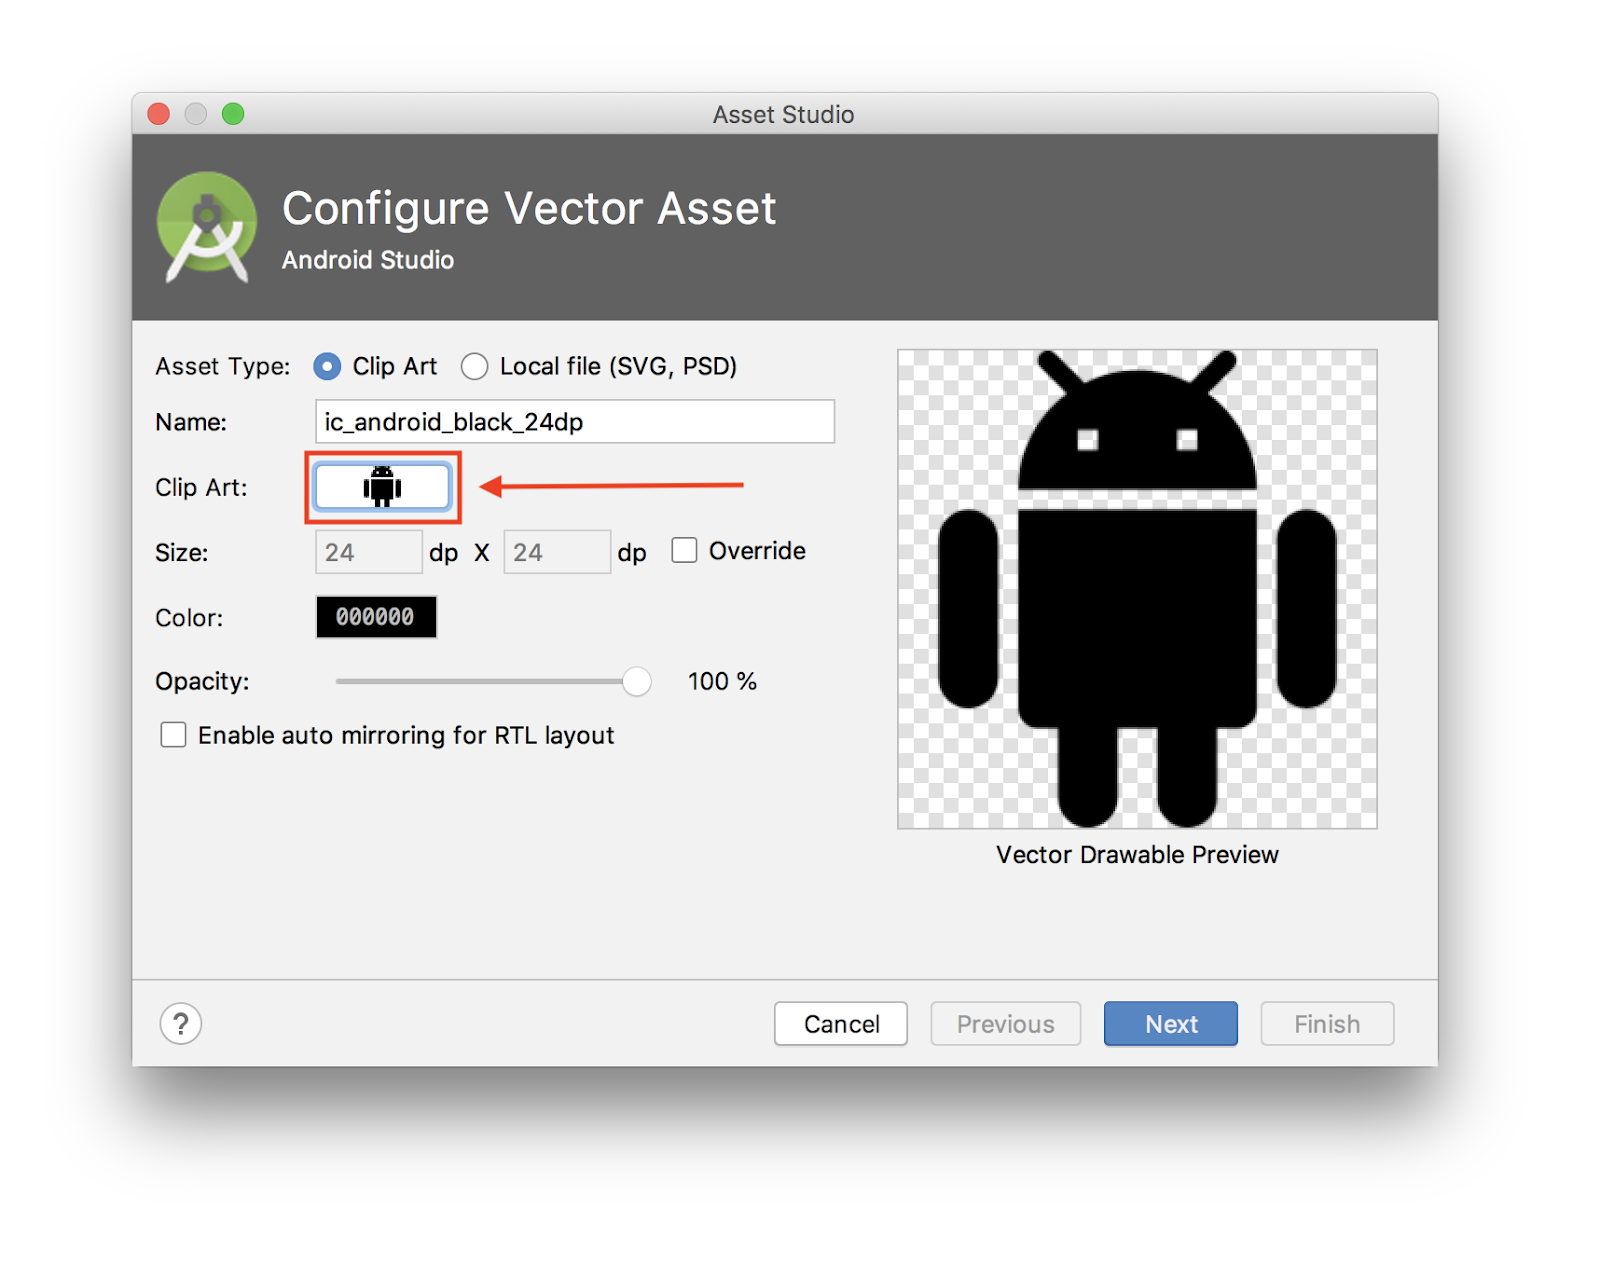
首先,我们需要添加一个新的 Vector Asset
- 选择 File > New > Vector Asset。
- 点击 Icon 中的 Android 机器人图标
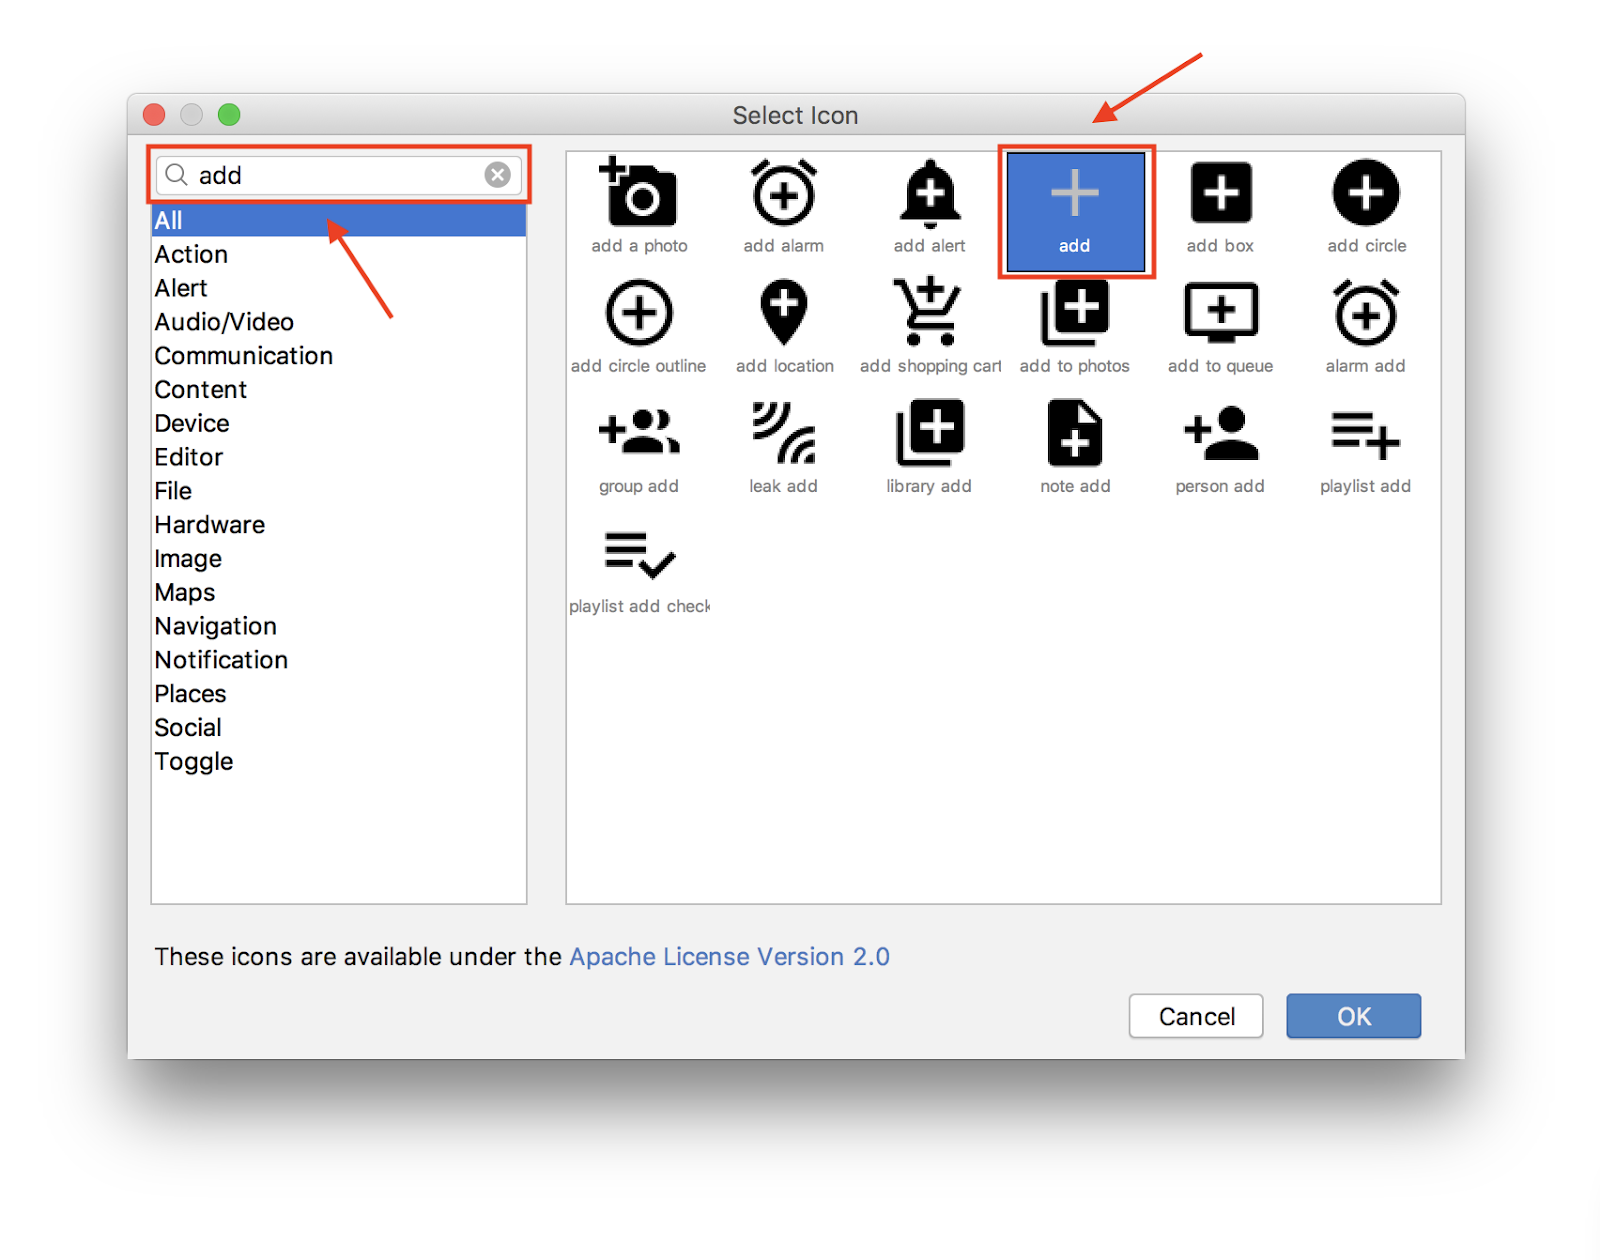
- 搜索“add”并选择“+” asset。点击 OK。
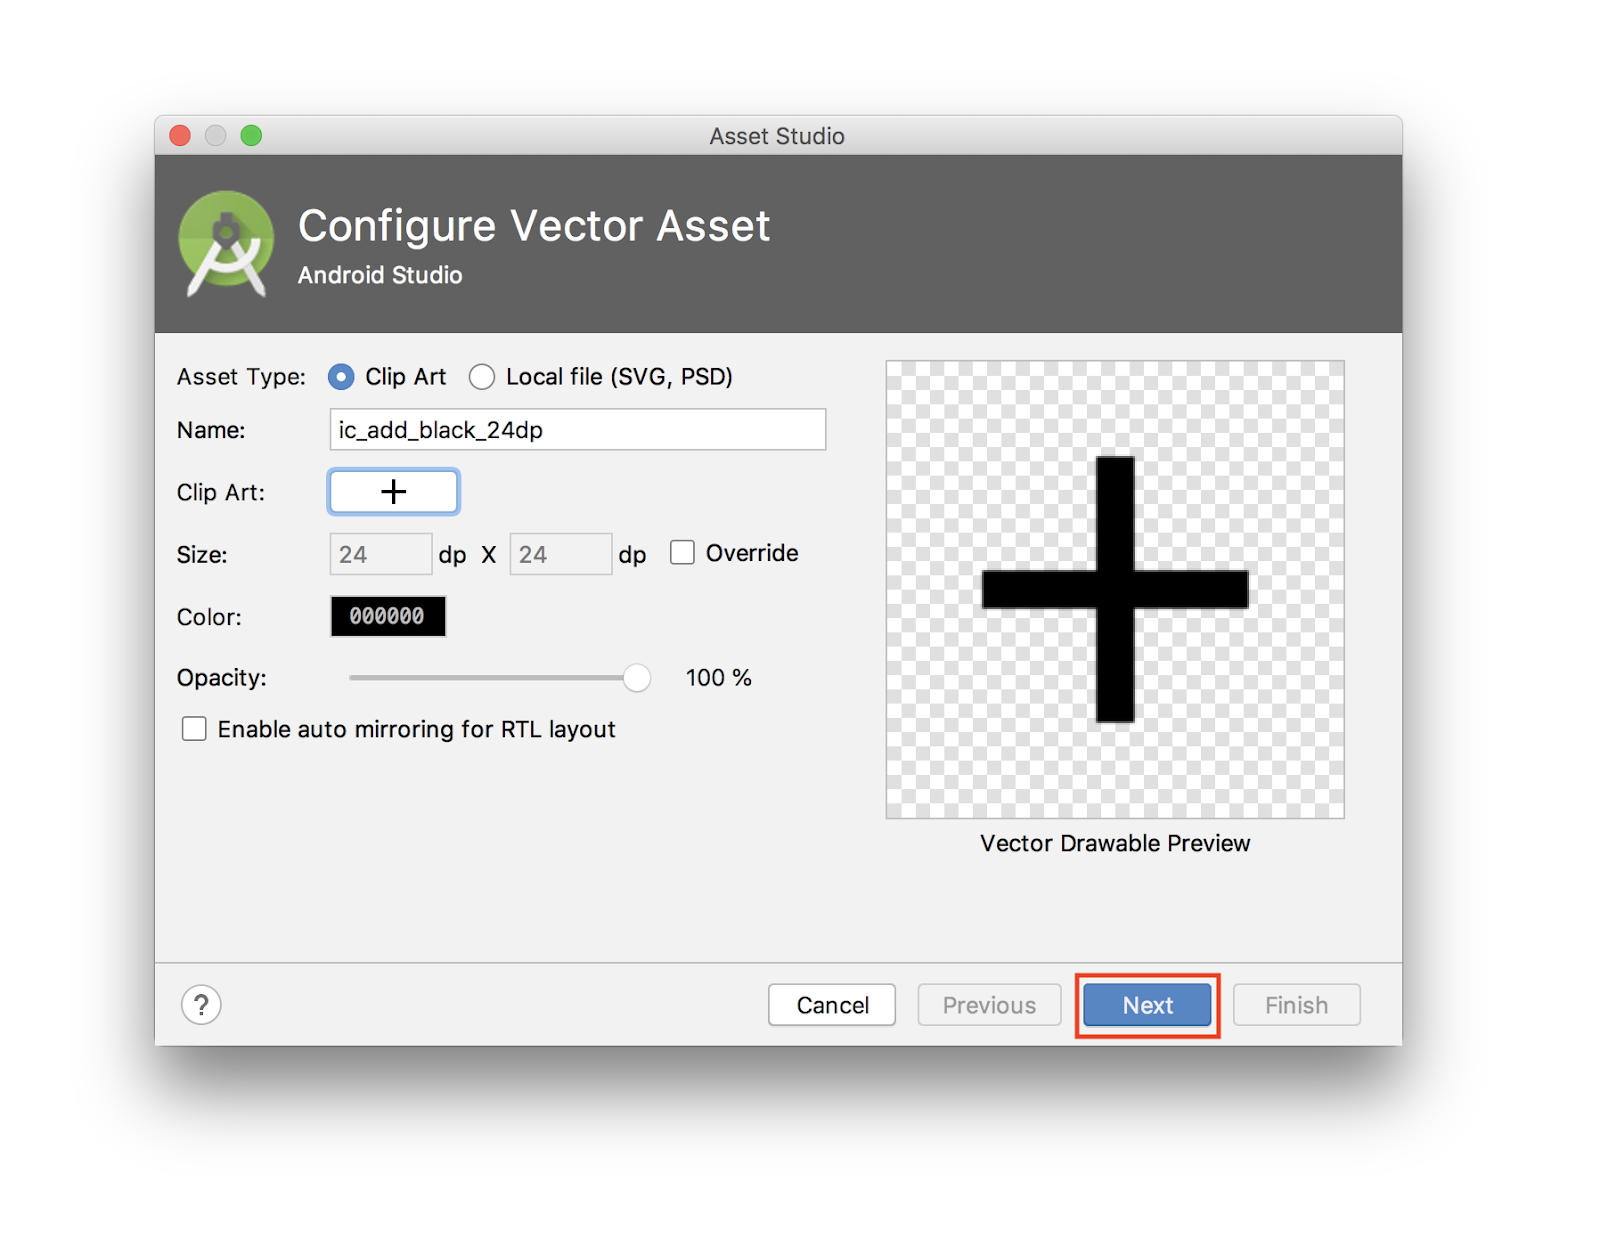
- 之后,点击 Next。
 (Keep bolding and img tag)
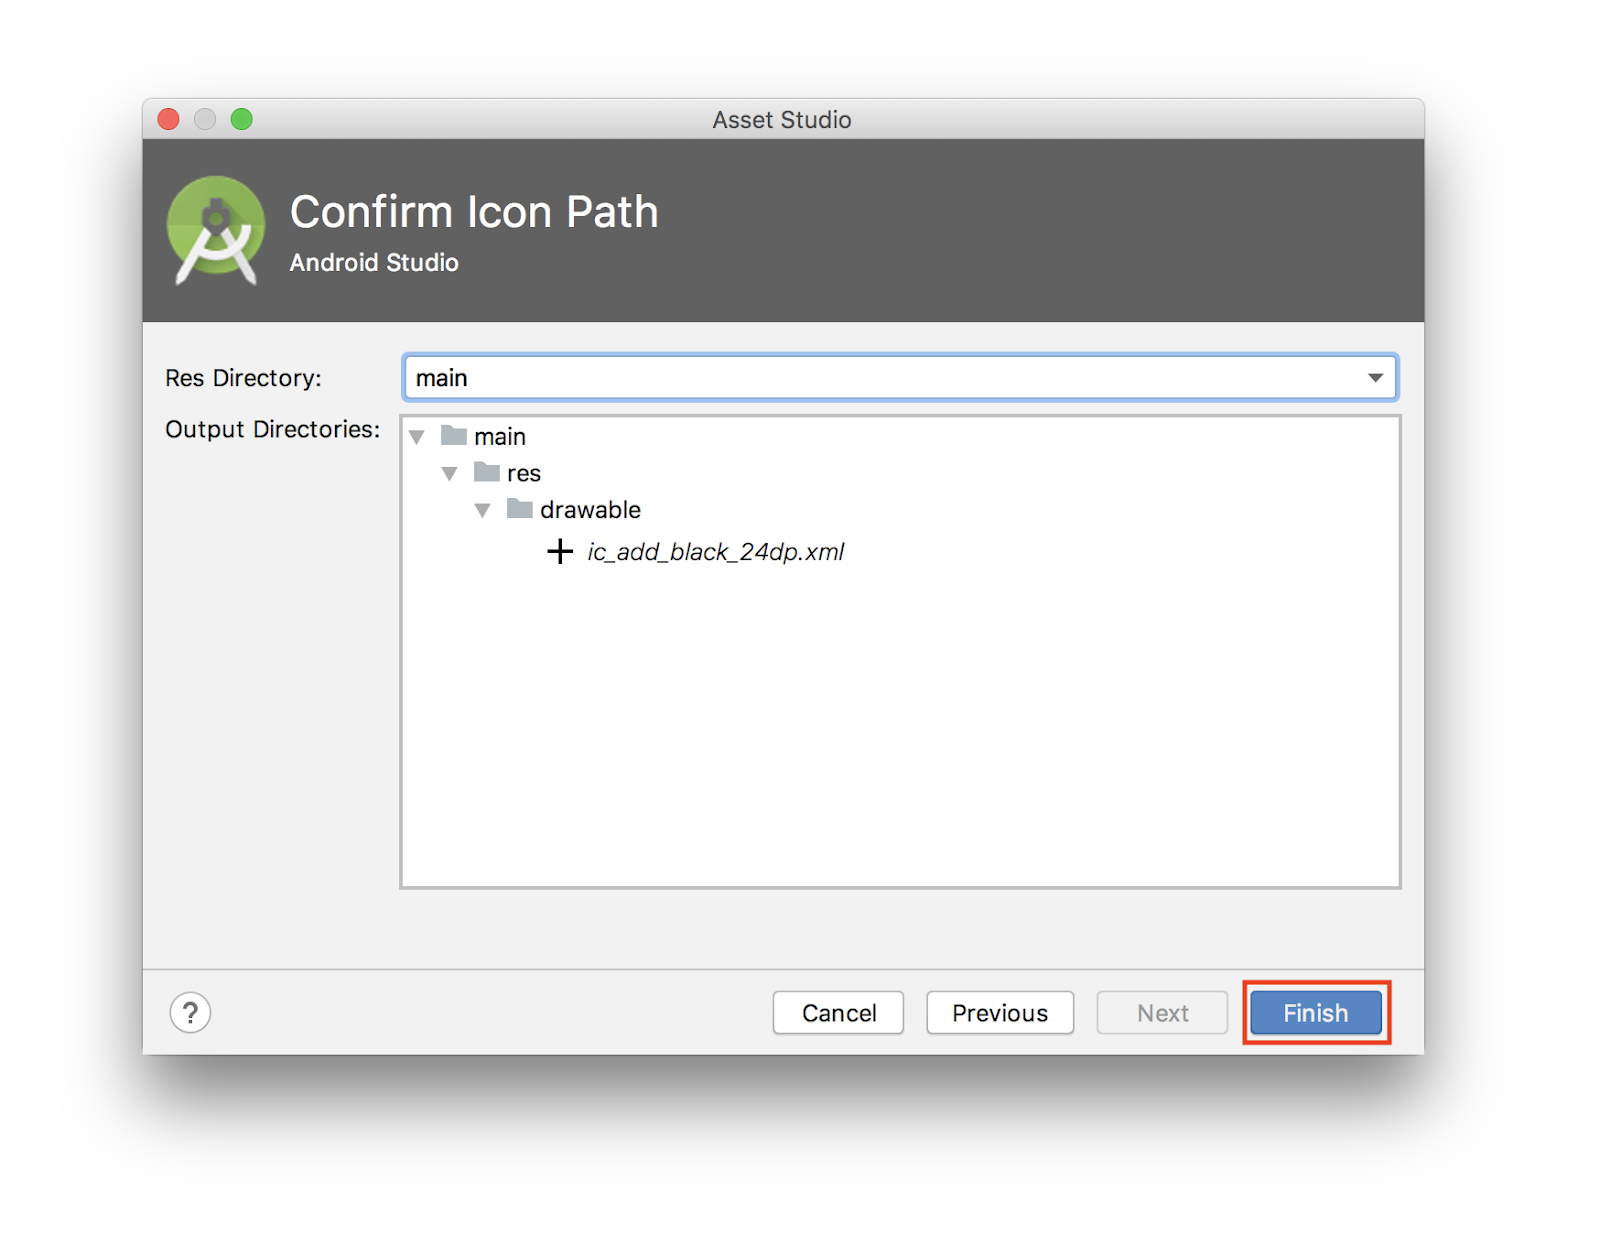
 - 确认图标路径为
main > drawable,然后点击 Finish 添加 asset。
- 仍在
layout/activity_main.xml中,更新 FAB 以包含新的 drawable
<com.google.android.material.floatingactionbutton.FloatingActionButton
        android:id="@+id/fab"
        app:layout_constraintBottom_toBottomOf="parent"
        app:layout_constraintEnd_toEndOf="parent"
        android:layout_width="wrap_content"
        android:layout_height="wrap_content"
        android:layout_margin="16dp"
        android:contentDescription="@string/add_word"
        android:src="@drawable/ic_add_black_24dp"/>
12. 添加 RecyclerView
您将数据显示在 RecyclerView 中,这比直接将数据放入 TextView 中更好一些。此 codelab 假定您知道 RecyclerView、RecyclerView.ViewHolder 和 ListAdapter 如何工作。
首先创建一个新文件,它将包含显示 Word 的 ViewHolder。创建一个设置文本的 bind 方法。
class WordViewHolder extends RecyclerView.ViewHolder {
    private final TextView wordItemView;

    private WordViewHolder(View itemView) {
        super(itemView);
        wordItemView = itemView.findViewById(R.id.textView);
    }

    public void bind(String text) {
        wordItemView.setText(text);
    }

    static WordViewHolder create(ViewGroup parent) {
        View view = LayoutInflater.from(parent.getContext())
                .inflate(R.layout.recyclerview_item, parent, false);
        return new WordViewHolder(view);
    }
}
创建一个扩展 ListAdapter 的类 WordListAdapter。在 WordListAdapter 中创建一个静态类来实现 DiffUtil.ItemCallback。以下是代码
public class WordListAdapter extends ListAdapter<Word, WordViewHolder> {

    public WordListAdapter(@NonNull DiffUtil.ItemCallback<Word> diffCallback) {
        super(diffCallback);
    }

    @Override
    public WordViewHolder onCreateViewHolder(ViewGroup parent, int viewType) {
        return WordViewHolder.create(parent);
    }

    @Override
    public void onBindViewHolder(WordViewHolder holder, int position) {
        Word current = getItem(position);
        holder.bind(current.getWord());
    }

    static class WordDiff extends DiffUtil.ItemCallback<Word> {

        @Override
        public boolean areItemsTheSame(@NonNull Word oldItem, @NonNull Word newItem) {
            return oldItem == newItem;
        }

        @Override
        public boolean areContentsTheSame(@NonNull Word oldItem, @NonNull Word newItem) {
            return oldItem.getWord().equals(newItem.getWord());
        }
    }
}
在 MainActivity 的 onCreate() 方法中添加 RecyclerView。
在 setContentView 之后的 onCreate() 方法中
RecyclerView recyclerView = findViewById(R.id.recyclerview);
final WordListAdapter adapter = new WordListAdapter(new WordListAdapter.WordDiff());
recyclerView.setAdapter(adapter);
recyclerView.setLayoutManager(new LinearLayoutManager(this));
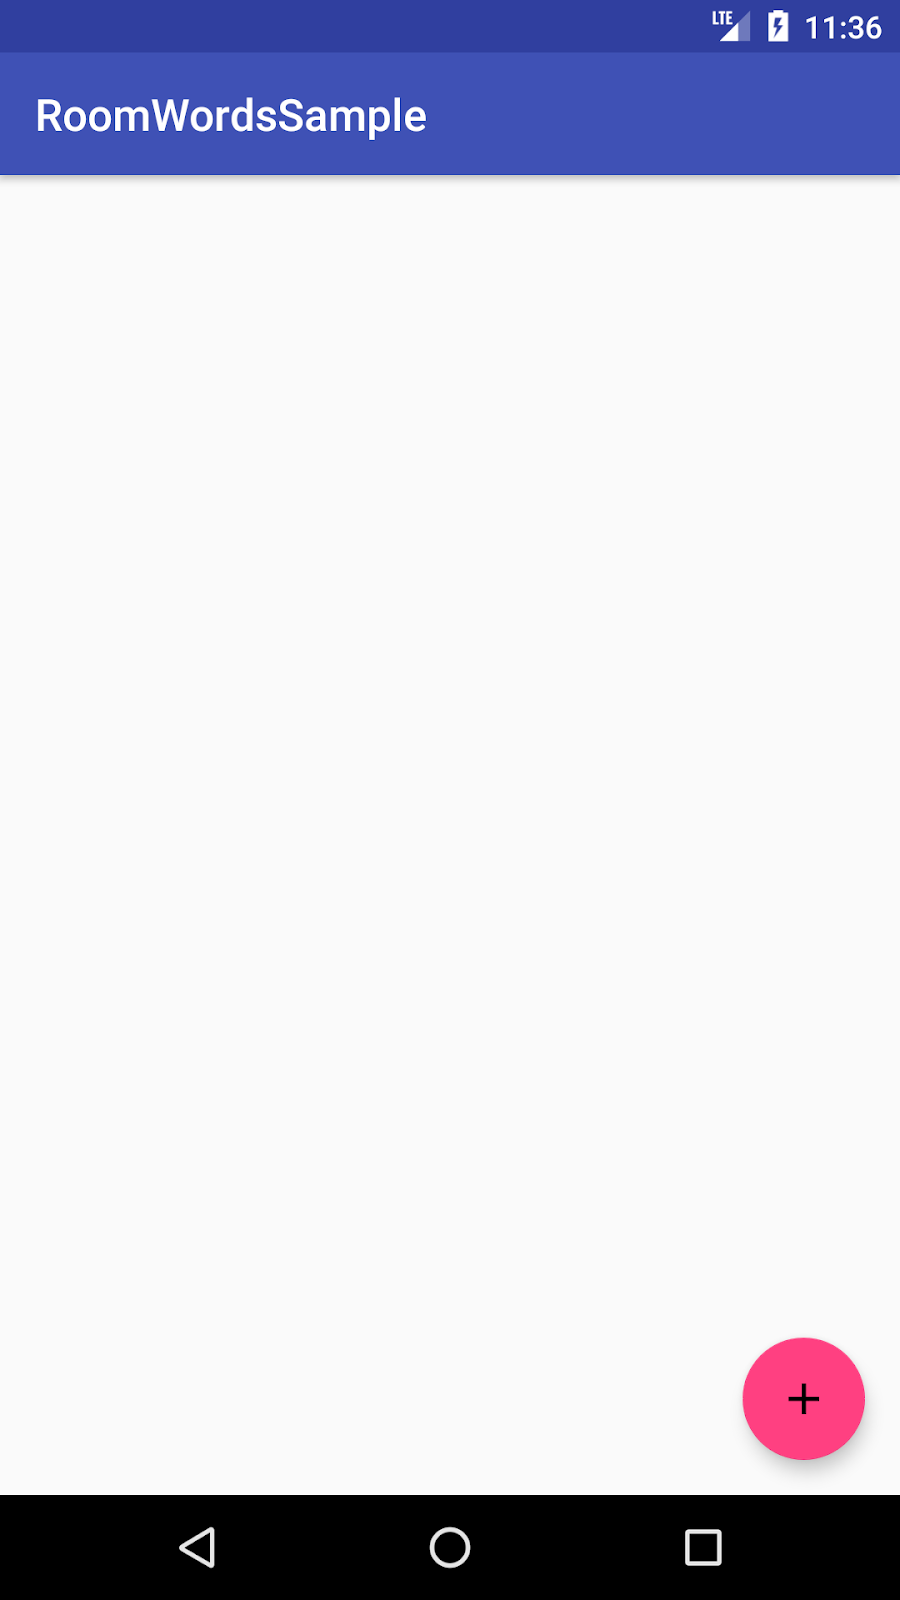
运行您的应用,确保一切正常。目前没有项目,因为您还没有连接数据。
13. 填充数据库
数据库中没有数据。您将通过两种方式添加数据:在数据库打开时添加一些数据,并添加一个用于添加单词的 Activity。
要在安装应用时删除所有内容并填充数据库,您可以创建一个 RoomDatabase.Callback 并覆盖 onCreate()。
这是在 WordRoomDatabase 类内创建 callback 的代码。由于您不能在 UI 线程上执行 Room 数据库操作,因此 onCreate() 使用之前定义的 databaseWriteExecutor 在后台线程上执行 lambda 表达式。该 lambda 表达式会删除数据库的内容,然后用“Hello”和“World”这两个单词填充它。欢迎添加更多单词!
private static RoomDatabase.Callback sRoomDatabaseCallback = new RoomDatabase.Callback() {
    @Override
    public void onCreate(@NonNull SupportSQLiteDatabase db) {
        super.onCreate(db);

        // If you want to keep data through app restarts,
        // comment out the following block
        databaseWriteExecutor.execute(() -> {
            // Populate the database in the background.
            // If you want to start with more words, just add them.
            WordDao dao = INSTANCE.wordDao();
            dao.deleteAll();

            Word word = new Word("Hello");
            dao.insert(word);
            word = new Word("World");
            dao.insert(word);
        });
    }
};
然后,在对 Room.databaseBuilder() 调用 .build() 之前,将 callback 添加到数据库构建序列中
.addCallback(sRoomDatabaseCallback)
14. 添加 NewWordActivity
在 values/strings.xml 中添加这些字符串资源
<string name="hint_word">Word...</string>
<string name="button_save">Save</string>
<string name="empty_not_saved">Word not saved because it is empty.</string>
在 value/colors.xml 中添加此颜色资源
<color name="buttonLabel">#FFFFFF</color>
创建一个新的 dimension 资源文件
- 选择 File > New > Android Resource File。
- 从 Available qualifiers 中,选择 Dimension。
- 设置文件名:dimens
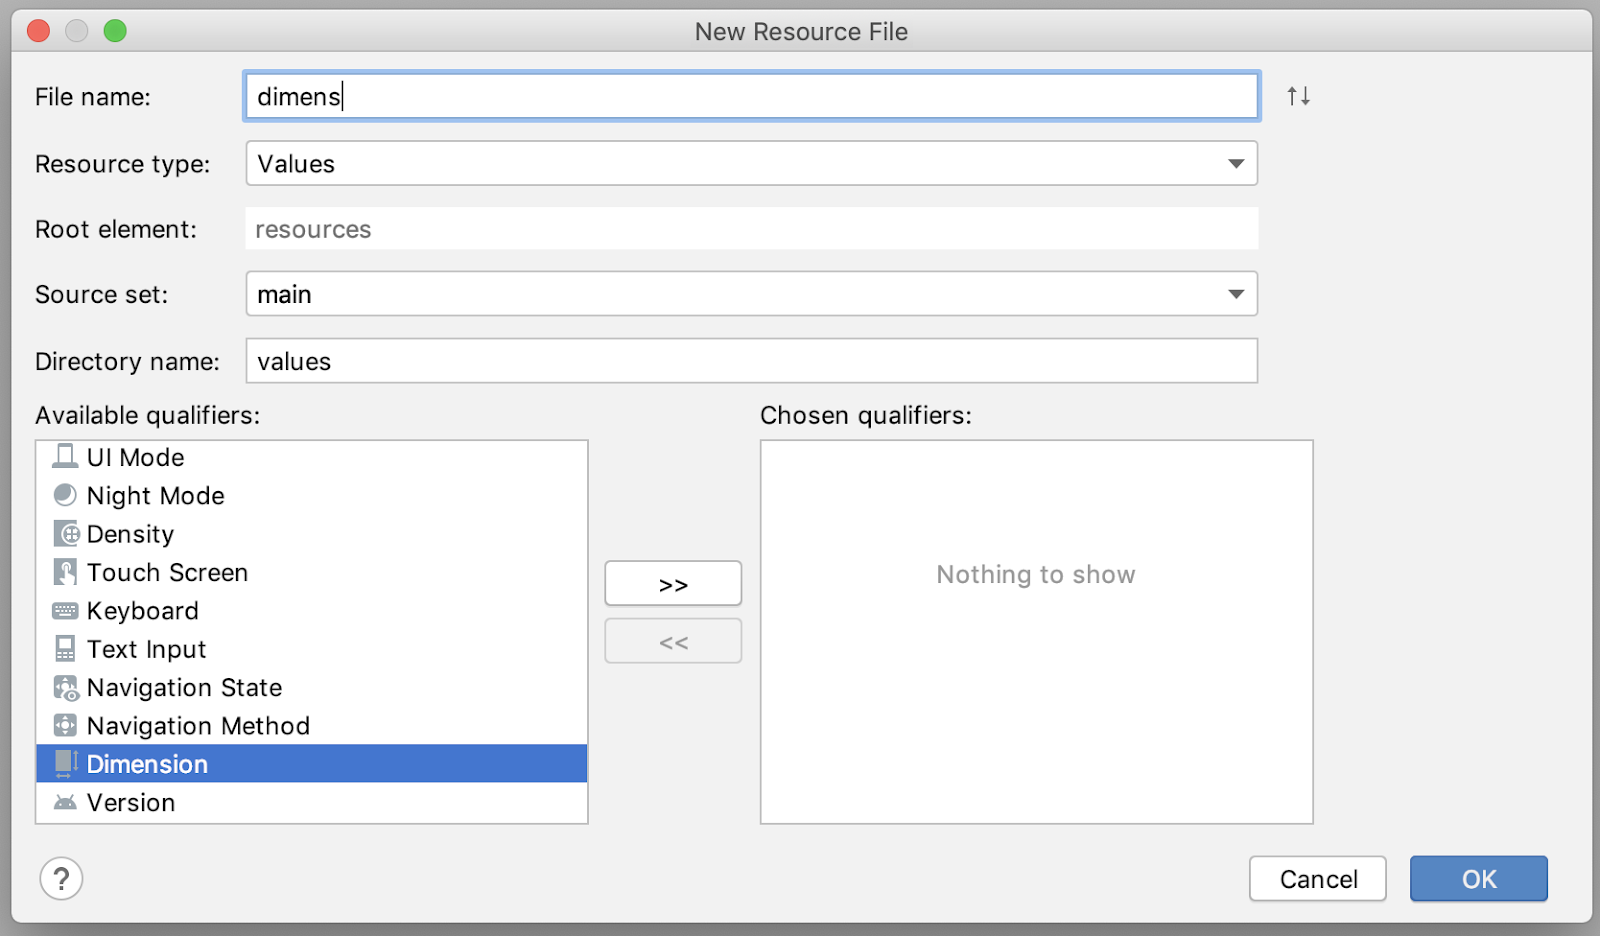
在 values/dimens.xml 中添加这些 dimension 资源
<dimen name="small_padding">8dp</dimen>
<dimen name="big_padding">16dp</dimen>
使用 Empty Activity 模板创建一个新的空 Android Activity
- 选择 File > New > Activity > Empty Activity
- 输入
NewWordActivity作为 Activity 名称。 - 验证新 Activity 是否已添加到 Android Manifest 中。
<activity android:name=".NewWordActivity"></activity>
使用以下代码更新 layout 文件夹中的 activity_new_word.xml 文件
<LinearLayout xmlns:android="http://schemas.android.com/apk/res/android"
    android:orientation="vertical"
    android:layout_width="match_parent"
    android:layout_height="match_parent">

    <EditText
        android:id="@+id/edit_word"
        android:layout_width="match_parent"
        android:layout_height="wrap_content"
        android:minHeight="@dimen/min_height"
        android:fontFamily="sans-serif-light"
        android:hint="@string/hint_word"
        android:inputType="textAutoComplete"
        android:layout_margin="@dimen/big_padding"
        android:textSize="18sp" />

    <Button
        android:id="@+id/button_save"
        android:layout_width="match_parent"
        android:layout_height="wrap_content"
        android:background="@color/colorPrimary"
        android:text="@string/button_save"
        android:layout_margin="@dimen/big_padding"
        android:textColor="@color/buttonLabel" />

</LinearLayout>
更新 activity 的代码
public class NewWordActivity extends AppCompatActivity {

   public static final String EXTRA_REPLY = "com.example.android.wordlistsql.REPLY";

   private  EditText mEditWordView;

   @Override
   public void onCreate(Bundle savedInstanceState) {
       super.onCreate(savedInstanceState);
       setContentView(R.layout.activity_new_word);
       mEditWordView = findViewById(R.id.edit_word);

       final Button button = findViewById(R.id.button_save);
       button.setOnClickListener(view -> {
           Intent replyIntent = new Intent();
           if (TextUtils.isEmpty(mEditWordView.getText())) {
               setResult(RESULT_CANCELED, replyIntent);
           } else {
               String word = mEditWordView.getText().toString();
               replyIntent.putExtra(EXTRA_REPLY, word);
               setResult(RESULT_OK, replyIntent);
           }
           finish();
       });
   }
}
15. 连接数据
最后一步是将 UI 连接到数据库,通过保存用户输入的新单词并在 RecyclerView 中显示单词数据库的当前内容。
要显示数据库的当前内容,请添加一个观察者,观察 ViewModel 中的 LiveData。
无论何时数据发生变化,都会调用 onChanged() callback,它会调用 adapter 的 setWords() 方法来更新 adapter 的缓存数据并刷新显示的列表。
在 MainActivity 中,为 ViewModel 创建一个成员变量
private WordViewModel mWordViewModel;
使用 ViewModelProvider 将您的 ViewModel 与您的 Activity 相关联。
当您的 Activity 首次启动时,ViewModelProviders 将创建 ViewModel。当 activity 被销毁时,例如通过配置更改,ViewModel 将持久存在。当 activity 重新创建时,ViewModelProviders 返回现有的 ViewModel。有关更多信息,请参阅ViewModel。
在 RecyclerView 代码块下方的 onCreate() 中,从 ViewModelProvider 获取一个 ViewModel
mWordViewModel = new ViewModelProvider(this).get(WordViewModel.class);
同样在 onCreate() 中,为 getAlphabetizedWords() 返回的 LiveData 添加一个观察者。onChanged() 方法在被观察的数据发生变化且 activity 处于前台时触发
mWordViewModel.getAllWords().observe(this, words -> {
    // Update the cached copy of the words in the adapter.
    adapter.submitList(words);
});
将请求代码定义为 MainActivity 的成员
public static final int NEW_WORD_ACTIVITY_REQUEST_CODE = 1;
在 MainActivity 中,为 NewWordActivity 添加 onActivityResult() 代码。
如果 activity 返回 RESULT_OK,则通过调用 WordViewModel 的 insert() 方法将返回的单词插入数据库。
public void onActivityResult(int requestCode, int resultCode, Intent data) {
   super.onActivityResult(requestCode, resultCode, data);

   if (requestCode == NEW_WORD_ACTIVITY_REQUEST_CODE && resultCode == RESULT_OK) {
       Word word = new Word(data.getStringExtra(NewWordActivity.EXTRA_REPLY));
       mWordViewModel.insert(word);
   } else {
       Toast.makeText(
               getApplicationContext(),
               R.string.empty_not_saved,
               Toast.LENGTH_LONG).show();
   }
}
在 MainActivity 中,当用户点击 FAB 时启动 NewWordActivity。在 MainActivity 的 onCreate 方法中,找到 FAB 并添加一个 onClickListener,代码如下
FloatingActionButton fab = findViewById(R.id.fab);
fab.setOnClickListener( view -> {
   Intent intent = new Intent(MainActivity.this, NewWordActivity.class);
   startActivityForResult(intent, NEW_WORD_ACTIVITY_REQUEST_CODE);
});
现在,运行您的应用!当您在 NewWordActivity 中向数据库添加单词时,UI 将自动更新。
16. 总结
现在您已经有一个工作的应用了,让我们回顾一下您构建了什么。以下是应用结构图

应用的组成部分包括
MainActivity:使用RecyclerView和WordListAdapter在列表中显示单词。在MainActivity中,有一个Observer观察数据库中的 words LiveData,并在它们变化时收到通知。NewWordActivity:向列表添加新单词。WordViewModel:提供访问数据层的方法,并返回 LiveData,以便 MainActivity 可以建立观察者关系。*LiveData<List<Word>>:使 UI 组件中的自动更新成为可能。在MainActivity中,有一个Observer观察数据库中的 words LiveData,并在它们变化时收到通知。Repository:管理一个或多个数据源。Repository提供方法供 ViewModel 与底层数据提供者交互。在此应用中,该后端是 Room 数据库。- Room:是对 SQLite 数据库的包装并实现。Room 为您做了很多您以前必须自己完成的工作。
- DAO:将方法调用映射到数据库查询,以便当 Repository 调用
getAlphabetizedWords()等方法时,Room 可以执行SELECT * FROM word_table ORDER BY word ASC。 Word:是包含单个单词的实体类。Views和Activities(以及Fragments)仅通过ViewModel与数据交互。因此,数据来自哪里并不重要。
17. 恭喜!
[可选] 下载解决方案代码
如果您还没有查看过此 Codelab 的解决方案代码,可以查看。您可以查看github 仓库或在此处下载代码
解压下载的 zip 文件。这将解压一个根文件夹 android-room-with-a-view-master,其中包含完整的应用。

