1. 简介
本 Codelab 介绍了高级 WorkManager 概念。它基于 使用 WorkManager 进行后台工作 Codelab 中介绍的基本内容。
其他可用于熟悉 WorkManager 的资源包括
- WorkManager 指南
- 博文系列:介绍 WorkManager
- ADS 2019 WorkManager 演讲:WorkManager:超越基础
- WorkManager - MAD 技能系列
您将构建的内容
在本 Codelab 中,您将使用 Blur-O-Matic,这是一个模糊照片和图像并将结果保存到文件的应用。如果您已完成 使用 WorkManager 进行后台工作 Codelab,则这是一个类似的示例应用(唯一的区别是此示例应用允许您从照片库中选择自己的图像进行模糊)。在这里,您将向代码添加一些功能
- 自定义配置
- 使用进度 API 在工作执行期间更新 UI
- 测试您的 Worker
您需要什么
要完成本 Codelab,您需要最新的 Android Studio 稳定版本。
您还应该熟悉 LiveData、ViewModel 和 View Binding。如果您不熟悉这些类,请查看 Android 生命周期感知组件 Codelab(特别是针对 ViewModel 和 LiveData)或 Room with a View Codelab(有关架构组件的介绍)。
如果您在任何时候遇到困难
如果您在任何时候使用本 Codelab 时遇到困难,或者您想查看代码的最终状态,您可以
或者,如果您愿意,可以从 GitHub 克隆已完成的 WorkManager Codelab
$ git clone -b advanced https://github.com/googlecodelabs/android-workmanager
2. 设置
步骤 1 - 下载代码
点击以下链接下载代码版本,以便跟随本 Codelab 进行学习
或者,如果您愿意,可以从 GitHub 克隆 Codelab
$ git clone -b advanced_start https://github.com/googlecodelabs/android-workmanager
步骤 2 - 运行应用
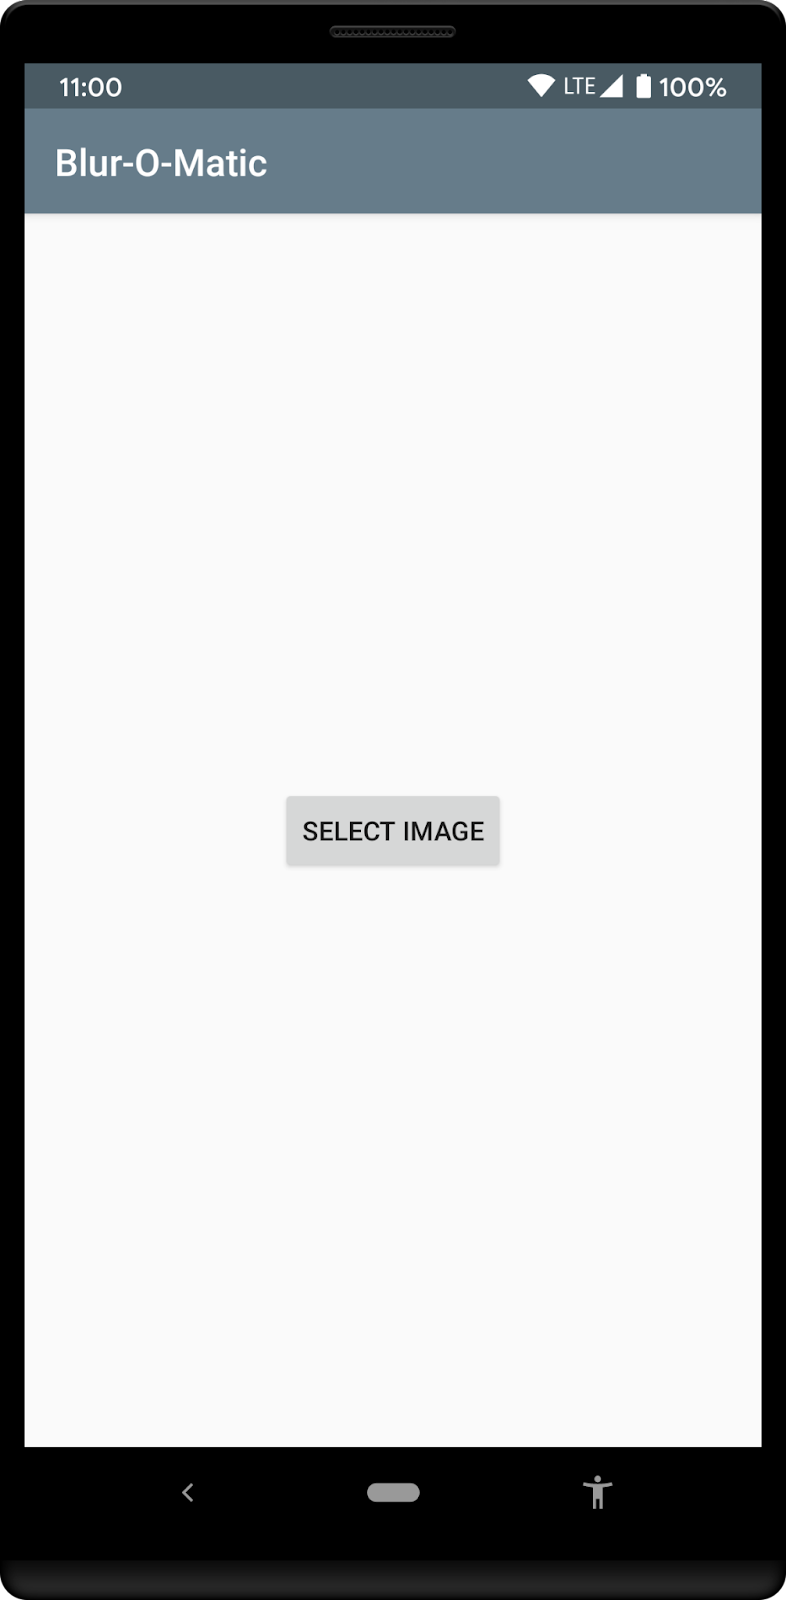
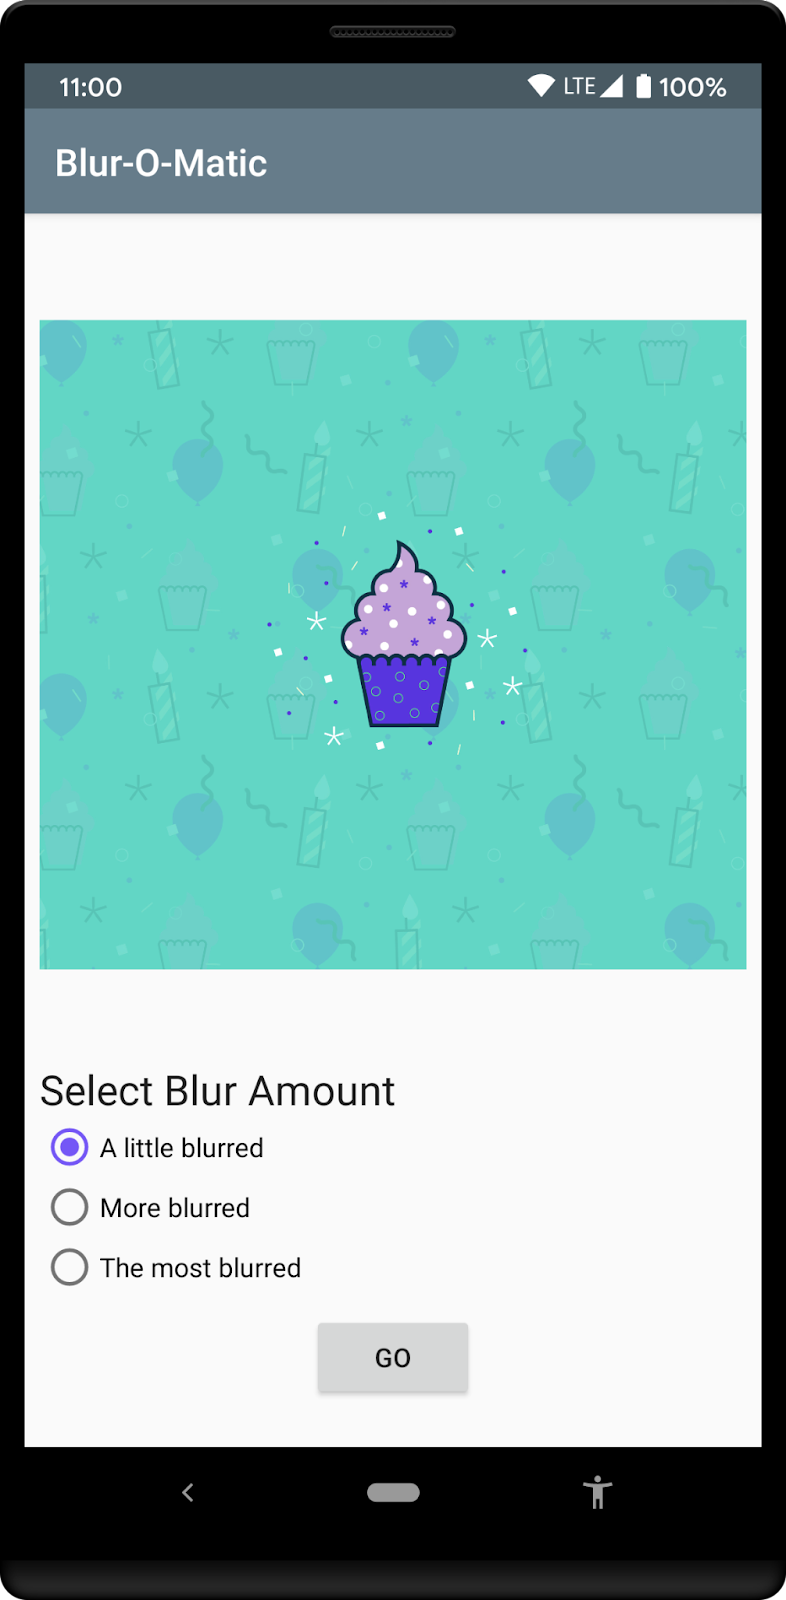
运行应用。您应该会看到以下屏幕。出现提示时,请确保授予应用访问您照片的权限。
|
|
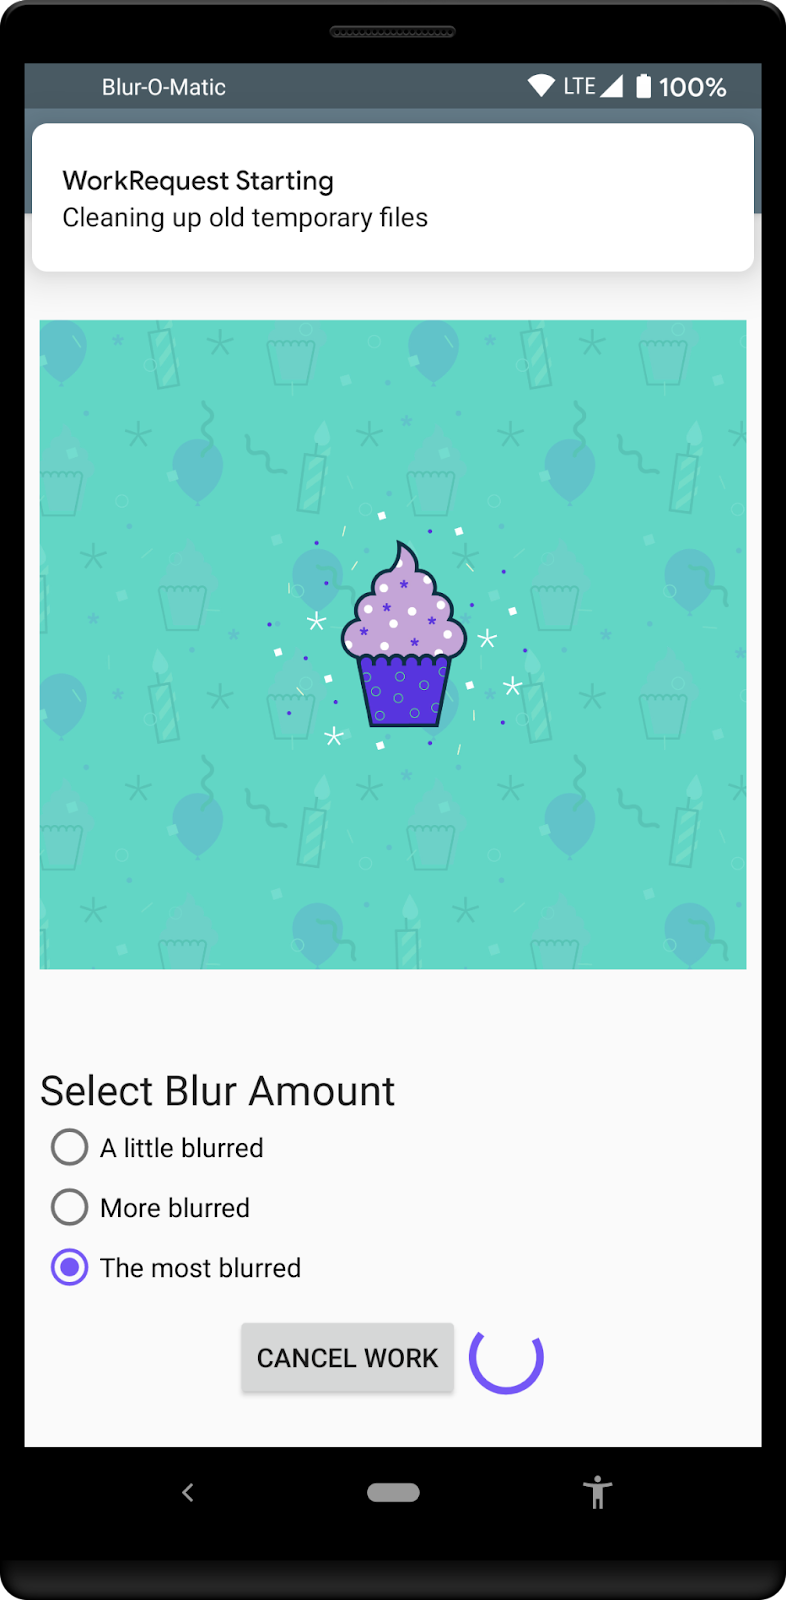
您可以选择一个图像并进入下一个屏幕,该屏幕具有单选按钮,您可以在其中选择希望图像的模糊程度。按下“开始”按钮将模糊并保存图像。在模糊期间,应用会显示“取消”按钮,以便您结束工作。
起始代码包含
WorkerUtils:此类包含实际模糊的代码,以及一些稍后将用于显示Notifications并降低应用速度的便捷方法。BlurApplication:应用程序类,其中包含一个简单的onCreate()方法,用于为调试版本初始化 Timber 日志系统。BlurActivity:显示图像并包含用于选择模糊级别的单选按钮的活动。BlurViewModel:此视图模型存储显示BlurActivity所需的所有数据。它也将是您使用 WorkManager 启动后台工作的类。Workers/CleanupWorker:此 Worker 始终删除现有的临时文件。Workers/BlurWorker:此 Worker 模糊作为输入数据传递的图像(使用 URI),并返回临时文件的 URI。Workers/SaveImageToFileWorker:此 Worker 以临时图像的 URI 作为输入,并返回最终文件的 URI。Constants:一个静态类,其中包含您在 Codelab 中将使用的一些常量。SelectImageActivity:第一个活动,允许您选择图像。res/activity_blur.xml和res/activity_select.xml:每个活动的布局文件。
您将在以下类中进行代码更改:BlurApplication、BlurActivity、BlurViewModel 和 BlurWorker。
3. 将 WorkManager 添加到您的应用
WorkManager 需要以下 Gradle 依赖项。这些已包含在文件中
app/build.gradle
dependencies {
    implementation "androidx.work:work-runtime-ktx:$versions.work"
}
您应该从 WorkManager 发行页面 获取最新版本的 work-runtime,并在其中放入最新稳定版本的版本,或使用以下版本
build.gradle
versions.work = "2.7.1"
请务必点击“立即同步”以将您的项目与更改后的 Gradle 文件同步。
4. 添加 WorkManager 的自定义配置
在此步骤中,您将向应用添加自定义配置,以修改调试版本的 WorkManager 日志级别。
步骤 1 - 禁用默认初始化
如 自定义 WorkManager 配置和初始化 文档中所述,您必须在 AndroidManifest.xml 文件中禁用默认初始化,方法是删除默认情况下 WorkManager 库自动合并的节点。
要删除此节点,您可以向 AndroidManifest.xml 添加一个新的 provider 节点,如下所示
AndroidManifest.xml
<application

...

    <provider
        android:name="androidx.work.impl.WorkManagerInitializer"
        android:authorities="${applicationId}.workmanager-init"
        tools:node="remove" />
</application>
您还需要将 tools 命名空间添加到清单中。包含这些更改的完整文件将为
AndroidManifest.xml
<?xml version="1.0" encoding="utf-8"?>
<!-- Copyright 2020 Google LLC.
   SPDX-License-Identifier: Apache-2.0 -->

<manifest package="com.example.background"
    xmlns:android="http://schemas.android.com/apk/res/android"
    xmlns:tools="http://schemas.android.com/tools">

    <uses-permission android:name="android.permission.INTERNET" />
    <uses-permission android:name="android.permission.READ_EXTERNAL_STORAGE" />
    <uses-permission android:name="android.permission.WRITE_EXTERNAL_STORAGE" />

    <application
        android:name=".BlurApplication"
        android:allowBackup="true"
        android:icon="@mipmap/ic_launcher"
        android:label="@string/app_name"
        android:roundIcon="@mipmap/ic_launcher_round"
        android:supportsRtl="true"
        android:theme="@style/AppTheme">

        <activity android:name=".SelectImageActivity">
            <intent-filter>
                <action android:name="android.intent.action.MAIN" />
                <category android:name="android.intent.category.LAUNCHER" />
            </intent-filter>
        </activity>

        <activity android:name=".BlurActivity" />

        <!-- ADD THE FOLLOWING NODE -->
        <provider
            android:name="androidx.work.impl.WorkManagerInitializer"
            android:authorities="${applicationId}.workmanager-init"
            tools:node="remove" />
    </application>
</manifest>
步骤 2 - 向 Application 类添加 Configuration.Provider
您可以通过在 Application 类中实现 WorkManager 的 Configuration.Provider 接口来使用按需初始化。您的应用第一次使用 getInstance(context) 获取 WorkManager 的实例时,WorkManager 将使用 getWorkManagerConfiguration() 返回的配置进行初始化。
BlurApplication.kt
class BlurApplication : Application(), Configuration.Provider {

    override fun getWorkManagerConfiguration(): Configuration =

        Configuration.Builder()
                     .setMinimumLoggingLevel(android.util.Log.DEBUG)
                     .build()
...
}
通过此更改,WorkManager 将以设置为 DEBUG 的日志级别运行。
更好的选择可能是仅针对应用的调试版本以这种方式设置 WorkManager,使用类似以下内容
BlurApplication.kt
class BlurApplication() : Application(), Configuration.Provider {

    override fun getWorkManagerConfiguration(): Configuration {
        return if (BuildConfig.DEBUG) {
            Configuration.Builder()
                    .setMinimumLoggingLevel(android.util.Log.DEBUG)
                    .build()
        } else {
            Configuration.Builder()
                    .setMinimumLoggingLevel(android.util.Log.ERROR)
                    .build()
        }
    }

...
}
然后,完整的 BlurApplication.kt 变为
BlurApplication.kt
/* Copyright 2020 Google LLC.
   SPDX-License-Identifier: Apache-2.0 */

package com.example.background

import android.app.Application
import androidx.work.Configuration
import timber.log.Timber
import timber.log.Timber.DebugTree

class BlurApplication() : Application(), Configuration.Provider {

    override fun getWorkManagerConfiguration(): Configuration {
        return if (BuildConfig.DEBUG) {
            Configuration.Builder()
                    .setMinimumLoggingLevel(android.util.Log.DEBUG)
                    .build()
        } else {
            Configuration.Builder()
                    .setMinimumLoggingLevel(android.util.Log.ERROR)
                    .build()
        }
    }

    override fun onCreate() {
        super.onCreate()
        if (BuildConfig.DEBUG) {
            Timber.plant(DebugTree())
        }
    }
}
步骤 3 - 在调试模式下运行应用
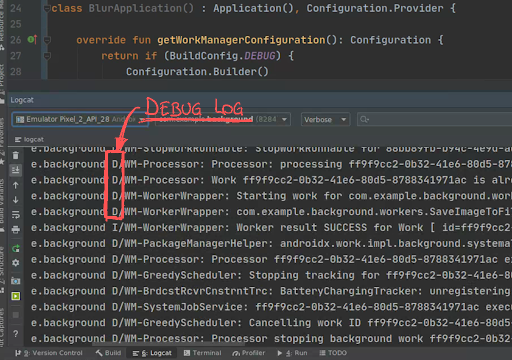
WorkManager 现在已配置为使调试版本记录来自库的所有消息。
运行应用,您可以在 Android Studio 的 logcat 选项卡中查看日志
步骤 4 - 您可以配置什么?
完整的参数列表位于 WorkManager 的 Configuration.Builder 参考指南中。请注意两个其他参数
WorkerFactoryJobId范围
修改 WorkerFactory 允许向 Worker 的构造函数添加其他参数。您可以在 自定义 WorkManager 文章中找到有关如何实现自定义 WorkerFactory 的更多信息。如果您在应用中同时使用 WorkManager 和 JobScheduler API,最好自定义 JobId 范围,以避免这两个 API 使用相同的 JobId 范围。
共享 WorkManager 的进度
WorkManager v2.3 添加了共享 Worker 进度信息到应用的功能,方法是使用 setProgressAsync()(或在从 CoroutineWorker 使用时使用 setProgress())。可以通过 WorkInfo 观察此信息,并旨在用于向用户提供 UI 反馈。然后,当 worker 达到最终状态(SUCCEEDED、FAILED 或 CANCELLED)时,进度数据将被取消。要详细了解如何发布和监听进度,请阅读 观察中间 Worker 进度。
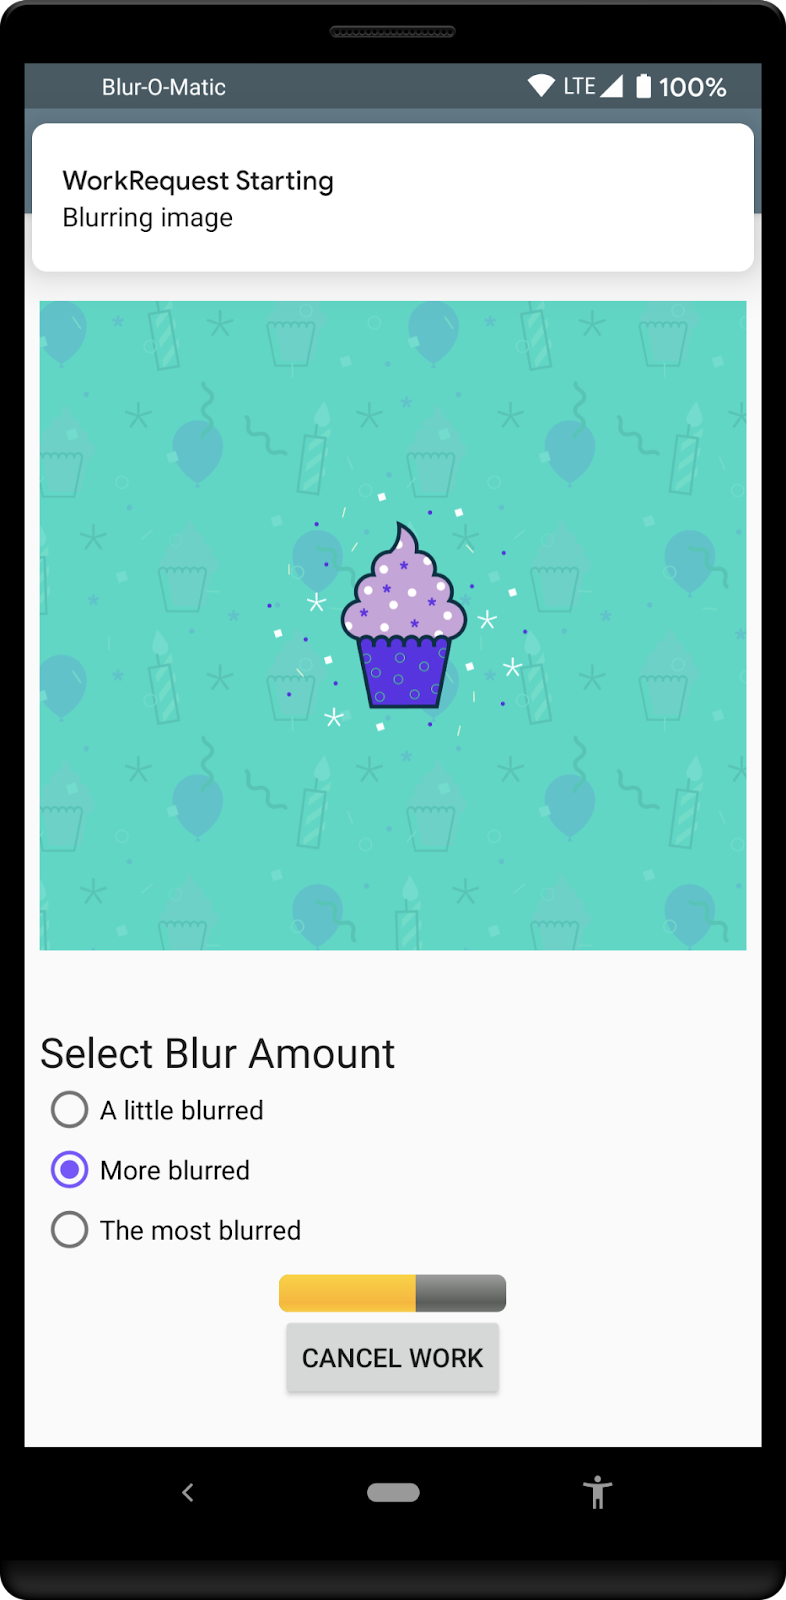
您现在要做的就是在 UI 中添加一个进度条,以便如果应用处于前台,用户可以看到模糊的进度。最终结果将类似于
步骤 1 - 修改 ProgressBar
要修改布局中的 ProgressBar,您需要删除 android:indeterminate="true" 参数,添加样式 style="@android:style/Widget.ProgressBar.Horizontal", 并使用 android:progress="0" 设置初始值。您还需要将 LinearLayout 的方向设置为 "vertical"
app/src/main/res/layout/activity_blur.xml
<LinearLayout
    android:layout_width="wrap_content"
    android:layout_height="wrap_content"
    android:orientation="vertical">
    <ProgressBar
        android:id="@+id/progress_bar"
        style="@android:style/Widget.ProgressBar.Horizontal"
        android:layout_width="match_parent"
        android:layout_height="wrap_content"
        android:progress="0"
        android:visibility="gone"
        android:layout_gravity="center_horizontal"
        />

    <Button
        android:id="@+id/cancel_button"
        android:layout_width="wrap_content"
        android:layout_height="wrap_content"
        android:text="@string/cancel_work"
        android:visibility="gone"
        />
</LinearLayout>
另一个需要的更改是确保 ProgressBar 在初始位置重新启动。您可以通过更新 BlurActivity.kt 文件中的 showWorkFinished() 函数来实现
app/src/main/java/com/example/background/BlurActivity.kt
/**
 * Shows and hides views for when the Activity is done processing an image
 */
private fun showWorkFinished() {
    with(binding) {
        progressBar.visibility = View.GONE
        cancelButton.visibility = View.GONE
        goButton.visibility = View.VISIBLE
        progressBar.progress = 0 // <-- ADD THIS LINE
    }
}
步骤 2 - 在 ViewModel 中观察进度信息
BlurViewModel 文件中已有一个观察器,用于检查链何时完成。添加一个新的观察器,用于观察 BlurWorker 发布的进度。
首先,在 Constants.kt 文件末尾添加几个常量以跟踪此信息
app/src/main/java/com/example/background/Constants.kt
// Progress Data Key
const val PROGRESS = "PROGRESS"
const val TAG_PROGRESS = "TAG_PROGRESS"
下一步是将此标记添加到 BlurWorker 的 WorkRequest 中(在 BlurViewModel.kt 文件中),以便您可以检索其 WorkInfo。从该 WorkInfo 中,您可以检索 worker 的进度信息
app/src/main/java/com/example/background/BlurViewModel.kt
// Add WorkRequests to blur the image the number of times requested
for (i in 0 until blurLevel) {
    val blurBuilder = OneTimeWorkRequestBuilder<BlurWorker>()

    // Input the Uri if this is the first blur operation
    // After the first blur operation the input will be the output of previous
    // blur operations.
    if (i == 0) {
        blurBuilder.setInputData(createInputDataForUri())
    }

    blurBuilder.addTag(TAG_PROGRESS) // <-- ADD THIS
    continuation = continuation.then(blurBuilder.build())
}
向 BlurViewModel.kt 文件添加一个新的 LiveData 来跟踪此 WorkRequest,并在 init 块中初始化 LiveData
app/src/main/java/com/example/background/BlurViewModel.kt
class BlurViewModel(application: Application) : AndroidViewModel(application) {

    internal var imageUri: Uri? = null
    internal var outputUri: Uri? = null
    internal val outputWorkInfoItems: LiveData<List<WorkInfo>>
    internal val progressWorkInfoItems: LiveData<List<WorkInfo>> // <-- ADD THIS
    private val workManager: WorkManager = WorkManager.getInstance(application)

    init {
        // This transformation makes sure that whenever the current work Id changes the WorkStatus
        // the UI is listening to changes
        outputWorkInfoItems = workManager.getWorkInfosByTagLiveData(TAG_OUTPUT)
        progressWorkInfoItems = workManager.getWorkInfosByTagLiveData(TAG_PROGRESS) // <-- ADD THIS
    }

...
}
步骤 3 - 在 Activity 中观察 LiveData
您现在可以在 BlurActivity 中使用此 LiveData 来观察所有发布的进度。首先在 onCreate() 方法的末尾注册一个新的 LiveData 观察者
app/src/main/java/com/example/background/BlurActivity.kt
// Show work status
viewModel.outputWorkInfoItems.observe(this, outputObserver())

// ADD THE FOLLOWING LINES
// Show work progress
viewModel.progressWorkInfoItems.observe(this, progressObserver())
现在您可以检查观察者中收到的 WorkInfo 以查看是否有任何进度信息,并相应地更新 ProgressBar
app/src/main/java/com/example/background/BlurActivity.kt
private fun progressObserver(): Observer<List<WorkInfo>> {
    return Observer { listOfWorkInfo ->
        if (listOfWorkInfo.isNullOrEmpty()) {
            return@Observer
        }

        listOfWorkInfo.forEach { workInfo ->
            if (WorkInfo.State.RUNNING == workInfo.state) {
                val progress = workInfo.progress.getInt(PROGRESS, 0)
                binding.progressBar.progress = progress
            }
        }

    }
}
步骤 4 - 从 BlurWorker 发布进度
现在所有显示进度信息所需的组件都已就绪。现在是时候将进度信息的实际发布添加到 BlurWorker 中了。
此示例只是在我们的 doWork() 函数中模拟了一些耗时的过程,以便它可以在定义的时间段内发布进度信息。
这里的更改是用 10 个较小的延迟替换单个延迟,并在每次迭代时设置新的进度
app/src/main/java/com/example/background/workers/BlurWorker.kt
override fun doWork(): Result {
    val appContext = applicationContext

    val resourceUri = inputData.getString(KEY_IMAGE_URI)

    makeStatusNotification("Blurring image", appContext)
    // sleep()
    (0..100 step 10).forEach {
        setProgressAsync(workDataOf(PROGRESS to it))
        sleep()
    }

...
}
由于原始延迟为 3 秒,因此最好也将其缩小十倍至 0.3 秒
app/src/main/java/com/example/background/Constants.kt
// const val DELAY_TIME_MILLIS: Long = 3000
const val DELAY_TIME_MILLIS: Long = 300
步骤 5 - 运行
此时运行应用程序,它应该会显示填充了来自 BlurWorker 的消息的 ProgressBar。
5. 测试 WorkManager
测试是每个应用程序的重要组成部分,并且在引入像 WorkManager 这样的库时,提供轻松测试代码的工具非常重要。
使用 WorkManager,我们还提供了一些辅助工具来轻松测试您的工作程序。要了解有关如何为您的工作程序创建测试的更多信息,您可以参考 WorkManager 测试文档。
在本节代码实验室中,我们将介绍一些工作程序类的测试,展示一些常见的用例。
首先,我们希望提供一种简单的方法来设置我们的测试,为此我们可以创建一个 TestRule 来设置 WorkManager
- 添加依赖项
- 创建
WorkManagerTestRule和TestUtils - 创建
CleanupWorker的测试 - 创建
BlurWorker的测试
假设您已经在项目中创建了 AndroidTest 文件夹,我们需要添加一些依赖项在我们的测试中使用
app/build.gradle
androidTestImplementation "androidx.arch.core:core-testing:2.1.0"
androidTestImplementation "androidx.test.ext:junit:1.1.3"
androidTestImplementation "androidx.test:rules:1.4.0"
androidTestImplementation "androidx.test:runner:1.4.0"
androidTestImplementation "androidx.work:work-testing:$versions.work"
现在我们可以使用 TestRule 将这些部分组合在一起,我们可以在测试中使用它
app/src/androidTest/java/com/example/background/workers/WorkManagerTestRule.kt
/* Copyright 2020 Google LLC.
   SPDX-License-Identifier: Apache-2.0 */

package com.example.background.workers

import android.content.Context
import android.util.Log
import androidx.test.platform.app.InstrumentationRegistry
import androidx.work.Configuration
import androidx.work.WorkManager
import androidx.work.testing.SynchronousExecutor
import androidx.work.testing.WorkManagerTestInitHelper
import org.junit.rules.TestWatcher
import org.junit.runner.Description

class WorkManagerTestRule : TestWatcher() {
    lateinit var targetContext: Context
    lateinit var testContext: Context
    lateinit var configuration: Configuration
    lateinit var workManager: WorkManager

    override fun starting(description: Description?) {
        targetContext = InstrumentationRegistry.getInstrumentation().targetContext
        testContext = InstrumentationRegistry.getInstrumentation().context
        configuration = Configuration.Builder()
                // Set log level to Log.DEBUG to make it easier to debug
                .setMinimumLoggingLevel(Log.DEBUG)
                // Use a SynchronousExecutor here to make it easier to write tests
                .setExecutor(SynchronousExecutor())
                .build()

        // Initialize WorkManager for instrumentation tests.
        WorkManagerTestInitHelper.initializeTestWorkManager(targetContext, configuration)
        workManager = WorkManager.getInstance(targetContext)
    }
}
由于我们需要在设备上(测试将在其中运行)使用此测试图像,因此我们可以创建几个辅助函数在测试中使用
app/src/androidTest/java/com/example/background/workers/TestUtils.kt
/* Copyright 2020 Google LLC.
   SPDX-License-Identifier: Apache-2.0 */

package com.example.background.workers

import android.content.Context
import android.graphics.BitmapFactory
import android.net.Uri
import com.example.background.OUTPUT_PATH
import java.io.BufferedInputStream
import java.io.BufferedOutputStream
import java.io.File
import java.io.FileNotFoundException
import java.io.FileOutputStream
import java.util.UUID

/**
 * Copy a file from the asset folder in the testContext to the OUTPUT_PATH in the target context.
 * @param testCtx android test context
 * @param targetCtx target context
 * @param filename source asset file
 * @return Uri for temp file
 */
@Throws(Exception::class)
fun copyFileFromTestToTargetCtx(testCtx: Context, targetCtx: Context, filename: String): Uri {
    // Create test image
    val destinationFilename = String.format("blur-test-%s.png", UUID.randomUUID().toString())
    val outputDir = File(targetCtx.filesDir, OUTPUT_PATH)
    if (!outputDir.exists()) {
        outputDir.mkdirs()
    }
    val outputFile = File(outputDir, destinationFilename)

    val bis = BufferedInputStream(testCtx.assets.open(filename))
    val bos = BufferedOutputStream(FileOutputStream(outputFile))
    val buf = ByteArray(1024)
    bis.read(buf)
    do {
        bos.write(buf)
    } while (bis.read(buf) != -1)
    bis.close()
    bos.close()

    return Uri.fromFile(outputFile)
}

/**
 * Check if a file exists in the given context.
 * @param testCtx android test context
 * @param uri for the file
 * @return true if file exist, false if the file does not exist of the Uri is not valid
 */
fun uriFileExists(targetCtx: Context, uri: String?): Boolean {
    if (uri.isNullOrEmpty()) {
        return false
    }

    val resolver = targetCtx.contentResolver

    // Create a bitmap
    try {
        BitmapFactory.decodeStream(
                resolver.openInputStream(Uri.parse(uri)))
    } catch (e: FileNotFoundException) {
        return false
    }
    return true
}
完成这些工作后,我们可以开始编写测试。
首先,我们测试 CleanupWorker,以检查它是否确实删除了我们的文件。为此,在测试中将测试图像复制到设备上,然后在执行 CleanupWorker 后检查它是否存在
app/src/androidTest/java/com/example/background/workers/CleanupWorkerTest.kt
/* Copyright 2020 Google LLC.
   SPDX-License-Identifier: Apache-2.0 */

package com.example.background.workers

import androidx.arch.core.executor.testing.InstantTaskExecutorRule
import androidx.work.OneTimeWorkRequestBuilder
import androidx.work.WorkInfo
import org.hamcrest.CoreMatchers.`is`
import org.junit.Assert.assertThat
import org.junit.Rule
import org.junit.Test

class CleanupWorkerTest {

    @get:Rule
    var instantTaskExecutorRule = InstantTaskExecutorRule()
    @get:Rule
    var wmRule = WorkManagerTestRule()

    @Test
    fun testCleanupWork() {
        val testUri = copyFileFromTestToTargetCtx(
                wmRule.testContext, wmRule.targetContext, "test_image.png")
        assertThat(uriFileExists(wmRule.targetContext, testUri.toString()), `is`(true))

        // Create request
        val request = OneTimeWorkRequestBuilder<CleanupWorker>().build()

        // Enqueue and wait for result. This also runs the Worker synchronously
        // because we are using a SynchronousExecutor.
        wmRule.workManager.enqueue(request).result.get()
        // Get WorkInfo
        val workInfo = wmRule.workManager.getWorkInfoById(request.id).get()

        // Assert
        assertThat(uriFileExists(wmRule.targetContext, testUri.toString()), `is`(false))
        assertThat(workInfo.state, `is`(WorkInfo.State.SUCCEEDED))
    }
}
您现在可以从 Android Studio 的“运行”菜单中运行此测试,或使用测试类左侧的绿色矩形。
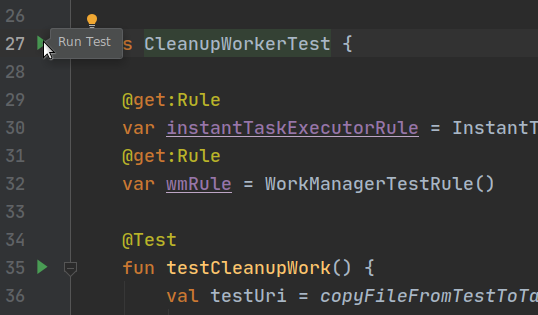
您还可以使用命令 ./gradlew cAT 从项目的根文件夹中通过命令行运行测试。
您应该会看到您的测试正确执行。
接下来,我们可以测试我们的 BlurWorker。此工作程序期望输入数据包含要处理的图像的 URI,因此我们可以构建几个测试:一个检查如果缺少输入 URI 则工作程序是否失败,另一个实际处理输入图像。
app/src/androidTest/java/com/example/background/workers/BlurWorkerTest.kt
/* Copyright 2020 Google LLC.
   SPDX-License-Identifier: Apache-2.0 */

package com.example.background.workers

import androidx.arch.core.executor.testing.InstantTaskExecutorRule
import androidx.work.OneTimeWorkRequestBuilder
import androidx.work.WorkInfo
import androidx.work.workDataOf
import org.hamcrest.CoreMatchers.`is`
import org.junit.Assert.assertThat
import org.junit.Rule
import com.example.background.KEY_IMAGE_URI
import org.junit.Test

class BlurWorkerTest {

    @get:Rule
    var instantTaskExecutorRule = InstantTaskExecutorRule()
    @get:Rule
    var wmRule = WorkManagerTestRule()

    @Test
    fun testFailsIfNoInput() {
        // Define input data

        // Create request
        val request = OneTimeWorkRequestBuilder<BlurWorker>().build()

        // Enqueue and wait for result. This also runs the Worker synchronously
        // because we are using a SynchronousExecutor.
        wmRule.workManager.enqueue(request).result.get()
        // Get WorkInfo
        val workInfo = wmRule.workManager.getWorkInfoById(request.id).get()

        // Assert
        assertThat(workInfo.state, `is`(WorkInfo.State.FAILED))
    }

    @Test
    @Throws(Exception::class)
    fun testAppliesBlur() {
        // Define input data
        val inputDataUri = copyFileFromTestToTargetCtx(
                wmRule.testContext,
                wmRule.targetContext,
                "test_image.png")
        val inputData = workDataOf(KEY_IMAGE_URI to inputDataUri.toString())

        // Create request
        val request = OneTimeWorkRequestBuilder<BlurWorker>()
                .setInputData(inputData)
                .build()

        // Enqueue and wait for result. This also runs the Worker synchronously
        // because we are using a SynchronousExecutor.
        wmRule.workManager.enqueue(request).result.get()
        // Get WorkInfo
        val workInfo = wmRule.workManager.getWorkInfoById(request.id).get()
        val outputUri = workInfo.outputData.getString(KEY_IMAGE_URI)

        // Assert
        assertThat(uriFileExists(wmRule.targetContext, outputUri), `is`(true))
        assertThat(workInfo.state, `is`(WorkInfo.State.SUCCEEDED))
    }
}
如果您运行这些测试,它们都应该成功。
6. 恭喜
恭喜!您已完成 Blur-O-Matic 应用程序,并且在此过程中,您学习了如何
- 创建自定义配置
- 从您的工作程序发布进度
- 在 UI 中显示工作进度
- 为您的工作程序编写测试
出色的“工作”!要查看代码的最终状态和所有更改,请查看
或者,如果您愿意,可以从 GitHub 克隆 WorkManager 的代码实验室
$ git clone -b advanced https://github.com/googlecodelabs/android-workmanager
WorkManager 支持的功能远不止我们在本代码实验室中介绍的功能。要了解更多信息,请访问 WorkManager 文档。

