
1. 简介
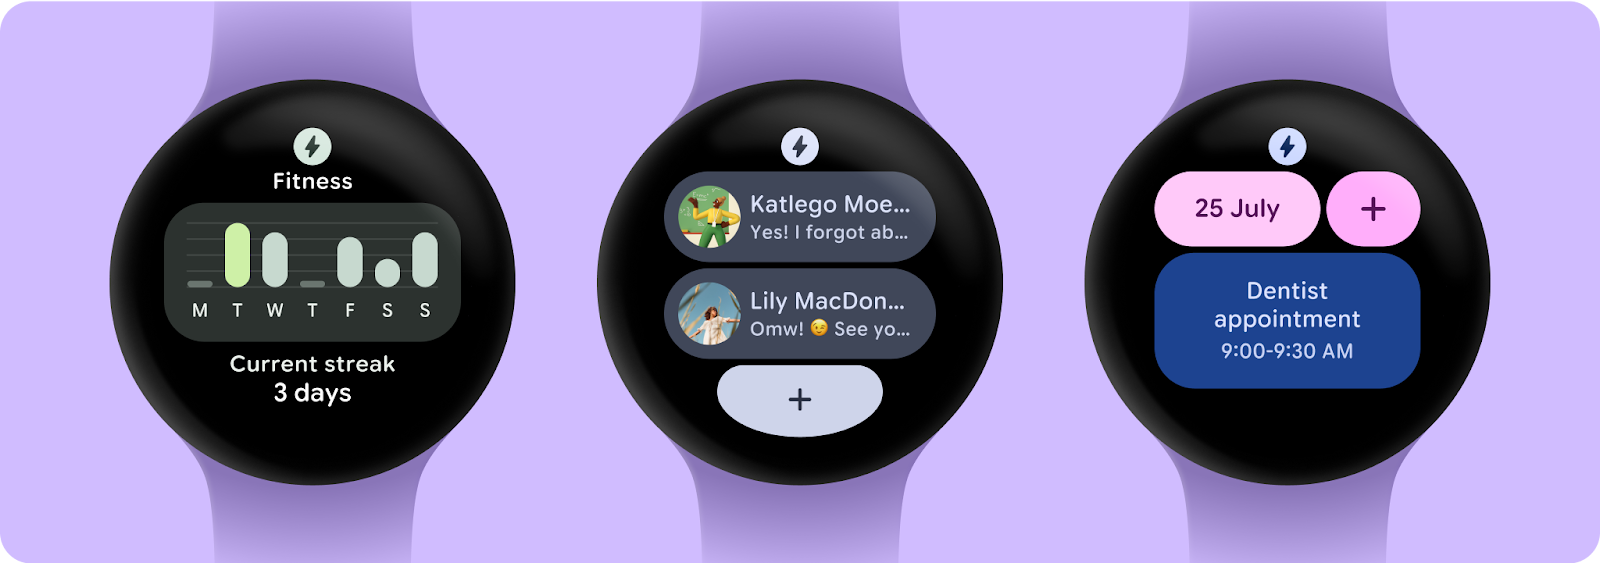
Wear OS Tile 提供便捷方式让用户获取所需信息并执行操作。只需从表盘轻扫一下,用户即可查看最新天气预报或启动计时器。
Tile 作为系统界面的一部分运行,而非在自己的应用容器中运行。我们使用 Service 来描述 Tile 的布局和内容。系统界面随后会在需要时渲染 Tile。
您将完成的操作
您将为消息应用构建一个 Tile,用于显示最近的对话。用户可从此界面跳转到三项常见任务:
- 打开对话
- 撰写新消息
您将学到什么
在此 Codelab 中,您将学习如何编写自己的 Wear OS Tile,包括如何:
- 创建
TileService - 在设备上测试 Tile
- 在 Android Studio 中预览 Tile 界面
- 开发 Tile 界面
- 添加图片
- 处理交互
前提条件
- 对 Kotlin 有基本了解
2. 设置
在此步骤中,您将设置环境并下载启动项目。
您将需要
- Android Studio Koala 功能更新 | 2024.1.2 Canary 1 或更高版本
- Wear OS 设备或模拟器
如果您不熟悉 Wear OS 的使用,建议在开始前阅读本快速指南。其中包含设置 Wear OS 模拟器的说明,并介绍了如何在系统中导航。
下载代码
如果您已安装 Git,只需运行以下命令即可从此代码库克隆代码。
git clone https://github.com/android/codelab-wear-tiles.git
cd codelab-wear-tiles
如果您没有 Git,可以点击以下按钮下载此 Codelab 的所有代码
在 Android Studio 中打开项目
在“欢迎使用 Android Studio”窗口中,选择  打开现有项目或依次选择 文件 > 打开,然后选择文件夹 [下载位置]。
3. 创建基本 Tile
Tile 的入口点是 Tile 服务。在此步骤中,您将注册 Tile 服务并为 Tile 定义布局。
HelloWorldTileService
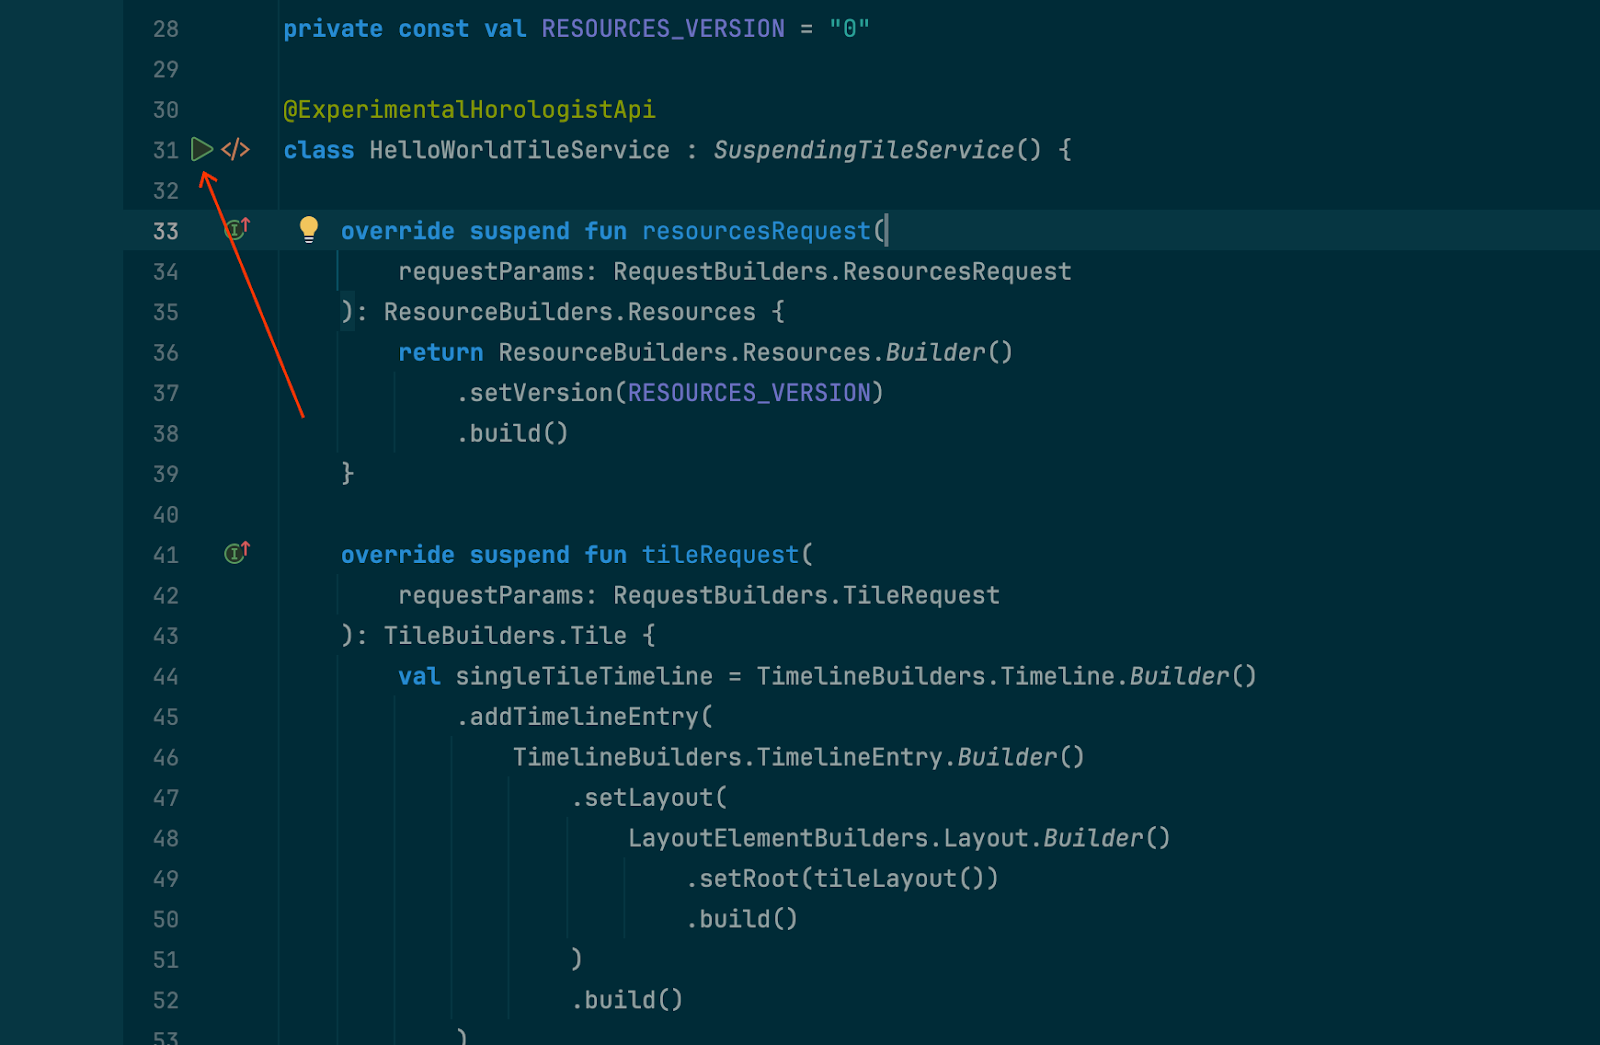
实现 TileService 的类需要指定两个方法
onTileResourcesRequest(requestParams: ResourcesRequest): ListenableFuture<Resources>onTileRequest(requestParams: TileRequest): ListenableFuture<Tile>
第一个方法返回一个 Resources 对象,该对象将字符串 ID 映射到我们将在 Tile 中使用的图片资源。
第二个方法返回 Tile 的描述,包括其布局。我们在这里定义 Tile 的布局以及数据如何绑定到它。
从 start 模块打开 HelloWorldTileService.kt。您将进行的所有更改都将在此模块中。如果您想查看此 Codelab 的结果,还有一个 finished 模块可供参考。
HelloWorldTileService 扩展了 Horologist Tiles 库中与 Kotlin 协程兼容的封装类 SuspendingTileService。Horologist 是 Google 提供的一组库,旨在为 Wear OS 开发者补充 Jetpack 中尚未提供但开发者常用的功能。
SuspendingTileService 提供了两个 suspend 函数,它们是 TileService 中函数的协程等效项:
suspend resourcesRequest(requestParams: ResourcesRequest): Resourcessuspend tileRequest(requestParams: TileRequest): Tile
要详细了解协程,请查阅Android 上的 Kotlin 协程文档。
HelloWorldTileService 尚未完成。我们需要在清单中注册该服务,并且还需要为 tileLayout 提供实现。
注册 Tile 服务
一旦 Tile 服务在清单中注册,它将显示在可供用户添加的 Tile 列表中。
在 <application> 元素中添加 <service>
start/src/main/AndroidManifest.xml
<service
    android:name="com.example.wear.tiles.hello.HelloWorldTileService"
    android:icon="@drawable/ic_waving_hand_24"
    android:label="@string/hello_tile_label"
    android:description="@string/hello_tile_description"
    android:exported="true"
    android:permission="com.google.android.wearable.permission.BIND_TILE_PROVIDER">

    <intent-filter>
        <action android:name="androidx.wear.tiles.action.BIND_TILE_PROVIDER" />
    </intent-filter>

    <!-- The tile preview shown when configuring tiles on your phone -->
    <meta-data
        android:name="androidx.wear.tiles.PREVIEW"
        android:resource="@drawable/tile_hello" />
</service>
首次加载 Tile 或加载 Tile 出错时,会使用图标和标签(作为占位符)。末尾的元数据定义了一个预览图片,该图片在用户添加 Tile 时显示在轮播界面中。
为 Tile 定义布局
HelloWorldTileService 有一个名为 tileLayout 的函数,其函数体为 TODO()。现在,我们将其替换为定义 Tile 布局的实现。
start/src/main/java/com/example/wear/tiles/hello/HelloWorldTileService.kt
fun tileLayout(
    context: Context,
    deviceConfiguration: DeviceParametersBuilders.DeviceParameters,
    message: String,
) =
    materialScope(
        context = context,
        deviceConfiguration = deviceConfiguration,
        allowDynamicTheme = false,
    ) {
        primaryLayout(mainSlot = { text(message.layoutString) })
    }
您的第一个 Wear OS Tile 就这样创建完成了!现在我们来安装这个 Tile 并看看它的样子。
4. 在设备上测试您的 Tile
在运行配置下拉菜单中选择 start 模块后,您可以将应用(即 start 模块)安装到您的设备或模拟器上,然后像用户一样手动安装 Tile。
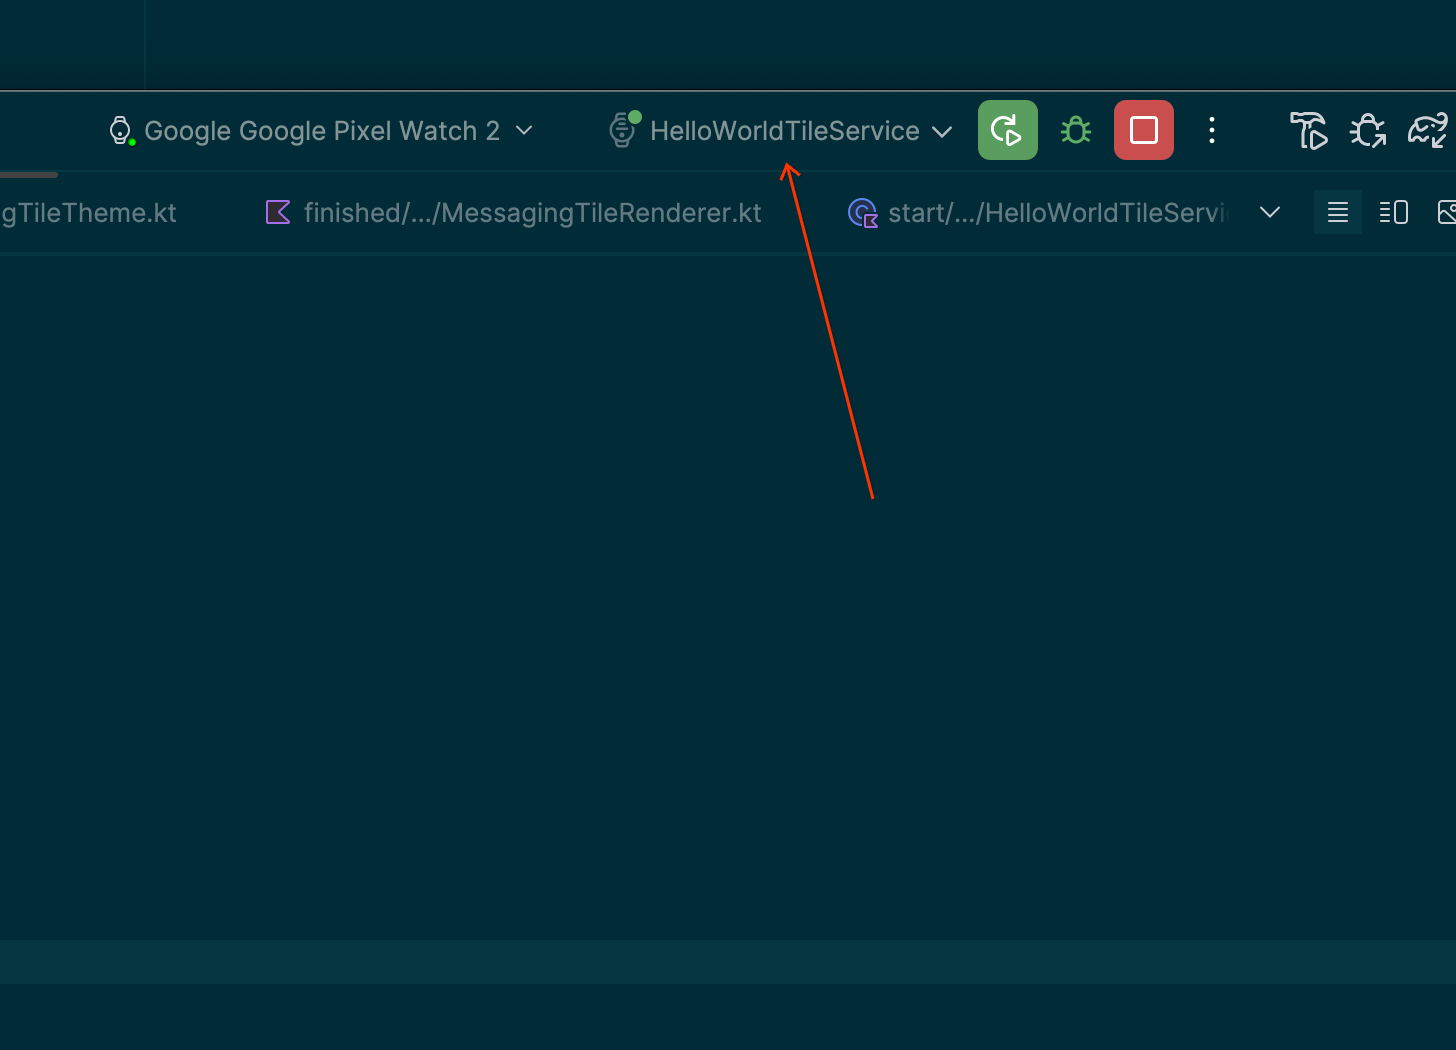
然而,Android Studio 提供了一个快捷方式:通过点击边槽中的“运行服务”图标 (▷),然后选择“运行 ‘HelloWorldTileService’”,它将在连接的设备上安装并启动 Tile。
选择“运行 ‘HelloWorldTileService’”以在连接的设备上构建并运行您的 Tile。它应如下图所示。
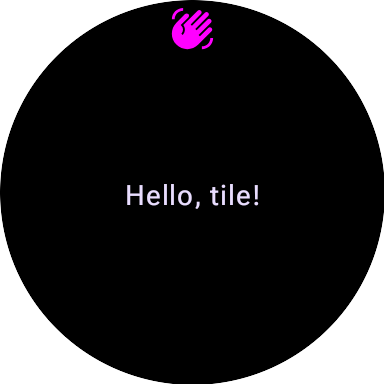
显示屏顶部出现的“挥手”图标由系统提供。要更改它,请修改清单中 Tile 的 <service> 元素的 android:icon 属性。
为方便起见,此过程还会创建一个“HelloWorldTileService”的“运行配置”,以供将来使用。
5. 添加预览函数
我们可以在 Android Studio 中预览 Tile 界面。这缩短了开发界面时的反馈循环,提高了开发速度。
在 HelloWorldTileService.kt 文件的末尾为 HelloWorldTileService 添加 Tile 预览。
start/src/main/java/com/example/wear/tiles/hello/HelloWorldTileService.kt
@Preview(device = WearDevices.SMALL_ROUND, name = "Small Round")
@Preview(device = WearDevices.LARGE_ROUND, name = "Large Round")
internal fun helloLayoutPreview(context: Context): TilePreviewData {
    return TilePreviewData {
        TilePreviewHelper.singleTimelineEntryTileBuilder(
            helloLayout(context, it.deviceConfiguration, "Hello, preview tile!")
        )
            .build()
    }
}
使用“拆分”编辑器模式查看 Tile 预览
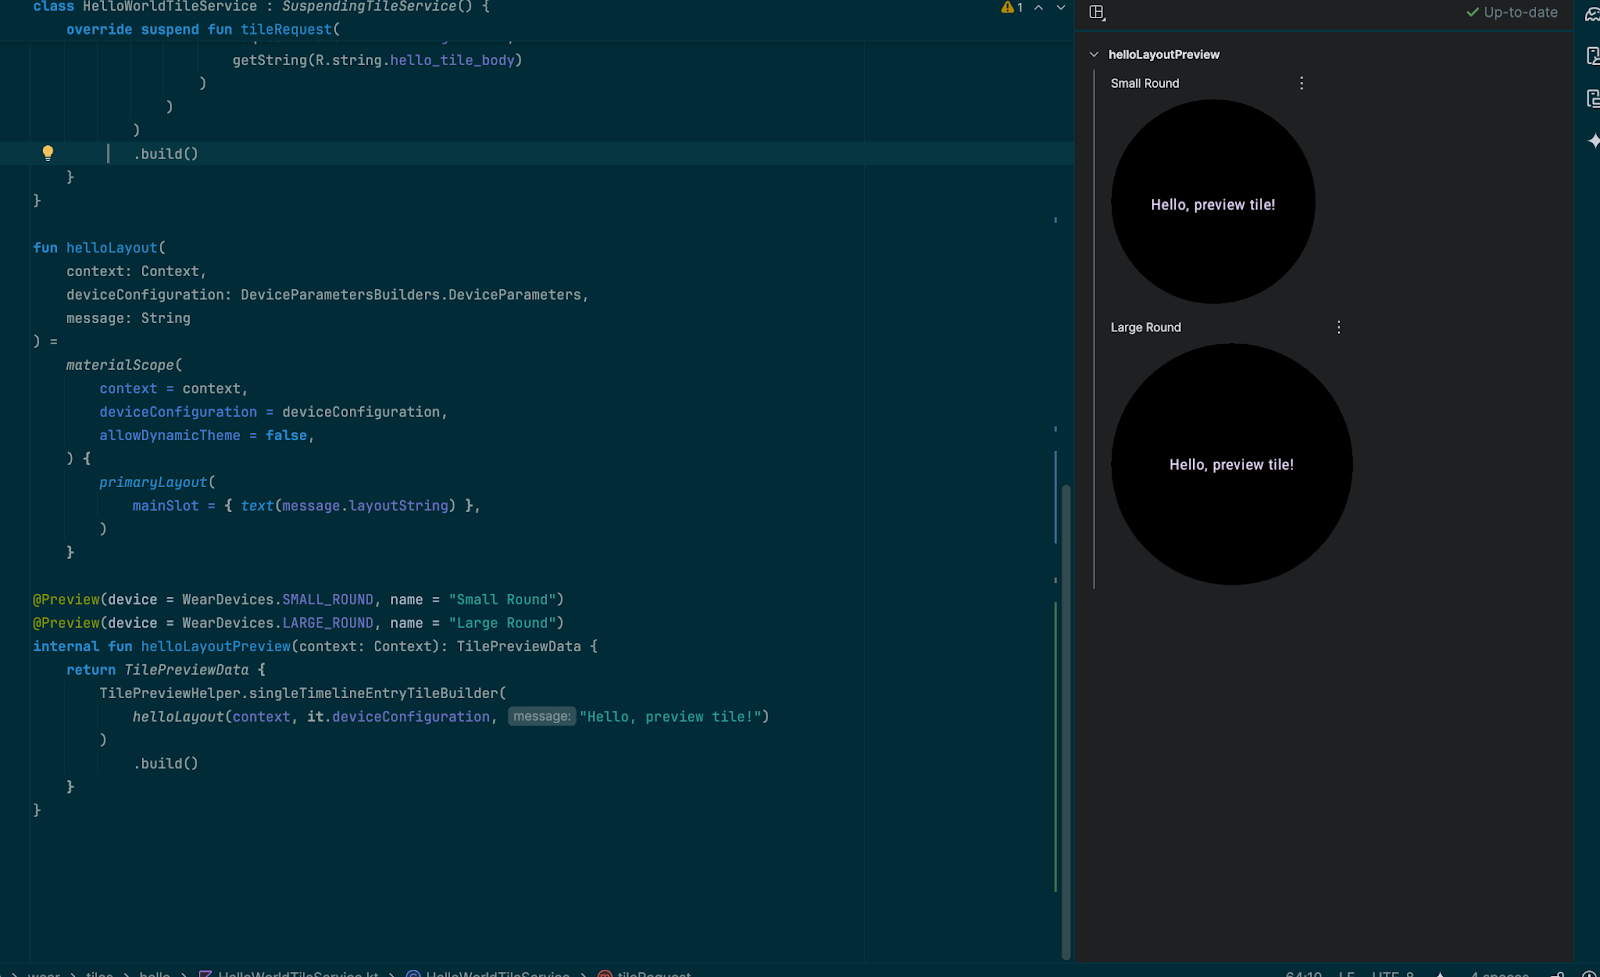
请注意,此处不使用 @Composable 注解—尽管 Tile 使用与可组合函数相同的预览界面,但 Tile 不使用 Compose,并且不可组合。
6. 构建消息 Tile
我们将要构建的消息 Tile 更符合实际应用中的 Tile。与 HelloWorld 示例不同,此 Tile 演示了 Material 3 Expressive 组件,显示图片,并处理交互以打开应用。
MessagingTileService
MessagingTileService 扩展了我们之前看到的 SuspendingTileService 类。
7. 添加界面组件
ProtoLayout 库提供了预构建的组件和布局,让您可以创建符合 Wear OS 最新 Material 3 Expressive 设计的 Tile。
将 Tiles Material 依赖项添加到您的 build.gradle 文件中
start/build.gradle
implementation "androidx.wear.protolayout:protolayout-material3:$protoLayoutVersion"
将布局代码添加到 tileLayout() 函数中,作为 materialScope() 函数的主体。这将创建一个包含两行(每行两个按钮)和一个边缘按钮的布局。
找到行“TODO() // Add primaryLayout()”,并将其替换为以下代码。
start/src/main/java/com/example/wear/tiles/messaging/tile/Layout.kt
primaryLayout(
    mainSlot = {
        // This layout code assumes "contacts" contains at least 4 elements, for sample code
        // that can handle an arbitrary number of contacts, and also shows different numbers
        // of contacts based on the physical screen size, see
        // <https://github.com/android/wear-os-samples/tree/main/WearTilesKotlin>.
        Column.Builder()
            .apply {
                setWidth(expand())
                setHeight(expand())
                addContent(
                    buttonGroup {
                        buttonGroupItem { contactButton(contacts[0]) }
                        buttonGroupItem { contactButton(contacts[1]) }
                    }
                )
                addContent(DEFAULT_SPACER_BETWEEN_BUTTON_GROUPS)
                addContent(
                    buttonGroup {
                        buttonGroupItem { contactButton(contacts[2]) }
                        buttonGroupItem { contactButton(contacts[3]) }
                    }
                )
            }
            .build()
    },
    bottomSlot = {
        textEdgeButton(
            onClick = clickable(), // TODO: Launch new conversation activity
            labelContent = { text("New".layoutString) },
        )
    },
)
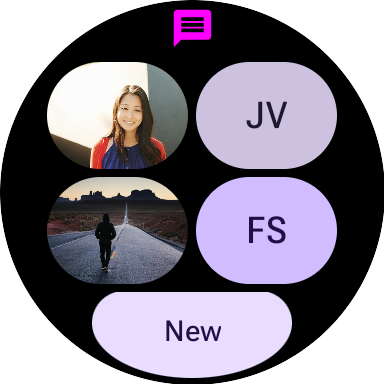
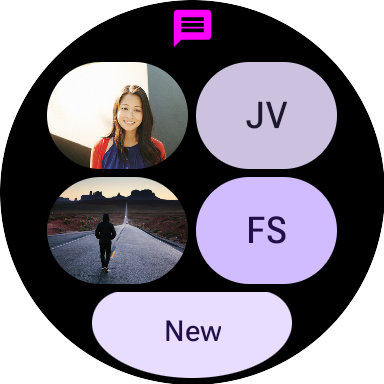
同一文件中的 contactButton() 函数用于创建各个联系人按钮。如果联系人有相关图片,则该图片会显示在按钮上。否则,会使用联系人的姓名首字母缩写。
此时您可能会注意到,尽管总体布局正确,但图片缺失。
如果您将 Tile 部署到设备上,也会看到同样的情况
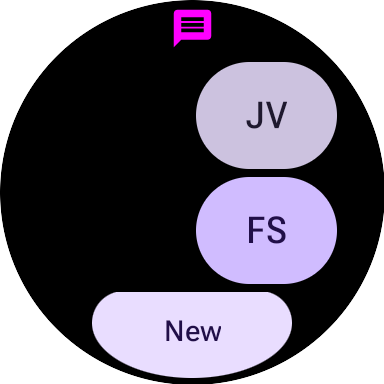
在下一步中,我们将修复缺失的图片。
8. 添加图片
从宏观层面看,Tile 由两部分组成:布局(通过字符串 ID 引用资源)和资源本身(可以是图片)。
目前,我们的代码提供了布局,但没有提供资源本身。要修复预览,我们需要提供图片“资源”。为此,请找到“TODO: Add onTileResourceRequest”并将以下代码作为额外的命名参数添加到 TilePreviewData() 中。
start/src/main/java/com/example/wear/tiles/messaging/tile/Layout.kt
// Additional named argument to TilePreviewData
onTileResourceRequest = { resourcesRequest ->
    Resources.Builder()
        .setVersion(resourcesRequest.version)
        .apply {
            contacts.forEach {
                if (it.avatarSource is AvatarSource.Resource) {
                    addIdToImageMapping(
                        it.imageResourceId(),
                        it.avatarSource.resourceId
                    )
                }
            }
        }
        .build()
}
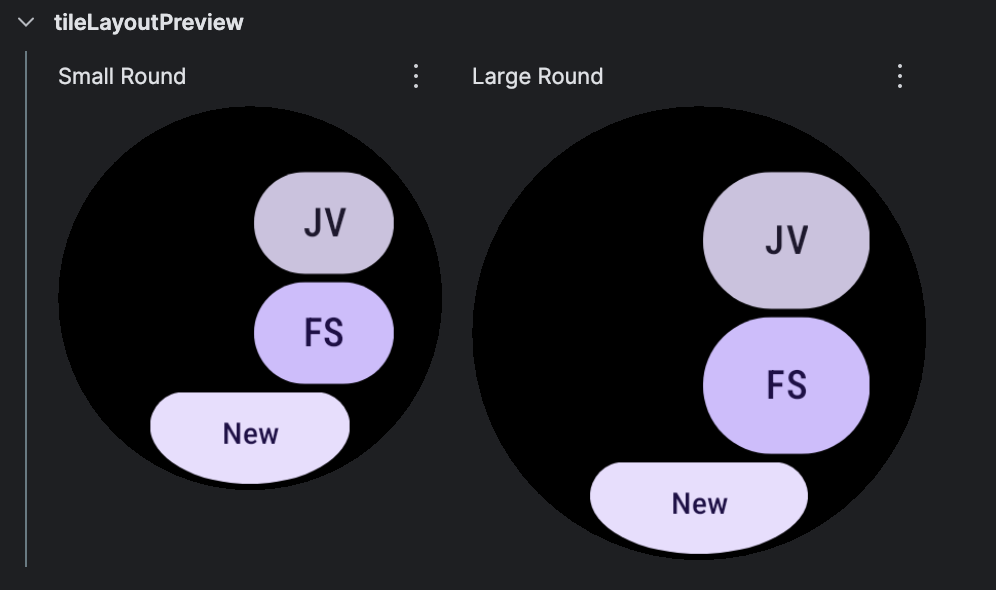
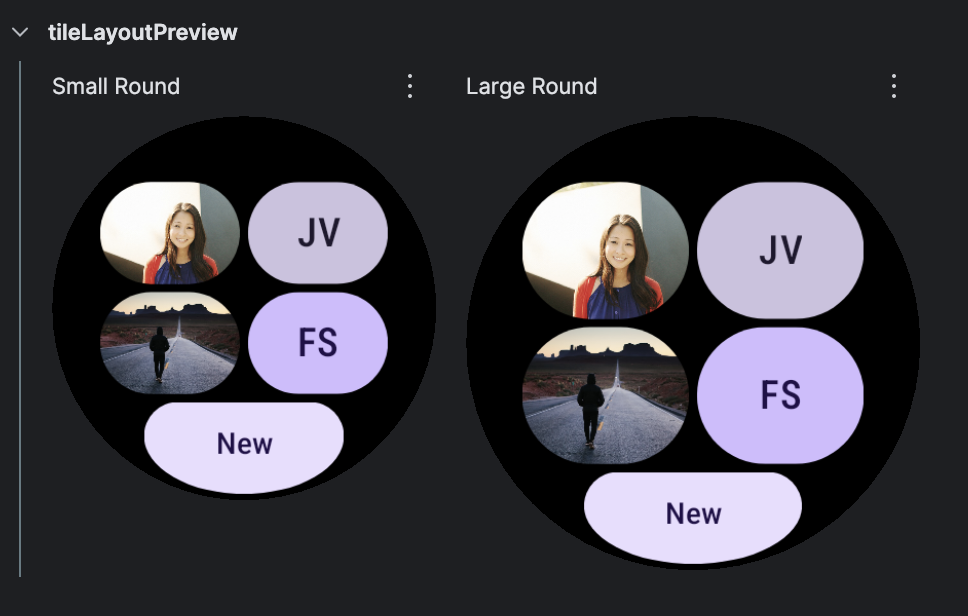
图片现在应显示在预览中
但是,如果 Tile 部署到设备上,图片将缺失。要解决此问题,请将 Service.kt 中的 resourcesRequest() 函数替换为以下内容:
start/src/main/java/com/example/wear/tiles/messaging/tile/Service.kt
override suspend fun resourcesRequest(
    requestParams: ResourcesRequest
): Resources {
    // resourceIds is a list of the ids we need to provide images for. If we're passed an empty
    // list, set resourceIds to all resources.
    val resourceIds =
        requestParams.resourceIds.ifEmpty {
            contacts.map { it.imageResourceId() }
        }

    // resourceMap maps (tile) resource ids to (Android) resource ids.
    val resourceMap =
        contacts
            .mapNotNull {
                when (it.avatarSource) {
                    is AvatarSource.Resource ->
                        it.imageResourceId() to
                            it.avatarSource.resourceId
                    else -> null
                }
            }
            .toMap()
            .filterKeys {
                it in resourceIds
            } // filter to only the resources we need

    // Add images in the resourceMap to the Resources object, and return the result.
    return Resources.Builder()
        .setVersion(requestParams.version)
        .apply {
            resourceMap.forEach { (id, imageResource) ->
                addIdToImageMapping(id, imageResource)
            }
        }
        .build()
}
现在,将 Tile 部署到设备时也会显示图片
在下一步中,我们将处理各个元素的点击事件。
9. 处理交互
使用 Tile 最有用的功能之一是为关键的用户旅程提供快捷方式。这与仅打开应用的启动器不同 - 在这里,我们有空间提供进入应用中特定屏幕的上下文快捷方式。
到目前为止,我们一直对芯片和每个按钮使用无参数 clickable() 提供的虚拟操作。这对于非交互式预览来说没问题,但现在我们来看看如何为元素添加操作。
LaunchAction
LaunchAction 可用于启动 Activity。我们来修改 Layout,以便点击“新建”按钮可启动“新对话”用户旅程。
找到行“TODO: Launch new conversation activity”并将 clickable() 替换为
start/src/main/java/com/example/wear/tiles/messaging/tile/Layout.kt
clickable(
    id = "new_button",
    action =
        launchAction(
            ComponentName(
                "com.example.wear.tiles",
                "com.example.wear.tiles.messaging.MainActivity",
            ),
            mapOf(
                MainActivity.EXTRA_JOURNEY to
                    ActionBuilders.stringExtra(
                        MainActivity.EXTRA_JOURNEY_NEW
                    )
            ),
        ),
)
重新部署 Tile。现在,点击“新建”将不再是无操作,而是启动 MainActivity 并开始“新对话”用户旅程:

同样,修改 Layout,以便点击联系人按钮可与特定用户开始对话。
找到行“Launch open conversation activity”并将 clickable() 替换为
start/src/main/java/com/example/wear/tiles/messaging/tile/Layout.kt
clickable(
    id = contact.id.toString(),
    action =
        launchAction(
            ComponentName(
                "com.example.wear.tiles",
                "com.example.wear.tiles.messaging.MainActivity",
            ),
            mapOf(
                MainActivity.EXTRA_JOURNEY to
                    ActionBuilders.stringExtra(
                        MainActivity
                            .EXTRA_JOURNEY_CONVERSATION
                    ),
                MainActivity.EXTRA_CONVERSATION_CONTACT to
                    ActionBuilders.stringExtra(
                        contact.name
                    ),
            ),
        ),
)
重新部署 Tile。现在,点击某个联系人将不再是无操作,而是与他们开始对话

10. 恭喜
恭喜!您已学会如何为 Wear OS 构建 Tile!
接下来?
如需了解更多信息,请查看 GitHub 上的 Golden Tiles 实现、Wear OS Tile 指南和设计准则。