
1. 简介
您将学习到什么
生物识别登录 提供了一种方便的方式来授权访问应用中的私有内容。用户无需每次打开应用时都记住帐户用户名和密码,他们只需使用其生物识别凭据即可确认身份并授权访问私有内容。
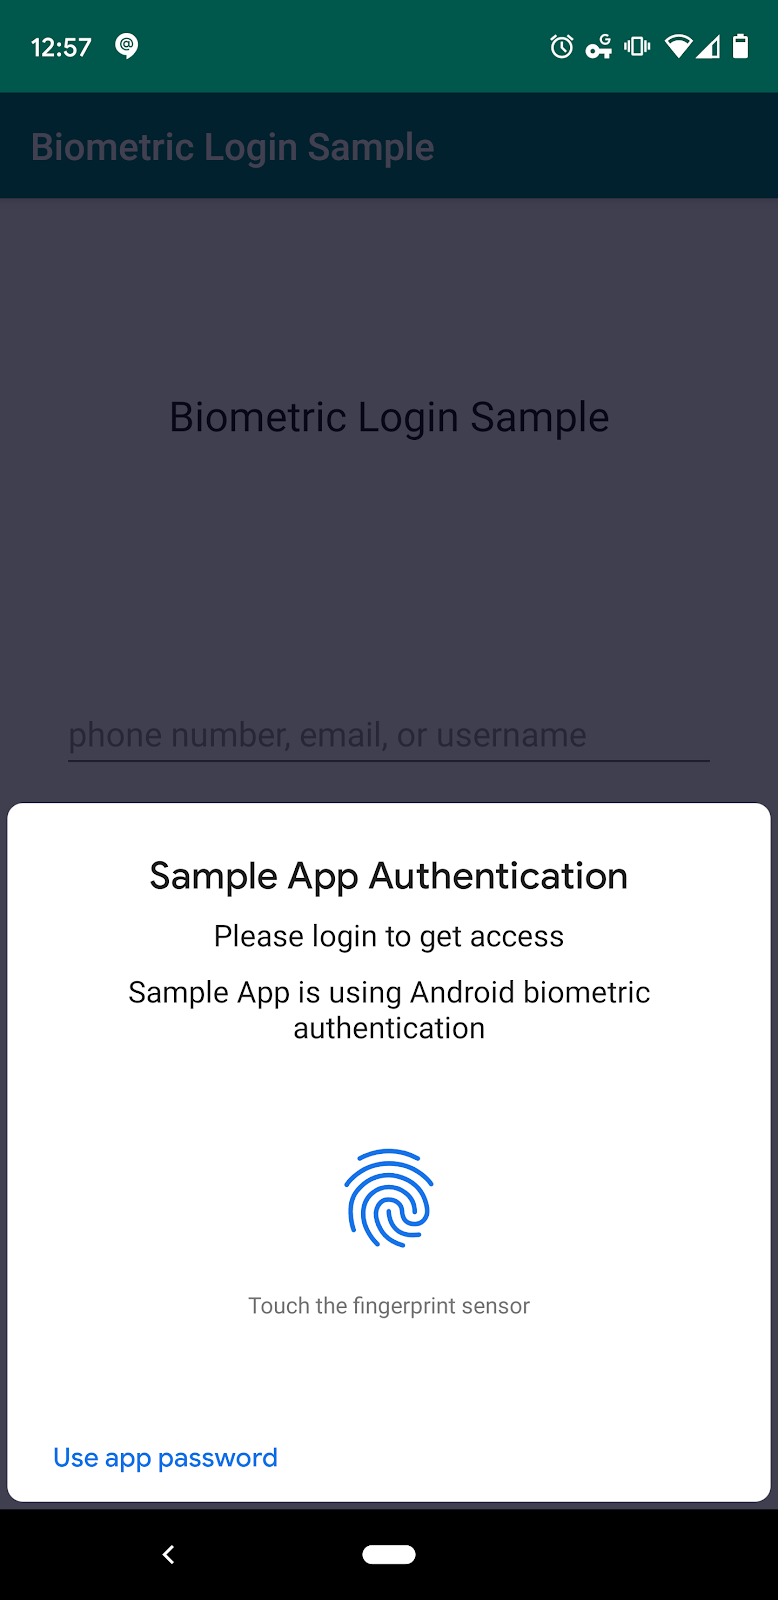
图 1
您需要准备什么
- 最新版本的 Android Studio (>= 3.6)
- 运行 Android 8.0 (Oreo) 或更高版本且具备生物识别传感器的 Android 设备 – 模拟器不起作用,因为它们没有密钥库
- 对 Android 开发有一定了解
- 能够阅读和理解 Kotlin 代码
您将构建什么
您将向一个现有应用添加生物识别身份验证功能,该应用目前需要用户频繁登录。这项新功能将使您的用户登录更加便捷。
- 从一个包含典型登录 Activity 的应用开始(已为您提供)。
- 添加一个按钮,让用户可以选择“使用生物识别”身份验证。
- 创建一个生物识别授权 Activity,用于将服务器生成的用户令牌与用户的生物识别凭据关联起来。
- 在登录 Activity 中,添加逻辑以提示用户使用生物识别技术登录。
从 Github 获取代码
入门代码存储在 GitHub 仓库中。您可以通过以下命令克隆仓库
git clone https://github.com/android/codelab-biometric-login.git
或者,您可以将仓库下载为 ZIP 文件并在本地解压
目录结构
从 Github 克隆或解压后,您将得到根目录 biometric-login-kotlin。根目录包含以下文件夹
/PATH/TO/YOUR/FOLDER/codelab-biometric-login/codelab-00
/PATH/TO/YOUR/FOLDER/codelab-biometric-login/codelab-01
/PATH/TO/YOUR/FOLDER/codelab-biometric-login/codelab-02
每个文件夹都是一个独立的 Android Studio 项目。codelab-00 项目包含我们将用作起点的源代码。可选的 codelab-NN 项目包含本 Codelab 中每个主要部分后预期的项目状态。您可以使用这些可选项目来随时检查您的工作。
2. Codelab-00: 基础工作
将项目导入 Android Studio
Codelab-00 是不包含任何生物识别功能的初始应用。启动 Android Studio 并选择 File -> New -> Import Project... 导入 codelab-00。Android Studio 构建项目后,通过 USB 连接设备并运行应用。您将看到类似于图 2 的屏幕。
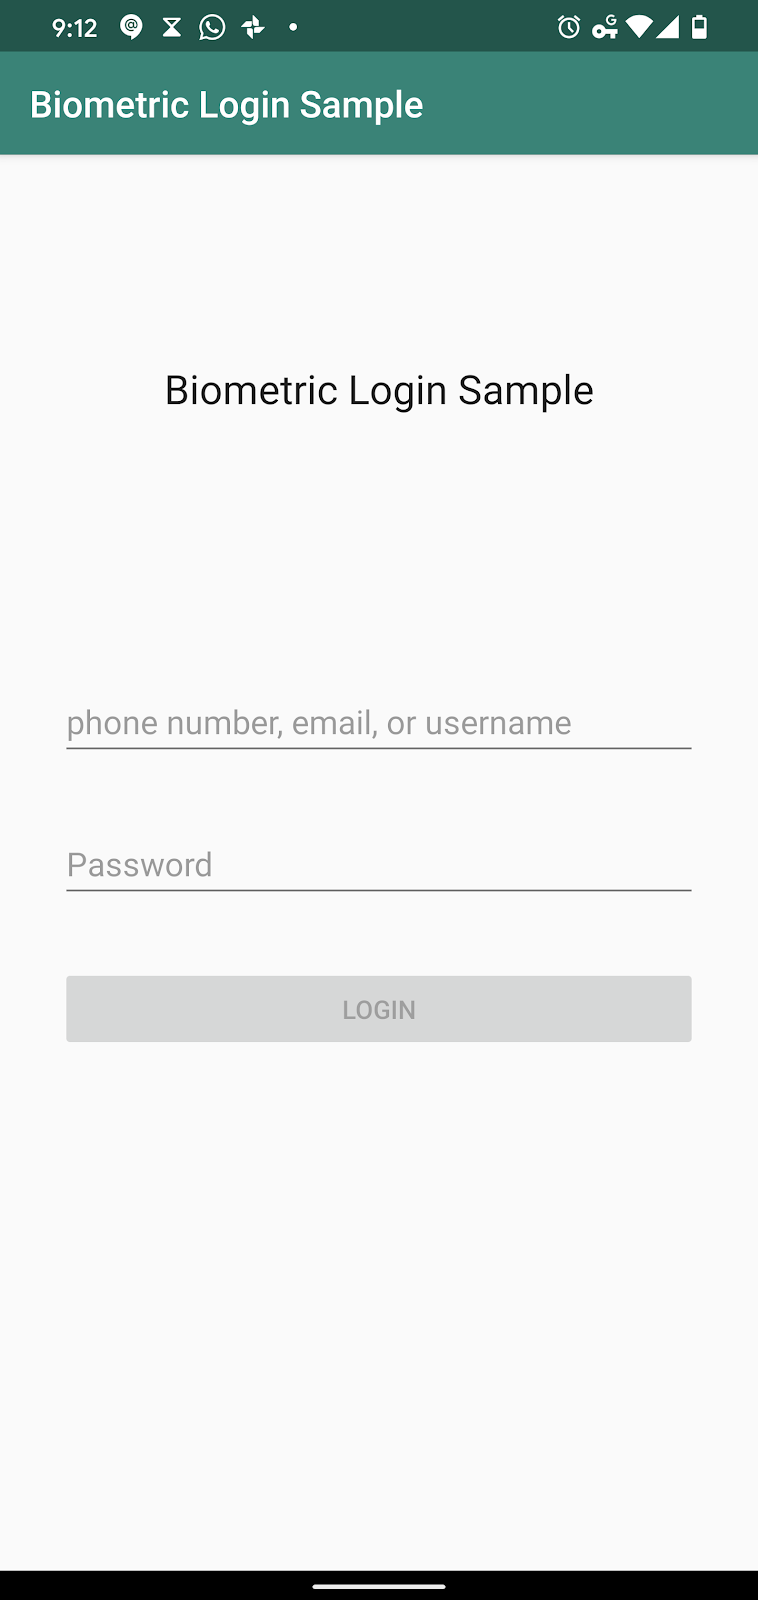
图 2
该应用包含五个类文件:LoginActivity, LoginResult, LoginState LoginViewModel, SampleAppUser。
Gradle
您需要添加一个 Gradle 依赖项才能在应用中使用 Android 生物识别库。打开 app 模块的 build.gradle 文件,并添加以下内容
dependencies {
   ...
   implementation "androidx.biometric:biometric:1.0.1"
   ...
}
生物识别登录的工作原理
在用户名-密码身份验证过程中,应用将用户的凭据发送到远程服务器,服务器返回一个用户令牌。该服务器生成的令牌可以保留在内存中,直到用户关闭应用。一段时间后,当用户再次打开应用时,他们可能需要再次登录。
对于生物识别身份验证,流程略有不同。您需要在登录页面添加一个 “使用生物识别技术” 的 UI。用户首次点击“使用生物识别技术”UI 时,应用会提示用户在应用中启用生物识别身份验证。在“启用”页面上,用户会像往常一样输入用户名和密码组合,凭据也会像往常一样发送到远程服务器。但这次当服务器返回用户令牌时,应用将使用由用户生物识别技术支持的密钥加密该令牌,然后将加密后的令牌存储在磁盘上。下次用户需要登录时,他们无需向服务器请求令牌,而是可以使用其生物识别技术解密存储的令牌。
设置生物识别登录
在显示“使用生物识别技术”UI 之前,需要准备好一些对象。
- 首先,我们将设置一个
CryptographyManager类来处理用户令牌的加密、解密和存储。 - 然后,由于
LoginActivity和EnableBiometricLoginActivity都需要调用BiometricPrompt,我们将创建一个BiometricPromptUtils文件用于共享代码。 - 最后,我们将创建“使用生物识别技术”UI 并将其连接起来以处理不同的行为。
CryptographyManager
用于向应用添加生物识别身份验证的 API 称为 BiometricPrompt。在本 Codelab 中,BiometricPrompt 使用 CryptoObject 与在 Android 上执行加密和解密的系统通信。CryptoObject 需要将 Cipher、MAC、Signature 或 IdentityCredential 作为参数。在此练习中,您将向其传递一个 Cipher。
创建一个名为 CryptographyManager.kt 的文件,并向其中添加以下内容。除了提供 Cipher 以及加密和解密函数外,此文件还提供用于存储和检索服务器生成的用户令牌的函数。
package com.example.biometricloginsample

import android.content.Context
import android.security.keystore.KeyGenParameterSpec
import android.security.keystore.KeyProperties
import com.google.gson.Gson
import java.nio.charset.Charset
import java.security.KeyStore
import javax.crypto.Cipher
import javax.crypto.KeyGenerator
import javax.crypto.SecretKey
import javax.crypto.spec.GCMParameterSpec

/**
* Handles encryption and decryption
*/
interface CryptographyManager {

   fun getInitializedCipherForEncryption(keyName: String): Cipher

   fun getInitializedCipherForDecryption(keyName: String, initializationVector: ByteArray): Cipher

   /**
    * The Cipher created with [getInitializedCipherForEncryption] is used here
    */
   fun encryptData(plaintext: String, cipher: Cipher): CiphertextWrapper

   /**
    * The Cipher created with [getInitializedCipherForDecryption] is used here
    */
   fun decryptData(ciphertext: ByteArray, cipher: Cipher): String

   fun persistCiphertextWrapperToSharedPrefs(
       ciphertextWrapper: CiphertextWrapper,
       context: Context,
       filename: String,
       mode: Int,
       prefKey: String
   )

   fun getCiphertextWrapperFromSharedPrefs(
       context: Context,
       filename: String,
       mode: Int,
       prefKey: String
   ): CiphertextWrapper?

}

fun CryptographyManager(): CryptographyManager = CryptographyManagerImpl()

/**
* To get an instance of this private CryptographyManagerImpl class, use the top-level function
* fun CryptographyManager(): CryptographyManager = CryptographyManagerImpl()
*/
private class CryptographyManagerImpl : CryptographyManager {

   private val KEY_SIZE = 256
   private val ANDROID_KEYSTORE = "AndroidKeyStore"
   private val ENCRYPTION_BLOCK_MODE = KeyProperties.BLOCK_MODE_GCM
   private val ENCRYPTION_PADDING = KeyProperties.ENCRYPTION_PADDING_NONE
   private val ENCRYPTION_ALGORITHM = KeyProperties.KEY_ALGORITHM_AES

   override fun getInitializedCipherForEncryption(keyName: String): Cipher {
       val cipher = getCipher()
       val secretKey = getOrCreateSecretKey(keyName)
       cipher.init(Cipher.ENCRYPT_MODE, secretKey)
       return cipher
   }

   override fun getInitializedCipherForDecryption(
       keyName: String,
       initializationVector: ByteArray
   ): Cipher {
       val cipher = getCipher()
       val secretKey = getOrCreateSecretKey(keyName)
       cipher.init(Cipher.DECRYPT_MODE, secretKey, GCMParameterSpec(128, initializationVector))
       return cipher
   }

   override fun encryptData(plaintext: String, cipher: Cipher): CiphertextWrapper {
       val ciphertext = cipher.doFinal(plaintext.toByteArray(Charset.forName("UTF-8")))
       return CiphertextWrapper(ciphertext, cipher.iv)
   }

   override fun decryptData(ciphertext: ByteArray, cipher: Cipher): String {
       val plaintext = cipher.doFinal(ciphertext)
       return String(plaintext, Charset.forName("UTF-8"))
   }

   private fun getCipher(): Cipher {
       val transformation = "$ENCRYPTION_ALGORITHM/$ENCRYPTION_BLOCK_MODE/$ENCRYPTION_PADDING"
       return Cipher.getInstance(transformation)
   }

   private fun getOrCreateSecretKey(keyName: String): SecretKey {
       // If Secretkey was previously created for that keyName, then grab and return it.
       val keyStore = KeyStore.getInstance(ANDROID_KEYSTORE)
       keyStore.load(null) // Keystore must be loaded before it can be accessed
       keyStore.getKey(keyName, null)?.let { return it as SecretKey }

       // if you reach here, then a new SecretKey must be generated for that keyName
       val paramsBuilder = KeyGenParameterSpec.Builder(
           keyName,
           KeyProperties.PURPOSE_ENCRYPT or KeyProperties.PURPOSE_DECRYPT
       )
       paramsBuilder.apply {
           setBlockModes(ENCRYPTION_BLOCK_MODE)
           setEncryptionPaddings(ENCRYPTION_PADDING)
           setKeySize(KEY_SIZE)
           setUserAuthenticationRequired(true)
       }

       val keyGenParams = paramsBuilder.build()
       val keyGenerator = KeyGenerator.getInstance(
           KeyProperties.KEY_ALGORITHM_AES,
           ANDROID_KEYSTORE
       )
       keyGenerator.init(keyGenParams)
       return keyGenerator.generateKey()
   }

   override fun persistCiphertextWrapperToSharedPrefs(
       ciphertextWrapper: CiphertextWrapper,
       context: Context,
       filename: String,
       mode: Int,
       prefKey: String
   ) {
       val json = Gson().toJson(ciphertextWrapper)
       context.getSharedPreferences(filename, mode).edit().putString(prefKey, json).apply()
   }

   override fun getCiphertextWrapperFromSharedPrefs(
       context: Context,
       filename: String,
       mode: Int,
       prefKey: String
   ): CiphertextWrapper? {
       val json = context.getSharedPreferences(filename, mode).getString(prefKey, null)
       return Gson().fromJson(json, CiphertextWrapper::class.java)
   }
}


data class CiphertextWrapper(val ciphertext: ByteArray, val initializationVector: ByteArray)
BiometricPrompt Utils
如前所述,我们来添加 BiometricPromptUtils,其中包含 LoginActivity 和 EnableBiometricLoginActivity 都将使用的代码。创建一个名为 BiometricPromptUtils.kt 的文件,并向其中添加以下内容。此文件只是将创建 BiometricPrompt 实例和 PromptInfo 实例的步骤提取出来。
package com.example.biometricloginsample

import android.util.Log
import androidx.appcompat.app.AppCompatActivity
import androidx.biometric.BiometricPrompt
import androidx.core.content.ContextCompat

// Since we are using the same methods in more than one Activity, better give them their own file.
object BiometricPromptUtils {
   private const val TAG = "BiometricPromptUtils"
   fun createBiometricPrompt(
       activity: AppCompatActivity,
       processSuccess: (BiometricPrompt.AuthenticationResult) -> Unit
   ): BiometricPrompt {
       val executor = ContextCompat.getMainExecutor(activity)

       val callback = object : BiometricPrompt.AuthenticationCallback() {

           override fun onAuthenticationError(errCode: Int, errString: CharSequence) {
               super.onAuthenticationError(errCode, errString)
               Log.d(TAG, "errCode is $errCode and errString is: $errString")
           }

           override fun onAuthenticationFailed() {
               super.onAuthenticationFailed()
               Log.d(TAG, "User biometric rejected.
")
           }

           override fun onAuthenticationSucceeded(result: BiometricPrompt.AuthenticationResult) {
               super.onAuthenticationSucceeded(result)
               Log.d(TAG, "Authentication was successful")
               processSuccess(result)
           }
       }
       return BiometricPrompt(activity, executor, callback)
   }

   fun createPromptInfo(activity: AppCompatActivity): BiometricPrompt.PromptInfo =
       BiometricPrompt.PromptInfo.Builder().apply {
           setTitle(activity.getString(R.string.prompt_info_title))
           setSubtitle(activity.getString(R.string.prompt_info_subtitle))
           setDescription(activity.getString(R.string.prompt_info_description))
           setConfirmationRequired(false)
           setNegativeButtonText(activity.getString(R.string.prompt_info_use_app_password))
       }.build()
}
您还需要将以下内容添加到您的 res/values/strings.xml 文件中。
<string name="prompt_info_title">Sample App Authentication</string>
<string name="prompt_info_subtitle">Please login to get access</string>
<string name="prompt_info_description">Sample App is using Android biometric authentication</string>
<string name="prompt_info_use_app_password">Use app password</string>
最后,创建一个 Constants.kt 文件,并向其中添加以下内容。
package com.example.biometricloginsample

const val SHARED_PREFS_FILENAME = "biometric_prefs"
const val CIPHERTEXT_WRAPPER = "ciphertext_wrapper"
添加生物识别登录 UI
打开 res/layout/activity_login.xml 文件,并添加一个 TextView,用户可以点击它以使用其生物识别凭据登录。(您需要删除旧的 @+id/success TextView)
<androidx.appcompat.widget.AppCompatTextView
   android:id="@+id/use_biometrics"
   android:layout_width="wrap_content"
   android:layout_height="wrap_content"
   android:layout_marginLeft="@dimen/standard_padding"
   android:layout_marginTop="16dp"
   android:layout_marginRight="@dimen/standard_padding"
   android:text="Use biometrics"
   android:textAppearance="?android:attr/textAppearanceMedium"
   android:textColor="#0000EE"
   app:layout_constraintLeft_toLeftOf="parent"
   app:layout_constraintTop_toBottomOf="@+id/login" />

<androidx.appcompat.widget.AppCompatTextView
   android:id="@+id/success"
   android:layout_width="match_parent"
   android:layout_height="wrap_content"
   android:layout_margin="@dimen/standard_padding"
   android:textAppearance="?android:attr/textAppearanceMedium"
   android:textColor="@color/colorPrimaryDark"
   app:layout_constraintLeft_toLeftOf="parent"
   app:layout_constraintRight_toRightOf="parent"
   app:layout_constraintTop_toBottomOf="@id/use_biometrics"
   tools:text="@string/already_signedin" />
您的应用现在应如图 3 所示。“使用生物识别技术”UI 目前没有任何功能。我们将在后续部分为其添加功能。
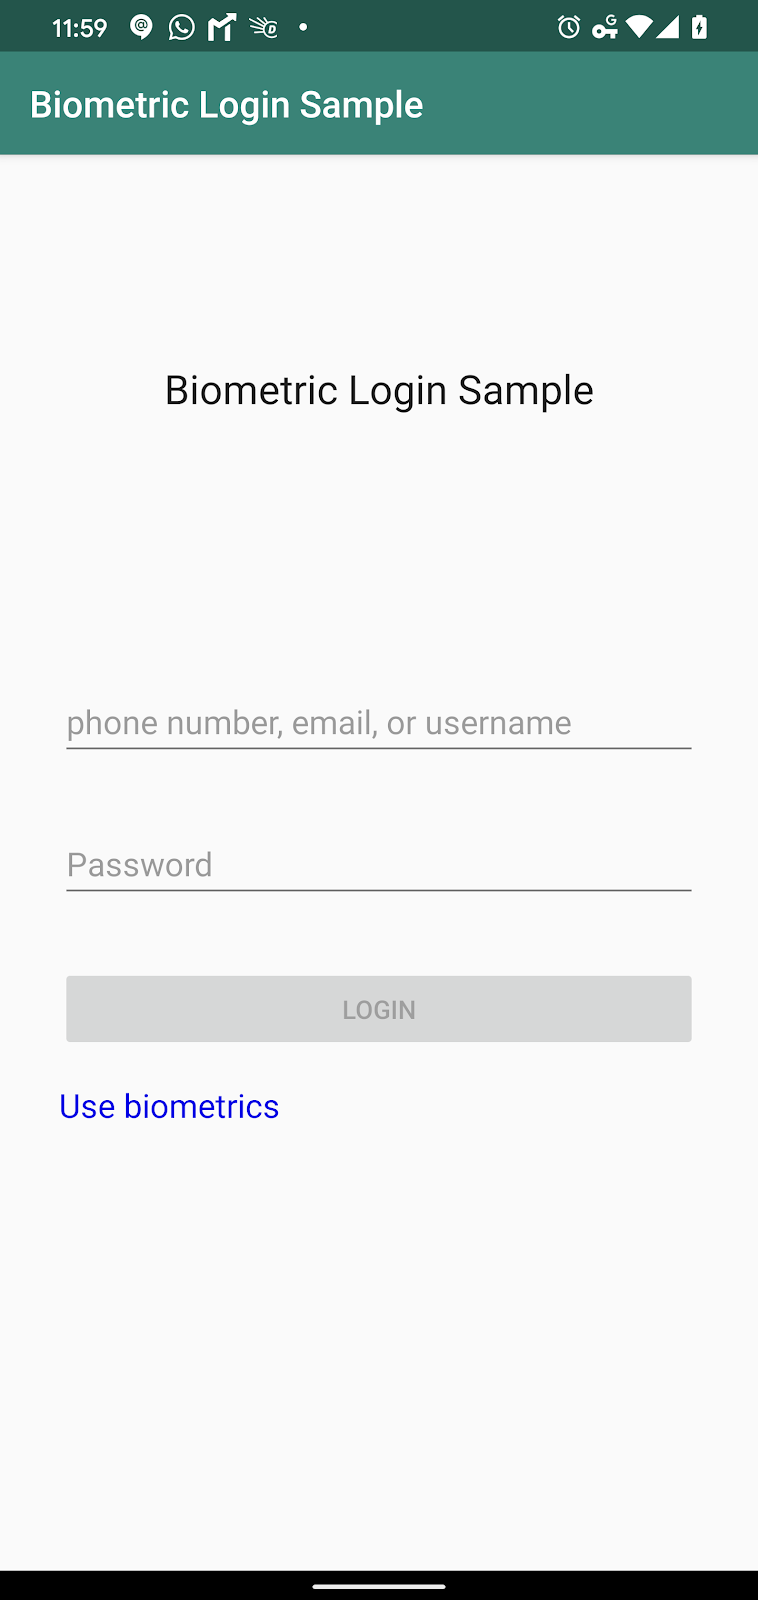
图 3
3. Codelab-01: 添加生物识别登录逻辑
添加生物识别身份验证连接
现在,前提条件已就绪,我们可以向 LoginActivity 添加生物识别逻辑。回想一下,“使用生物识别技术”UI 有一个初始行为和一个通用行为。当用户首次与 UI 交互时,它会提示用户确认是否要在应用中启用生物识别登录。为此,UI 的 onClick() 方法会启动一个 intent 来启动 Activity EnableBiometricLoginActivity。之后用户每次看到该 UI 时,都会出现生物识别提示。
将以下逻辑添加到 LoginActivity 以处理这些行为。(请注意,此代码片段将替换您现有的 onCreate() 函数。)
private lateinit var biometricPrompt: BiometricPrompt
private val cryptographyManager = CryptographyManager()
private val ciphertextWrapper
   get() = cryptographyManager.getCiphertextWrapperFromSharedPrefs(
       applicationContext,
       SHARED_PREFS_FILENAME,
       Context.MODE_PRIVATE,
       CIPHERTEXT_WRAPPER
   )

override fun onCreate(savedInstanceState: Bundle?) {
   super.onCreate(savedInstanceState)
   binding = ActivityLoginBinding.inflate(layoutInflater)
   setContentView(binding.root)

   val canAuthenticate = BiometricManager.from(applicationContext).canAuthenticate()
   if (canAuthenticate == BiometricManager.BIOMETRIC_SUCCESS) {
       binding.useBiometrics.visibility = View.VISIBLE
       binding.useBiometrics.setOnClickListener {
           if (ciphertextWrapper != null) {
               showBiometricPromptForDecryption()
           } else {
               startActivity(Intent(this, EnableBiometricLoginActivity::class.java))
           }
       }
   } else {
       binding.useBiometrics.visibility = View.INVISIBLE
   }

   if (ciphertextWrapper == null) {
       setupForLoginWithPassword()
   }
}

/**
* The logic is kept inside onResume instead of onCreate so that authorizing biometrics takes
* immediate effect.
*/
override fun onResume() {
   super.onResume()

   if (ciphertextWrapper != null) {
       if (SampleAppUser.fakeToken == null) {
           showBiometricPromptForDecryption()
       } else {
           // The user has already logged in, so proceed to the rest of the app
           // this is a todo for you, the developer
           updateApp(getString(R.string.already_signedin))
       }
   }
}

// USERNAME + PASSWORD SECTION
现在我们将保持 showBiometricPromptForDecryption() 函数未实现。
创建 EnableBiometricLoginActivity
创建一个继承自 AppCompatActivity 的空 Activity,并将其命名为 EnableBiometricLoginActivity。将相关的 XML 文件 res/layout/activity_enable_biometric_login.xml 更改为以下内容。
<?xml version="1.0" encoding="utf-8"?>
<androidx.constraintlayout.widget.ConstraintLayout xmlns:android="http://schemas.android.com/apk/res/android"
   xmlns:app="http://schemas.android.com/apk/res-auto"
   xmlns:tools="http://schemas.android.com/tools"
   android:layout_width="match_parent"
   android:layout_height="match_parent"
   tools:context=".EnableBiometricLoginActivity">

   <androidx.appcompat.widget.AppCompatTextView
       android:id="@+id/title"
       android:layout_width="wrap_content"
       android:layout_height="wrap_content"
       android:layout_margin="@dimen/standard_padding"
       android:fontFamily="sans-serif-condensed-light"
       android:text="@string/enable_biometric_login"
       android:textAppearance="?android:attr/textAppearanceLarge"
       app:layout_constraintLeft_toLeftOf="parent"
       app:layout_constraintRight_toRightOf="parent"
       app:layout_constraintTop_toTopOf="parent" />

   <androidx.appcompat.widget.AppCompatTextView
       android:id="@+id/description"
       android:layout_width="match_parent"
       android:layout_height="wrap_content"
       android:layout_margin="@dimen/standard_padding"
       android:text="@string/desc_biometrics_authorization"
       app:layout_constraintLeft_toLeftOf="parent"
       app:layout_constraintRight_toRightOf="parent"
       app:layout_constraintTop_toBottomOf="@id/title" />

   <androidx.appcompat.widget.AppCompatEditText
       android:id="@+id/username"
       android:layout_width="match_parent"
       android:layout_height="wrap_content"
       android:layout_margin="@dimen/standard_padding"
       android:hint="@string/username_hint"
       app:layout_constraintLeft_toLeftOf="parent"
       app:layout_constraintRight_toRightOf="parent"
       app:layout_constraintTop_toBottomOf="@id/description" />

   <androidx.appcompat.widget.AppCompatEditText
       android:id="@+id/password"
       android:layout_width="match_parent"
       android:layout_height="wrap_content"
       android:layout_margin="@dimen/standard_padding"
       android:hint="@string/password"
       android:imeOptions="actionDone"
       android:inputType="textPassword"
       app:layout_constraintLeft_toLeftOf="parent"
       app:layout_constraintRight_toRightOf="parent"
       app:layout_constraintTop_toBottomOf="@id/username" />

   <androidx.appcompat.widget.AppCompatButton
       android:id="@+id/cancel"
       android:layout_width="wrap_content"
       android:layout_height="wrap_content"
       android:layout_marginTop="@dimen/standard_padding"
       android:text="@string/cancel"
       app:layout_constraintHorizontal_chainStyle="spread"
       app:layout_constraintLeft_toLeftOf="parent"
       app:layout_constraintRight_toLeftOf="@+id/authorize"
       app:layout_constraintTop_toBottomOf="@id/password" />

   <androidx.appcompat.widget.AppCompatButton
       android:id="@+id/authorize"
       android:layout_width="wrap_content"
       android:layout_height="wrap_content"
       android:layout_marginTop="@dimen/standard_padding"
       android:text="@string/btn_authorize"
       app:layout_constraintLeft_toRightOf="@+id/cancel"
       app:layout_constraintRight_toRightOf="parent"
       app:layout_constraintTop_toBottomOf="@id/password" />

</androidx.constraintlayout.widget.ConstraintLayout>
将以下代码片段添加到您的 res/values/strings.xml 资源文件中
<string name="enable_biometric_login">Enable Biometric Login</string>
<string name="desc_biometrics_authorization">Enter your login ID and password to confirm activation of Biometric Login.</string>
<string name="cancel">Cancel</string>
<string name="btn_authorize">Authorize</string>
运行您的应用。当您点击“使用生物识别技术”UI 时,它应该会将您带到类似于图 4 的屏幕。
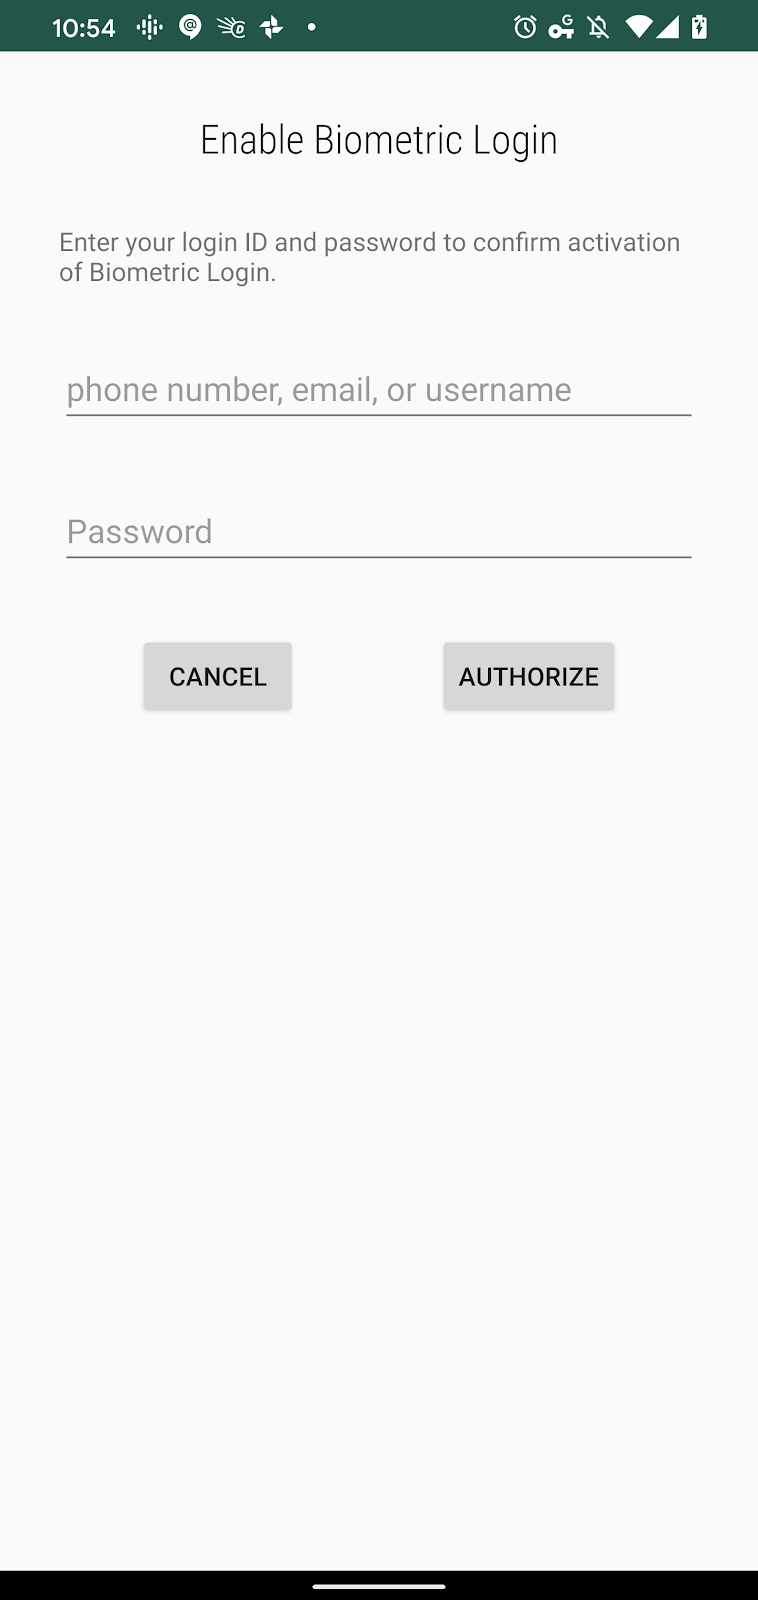
图 4
向 EnableBiometricLoginActivity 添加逻辑
从图 4 可以看出,输入用户名和密码后,用户必须点击“授权”以启用生物识别身份验证。这对您的代码意味着以下内容。
EnableBiometricLoginActivity中的用户名和密码 TextViews 应与LoginActivity中的 TextViews 连接方式类似。- 然而,与
LoginActivity不同的是,当用户点击“授权”按钮时,您将启动BiometricPrompt。 - 当
BiometricPrompt返回时,您将使用关联的Cipher来加密服务器生成的用户令牌。 - 最后,您应该关闭
EnableBiometricLoginActivity。
对于步骤 1,您只需连接 LoginViewModel 并让它为您处理用户名-密码身份验证。为此,请将您的 onCreate() 函数替换为以下代码片段。
private val TAG = "EnableBiometricLogin"
private lateinit var cryptographyManager: CryptographyManager
private val loginViewModel by viewModels<LoginViewModel>()

override fun onCreate(savedInstanceState: Bundle?) {
   super.onCreate(savedInstanceState)
   val binding = ActivityEnableBiometricLoginBinding.inflate(layoutInflater)
   setContentView(binding.root)
   binding.cancel.setOnClickListener { finish() }

   loginViewModel.loginWithPasswordFormState.observe(this, Observer { formState ->
       val loginState = formState ?: return@Observer
       when (loginState) {
           is SuccessfulLoginFormState -> binding.authorize.isEnabled = loginState.isDataValid
           is FailedLoginFormState -> {
               loginState.usernameError?.let { binding.username.error = getString(it) }
               loginState.passwordError?.let { binding.password.error = getString(it) }
           }
       }
   })
   loginViewModel.loginResult.observe(this, Observer {
       val loginResult = it ?: return@Observer
       if (loginResult.success) {
           showBiometricPromptForEncryption()
       }
   })
   binding.username.doAfterTextChanged {
       loginViewModel.onLoginDataChanged(
           binding.username.text.toString(),
           binding.password.text.toString()
       )
   }
   binding.password.doAfterTextChanged {
       loginViewModel.onLoginDataChanged(
           binding.username.text.toString(),
           binding.password.text.toString()
       )
   }
   binding.password.setOnEditorActionListener { _, actionId, _ ->
       when (actionId) {
           EditorInfo.IME_ACTION_DONE ->
               loginViewModel.login(
                   binding.username.text.toString(),
                   binding.password.text.toString()
               )
       }
       false
   }
   binding.authorize.setOnClickListener {
       loginViewModel.login(binding.username.text.toString(), binding.password.text.toString())
   }
}
同样,LoginActivity 和这段用于 EnableBiometricLoginActivity 的代码之间唯一的本质区别是,在服务器返回 userToken 后调用了 showBiometricPromptForEncryption()。
为了启动 EnableBiometricLoginActivity,我们必须在 LoginActivity 的 onCreate() 函数中添加代码来启动它。
最后,添加以下代码片段以完成 EnableBiometricLoginActivity 的实现。
private fun showBiometricPromptForEncryption() {
   val canAuthenticate = BiometricManager.from(applicationContext).canAuthenticate()
   if (canAuthenticate == BiometricManager.BIOMETRIC_SUCCESS) {
       val secretKeyName = "biometric_sample_encryption_key"
       cryptographyManager = CryptographyManager()
       val cipher = cryptographyManager.getInitializedCipherForEncryption(secretKeyName)
       val biometricPrompt =
           BiometricPromptUtils.createBiometricPrompt(this, ::encryptAndStoreServerToken)
       val promptInfo = BiometricPromptUtils.createPromptInfo(this)
       biometricPrompt.authenticate(promptInfo, BiometricPrompt.CryptoObject(cipher))
   }
}

private fun encryptAndStoreServerToken(authResult: BiometricPrompt.AuthenticationResult) {
   authResult.cryptoObject?.cipher?.apply {
       SampleAppUser.fakeToken?.let { token ->
           Log.d(TAG, "The token from server is $token")
           val encryptedServerTokenWrapper = cryptographyManager.encryptData(token, this)
           cryptographyManager.persistCiphertextWrapperToSharedPrefs(
               encryptedServerTokenWrapper,
               applicationContext,
               SHARED_PREFS_FILENAME,
               Context.MODE_PRIVATE,
               CIPHERTEXT_WRAPPER
           )
       }
   }
   finish()
}
此时,如果您运行应用,它看起来您的工作已经完成。但还不完全。您仍然需要在 LoginActivity 内部实现 showBiometricPromptForDecryption(),以便用户将来能够继续使用生物识别技术登录。
向 LoginActivity 添加生物识别身份验证逻辑
在 LoginActivity 内部,将 showBiometricPromptForDecryption() 占位符替换为以下代码。
// BIOMETRICS SECTION

private fun showBiometricPromptForDecryption() {
   ciphertextWrapper?.let { textWrapper ->
       val secretKeyName = getString(R.string.secret_key_name)
       val cipher = cryptographyManager.getInitializedCipherForDecryption(
           secretKeyName, textWrapper.initializationVector
       )
       biometricPrompt =
           BiometricPromptUtils.createBiometricPrompt(
               this,
               ::decryptServerTokenFromStorage
           )
       val promptInfo = BiometricPromptUtils.createPromptInfo(this)
       biometricPrompt.authenticate(promptInfo, BiometricPrompt.CryptoObject(cipher))
   }
}

private fun decryptServerTokenFromStorage(authResult: BiometricPrompt.AuthenticationResult) {
   ciphertextWrapper?.let { textWrapper ->
       authResult.cryptoObject?.cipher?.let {
           val plaintext =
               cryptographyManager.decryptData(textWrapper.ciphertext, it)
           SampleAppUser.fakeToken = plaintext
           // Now that you have the token, you can query server for everything else
           // the only reason we call this fakeToken is because we didn't really get it from
           // the server. In your case, you will have gotten it from the server the first time
           // and therefore, it's a real token.

           updateApp(getString(R.string.already_signedin))
       }
   }
}

// USERNAME + PASSWORD SECTION
4. 完成。
您做到了!恭喜!您为您的用户带来了生物识别身份验证的便利!在此过程中,您学到了以下内容
- 如何将 BiometricPrompt 添加到您的应用。
- 如何创建用于加密和解密的 Cipher。
- 如何存储服务器生成的用户令牌用于生物识别身份验证。
有关 BiometricPrompt 和加密如何协同工作的更多信息,请参阅
祝您的应用蓬勃发展!