
1. 开始之前
简介
在本课程的当前阶段,您已熟练掌握如何使用 Compose 构建应用,并且对使用 XML、View、View Binding 和 Fragment 构建应用有了一些了解。在使用 View 构建应用之后,您可能已经体会到使用 Compose 等声明式 UI 构建应用带来的便利。然而,在某些情况下,使用 View 可能比使用 Compose 更合理。在本 Codelab 中,您将学习如何使用 View 互操作性将 View 组件添加到现代 Compose 应用中。
在本 Codelab 撰写时,您将要创建的 UI 组件在 Compose 中尚不可用。这是利用 View 互操作性的绝佳机会!
前提条件
- 完成 Android Basics with Compose 课程的学习,包括 Build an Android App with Views Codelab。
所需物品
- 一台有互联网连接的计算机和 Android Studio
- 一个设备或模拟器
- Juice Tracker 应用的启动代码
您将构建的内容
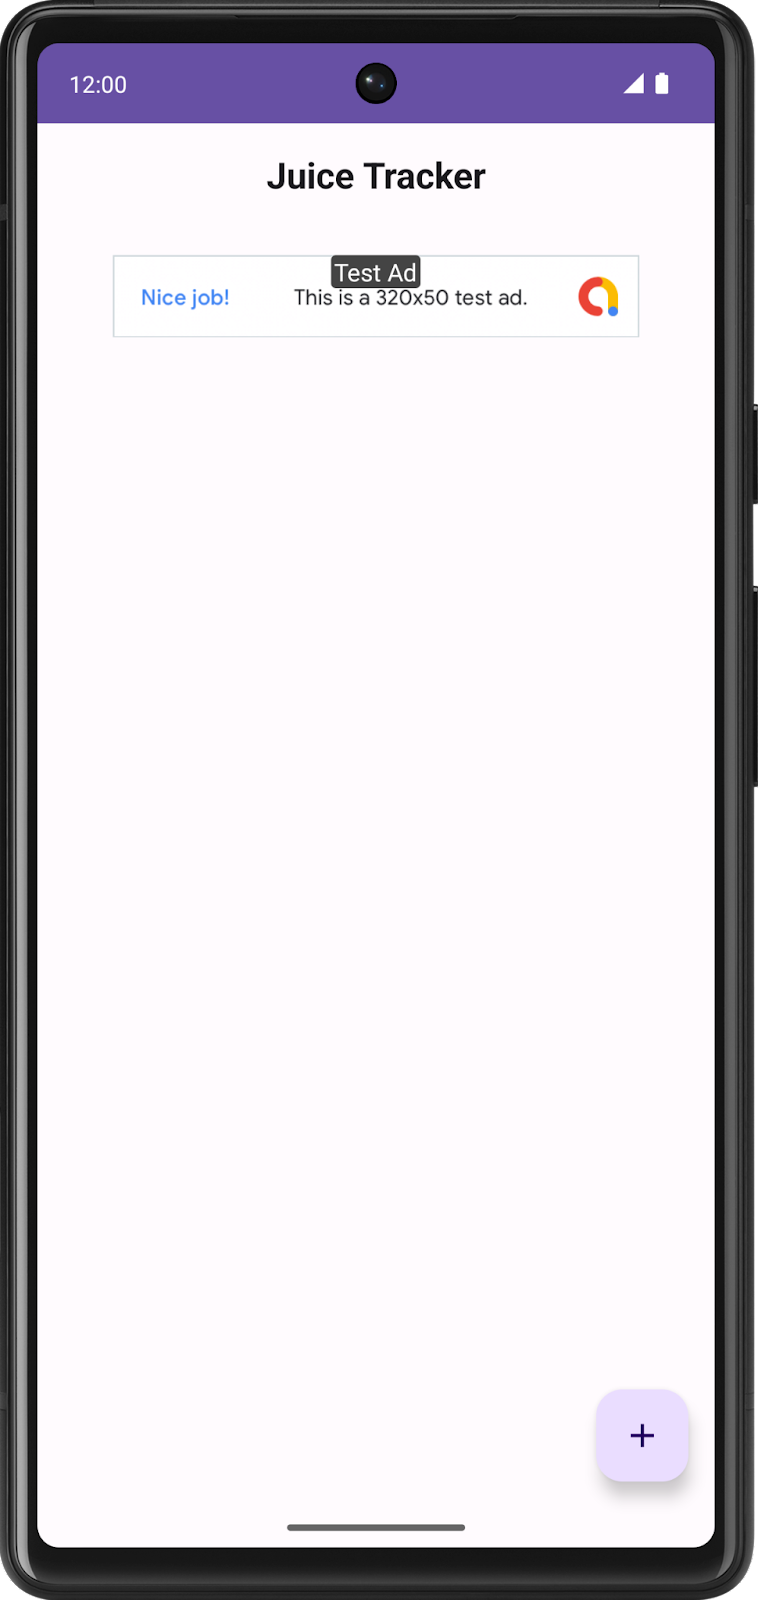
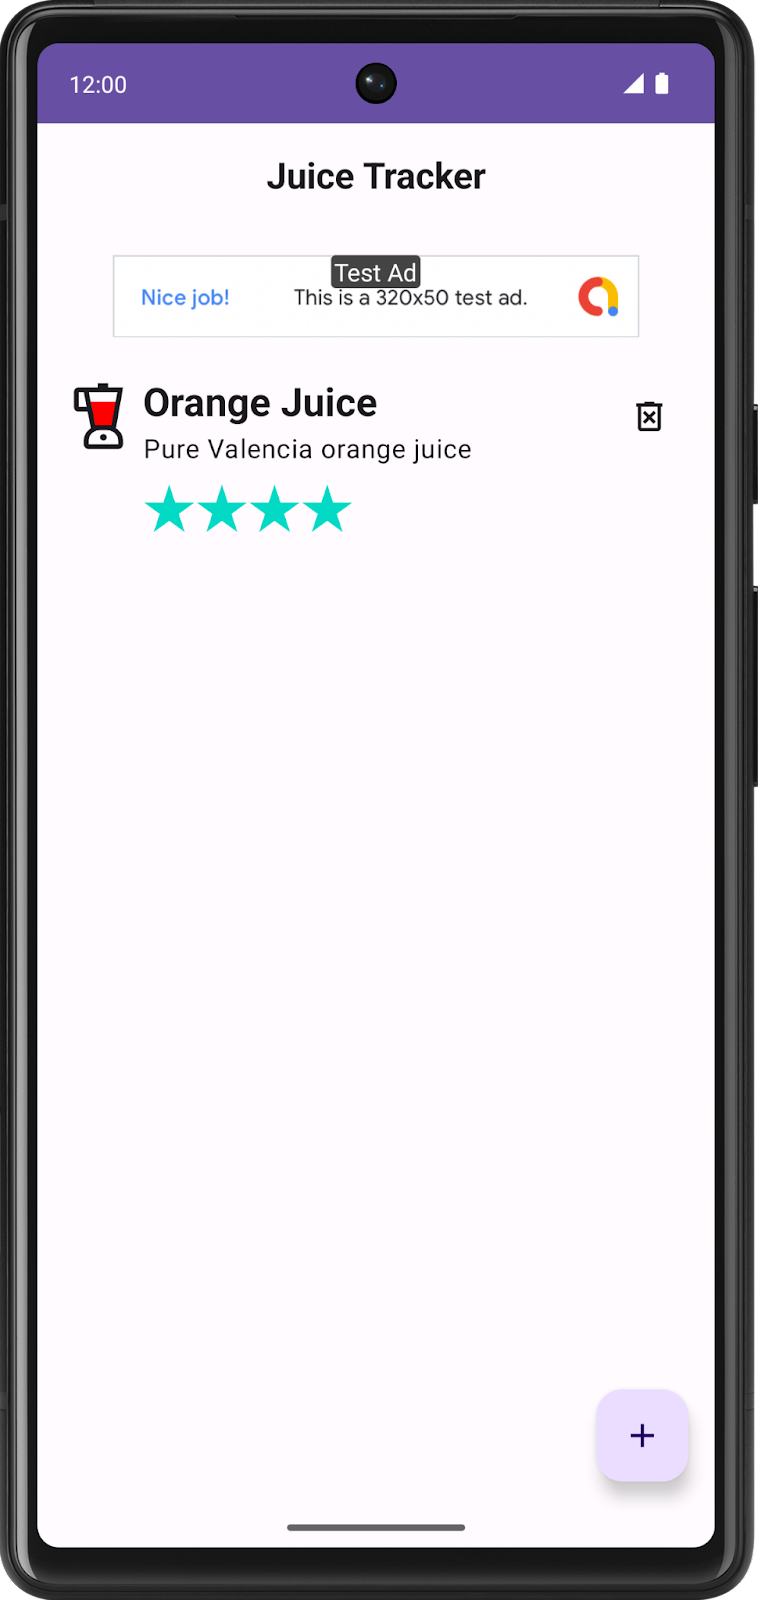
在本 Codelab 中,您需要将三个 View 集成到 Compose UI 中以完成 Juice Tracker 应用 UI:一个 Spinner、一个 RatingBar 和一个 AdView。为了构建这些组件,您将使用 View 互操作性(简称 View Interop)。通过 View Interop,您实际上可以通过将 View 封装到 Composable 中来将其添加到应用中。
代码演练
在本 Codelab 中,您将使用与 Build an Android App with Views 和 Add Compose to a View-based app Codelab 中相同的 JuiceTracker 应用。此版本不同之处在于,提供的启动代码完全使用 Compose 编写。当前应用在输入对话框底部工作表缺少颜色和评分输入,并在列表屏幕顶部缺少广告横幅。
bottomsheet 目录包含与输入对话框相关的所有 UI 组件。此包应该包含创建颜色和评分输入时所需的 UI 组件。
homescreen 包含主屏幕托管的 UI 组件,其中包括 JuiceTracker 列表。此包最终应该包含创建广告横幅时所需的组件。
主要的 UI 组件,例如底部工作表和果汁列表,都托管在 JuiceTrackerApp.kt 文件中。
2. 获取启动代码
首先,下载启动代码
或者,您可以克隆代码的 GitHub 仓库
$ git clone https://github.com/google-developer-training/basic-android-kotlin-compose-training-juice-tracker.git
$ cd basic-android-kotlin-compose-training-juice-tracker
$ git checkout compose-starter
- 在 Android Studio 中,打开
basic-android-kotlin-compose-training-juice-tracker文件夹。 - 在 Android Studio 中打开 Juice Tracker 应用代码。
3. Gradle 配置
在应用 build.gradle.kts 文件中添加 play services ads 依赖项。
app/build.gradle.kts
android {
   ...
   dependencies {
      ...
      implementation("com.google.android.gms:play-services-ads:22.2.0")
   }
}
4. 设置
在 Android manifest 中,在 activity 标签上方,添加以下值以启用广告横幅进行测试
AndroidManifest.xml
...
<meta-data
   android:name="com.google.android.gms.ads.APPLICATION_ID"
   android:value="ca-app-pub-3940256099942544~3347511713" />

...
5. 完成输入对话框
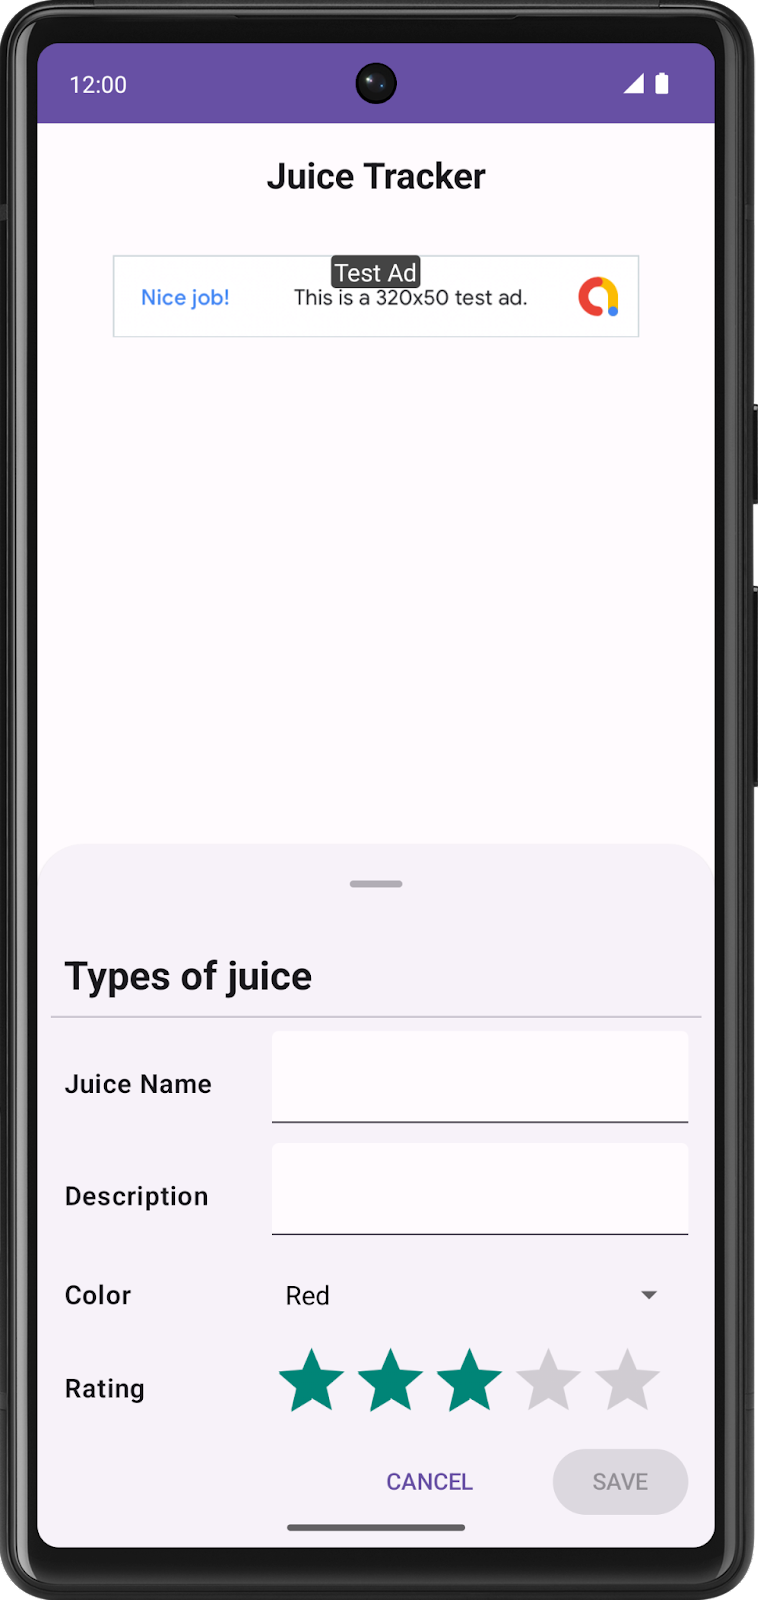
在本节中,您将通过创建颜色选择器(Spinner)和评分条(RatingBar)来完成输入对话框。颜色选择器是允许您选择颜色的组件,评分条允许您为果汁选择一个评分。请参阅下面的设计图:
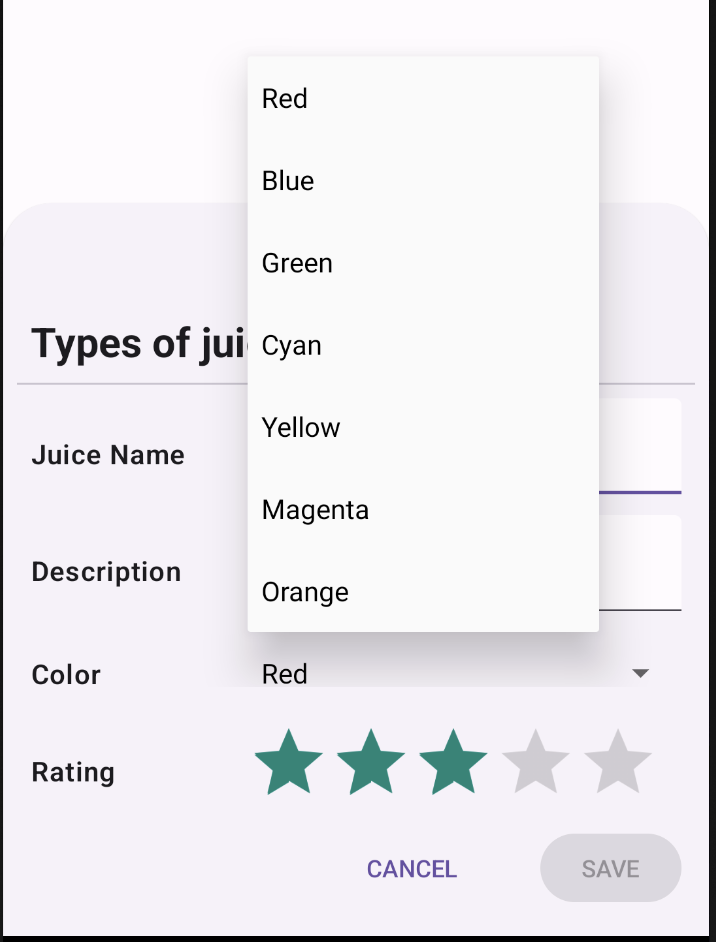

创建颜色选择器
要在 Compose 中实现选择器,必须使用 Spinner 类。Spinner 是一个 View 组件,而不是 Composable,因此必须使用互操作性来实现。
- 在
bottomsheet目录中,创建一个名为ColorSpinnerRow.kt的新文件。 - 在该文件中创建一个名为
SpinnerAdapter的新类。 - 在
SpinnerAdapter的构造函数中,定义一个名为onColorChange的回调参数,该参数接受一个Int参数。SpinnerAdapter处理Spinner的回调函数。
bottomsheet/ColorSpinnerRow.kt
class SpinnerAdapter(val onColorChange: (Int) -> Unit){
}
- 实现
AdapterView.OnItemSelectedListener接口。
实现此接口允许您定义选择器的点击行为。稍后您将在 Composable 中设置此适配器。
bottomsheet/ColorSpinnerRow.kt
class SpinnerAdapter(val onColorChange: (Int) -> Unit): AdapterView.OnItemSelectedListener {
}
- 实现
AdapterView.OnItemSelectedListener成员函数:onItemSelected()和onNothingSelected()。
bottomsheet/ColorSpinnerRow.kt
class SpinnerAdapter(val onColorChange: (Int) -> Unit): AdapterView.OnItemSelectedListener {
   override fun onItemSelected(parent: AdapterView<*>?, view: View?, position: Int, id: Long) {
        TODO("Not yet implemented")
    }

    override fun onNothingSelected(parent: AdapterView<*>?) {
        TODO("Not yet implemented")
    }
}
- 修改
onItemSelected()函数以调用onColorChange()回调函数,以便当您选择颜色时,应用会更新 UI 中的选定值。
bottomsheet/ColorSpinnerRow.kt
class SpinnerAdapter(val onColorChange: (Int) -> Unit): AdapterView.OnItemSelectedListener {
   override fun onItemSelected(parent: AdapterView<*>?, view: View?, position: Int, id: Long) {
        onColorChange(position)
    }

    override fun onNothingSelected(parent: AdapterView<*>?) {
        TODO("Not yet implemented")
    }
}
- 修改
onNothingSelected()函数,将颜色设置为0,以便当您未选择任何内容时,默认颜色是第一种颜色:红色。
bottomsheet/ColorSpinnerRow.kt
class SpinnerAdapter(val onColorChange: (Int) -> Unit): AdapterView.OnItemSelectedListener {
   override fun onItemSelected(parent: AdapterView<*>?, view: View?, position: Int, id: Long) {
        onColorChange(position)
    }

    override fun onNothingSelected(parent: AdapterView<*>?) {
        onColorChange(0)
    }
}
SpinnerAdapter 用于通过回调函数定义选择器的行为,现在已构建完成。接下来您需要构建选择器的内容并填充数据。
- 在
ColorSpinnerRow.kt文件内,但在SpinnerAdapter类之外,创建一个名为ColorSpinnerRow的新 Composable。 - 在
ColorSpinnerRow()的方法签名中,添加一个用于选择器位置的Int参数,一个接受Int参数的回调函数以及一个 modifier。
bottomsheet/ColorSpinnerRow.kt
...
@Composable
fun ColorSpinnerRow(
    colorSpinnerPosition: Int,
    onColorChange: (Int) -> Unit,
    modifier: Modifier = Modifier
) {
}
- 在函数内部,使用
JuiceColor枚举创建一个果汁颜色字符串资源数组。此数组将用作填充选择器的内容。
bottomsheet/ColorSpinnerRow.kt
...
@Composable
fun ColorSpinnerRow(
    colorSpinnerPosition: Int,
    onColorChange: (Int) -> Unit,
    modifier: Modifier = Modifier
) {
   val juiceColorArray =
        JuiceColor.values().map { juiceColor -> stringResource(juiceColor.label) }

}
- 添加一个
InputRow()Composable,并传入输入标签的颜色字符串资源和一个 modifier,该 modifier 定义Spinner出现的输入行。
bottomsheet/ColorSpinnerRow.kt
...
@Composable
fun ColorSpinnerRow(
    colorSpinnerPosition: Int,
    onColorChange: (Int) -> Unit,
    modifier: Modifier = Modifier
) {
   val juiceColorArray =
        JuiceColor.values().map { juiceColor -> stringResource(juiceColor.label) }
   InputRow(inputLabel = stringResource(R.string.color), modifier = modifier) {
   }
}
接下来您将创建 Spinner!由于 Spinner 是一个 View 类,必须使用 Compose 的 View 互操作性 API 将其封装到 Composable 中。这可以通过 AndroidView Composable 实现。
- 要在 Compose 中使用
Spinner,请在InputRowlambda 主体中创建一个AndroidView()Composable。AndroidView()Composable 在 Composable 中创建 View 元素或层次结构。
bottomsheet/ColorSpinnerRow.kt
...
@Composable
fun ColorSpinnerRow(
    colorSpinnerPosition: Int,
    onColorChange: (Int) -> Unit,
    modifier: Modifier = Modifier
) {
   val juiceColorArray =
        JuiceColor.values().map { juiceColor -> stringResource(juiceColor.label) }
   InputRow(inputLabel = stringResource(R.string.color), modifier = modifier) {
      AndroidView()
   }
}
AndroidView Composable 接受三个参数
factorylambda,这是一个创建 View 的函数。update回调,当factory中创建的 View 被膨胀时调用。- 一个 Composable
modifier。

- 要实现
AndroidView,首先传递一个 modifier 并填充屏幕的最大宽度。 - 为
factory参数传递一个 lambda。 factorylambda 接受一个Context作为参数。创建一个Spinner类并传递 context。
bottomsheet/ColorSpinnerRow.kt
...
@Composable
fun ColorSpinnerRow(
    colorSpinnerPosition: Int,
    onColorChange: (Int) -> Unit,
    modifier: Modifier = Modifier
) {
   ...
   InputRow(...) {
      AndroidView(
         modifier = Modifier.fillMaxWidth(),
         factory = { context ->
            Spinner(context)
         }
      )
   }
}
就像 RecyclerView.Adapter 为 RecyclerView 提供数据一样,ArrayAdapter 为 Spinner 提供数据。Spinner 需要一个适配器来保存颜色数组。
- 使用
ArrayAdapter设置适配器。ArrayAdapter需要一个 context、一个 XML 布局和一个数组。将simple_spinner_dropdown_item传递给布局;此布局是 Android 提供的默认布局。
bottomsheet/ColorSpinnerRow.kt
...
@Composable
fun ColorSpinnerRow(
colorSpinnerPosition: Int,
onColorChange: (Int) -> Unit,
modifier: Modifier = Modifier
) {
...
InputRow(...) {
AndroidView(
modifier = Modifier.fillMaxWidth(),
factory = { context ->
Spinner(context).apply {
adapter =
ArrayAdapter(
context,
android.R.layout.simple_spinner_dropdown_item,
juiceColorArray
)
}
}
)
}
}
factory 回调返回其中创建的 View 实例。update 是一个回调,它接受与 factory 回调返回的类型相同的参数。此参数是由 factory 膨胀的 View 实例。在这种情况下,由于在 factory 中创建了 Spinner,因此可以在 update lambda 主体中访问该 Spinner 的实例。
- 添加一个
update回调,它传递一个spinner。使用update中提供的回调来调用setSelection()方法。
bottomsheet/ColorSpinnerRow.kt
...
@Composable
fun ColorSpinnerRow(
    colorSpinnerPosition: Int,
    onColorChange: (Int) -> Unit,
    modifier: Modifier = Modifier
) {
   ...
   InputRow(...) {
      //...
         },
         update = { spinner ->
             spinner.setSelection(colorSpinnerPosition)
             spinner.onItemSelectedListener = SpinnerAdapter(onColorChange)
         }
      )
   }
}
- 使用您之前创建的
SpinnerAdapter在update中设置onItemSelectedListener()回调。
bottomsheet/ColorSpinnerRow.kt
...
@Composable
fun ColorSpinnerRow(
    colorSpinnerPosition: Int,
    onColorChange: (Int) -> Unit,
    modifier: Modifier = Modifier
) {
   ...
   InputRow(...) {
      AndroidView(
         // ...
         },
         update = { spinner ->
             spinner.setSelection(colorSpinnerPosition)
             spinner.onItemSelectedListener = SpinnerAdapter(onColorChange)
         }
      )
   }
}
颜色选择器组件的代码现已完成。
- 添加以下实用函数以获取
JuiceColor的枚举索引。您将在下一步中使用此函数。
private fun findColorIndex(color: String): Int {
   val juiceColor = JuiceColor.valueOf(color)
   return JuiceColor.values().indexOf(juiceColor)
}
- 在
EntryBottomSheet.kt文件中的SheetFormComposable 中实现ColorSpinnerRow。将颜色选择器放在“描述”文本下方,并在按钮上方。
bottomsheet/EntryBottomSheet.kt
...
@Composable
fun SheetForm(
   juice: Juice,
   onUpdateJuice: (Juice) -> Unit,
   onCancel: () -> Unit,
   onSubmit: () -> Unit,
   modifier: Modifier = Modifier,
) {
   ...
   TextInputRow(
            inputLabel = stringResource(R.string.juice_description),
            fieldValue = juice.description,
            onValueChange = { description -> onUpdateJuice(juice.copy(description = description)) },
            modifier = Modifier.fillMaxWidth()
        )
        ColorSpinnerRow(
            colorSpinnerPosition = findColorIndex(juice.color),
            onColorChange = { color ->
                onUpdateJuice(juice.copy(color = JuiceColor.values()[color].name))
            }
        )
   ButtonRow(
            modifier = Modifier
                .align(Alignment.End)
                .padding(bottom = dimensionResource(R.dimen.padding_medium)),
            onCancel = onCancel,
            onSubmit = onSubmit,
            submitButtonEnabled = juice.name.isNotEmpty()
        )
    }
}
创建评分输入
- 在
bottomsheet目录中创建一个名为RatingInputRow.kt的新文件。 - 在
RatingInputRow.kt文件中,创建一个名为RatingInputRow()的新 Composable。 - 在方法签名中,传入一个用于评分的
Int,一个带有Int参数的回调函数以处理选择更改,以及一个 modifier。
bottomsheet/RatingInputRow.kt
@Composable
fun RatingInputRow(rating:Int, onRatingChange: (Int) -> Unit, modifier: Modifier = Modifier){
}
- 与
ColorSpinnerRow一样,向 Composable 添加一个包含AndroidView的InputRow,如以下示例代码所示。
bottomsheet/RatingInputRow.kt
@Composable
fun RatingInputRow(rating:Int, onRatingChange: (Int) -> Unit, modifier: Modifier = Modifier){
    InputRow(inputLabel = stringResource(R.string.rating), modifier = modifier) {
        AndroidView(
            factory = {},
            update = {}
        )
    }
}
- 在
factorylambda 主体中,创建RatingBar类的实例,该类提供此设计所需的评分条类型。将stepSize设置为1f以强制评分只能是整数。
bottomsheet/RatingInputRow.kt
@Composable
fun RatingInputRow(rating:Int, onRatingChange: (Int) -> Unit, modifier: Modifier = Modifier){
    InputRow(inputLabel = stringResource(R.string.rating), modifier = modifier) {
        AndroidView(
            factory = { context ->
                RatingBar(context).apply {
                    stepSize = 1f
                }
            },
            update = {}
        )
    }
}
当 View 膨胀时,评分即被设置。请记住,factory 将 RatingBar 的实例返回给 update 回调。
- 使用传递给 Composable 的评分来设置
updatelambda 主体中RatingBar实例的评分。 - 设置新评分时,使用
RatingBar回调函数来调用onRatingChange()回调函数,以更新 UI 中的评分。
bottomsheet/RatingInputRow.kt
@Composable
fun RatingInputRow(rating:Int, onRatingChange: (Int) -> Unit, modifier: Modifier = Modifier){
    InputRow(inputLabel = stringResource(R.string.rating), modifier = modifier) {
        AndroidView(
            factory = { context ->
                RatingBar(context).apply {
                    stepSize = 1f
                }
            },
            update = { ratingBar ->
                ratingBar.rating = rating.toFloat()
                ratingBar.setOnRatingBarChangeListener { _, _, _ ->
                    onRatingChange(ratingBar.rating.toInt())
                }
            }
        )
    }
}
评分输入 Composable 现已完成。
- 在
EntryBottomSheet中使用RatingInputRow()composable。将其放在颜色选择器之后,并在按钮上方。
bottomsheet/EntryBottomSheet.kt
@Composable
fun SheetForm(
    juice: Juice,
    onUpdateJuice: (Juice) -> Unit,
    onCancel: () -> Unit,
    onSubmit: () -> Unit,
    modifier: Modifier = Modifier,
) {
    Column(
        modifier = modifier,
        verticalArrangement = Arrangement.spacedBy(4.dp)
    ) {
        ...
        ColorSpinnerRow(
            colorSpinnerPosition = findColorIndex(juice.color),
            onColorChange = { color ->
                onUpdateJuice(juice.copy(color = JuiceColor.values()[color].name))
            }
        )
        RatingInputRow(
            rating = juice.rating,
            onRatingChange = { rating -> onUpdateJuice(juice.copy(rating = rating)) }
        )
        ButtonRow(
            modifier = Modifier.align(Alignment.CenterHorizontally),
            onCancel = onCancel,
            onSubmit = onSubmit,
            submitButtonEnabled = juice.name.isNotEmpty()
        )
    }
}
创建广告横幅
- 在
homescreen包中,创建一个名为AdBanner.kt的新文件。 - 在
AdBanner.kt文件中,创建一个名为AdBanner()的新 Composable。
与您之前创建的 Composable 不同,AdBanner 不需要输入。因此,您无需将其封装在 InputRow Composable 中。但是,它确实需要一个 AndroidView。
- 尝试使用
AdView类自行构建横幅。请确保将广告尺寸设置为AdSize.BANNER,并将广告单元 ID 设置为"ca-app-pub-3940256099942544/6300978111"。 - 当
AdView膨胀时,使用AdRequest Builder加载广告。
homescreen/AdBanner.kt
@Composable
fun AdBanner(modifier: Modifier = Modifier) {
    AndroidView(
        modifier = modifier,
        factory = { context ->
            AdView(context).apply {
                setAdSize(AdSize.BANNER)
                // Use test ad unit ID
                adUnitId = "ca-app-pub-3940256099942544/6300978111"
            }
        },
        update = { adView ->
            adView.loadAd(AdRequest.Builder().build())
        }
    )
}
- 将
AdBanner放在JuiceTrackerApp中JuiceTrackerList之前。JuiceTrackerList在第 83 行声明。
ui/JuiceTrackerApp.kt
...
AdBanner(
   Modifier
       .fillMaxWidth()
       .padding(
           top = dimensionResource(R.dimen.padding_medium),
           bottom = dimensionResource(R.dimen.padding_small)
       )
)

JuiceTrackerList(
    juices = trackerState,
    onDelete = { juice -> juiceTrackerViewModel.deleteJuice(juice) },
    onUpdate = { juice ->
        juiceTrackerViewModel.updateCurrentJuice(juice)
        scope.launch {
            bottomSheetScaffoldState.bottomSheetState.expand()
        }
     },
)
6. 获取解决方案代码
要下载已完成 Codelab 的代码,您可以使用以下 git 命令
$ git clone https://github.com/google-developer-training/basic-android-kotlin-compose-training-juice-tracker.git
$ cd basic-android-kotlin-compose-training-juice-tracker
$ git checkout compose-with-views
或者,您可以将仓库下载为 zip 文件,解压并在 Android Studio 中打开。
如果您想查看解决方案代码,请在 GitHub 上查看。
7. 了解更多
8. 结束语!
本课程可能到此结束,但这仅仅是您 Android 应用开发之旅的开始!
在本课程中,您学习了如何使用 Jetpack Compose 构建应用,Jetpack Compose 是用于构建原生 Android 应用的现代 UI 工具包。在整个课程中,您构建了包含列表、单屏或多屏的应用,并在它们之间进行导航。您学习了如何创建交互式应用,使应用响应用户输入并更新 UI。您应用了 Material Design,并使用了颜色、形状和排版来美化您的应用。您还使用了 Jetpack 和其他第三方库来调度任务、从远程服务器检索数据、在本地持久化数据等等。
通过完成本课程,您不仅对如何使用 Jetpack Compose 创建美观且响应迅速的应用有了很好的理解,而且还掌握了创建高效、可维护且视觉吸引力强的 Android 应用所需的知识和技能。这一基础将帮助您继续学习并在现代 Android 开发和 Compose 中不断提升技能。
我们要感谢所有参与并完成本课程的同学!我们鼓励大家通过更多资源继续学习和扩展技能,例如 Android 开发者文档、面向 Android 开发者的 Jetpack Compose 课程、现代 Android 应用架构、Android Developers 博客、其他 Codelabs 和 示例项目。
最后,别忘了在社交媒体上分享您的作品并使用 #AndroidBasics 标签,这样我们和其他 Android 开发者社区成员也能关注您的学习历程!
祝您创作愉快!!