
1. 简介
在之前的 Codelab 中,您开始使用窗口大小类别和实现动态导航来改造 Reply 应用,使其具有自适应能力。这些功能是构建适用于所有屏幕尺寸的应用的重要基础和第一步。如果您错过了使用动态导航构建自适应应用 Codelab,强烈建议您先完成该 Codelab。
在本 Codelab 中,您将基于之前学到的概念,进一步在您的应用中实现自适应布局。您将实现的自适应布局是规范布局的一部分 - 用于大屏幕显示的常用模式集合。您还将了解更多工具和测试技巧,以帮助您快速构建稳健的应用。
前提条件
- 完成使用动态导航构建自适应应用 Codelab
- 熟悉 Kotlin 编程,包括类、函数和条件
- 熟悉
ViewModel类 - 熟悉
Composable函数 - 有使用 Jetpack Compose 构建布局的经验
- 有在设备或模拟器上运行应用的经验
- 有使用
WindowSizeClassAPI 的经验
您将学到的内容
- 如何使用 Jetpack Compose 创建列表视图模式的自适应布局
- 如何为不同屏幕尺寸创建预览
- 如何为多种屏幕尺寸测试代码
您将构建的内容
- 您将继续更新 Reply 应用,使其适应所有屏幕尺寸。
完成的应用如下所示
您将需要的物品
- 一台联网计算机、一个网页浏览器和 Android Studio
- 访问 GitHub
下载起始代码
要开始,请下载起始代码
或者,您可以克隆代码的 GitHub 仓库
$ git clone
https://github.com/google-developer-training/basic-android-kotlin-compose-training-reply-app.git
$ cd basic-android-kotlin-compose-training-reply-app
$ git checkout nav-update
您可以在 Reply GitHub 仓库中浏览起始代码。
2. 不同屏幕尺寸的预览
为不同屏幕尺寸创建预览
在使用动态导航构建自适应应用 Codelab 中,您学习了如何使用可组合预览来帮助您的开发过程。对于自适应应用,最佳实践是创建多个预览以在不同屏幕尺寸上显示应用。通过多个预览,您可以同时看到所有屏幕尺寸上的更改。此外,预览还可以作为文档,供其他查看您的代码的开发者参考,以了解您的应用与不同屏幕尺寸兼容。
以前,您只有一个支持紧凑屏幕的预览。接下来,您将添加更多预览。
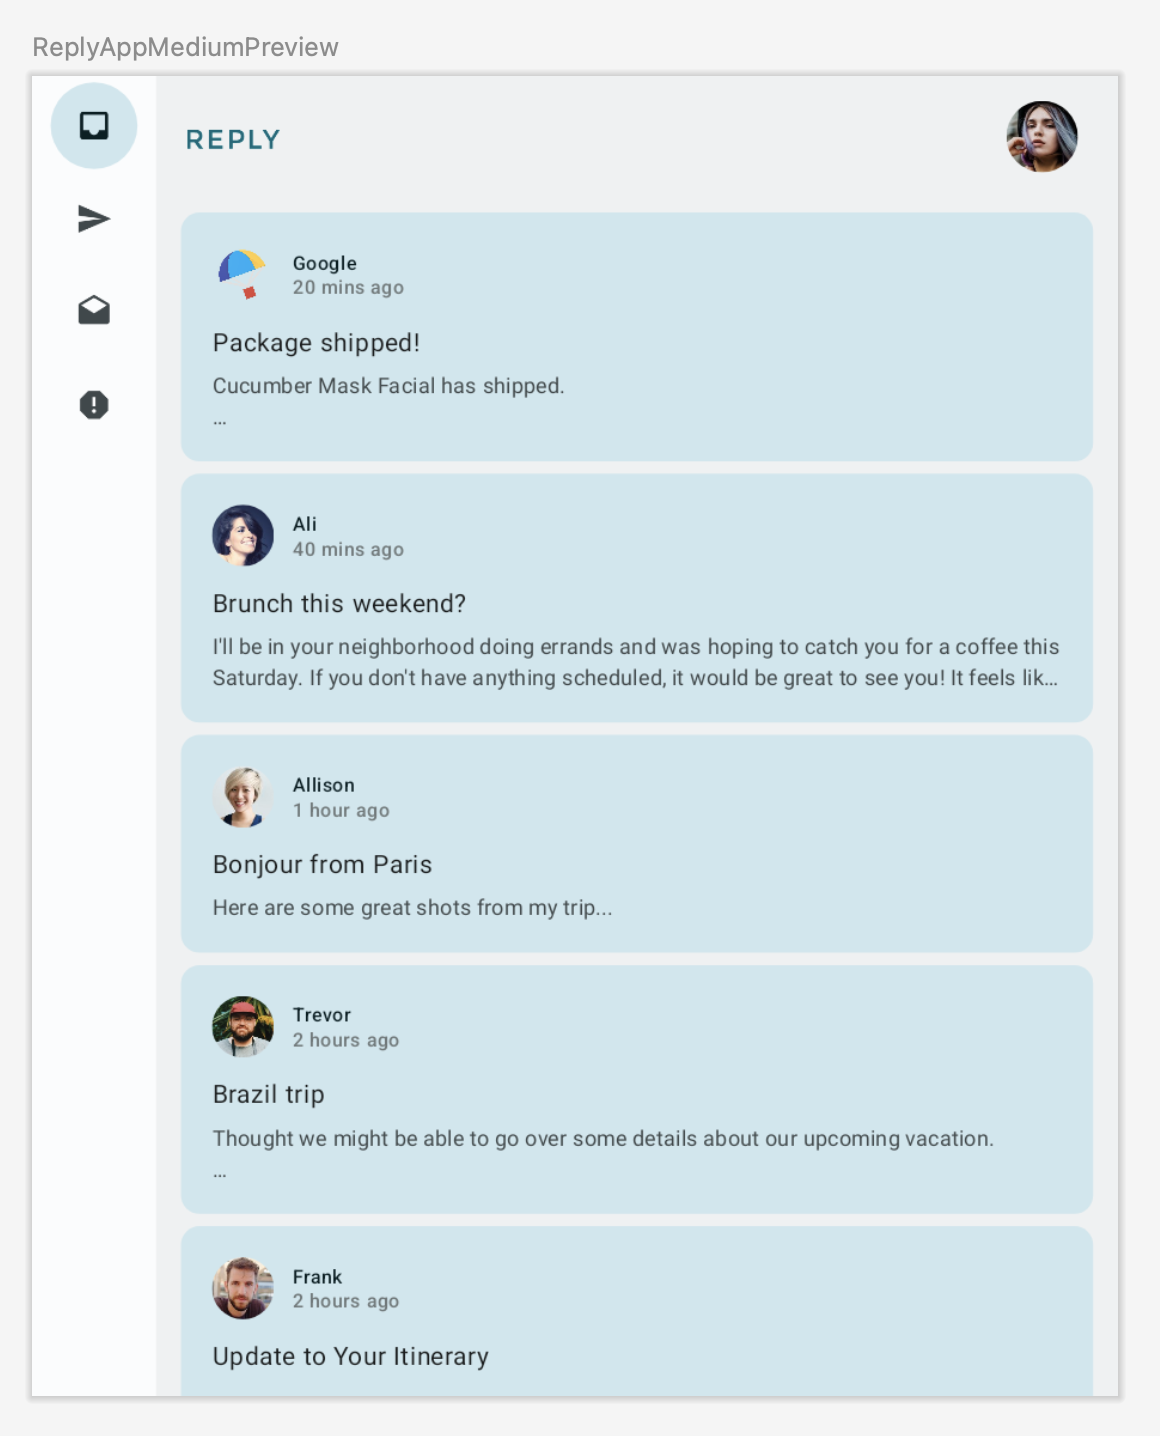
要添加适用于中等和展开屏幕的预览,请完成以下步骤
- 通过在
Preview注解参数中设置中等widthDp值,并将WindowWidthSizeClass.Medium值指定为ReplyApp可组合项的参数,添加适用于中等屏幕的预览。
MainActivity.kt
...
@Preview(showBackground = true, widthDp = 700)
@Composable
fun ReplyAppMediumPreview() {
    ReplyTheme {
        Surface {
            ReplyApp(windowSize = WindowWidthSizeClass.Medium)
        }
    }
}
...
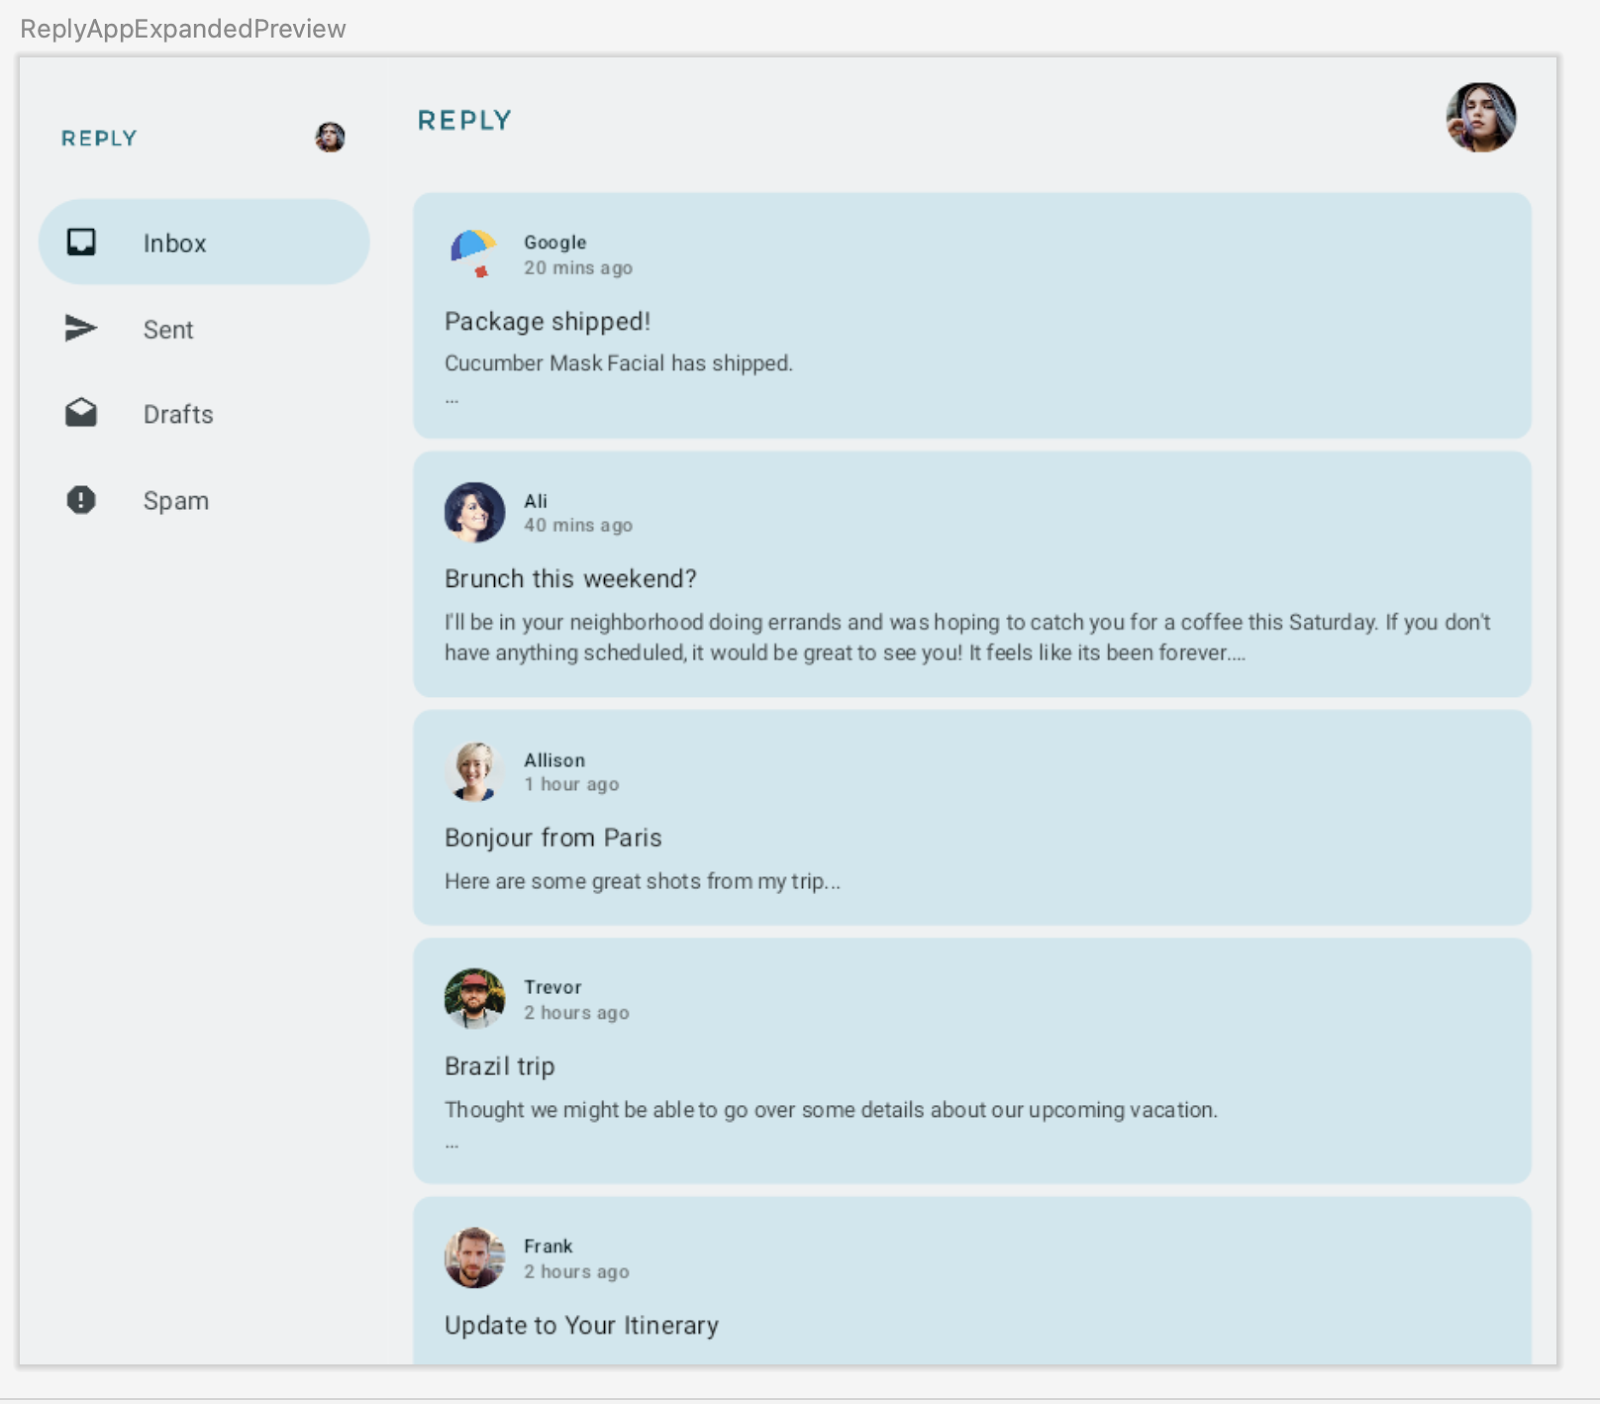
- 通过在
Preview注解参数中设置大widthDp值,并将WindowWidthSizeClass.Expanded值指定为ReplyApp可组合项的参数,添加适用于展开屏幕的另一个预览。
MainActivity.kt
...
@Preview(showBackground = true, widthDp = 1000)
@Composable
fun ReplyAppExpandedPreview() {
    ReplyTheme {
        Surface {
            ReplyApp(windowSize = WindowWidthSizeClass.Expanded)
        }
    }
}
...
- 构建预览以查看以下内容
3. 实现自适应内容布局
列表-详情视图简介
您可能会注意到,在展开屏幕中,内容看起来拉伸了,并且没有充分利用可用的屏幕空间。
您可以通过应用其中一种规范布局来改进此布局。规范布局是用于大屏幕组合的布局,可作为设计和实现的起点。您可以使用这三种可用布局来指导您如何在应用中组织常见元素:列表视图、辅助面板和 Feed。每种布局都考虑了常见用例和组件,以满足用户对应用如何跨屏幕尺寸和断点进行调整的期望和需求。
对于 Reply 应用,我们来实施列表-详情视图,因为它是浏览内容和快速查看详情的最佳选择。使用列表-详情视图布局,您将在电子邮件列表屏幕旁边创建另一个面板,以显示电子邮件详情。此布局允许您利用可用屏幕向用户显示更多信息,并使您的应用更高效。
实现列表-详情视图
要为展开屏幕实现列表-详情视图,请完成以下步骤
- 为了表示不同类型的内容布局,在
WindowStateUtils.kt上,为不同内容类型创建新的Enum类。展开屏幕时使用LIST_AND_DETAIL值,否则使用LIST_ONLY值。
WindowStateUtils.kt
...
enum class ReplyContentType {
    LIST_ONLY, LIST_AND_DETAIL
}
...
- 在
ReplyApp.kt上声明contentType变量,并为各种窗口尺寸分配适当的contentType,以帮助根据屏幕尺寸确定适当的内容类型选择。
ReplyApp.kt
...
import com.example.reply.ui.utils.ReplyContentType
...

    val navigationType: ReplyNavigationType
    val contentType: ReplyContentType

    when (windowSize) {
        WindowWidthSizeClass.Compact -> {
            ...
            contentType = ReplyContentType.LIST_ONLY
        }
        WindowWidthSizeClass.Medium -> {
            ...
            contentType = ReplyContentType.LIST_ONLY
        }
        WindowWidthSizeClass.Expanded -> {
            ...
            contentType = ReplyContentType.LIST_AND_DETAIL
        }
        else -> {
            ...
            contentType = ReplyContentType.LIST_ONLY
        }
    }
...
接下来,您可以使用 contentType 值在 ReplyAppContent 可组合项中创建不同的布局分支。
- 在
ReplyHomeScreen.kt中,将contentType添加为ReplyHomeScreen可组合项的参数。
ReplyHomeScreen.kt
...
@OptIn(ExperimentalMaterial3Api::class)
@Composable
fun ReplyHomeScreen(
    navigationType: ReplyNavigationType,
    contentType: ReplyContentType,
    replyUiState: ReplyUiState,
    onTabPressed: (MailboxType) -> Unit,
    onEmailCardPressed: (Email) -> Unit,
    onDetailScreenBackPressed: () -> Unit,
    modifier: Modifier = Modifier
) {
...
- 将
contentType值传递给ReplyHomeScreen可组合项。
ReplyApp.kt
...
    ReplyHomeScreen(
        navigationType = navigationType,
        contentType = contentType,
        replyUiState = replyUiState,
        onTabPressed = { mailboxType: MailboxType ->
            viewModel.updateCurrentMailbox(mailboxType = mailboxType)
            viewModel.resetHomeScreenStates()
        },
        onEmailCardPressed = { email: Email ->
            viewModel.updateDetailsScreenStates(
                email = email
            )
        },
        onDetailScreenBackPressed = {
            viewModel.resetHomeScreenStates()
        },
        modifier = modifier
    )

...
- 将
contentType添加为ReplyAppContent可组合项的参数。
ReplyHomeScreen.kt
...
@Composable
private fun ReplyAppContent(
    navigationType: ReplyNavigationType,
    contentType: ReplyContentType,
    replyUiState: ReplyUiState,
    onTabPressed: ((MailboxType) -> Unit),
    onEmailCardPressed: (Email) -> Unit,
    navigationItemContentList: List<NavigationItemContent>,
    modifier: Modifier = Modifier
) {
...
- 将
contentType值传递给两个ReplyAppContent可组合项。
ReplyHomeScreen.kt
...
            ReplyAppContent(
                navigationType = navigationType,
                contentType = contentType,
                replyUiState = replyUiState,
                onTabPressed = onTabPressed,
                onEmailCardPressed = onEmailCardPressed,
                navigationItemContentList = navigationItemContentList,
                modifier = modifier
            )
        }
    } else {
        if (replyUiState.isShowingHomepage) {
            ReplyAppContent(
                navigationType = navigationType,
                contentType = contentType,
                replyUiState = replyUiState,
                onTabPressed = onTabPressed,
                onEmailCardPressed = onEmailCardPressed,
                navigationItemContentList = navigationItemContentList,
                modifier = modifier
            )
        } else {
            ReplyDetailsScreen(
                replyUiState = replyUiState,
                isFullScreen = true,
                onBackButtonClicked = onDetailScreenBackPressed,
                modifier = modifier
            )
        }
    }
...
当 contentType 为 LIST_AND_DETAIL 时,让我们显示完整的列表和详情屏幕;当 contentType 为 LIST_ONLY 时,仅显示列表电子邮件内容。
- 在
ReplyHomeScreen.kt中,在ReplyAppContent可组合项上添加一个if/else语句,以便在contentType值为LIST_AND_DETAIL时显示ReplyListAndDetailContent可组合项,并在else分支中显示ReplyListOnlyContent可组合项。
ReplyHomeScreen.kt
...
        Column(
            modifier = modifier
                .fillMaxSize()
                .background(MaterialTheme.colorScheme.inverseOnSurface)
        ) {
            if (contentType == ReplyContentType.LIST_AND_DETAIL) {
                ReplyListAndDetailContent(
                    replyUiState = replyUiState,
                    onEmailCardPressed = onEmailCardPressed,
                    modifier = Modifier.weight(1f)
                )
            } else {
                ReplyListOnlyContent(
                    replyUiState = replyUiState,
                    onEmailCardPressed = onEmailCardPressed,
                    modifier = Modifier.weight(1f)
                        .padding(
                            horizontal = dimensionResource(R.dimen.email_list_only_horizontal_padding)
                        )
                )
            }
            AnimatedVisibility(visible = navigationType == ReplyNavigationType.BOTTOM_NAVIGATION) {
                ReplyBottomNavigationBar(
                    currentTab = replyUiState.currentMailbox,
                    onTabPressed = onTabPressed,
                    navigationItemContentList = navigationItemContentList
                )
            }
        }
...
- 移除
replyUiState.isShowingHomepage条件以显示永久导航抽屉,因为如果用户使用展开视图,则无需导航到详情视图。
ReplyHomeScreen.kt
...
    if (navigationType == ReplyNavigationType.PERMANENT_NAVIGATION_DRAWER) {
        PermanentNavigationDrawer(
            drawerContent = {
                PermanentDrawerSheet(Modifier.width(dimensionResource(R.dimen.drawer_width))) {
                    NavigationDrawerContent(
                        selectedDestination = replyUiState.currentMailbox,
                        onTabPressed = onTabPressed,
                        navigationItemContentList = navigationItemContentList,
                        modifier = Modifier
                            .wrapContentWidth()
                            .fillMaxHeight()
                            .background(MaterialTheme.colorScheme.inverseOnSurface)
                            .padding(dimensionResource(R.dimen.drawer_padding_content))
                    )
                }
            }
        ) {

...
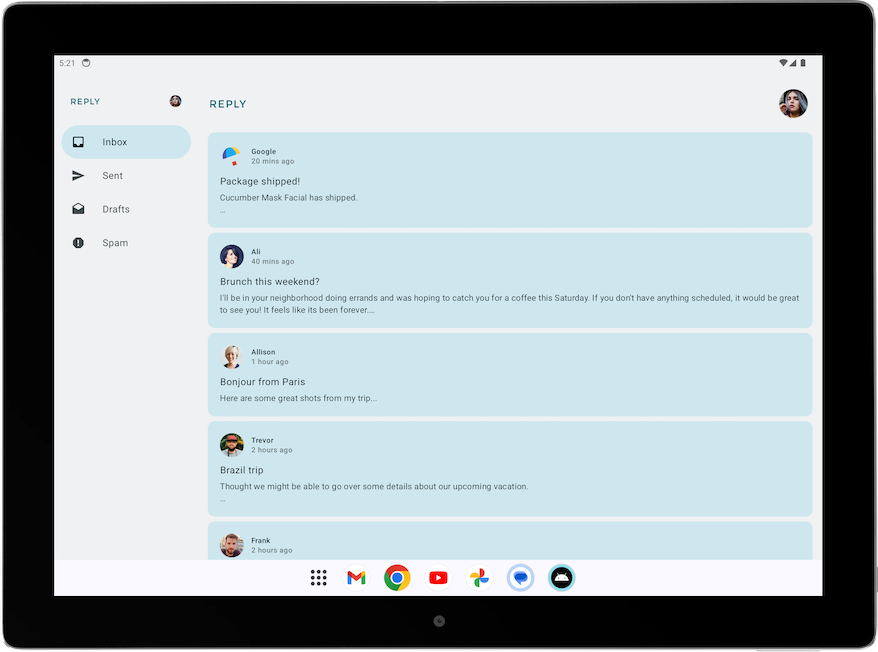
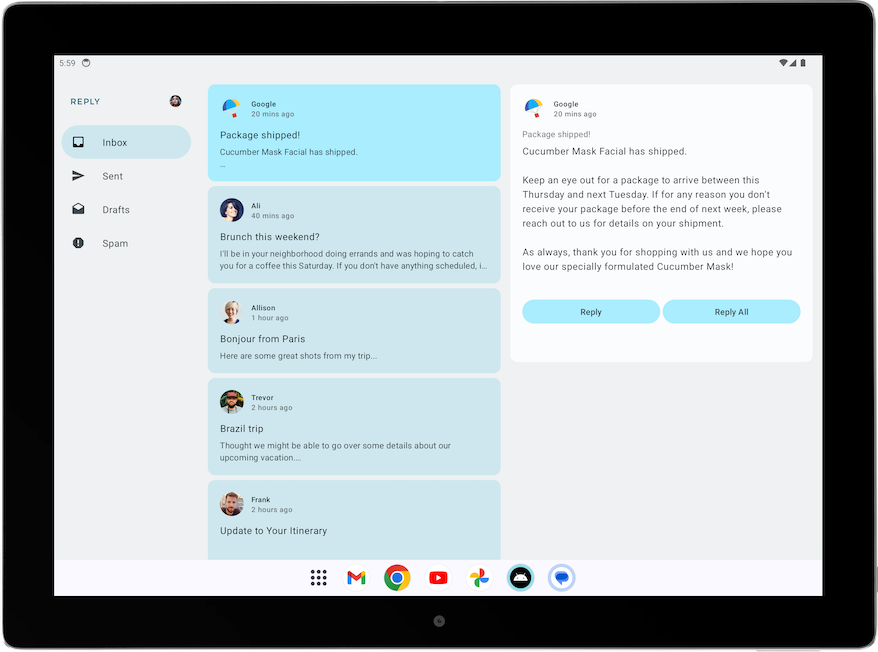
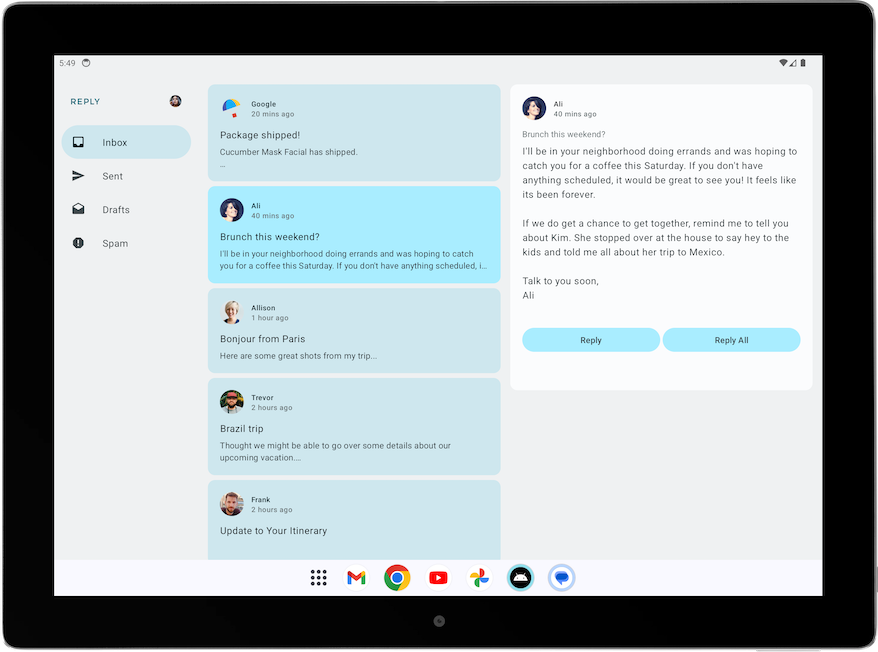
- 在平板电脑模式下运行应用,查看以下屏幕
改进列表-详情视图的 UI 元素
目前,您的应用在主屏幕上显示了展开屏幕的详情面板。
但是,屏幕包含了一些多余的元素,例如返回按钮、主题标题和额外的内边距,因为它是为一个独立的详情屏幕设计的。接下来,您可以通过简单的调整来改进这一点。
要改进展开视图的详情屏幕,请完成以下步骤
- 在
ReplyDetailsScreen.kt中,将isFullScreen变量作为Boolean参数添加到ReplyDetailsScreen可组合项中。
此添加允许您在使用该可组合项作为独立组件时与在主屏幕内使用时进行区分。
ReplyDetailsScreen.kt
...
@Composable
fun ReplyDetailsScreen(
    replyUiState: ReplyUiState,
    onBackPressed: () -> Unit,
    modifier: Modifier = Modifier,
    isFullScreen: Boolean = false
) {
...
- 在
ReplyDetailsScreen可组合项内,将ReplyDetailsScreenTopBar可组合项包装在if语句中,以便仅在应用全屏显示时才显示它。
ReplyDetailsScreen.kt
...
    LazyColumn(
        modifier = modifier
            .fillMaxSize()
            .background(color = MaterialTheme.colorScheme.inverseOnSurface)
            .padding(top = dimensionResource(R.dimen.detail_card_list_padding_top))
    ) {
        item {
            if (isFullScreen) {
                ReplyDetailsScreenTopBar(
                    onBackPressed,
                    replyUiState,
                    Modifier
                        .fillMaxWidth()
                        .padding(bottom = dimensionResource(R.dimen.detail_topbar_padding_bottom))
                    )
                )
            }

...
您现在可以添加内边距。 ReplyEmailDetailsCard 可组合项所需的内边距取决于您是否将其用作全屏。当您在展开屏幕中将 ReplyEmailDetailsCard 与其他可组合项一起使用时,其他可组合项会产生额外的内边距。
- 将
isFullScreen值传递给ReplyEmailDetailsCard可组合项。如果屏幕是全屏,则传递一个具有水平内边距R.dimen.detail_card_outer_padding_horizontal的修饰符;否则,传递一个具有末尾内边距R.dimen.detail_card_outer_padding_horizontal的修饰符。
ReplyDetailsScreen.kt
...
        item {
            if (isFullScreen) {
                ReplyDetailsScreenTopBar(
                    onBackPressed,
                    replyUiState,
                    Modifier
                        .fillMaxWidth()
                        .padding(bottom = dimensionResource(R.dimen.detail_topbar_padding_bottom))
                    )
                )
            }
            ReplyEmailDetailsCard(
                email = replyUiState.currentSelectedEmail,
                mailboxType = replyUiState.currentMailbox,
                isFullScreen = isFullScreen,
                modifier = if (isFullScreen) {
                    Modifier.padding(horizontal = dimensionResource(R.dimen.detail_card_outer_padding_horizontal))
                } else {
                    Modifier.padding(end = dimensionResource(R.dimen.detail_card_outer_padding_horizontal))
                }
            )
        }
...
- 将
isFullScreen值添加为ReplyEmailDetailsCard可组合项的参数。
ReplyDetailsScreen.kt
...
@OptIn(ExperimentalMaterial3Api::class)
@Composable
private fun ReplyEmailDetailsCard(
    email: Email,
    mailboxType: MailboxType,
    modifier: Modifier = Modifier,
    isFullScreen: Boolean = false
) {
...
- 在
ReplyEmailDetailsCard可组合项内部,仅当应用未处于全屏状态时才显示电子邮件主题文本,因为全屏布局已将电子邮件主题显示为标题。如果是全屏,则添加一个高度为R.dimen.detail_content_padding_top的 Spacer。
ReplyDetailsScreen.kt
...
Column(
    modifier = Modifier
        .fillMaxWidth()
        .padding(dimensionResource(R.dimen.detail_card_inner_padding))
) {
    DetailsScreenHeader(
        email,
        Modifier.fillMaxWidth()
    )
    if (isFullScreen) {
        Spacer(modifier = Modifier.height(dimensionResource(R.dimen.detail_content_padding_top)))
    } else {
        Text(
            text = stringResource(email.subject),
            style = MaterialTheme.typography.bodyMedium,
            color = MaterialTheme.colorScheme.outline,
            modifier = Modifier.padding(
                top = dimensionResource(R.dimen.detail_content_padding_top),
                bottom = dimensionResource(R.dimen.detail_expanded_subject_body_spacing)
            ),
        )
    }
    Text(
        text = stringResource(email.body),
        style = MaterialTheme.typography.bodyLarge,
        color = MaterialTheme.colorScheme.onSurfaceVariant,
    )
    DetailsScreenButtonBar(mailboxType, displayToast)
}

...
- 在
ReplyHomeScreen.kt中,在ReplyHomeScreen可组合项内部,在创建作为独立组件的ReplyDetailsScreen可组合项时,为isFullScreen参数传递true值。
ReplyHomeScreen.kt
...
        } else {
            ReplyDetailsScreen(
                replyUiState = replyUiState,
                isFullScreen = true,
                onBackPressed = onDetailScreenBackPressed,
                modifier = modifier
            )
        }
...
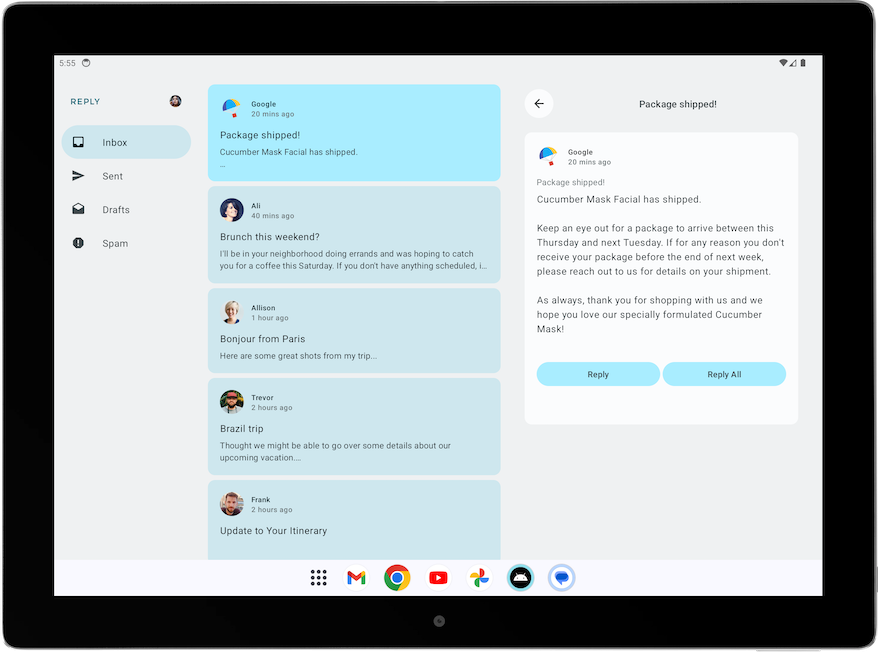
- 在平板电脑模式下运行应用,查看以下布局
调整列表-详情视图的返回处理
对于展开屏幕,您根本无需导航到 ReplyDetailsScreen。相反,您希望应用在用户选择返回按钮时关闭。因此,我们应该调整返回处理。
修改返回处理程序,方法是将 activity.finish() 函数作为 ReplyListAndDetailContent 可组合项内部 ReplyDetailsScreen 可组合项的 onBackPressed 参数传递。
ReplyHomeContent.kt
...
import android.app.Activity
import androidx.compose.ui.platform.LocalContext
...
        val activity = LocalContext.current as Activity
        ReplyDetailsScreen(
            replyUiState = replyUiState,
            modifier = Modifier.weight(1f),
            onBackPressed = { activity.finish() }
        )
...
4. 验证不同屏幕尺寸
大屏幕应用质量指南
为了为 Android 用户构建优质且一致的体验,重要的是构建和测试您的应用时要考虑到质量。您可以参考核心应用质量指南来确定如何改进您的应用质量。
要为所有设备类型构建高质量的应用,请查阅大屏幕应用质量指南。您的应用还必须满足第 3 层 - 大屏幕就绪要求。
手动测试您的大屏幕就绪应用
应用质量指南提供了测试设备建议和检查应用质量的程序。我们来看一个与 Reply 应用相关的测试示例。
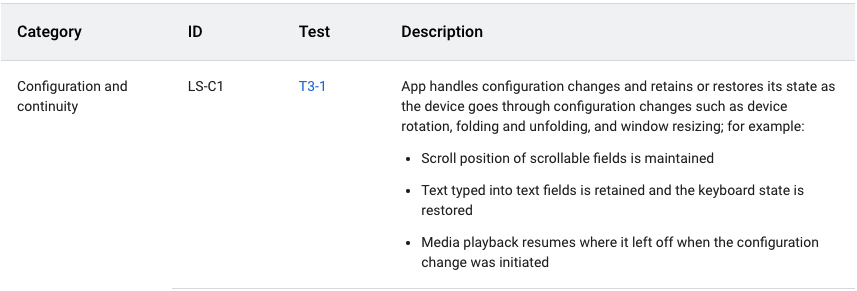
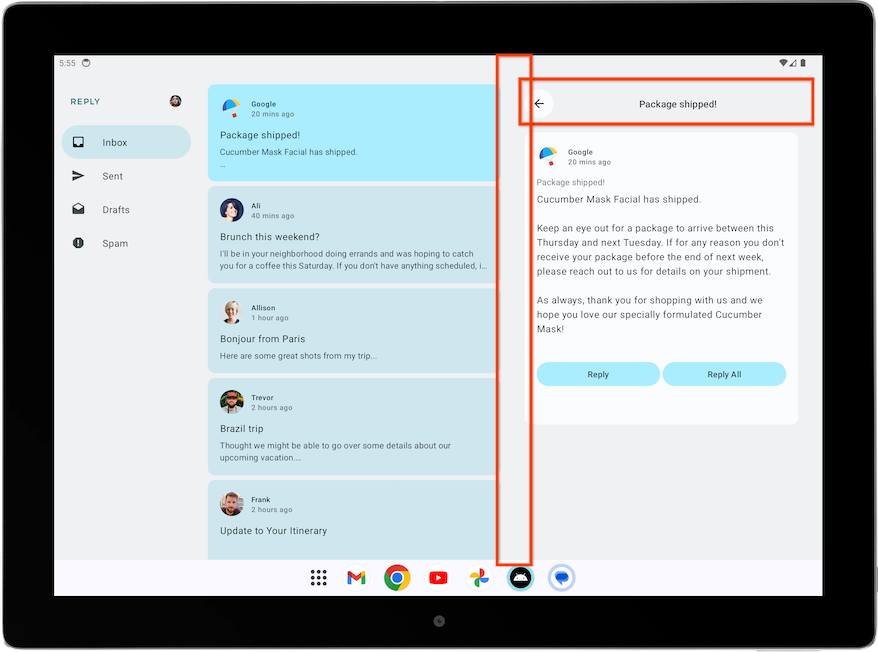
上述应用质量指南要求应用在配置更改后保留或恢复其状态。该指南还提供了关于如何测试应用的说明,如下图所示
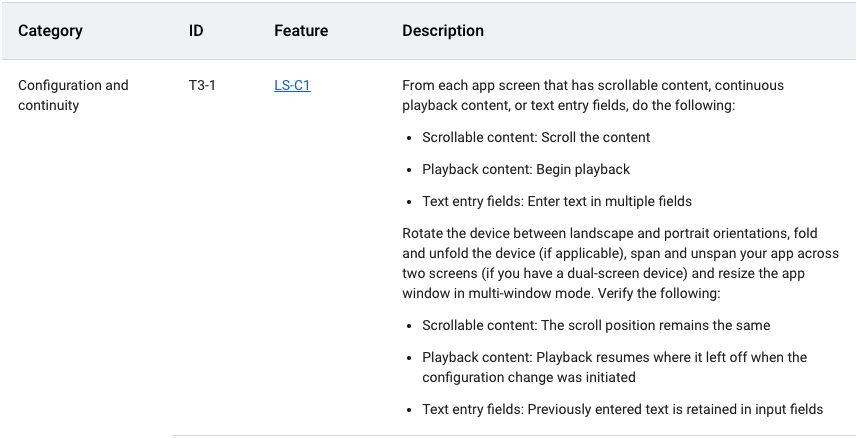
要手动测试 Reply 应用的配置连续性,请完成以下步骤
- 在中间尺寸设备上运行 Reply 应用,或者如果您使用的是可调整大小的模拟器,请在折叠状态下运行。
- 确保模拟器上的自动旋转设置为开启。
- 向下滚动电子邮件列表。
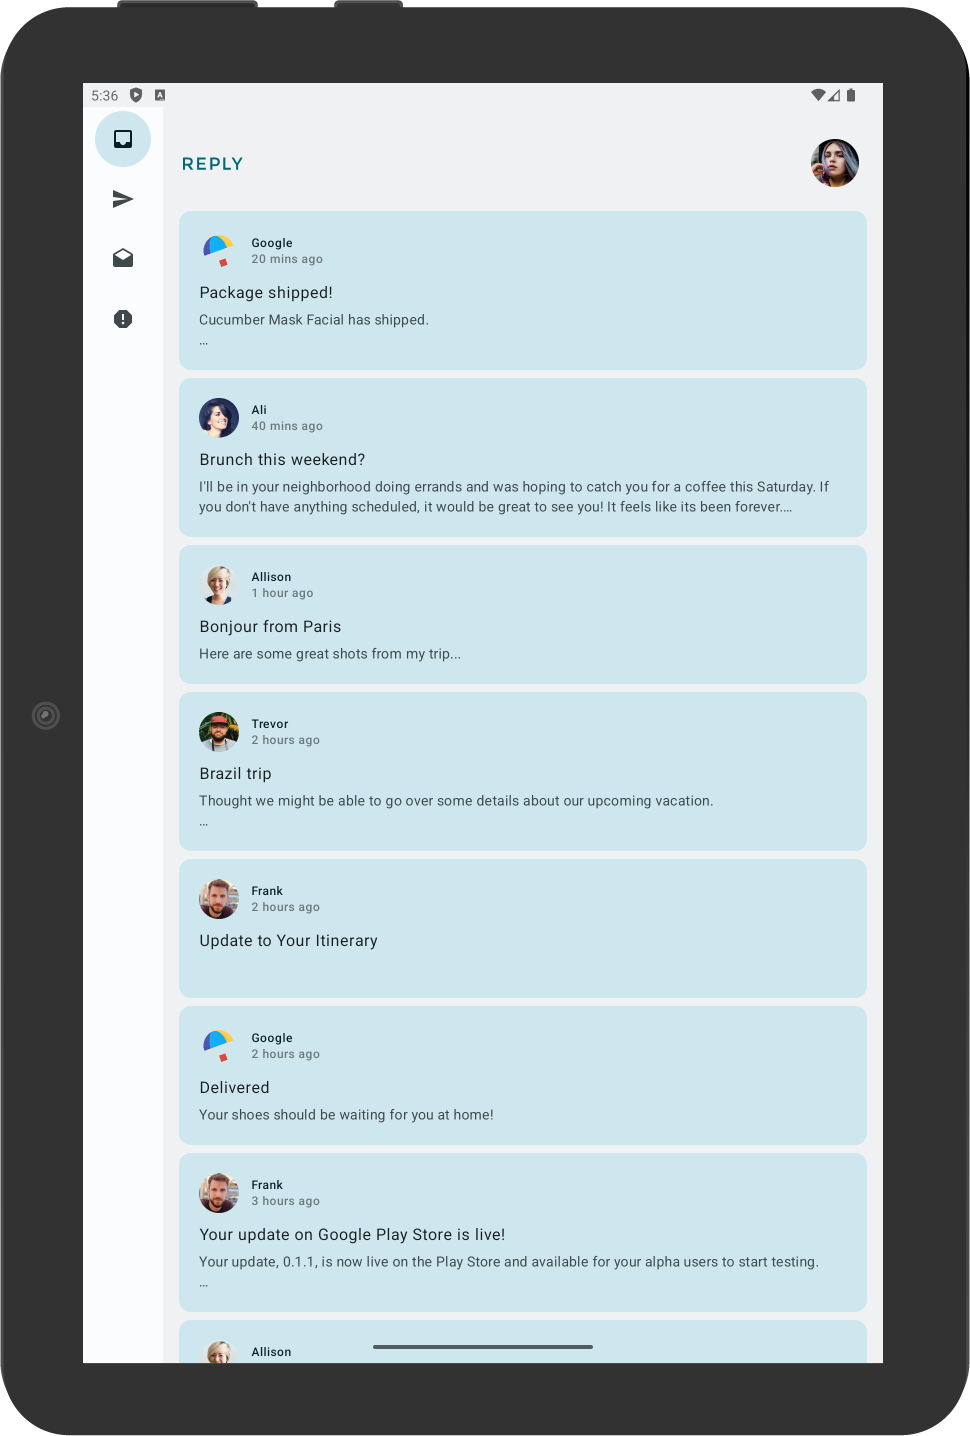
- 点击电子邮件卡片。例如,打开来自 Ali 的电子邮件。
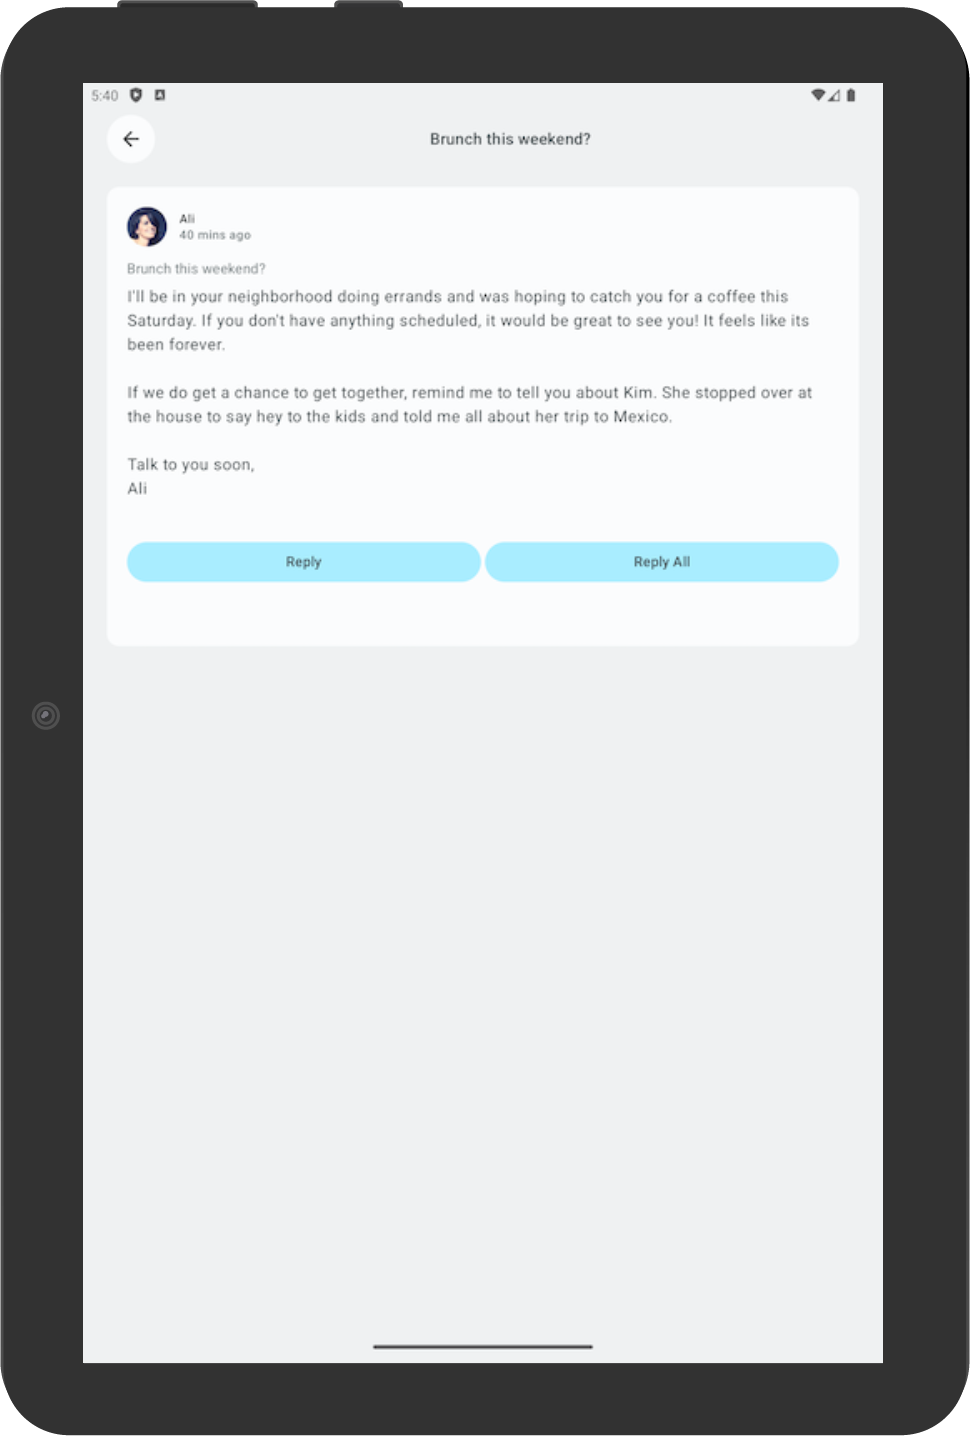
- 旋转设备以检查选定的电子邮件是否仍与纵向时选择的电子邮件一致。在此示例中,仍显示了来自 Ali 的电子邮件。
- 旋转回纵向以检查应用是否仍显示相同的电子邮件。
5. 为自适应应用添加自动化测试
配置紧凑屏幕尺寸的测试
在测试 Cupcake 应用 Codelab 中,您学习了如何创建 UI 测试。现在我们来学习如何为不同的屏幕尺寸创建特定的测试。
在 Reply 应用中,您为不同的屏幕尺寸使用不同的导航元素。例如,当用户看到展开屏幕时,您希望看到永久导航抽屉。创建测试来验证各种导航元素(例如底部导航、导航栏和导航抽屉)在不同屏幕尺寸下的存在情况非常有用。
要创建测试来验证紧凑屏幕中底部导航元素的存在性,请完成以下步骤
- 在 test 目录中,创建一个名为
ReplyAppTest.kt的新 Kotlin 类。 - 在
ReplyAppTest类中,使用createAndroidComposeRule并将ComponentActivity作为类型参数传递来创建测试规则。ComponentActivity用于访问一个空 Activity,而不是MainActivity。
ReplyAppTest.kt
...
class ReplyAppTest {

    @get:Rule
    val composeTestRule = createAndroidComposeRule<ComponentActivity>()
...
为了区分屏幕中的导航元素,请在 ReplyBottomNavigationBar 可组合项中添加一个 testTag。
- 定义用于底部导航 (Navigation Bottom) 的字符串资源。
strings.xml
...
<resources>
...
    <string name="navigation_bottom">Navigation Bottom</string>
...
</resources>
- 将字符串名称作为
ReplyBottomNavigationBar可组合项中Modifier的testTag方法的testTag参数添加。
ReplyHomeScreen.kt
...
val bottomNavigationContentDescription = stringResource(R.string.navigation_bottom)
ReplyBottomNavigationBar(
    ...
    modifier = Modifier
        .fillMaxWidth()
        .testTag(bottomNavigationContentDescription)
)
...
- 在
ReplyAppTest类中,创建一个测试函数来测试紧凑尺寸屏幕。使用ReplyApp可组合项设置composeTestRule的内容,并将WindowWidthSizeClass.Compact作为windowSize参数传递。
ReplyAppTest.kt
...
    @Test
    fun compactDevice_verifyUsingBottomNavigation() {
        // Set up compact window
        composeTestRule.setContent {
            ReplyApp(
                windowSize = WindowWidthSizeClass.Compact
            )
        }
    }
- 使用测试标记断言底部导航元素存在。在
composeTestRule上调用扩展函数onNodeWithTagForStringId,并传递底部导航字符串,然后调用assertExists()方法。
ReplyAppTest.kt
...
    @Test
    fun compactDevice_verifyUsingBottomNavigation() {
        // Set up compact window
        composeTestRule.setContent {
            ReplyApp(
                windowSize = WindowWidthSizeClass.Compact
            )
        }
        // Bottom navigation is displayed
        composeTestRule.onNodeWithTagForStringId(
            R.string.navigation_bottom
        ).assertExists()
    }
- 运行测试并验证其通过。
配置中等和展开屏幕尺寸的测试
既然您已成功为紧凑屏幕创建了测试,接下来就为中等和展开屏幕创建相应的测试。
要创建测试来验证中等和展开屏幕的导航栏和永久导航抽屉的存在性,请完成以下步骤
- 定义用于导航栏 (Navigation Rail) 的字符串资源,以后用作测试标记。
strings.xml
...
<resources>
...
    <string name="navigation_rail">Navigation Rail</string>
...
</resources>
- 通过
PermanentNavigationDrawer可组合项中的Modifier将字符串作为测试标记传递。
ReplyHomeScreen.kt
...
    val navigationDrawerContentDescription = stringResource(R.string.navigation_drawer)
        PermanentNavigationDrawer(
...
modifier = Modifier.testTag(navigationDrawerContentDescription)
)
...
- 通过
ReplyNavigationRail可组合项中的Modifier将字符串作为测试标记传递。
ReplyHomeScreen.kt
...
val navigationRailContentDescription = stringResource(R.string.navigation_rail)
ReplyNavigationRail(
    ...
    modifier = Modifier
        .testTag(navigationRailContentDescription)
)
...
- 添加测试以验证导航栏元素在中等屏幕中存在。
ReplyAppTest.kt
...
@Test
fun mediumDevice_verifyUsingNavigationRail() {
    // Set up medium window
    composeTestRule.setContent {
        ReplyApp(
            windowSize = WindowWidthSizeClass.Medium
        )
    }
    // Navigation rail is displayed
    composeTestRule.onNodeWithTagForStringId(
        R.string.navigation_rail
    ).assertExists()
}
- 添加测试以验证导航抽屉元素在展开屏幕中存在。
ReplyAppTest.kt
...
@Test
fun expandedDevice_verifyUsingNavigationDrawer() {
    // Set up expanded window
    composeTestRule.setContent {
        ReplyApp(
            windowSize = WindowWidthSizeClass.Expanded
        )
    }
    // Navigation drawer is displayed
    composeTestRule.onNodeWithTagForStringId(
        R.string.navigation_drawer
    ).assertExists()
}
- 使用平板电脑模拟器或在平板电脑模式下使用可调整大小的模拟器运行测试。
- 运行所有测试并验证其通过。
测试紧凑屏幕中的配置更改
配置更改是在应用生命周期中发生的常见事件。例如,当您将方向从纵向更改为横向时,就会发生配置更改。发生配置更改时,测试应用是否保留其状态非常重要。接下来,您将创建测试,模拟配置更改,以测试应用在紧凑屏幕中是否保留其状态。
测试紧凑屏幕中的配置更改
- 在 test 目录中,创建一个名为
ReplyAppStateRestorationTest.kt的新 Kotlin 类。 - 在
ReplyAppStateRestorationTest类中,使用createAndroidComposeRule并将ComponentActivity作为类型参数传递来创建测试规则。
ReplyAppStateRestorationTest.kt
...
class ReplyAppStateRestorationTest {

    /**
     * Note: To access to an empty activity, the code uses ComponentActivity instead of
     * MainActivity.
     */
    @get:Rule
    val composeTestRule = createAndroidComposeRule<ComponentActivity>()
}
...
- 创建一个测试函数,以验证在配置更改后,电子邮件在紧凑屏幕中是否仍处于选中状态。
ReplyAppStateRestorationTest.kt
...
@Test
fun compactDevice_selectedEmailEmailRetained_afterConfigChange() {

}
...
要测试配置更改,需要使用 StateRestorationTester。
- 通过将
composeTestRule作为参数传递给StateRestorationTester来设置stateRestorationTester。 - 使用
setContent()和ReplyApp可组合项,并将WindowWidthSizeClass.Compact作为windowSize参数传递。
ReplyAppStateRestorationTest.kt
...
@Test
fun compactDevice_selectedEmailEmailRetained_afterConfigChange() {
    // Setup compact window
    val stateRestorationTester = StateRestorationTester(composeTestRule)
    stateRestorationTester.setContent { ReplyApp(windowSize = WindowWidthSizeClass.Compact) }

}
...
- 验证应用中是否显示了第三封电子邮件。对
composeTestRule使用assertIsDisplayed()方法,该方法会查找第三封电子邮件的文本。
ReplyAppStateRestorationTest.kt
...
@Test
fun compactDevice_selectedEmailEmailRetained_afterConfigChange() {
    // Setup compact window
    val stateRestorationTester = StateRestorationTester(composeTestRule)
    stateRestorationTester.setContent { ReplyApp(windowSize = WindowWidthSizeClass.Compact) }

    // Given third email is displayed
    composeTestRule.onNodeWithText(
        composeTestRule.activity.getString(LocalEmailsDataProvider.allEmails[2].body)
    ).assertIsDisplayed()
}
...
- 通过点击电子邮件主题导航到电子邮件的详情屏幕。使用
performClick()方法进行导航。
ReplyAppStateRestorationTest.kt
...
@Test
fun compactDevice_selectedEmailEmailRetained_afterConfigChange() {
    // Setup compact window
    val stateRestorationTester = StateRestorationTester(composeTestRule)
    stateRestorationTester.setContent { ReplyApp(windowSize = WindowWidthSizeClass.Compact) }

    // Given third email is displayed
    composeTestRule.onNodeWithText(
        composeTestRule.activity.getString(LocalEmailsDataProvider.allEmails[2].body)
    ).assertIsDisplayed()

    // Open detailed page
    composeTestRule.onNodeWithText(
        composeTestRule.activity.getString(LocalEmailsDataProvider.allEmails[2].subject)
    ).performClick()
}
...
- 验证第三封电子邮件是否显示在详情屏幕中。断言返回按钮是否存在以确认应用处于详情屏幕,并验证第三封电子邮件的文本是否显示。
ReplyAppStateRestorationTest.kt
...
@Test
fun compactDevice_selectedEmailEmailRetained_afterConfigChange() {
    ...
    // Open detailed page
    composeTestRule.onNodeWithText(
        composeTestRule.activity.getString(LocalEmailsDataProvider.allEmails[2].subject)
    ).performClick()

    // Verify that it shows the detailed screen for the correct email
    composeTestRule.onNodeWithContentDescriptionForStringId(
        R.string.navigation_back
    ).assertExists()
    composeTestRule.onNodeWithText(
}
...
- 使用
stateRestorationTester.emulateSavedInstanceStateRestore()模拟配置更改。
ReplyAppStateRestorationTest.kt
...
@Test
fun compactDevice_selectedEmailEmailRetained_afterConfigChange() {
    ...
    // Verify that it shows the detailed screen for the correct email
    composeTestRule.onNodeWithContentDescriptionForStringId(
        R.string.navigation_back
    ).assertExists()
    composeTestRule.onNodeWithText(
        composeTestRule.activity.getString(LocalEmailsDataProvider.allEmails[2].body)
    ).assertExists()

    // Simulate a config change
    stateRestorationTester.emulateSavedInstanceStateRestore()
}
...
- 再次验证第三封电子邮件是否显示在详情屏幕中。
ReplyAppStateRestorationTest.kt
...
@Test
fun compactDevice_selectedEmailEmailRetained_afterConfigChange() {
    // Setup compact window
    val stateRestorationTester = StateRestorationTester(composeTestRule)
    stateRestorationTester.setContent { ReplyApp(windowSize = WindowWidthSizeClass.Compact) }

    // Given third email is displayed
    composeTestRule.onNodeWithText(
        composeTestRule.activity.getString(LocalEmailsDataProvider.allEmails[2].body)
    ).assertIsDisplayed()

    // Open detailed page
    composeTestRule.onNodeWithText(
        composeTestRule.activity.getString(LocalEmailsDataProvider.allEmails[2].subject)
    ).performClick()

    // Verify that it shows the detailed screen for the correct email
    composeTestRule.onNodeWithContentDescriptionForStringId(
        R.string.navigation_back
    ).assertExists()
    composeTestRule.onNodeWithText(
        composeTestRule.activity.getString(LocalEmailsDataProvider.allEmails[2].body)
    ).assertExists()

    // Simulate a config change
    stateRestorationTester.emulateSavedInstanceStateRestore()

    // Verify that it still shows the detailed screen for the same email
    composeTestRule.onNodeWithContentDescriptionForStringId(
        R.string.navigation_back
    ).assertExists()
    composeTestRule.onNodeWithText(
        composeTestRule.activity.getString(LocalEmailsDataProvider.allEmails[2].body)
    ).assertExists()
}

...
- 使用手机模拟器或在手机模式下使用可调整大小的模拟器运行测试。
- 验证测试是否通过。
测试展开屏幕中的配置更改
要测试展开屏幕中的配置更改,方法是模拟配置更改并传递相应的 WindowWidthSizeClass,请完成以下步骤
- 创建一个测试函数,以验证在配置更改后,电子邮件在详情屏幕中是否仍处于选中状态。
ReplyAppStateRestorationTest.kt
...
@Test
fun expandedDevice_selectedEmailEmailRetained_afterConfigChange() {

}
...
要测试配置更改,需要使用 StateRestorationTester。
- 通过将
composeTestRule作为参数传递给StateRestorationTester来设置stateRestorationTester。 - 使用
setContent()和ReplyApp可组合项,并将WindowWidthSizeClass.Expanded作为windowSize参数传递。
ReplyAppStateRestorationTest.kt
...
@Test
fun expandedDevice_selectedEmailEmailRetained_afterConfigChange() {
    // Setup expanded window
    val stateRestorationTester = StateRestorationTester(composeTestRule)
    stateRestorationTester.setContent { ReplyApp(windowSize = WindowWidthSizeClass.Expanded) }
}
...
- 验证应用中是否显示了第三封电子邮件。对
composeTestRule使用assertIsDisplayed()方法,该方法会查找第三封电子邮件的文本。
ReplyAppStateRestorationTest.kt
...
@Test
fun expandedDevice_selectedEmailEmailRetained_afterConfigChange() {
    // Setup expanded window
    val stateRestorationTester = StateRestorationTester(composeTestRule)
    stateRestorationTester.setContent { ReplyApp(windowSize = WindowWidthSizeClass.Expanded) }

    // Given third email is displayed
    composeTestRule.onNodeWithText(
        composeTestRule.activity.getString(LocalEmailsDataProvider.allEmails[2].body)
    ).assertIsDisplayed()
}
...
- 选择详情屏幕中的第三封电子邮件。使用
performClick()方法选择电子邮件。
ReplyAppStateRestorationTest.kt
...
@Test
fun expandedDevice_selectedEmailEmailRetained_afterConfigChange() {
    // Setup expanded window
    val stateRestorationTester = StateRestorationTester(composeTestRule)
    stateRestorationTester.setContent { ReplyApp(windowSize = WindowWidthSizeClass.Expanded) }

    // Given third email is displayed
    composeTestRule.onNodeWithText(
        composeTestRule.activity.getString(LocalEmailsDataProvider.allEmails[2].body)
    ).assertIsDisplayed()

    // Select third email
    composeTestRule.onNodeWithText(
        composeTestRule.activity.getString(LocalEmailsDataProvider.allEmails[2].subject)
    ).performClick()
    ...
}

...
- 通过在详情屏幕上使用
testTag并查找其子项中的文本来验证详情屏幕是否显示了第三封电子邮件。此方法确保您可以在详情部分找到文本,而不是在电子邮件列表中。
ReplyAppStateRestorationTest.kt
...

@Test
fun expandedDevice_selectedEmailEmailRetained_afterConfigChange() {
    ...
    // Select third email
    composeTestRule.onNodeWithText(
        composeTestRule.activity.getString(LocalEmailsDataProvider.allEmails[2].subject)
    ).performClick()

    // Verify that third email is displayed on the details screen
    composeTestRule.onNodeWithTagForStringId(R.string.details_screen).onChildren()
        .assertAny(hasAnyDescendant(hasText(
            composeTestRule.activity.getString(LocalEmailsDataProvider.allEmails[2].body)))
        )
...
}

...
- 使用
stateRestorationTester.emulateSavedInstanceStateRestore()模拟配置更改。
ReplyAppStateRestorationTest.kt
...
@Test
fun expandedDevice_selectedEmailEmailRetained_afterConfigChange() {
    ...
    // Verify that third email is displayed on the details screen
    composeTestRule.onNodeWithTagForStringId(R.string.details_screen).onChildren()
        .assertAny(hasAnyDescendant(hasText(
            composeTestRule.activity.getString(LocalEmailsDataProvider.allEmails[2].body)))
        )

    // Simulate a config change
    stateRestorationTester.emulateSavedInstanceStateRestore()
    ...
}
...
- 再次验证在配置更改后,详情屏幕是否显示了第三封电子邮件。
ReplyAppStateRestorationTest.kt
...
@Test
fun expandedDevice_selectedEmailEmailRetained_afterConfigChange() {
    // Setup expanded window
    val stateRestorationTester = StateRestorationTester(composeTestRule)
    stateRestorationTester.setContent { ReplyApp(windowSize = WindowWidthSizeClass.Expanded) }

    // Given third email is displayed
    composeTestRule.onNodeWithText(
        composeTestRule.activity.getString(LocalEmailsDataProvider.allEmails[2].body)
    ).assertIsDisplayed()

    // Select third email
    composeTestRule.onNodeWithText(
        composeTestRule.activity.getString(LocalEmailsDataProvider.allEmails[2].subject)
    ).performClick()

    // Verify that third email is displayed on the details screen
    composeTestRule.onNodeWithTagForStringId(R.string.details_screen).onChildren()
        .assertAny(hasAnyDescendant(hasText(
            composeTestRule.activity.getString(LocalEmailsDataProvider.allEmails[2].body)))
        )

    // Simulate a config change
    stateRestorationTester.emulateSavedInstanceStateRestore()

    // Verify that third email is still displayed on the details screen
    composeTestRule.onNodeWithTagForStringId(R.string.details_screen).onChildren()
        .assertAny(hasAnyDescendant(hasText(
            composeTestRule.activity.getString(LocalEmailsDataProvider.allEmails[2].body)))
        )
}
...
- 使用平板电脑模拟器或在平板电脑模式下使用可调整大小的模拟器运行测试。
- 验证测试是否通过。
使用注解对不同屏幕尺寸的测试进行分组
您可能会从之前的测试中发现,某些测试在不兼容屏幕尺寸的设备上运行时会失败。虽然您可以使用适当的设备逐个运行测试,但当测试用例很多时,此方法可能无法扩展。
要解决此问题,您可以创建注解来指示测试可以在哪些屏幕尺寸上运行,并为适当的设备配置带有注解的测试。
要根据屏幕尺寸运行测试,请完成以下步骤
- 在 test 目录中,创建
TestAnnotations.kt,其中包含三个注解类:TestCompactWidth、TestMediumWidth、TestExpandedWidth。
TestAnnotations.kt
...
annotation class TestCompactWidth
annotation class TestMediumWidth
annotation class TestExpandedWidth
...
- 在紧凑测试的测试函数上使用注解,方法是在
ReplyAppTest和ReplyAppStateRestorationTest中,在紧凑测试的 test 注解之后添加TestCompactWidth注解。
ReplyAppTest.kt
...
    @Test
    @TestCompactWidth
    fun compactDevice_verifyUsingBottomNavigation() {
...
ReplyAppStateRestorationTest.kt
...
    @Test
    @TestCompactWidth
    fun compactDevice_selectedEmailEmailRetained_afterConfigChange() {

...
- 在中等测试的测试函数上使用注解,方法是在
ReplyAppTest中,在中等测试的 test 注解之后添加TestMediumWidth注解。
ReplyAppTest.kt
...
    @Test
    @TestMediumWidth
    fun mediumDevice_verifyUsingNavigationRail() {
...
- 在展开测试的测试函数上使用注解,方法是在
ReplyAppTest和ReplyAppStateRestorationTest中,在展开测试的 test 注解之后添加TestExpandedWidth注解。
ReplyAppTest.kt
...
    @Test
    @TestExpandedWidth
    fun expandedDevice_verifyUsingNavigationDrawer() {
...
ReplyAppStateRestorationTest.kt
...
    @Test
    @TestExpandedWidth
    fun expandedDevice_selectedEmailEmailRetained_afterConfigChange() {
...
为确保成功,将测试配置为仅运行带有 TestCompactWidth 注解的测试。
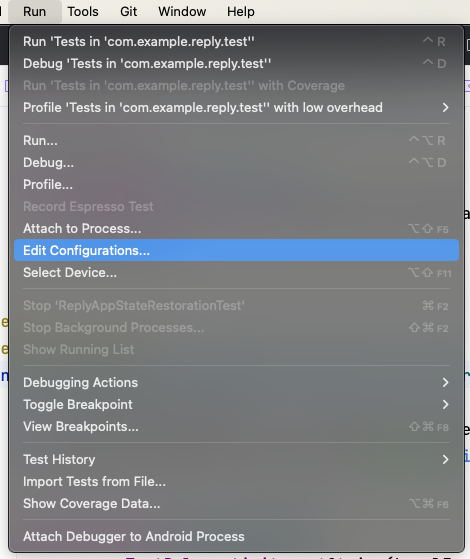
- 在 Android Studio 中,选择 Run > Edit Configurations...
- 将测试重命名为紧凑测试 (Compact tests),并选择运行包中的所有测试 (All in Package)。
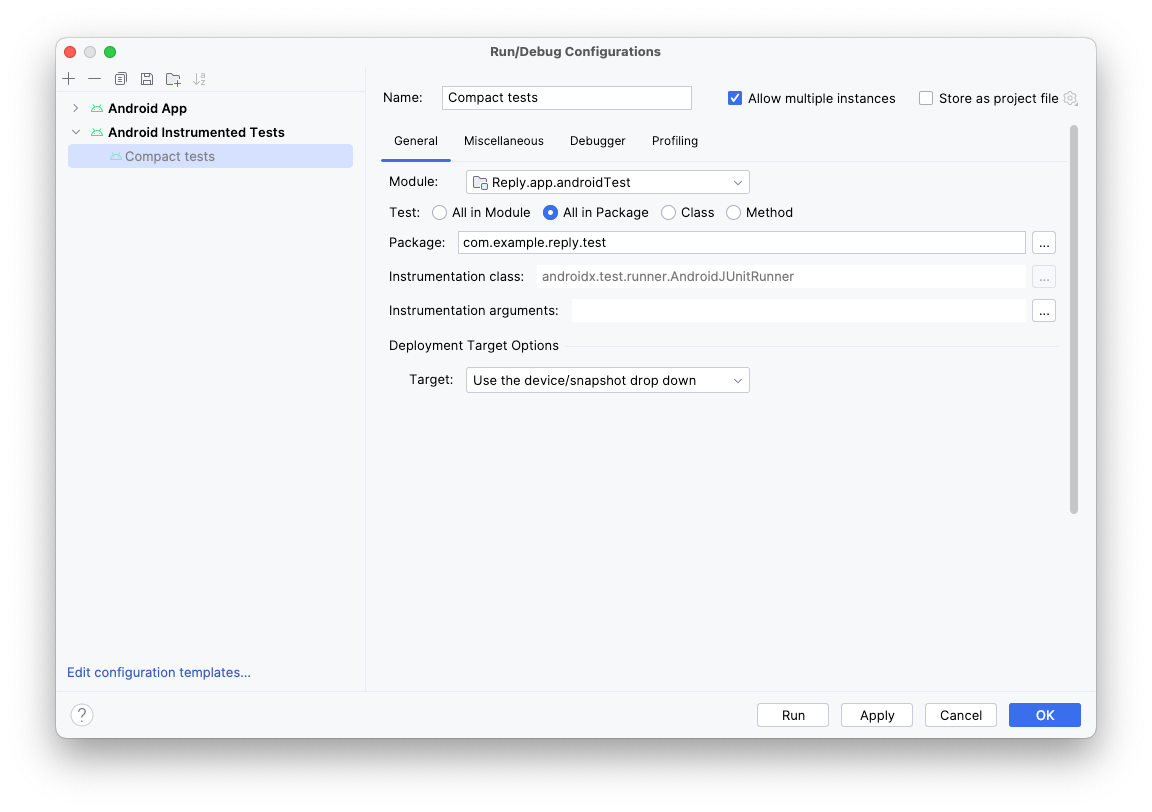
- 点击Instrumentation arguments字段右侧的三个点 (...)。
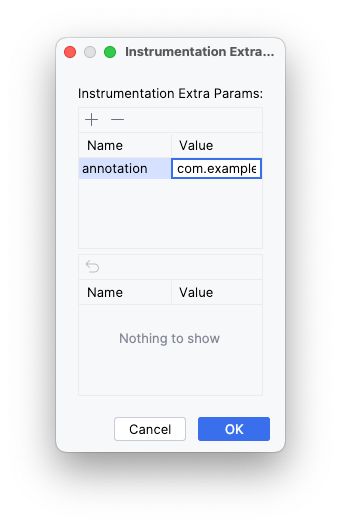
- 点击加号 (
+) 按钮并添加额外参数:annotation,值为 com.example.reply.test.TestCompactWidth。
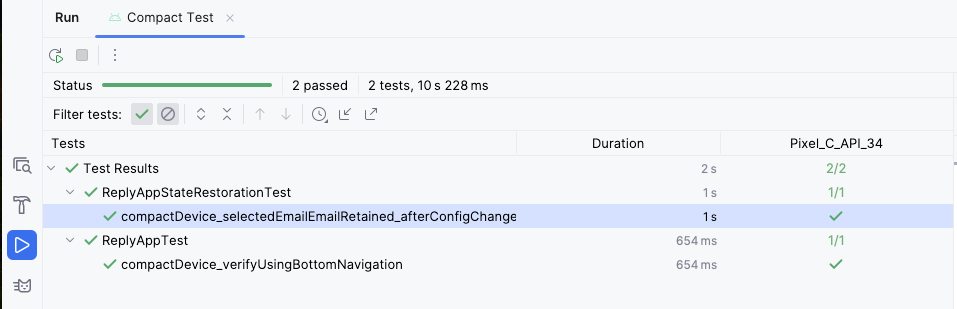
- 使用紧凑模拟器运行测试。
- 检查是否仅运行了紧凑测试。
- 对中等和展开屏幕重复上述步骤。
6. 获取解决方案代码
要下载已完成 Codelab 的代码,请使用以下 git 命令
$ git clone https://github.com/google-developer-training/basic-android-kotlin-compose-training-reply-app.git
或者,您可以将仓库下载为 zip 文件,解压并在 Android Studio 中打开。
如果您想查看解决方案代码,请在 GitHub 上查看。
7. 结论
恭喜!您通过实现自适应布局,使 Reply 应用适应了所有屏幕尺寸。您还学习了如何使用预览加快开发速度,以及如何使用各种测试方法维护应用质量。
别忘了在社交媒体上分享您的作品,带上话题 #AndroidBasics!